
Categorias populares
Procura um fio?


Comentários / Perguntas (106)
![]() Jonee escreveu:
Jonee escreveu:
I have a question about the following part: Now work the foot in sc as follows – insert a marker in the middle st: (ROW 1, ROW 2, ROW 3, ROW 4, Repeat 3rd and 4th row until piece measures approx. 22-24-27 cm / 8 3/4"-9½"-10½" in length - measured when piece is folded double.) Do you still need to crochet a turning chain at the beginning of each of these rows?
16.10.2014 - 23:54DROPS Design respondeu:
Dear Jonee, you will replace first sc by a turning ch at the beg of every row, even for dec rows. Happy crocheting!
17.10.2014 - 09:47
![]() Jesie escreveu:
Jesie escreveu:
I'm confused a little on this pattern. Where it says to DEC 2sts, 1 at the beginning of the row and 1 in the middle of the row. 29-31-33 on row then continue until piece measures 19-20-21cm. Are you saying to continue DEC rows until your piece has reached its desired measurements or are you saying to go back to the pattern of 1 row sc and 1 row DC till you've reached your desired measurement?
18.09.2014 - 20:37DROPS Design respondeu:
Dear Jesie, after you have dec 2 sts and get 29-31-33 sts, continue over these 29-31-33 sts without dec anymore until piece reaches 19-20-21 cm in pattern as before with 1 row sc/1 row dc. Happy crocheting!
19.09.2014 - 09:12
![]() Patty escreveu:
Patty escreveu:
On the cuff do you chain one at the end of each row for your turning chain?
12.09.2014 - 05:10DROPS Design respondeu:
Dear Patty, working the cuff alternately in dc and sc, there will be at beg of each dc row 2 turning ch and at beg of each sc row 1 turning ch. Happy crocheting!
12.09.2014 - 09:23
![]() Vicki Tenn escreveu:
Vicki Tenn escreveu:
Having trouble getting patern to print. Are patterns available in PFD format. I press print all thr way through the pattern and nothing happens. I don't know where it goes. Thank you. (I really like working from a written patern.)
07.09.2014 - 05:28DROPS Design respondeu:
Dear Mrs Tenn, to print our patterns click on the "print" button, a new window will open - make sure your brower allows pop up windows- in this new window, click again on "print pattern" to launch printing. You can then either choose to use your printer or a virtual printer to save it as a PDF. Happy crocheting!
08.09.2014 - 09:05
![]() Jordan escreveu:
Jordan escreveu:
I am having some problems with an area in the pattern. This is the part of the pattern I am having problems understanding (dec 2 sts on the row as follows: Work the first 2 sts tog-see explanation above-and the 2 middle sts tog=29-31-33 sts on row. Then continue until piece measures 19-20-21 cm / 7½"-8"-8 1/4". Now work the foot in sc as follows–insert a marker in the middle st) Please help. Maybe explain it a little better. Thank you.
24.02.2014 - 07:35DROPS Design respondeu:
Dear Jordan, when piece measures 10 cm, dec 2 sts : 1 st at beg of row and 1 st in the middle of row (crochet 2 sts tog). Then continue as before (1 st in each st, without dec/inc) until piece measures the height required for your size. Happy crocheting!
24.02.2014 - 09:53
![]() Monique escreveu:
Monique escreveu:
Sorry the pattern I am referring to is your DROPS Extra 0-888
29.01.2014 - 20:33
![]() Monique escreveu:
Monique escreveu:
Love this pattern...I just need some clarification regarding the part where it says "continue in established pattern" Means I repeat rows 2 & 3 alternately until the piece reaches 6 in then I decrease on the 4th. Repeat 2, 3 & 4 until the piece reaches 10 inches?
29.01.2014 - 20:29DROPS Design respondeu:
Dear Monique, in 0-888, work as stated from * to* in dc until works measures 6 inches, dec then 2 sts as explained and continue as before (= from *to*) until piece measures 10 (29 sts). Happy crocheting!
30.01.2014 - 10:23
![]() DOISNEAU escreveu:
DOISNEAU escreveu:
Dans les fournitures vous ne proposez pas les semelles. J'aurais bien envie d'acheter la laine mais à condition d'avoir les semelles !!
09.12.2013 - 20:09DROPS Design respondeu:
Bonjour Mme Doisneau, la partie "semelle" du chausson est réalisée en DROPS Eskimo (100 g pour toutes les tailles), au crochet, et le reste du chausson en DROPS Symphony. Bon crochet!
10.12.2013 - 09:08
![]() Christina escreveu:
Christina escreveu:
Super fine tøfler; skal der bare vendes med en enkelt vendemaske, hvor der ikke står andet (i foden)? Tak!
01.12.2013 - 12:30DROPS Design respondeu:
Hej Christina. Ja, hvis du haekler fm vender du med 1 lm
04.12.2013 - 17:25
![]() Karen escreveu:
Karen escreveu:
Ik ben bezig deze sloffen te maken. Ik heb net voor de eerste maal TOER 3 gehaakt. Ik zou nu dus 4 moeten doen en dan herhalen tot ik 22cm heb. Maar wat wordt er bedoeld met 'meten als het werk dubbelgevouwen wordt'? Want ik heb nu al zo'n 21 cm na TOER 3... Hoe vouw ik het werk dan correct om te meten?
15.03.2013 - 13:00DROPS Design respondeu:
U meet niet de hoogte van het breiwerk, maar de lengte van de voet; vouw het werk dubbel zodat u goed kunt meten hoelang het werk is van de teen naar de achterkant gemeten.
16.03.2013 - 07:57
|
|
Pocahontas#pocahontasslippers |
|
|
|
|
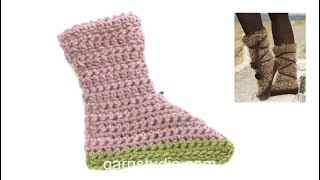
Pantufas DROPS em croché, em "Symphony" e "Snow" ou "Melody".
DROPS 133-9 |
|
|
-------------------------------------------------------- NOTA: Existem termos diferentes de tricô e croché em português de Portugal e do Brasil. TRICÔ : Malha = Ponto Canelado = Barra Ponto Jarreteira = Cordões de Tricô Ponto Liga = Ponto Tricô CROCHÉ : mpa – meio ponto alto pa – ponto alto pad – ponto alto duplo pat – ponto alto triplo pb – ponto baixo pbx – ponto baixíssimo pc – ponto corrente -------------------------------------------------------- CROCHETAR JUNTAMENTE 2 PONTOS : Crochetar juntamente 2 pontos : Crochetar o 1.º ponto mas não fazer a última laçada, crochetar o ponto seguinte e, aquando da última laçada, crochetar as 3 argolas que estão na agulha de croché. -------------------------------------------------------- PANTUFAS : Tricotam-se em idas e voltas, de cima para baixo. Montar frouxamente uma corrente de 32-34-36 pc com a agulha de croché 8 mm e 2 fios Symphony ( 1 fio castanho e 1 fio bege) ou 2 fios Melody bege. Virar a peça. Crochetar 1 pb no 2.º pc a partir da agulha de croché e, depois, crochetar 1 pb em cada pc em toda a carreira = 31-33-35 pb. Continuar da seguinte maneira : * 2 pc, virar a peça, crochetar 1 pa em cada ponto, 1 pc, virar a peça, crochetar 1 pb em cada ponto *, repetir de * a * - NÃO ESQUECER DE MANTER A MESMA TENSÃO DA INDICADA PARA A AMOSTRA – isto é importante para que as pantufas tenham as medidas exactas AO MESMO TEMPO, a 10-10-10 cm de altura total, diminuir 2 pontos da seguinte maneira : crochetar juntamente os 2 primeiros pontos - ver acima - e os 2 pontos centrais = restam 29-31-33 m. Continuar, depois, até a peça medir 19-20-21 cm. Crochetar, depois, o pé em pb da seguinte maneira – colocar um marcador no ponto central : CARREIRA 1 : 1 pb em cada ponto até restar 1 ponto antes do ponto central, 2 pb no ponto seguinte, 1 pc (= ponto central), saltar o ponto seguinte, 2 pb no ponto seguinte, 1 pb em cada um dos últimos pontos, virar a peça. CARREIRA 2 : 1 pb em cada um dos primeiros pontos até ao pc, 7 pa no pc central (o 4.º pa é, agora, o ponto central), e 1 p em cada um dos últimos pontos, virar a peça. CARREIRA 3 : 1 pb em cada um dos pontos seguintes até restar 1 ponto antes do ponto central, 2 pb no ponto seguinte, 1 pc (= ponto central), saltar o ponto seguinte, 2 pb no ponto seguinte, 1 pb em cada um dos últimos pontos, virar a peça. CARREIRA 4 : 1 pb em cada um dos pontos até ao ponto central, 7 pa no pc e 1 pb em cada um dos últimos pontos, virar a peça. Repetir a 3.ª e a 4.ª carreira até a peça medir cerca de 22-24-27 cm de comprimento – dobrar a peça ao meio para medir. Continuar com o fio Snow e passar a medir a partir daqui. * Crochetar 1 carreira de pb, terminar a carreira com 1 pc e virar a peça *, repetir de * a * até a peça medir cerca de 4-4,5-5 cm – ao mesmo tempo, na última carreira, crochetar juntamente os 2 primeiros e os 2 últimos pontos - ver acima. Cortar o fio. MONTAGEM : Dobrar a pantufa ao meio, costurar orla com orla na alça da frente dos pontos mais exteriores para que a costura não seja demasiado grossa. Crochetar frouxamente com o fio Snow 1 carreira de pb na parte de cima da perna. Crochetar com o fio Snow uma corrente de cerca de 150 cm, fazer 2 pequenos pompons e costurá-los a cada ponta da corrente – Dica : antes de costurar o último pompom à corrente, enfiar o cordão num ponto da parte de baixo da perna na transição entre o fio Symphony e o fio Snow para que fique bem afixado. Enrolar e atar esta corrente à volta da perna da pantufa. |
|
Terminou este projecto?Então, identifique as suas fotos com as tags #dropspattern #pocahontasslippers ou mostre-as na galeria #dropsfan. Precisa de ajuda para este modelo?Encontrará 7 turotiais em vídeo, uma rubrica Comentários/Perguntas e muito mais ao visitar a página do modelo em www.garnstudio.com © 1982-2026 DROPS Design A/S. Todos os direitos reservados. Este documento, incluuindo as suas su-secções, tem copyrights. Saia mais o que pode fazer com os nossos modelos no fim de cada uma das páginas do nosso site. |


Com mais de 40 anos no design de modelos de tricô e de croché, a DROPS Design oferece uma das mais vastas colecções demodelos gratuitos na Internet - traduzidos em 17 línguas. Neste dia de hoje, temos 324 catálogos e 12245 modelos - dos quais 12226 estão traduzidos em português.
Trabalhamos com muito empenho para lhe proporcionar o melhor que o tricô e o croché têm para oferecer, para lhe fornecer inspiração e conselhos bem como fios da mais elevada qualidade a preços incríveis! Gostaria de usar os nossos modelos para outros fins que não uso pessoal? Pode ler o que lhe é permitido fazer no Copyright texto que se encontra na parte de baixo de todos os nossos modelos. Bom tricô! Bom croché!
Deixe um comentário acerca do modelo DROPS 133-9
Gostaríamos muito de saber o que tem a dizer-nos acerca deste modelo!
Se deixar uma pergunta acerca do modelo, certifique-se de que escolhe a categoria adequada no formulário abaixo para acelerar o processo relativo à resposta. Os campos obrigatórios estão assinalados com um *.