
Categorias populares
Procura um fio?


Comentários / Perguntas (238)
![]() Andrea escreveu:
Andrea escreveu:
Hallo, eine Frage: Wenn ich mit den verkürzten Reihen fertig bin, muss ich dann direkt wieder über alle 124M (Gr.xxl) stricken, oder nach dem selben Schema wie beim verkürzen die Reihen wieder verlängern? LG
23.02.2026 - 16:37DROPS Design respondeu:
Liebe Andrea, Sie beginnen erneut mit den verkürzten Reihen (die ersten 2 Runden stricken Sie über alle Maschen) , um den Kreis weiter zu erweitern. Viel Spaß beim Stricken!
24.02.2026 - 09:02
![]() Lotta escreveu:
Lotta escreveu:
Äh glöm min fråga, repar upp & använder ett för mig mer begripligt mönster.
27.11.2025 - 17:23
![]() Lotta escreveu:
Lotta escreveu:
Hej igen! Storlek XL/XXL totalt antal maskor 124 st och märktråden sitter på maska 73. Just nu är stickningen bananformad, maska 73 sitter närmare innercirkeln och fattar att det är från den jag ska mäta. Men hur ska jag mäta, mot vad? Ska fortsätta med att minska med 8 maskor för första gången. Vi hörs!
25.11.2025 - 16:04DROPS Design respondeu:
Hei Lotta. Da har vi "glemt" ditt spørsmål og ønsker deg lykke til på ditt neste prosjekt :) mvh DROPS Design
01.12.2025 - 11:27
![]() Lotta escreveu:
Lotta escreveu:
Begriper inte hur jag ska mäta från märktråden för ärmhål!? Skickar gärna en bild men det går ju inte i detta formulär. Kontakta gärna mig via e-post. Tack på förhand!
24.11.2025 - 18:29DROPS Design respondeu:
Hej Lotta, skriv hvilken størrelse du strikker. Skriv hvor mange masker og cm du har og skriv den sætning du ikke forstår, så skal vi prøve at hjælpe dig her :)
25.11.2025 - 13:58
![]() Lisa escreveu:
Lisa escreveu:
Hi, Just trying to clarify; on the second row, do I leave 2 stitches on needle and turn, work 14 stitches then turn and work 16 stitches? Then repeat row 1 and do I leave 4 stitches unworked or just 2 again?
11.11.2025 - 19:16
![]() Lisa escreveu:
Lisa escreveu:
Pattern instructions far too difficult. I love the jacket and I love a challenge but this? What happened to row 1 all the way through to last row with specific instructions such as ask or dec or s1k1. Etc? I give up😞
27.07.2025 - 20:09
![]() Lisa escreveu:
Lisa escreveu:
So, am I leaving the the uncorked stitches on the needle or just not knitting them?
27.07.2025 - 19:38DROPS Design respondeu:
Dear Lisa, work the first 2 rows over all 112 stitches. In the 3rd row work only over the first 16 sts of the row. Now, start working the next row over all stitches but turn when you have worked 110 stitches. Work the next row back over all stitches, but turn when you have worked 108; so you work 2 less stitches on each side. Repeat rows 3 and 4 exactly as before. Continue working 2 less stitches on each side on the "long" rows 9 more times, then 4 less stitches 9 times and 8 less stitches 5 times. The stitches are simply left unworked until we "start at the beginning" the short rows technique. Happy knitting!
27.07.2025 - 20:36
![]() Lisa escreveu:
Lisa escreveu:
Where do I start the pattern? At the top of page or where it says circle? Also, what does it mean under the short row section to start again from beginning over all stitches? How many sections is this piece? I’m reading cast on 112 sts. Twice and under short row section start over from beginning? So, cast on another 112sts?
27.07.2025 - 19:06DROPS Design respondeu:
Dear Lisa, yes, the written instructions start at "Circle"; all of the instructions above are tips for when you are crochetting. In the short rows you work by turning the piece (but not decreasing) in order to get the correct circle shape. After reaching the remaining 18-16-20-20 outermost sts of circle, you will now work over all stitches again (not the pattern from the beginning); they were not decreased, just left behind. You work a single circle: you cast on 112 stitches, over which you will work the chart and short rows. Then you work the armholes, and continue working the other half-circle on the other side. Then you work the sleeves. Happy knitting!
27.07.2025 - 19:25
![]() Lisa escreveu:
Lisa escreveu:
Is there a row by row instruction for this pattern (ie, row 1, row 2 etc)? I find this really confusing
27.07.2025 - 15:44DROPS Design respondeu:
Dear Lisa, this is the only version of the pattern available, with both charts and written instructions. If you have any doubts as you read and work the pattern you can write us a comment here and we will try to answer all of your questions as clearly as possible. Happy knitting!
27.07.2025 - 18:59
![]() Patricia Alexandra Caruso Reis escreveu:
Patricia Alexandra Caruso Reis escreveu:
Caros, os diagramas M1 já não estão nítidos. Existe alguma nova versão desses diagramas que possam ser melhor vistos? Está tudo opaco, talvez pelo tempo. Grata
07.06.2024 - 03:36DROPS Design respondeu:
Bom dia, Vamos comunicar à equipa de web design. Obrigado!
07.06.2024 - 09:17
|
||||||||||||||||
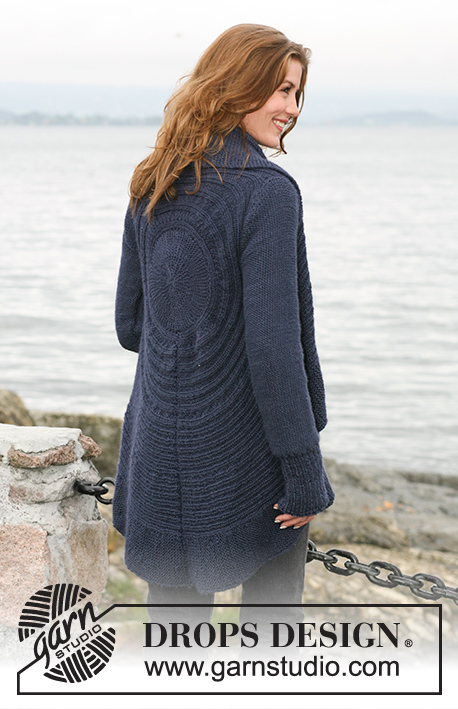
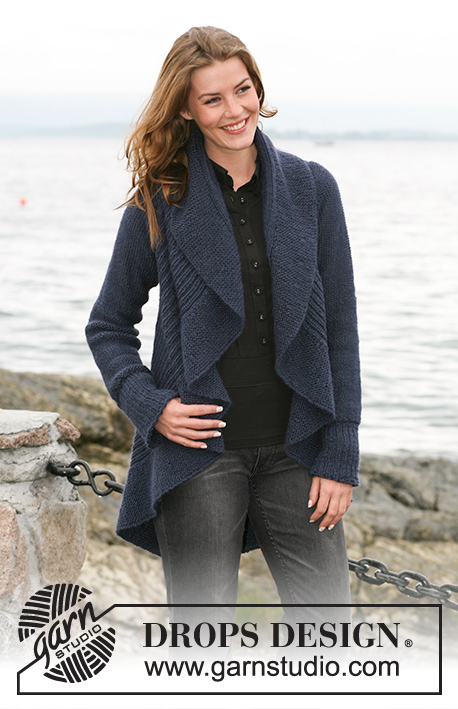
Blue Moon |
||||||||||||||||
 |
 |
|||||||||||||||
Casaco DROPS tricotado em redondo em “Silke-Alpaca” ou "Air" – Tamanhos S - XXXL
DROPS 102-6 |
||||||||||||||||
|
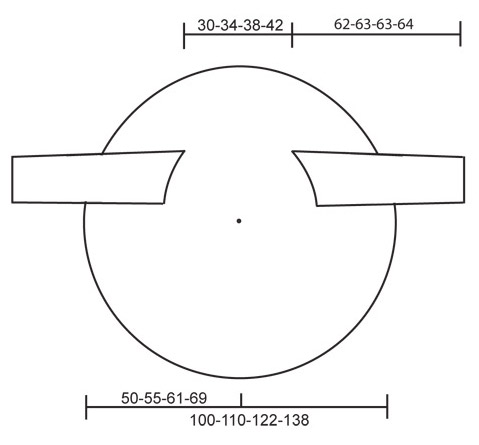
NOTA: Existem termos diferentes de tricô e croché em português de Portugal e do Brasil. Malha = Ponto Canelado = Barra Ponto Jarreteira = Cordões de Tricô Ponto Liga – Ponto Tricô Croché : mpa – meio ponto alto pa – ponto alto pad – ponto alto duplo pat – ponto alto triplo pb – ponto baixo pbx – ponto baixíssimo pc – ponto corrente AMOSTRA: 17 ms/pts x 22 carreiras = 10 x 10 cm PONTO FANTASIA : ver diagrama M1. O diagrama mostra o ponto fantasia pelo direito. NOTE : cada tamanho tem o seu diagrama correspondente CARREIRAS ENCURTADAS : para assegurar a forma circular da peça, fazer as carreiras encurtadas da seguinte maneira : 1.ª carreira : tricotar 102-112-124-140 ms/pts , virar e tricotar a carreira de volta 3.ª carreira : tricotar 1 carreira em idas e voltas (=2 carreiras) nas primeiras 18-16-20-20 ms/pts (= as ms/pts mais exteriores do círculo) – ver dica tricô 1 abaixo. Repetir as carreiras 1 a 4, mas diminuir 2 ms/pts na 1.ª carreira antes de virar – repetir esta carreira encurtada num total de 10-10-12-12 vezes e, depois, diminuir 4 ms/pts antes de virar 6-9-8-12 vezes. Depois, diminuir 8 ms/pts antes de virar 5-5-6-6 vezes. As 18-16-20-20 m restantes são as ms/pts da volta do círculo. Começar novamente a partir do princípio em todas as ms/pts. Ver dica tricô 2. DICA TRICÔ 1 : quando se vira a peça, deslizar a 1.ª m/p e puxar o fio antes de continuar. Isto evita buracos nas transições. Esta dica não se aplica às 20-20-24-24 ms/pts do interior do círculo – quando a peça foi virada e todas as ms/pts tricotadas. DICA TRICÔ 2 : nas carreiras em que todas as ms/pts são tricotadas, tricotar em ponto liga/tricô as 20-20-24-24 ms/pts do interior do círculo (visto pelo direito). Depois, continuar em M1 como antes DICA de MEDIÇÃO : todas as medidas do círculo são tiradas na horizontal. Não medir na diagonal. As medidas seguem a curva até à 63.ª-69.ª-73.ª-81.ª m/p. INSTRUÇÕES CÍRCULO Dado o número de ms/pts, o círculo tricota-se em idas e voltas na agulha circular. Com o fio Silke-Alpaca ou Air e a agulha circular 4,5 mm montar 102-112-124-140 ms/pts. Colocar 1 marcador depois da 63-69-73-81.ª m/p. Tirar todas as medidas a partir daqui. Tricotar M1 - ver diagrama adequado a cada tamanho – da direita para a esquerda (ou seja, do exterior do círculo para o interior). A 1.ª carreira é uma carreira do direito. AO MESMO TEMPO que tricota M1, tricotar as carreiras encurtadas – ver acima – para dar a forma circular. A 37-40-49-57 cm de altura do marcador – ver dica de medição - tricotar as cavas. CAVAS : deslizar as 63-69-73-81 ms/pts do exterior do círculo numa outra agulha circular 4,5 mm (a agulha circular é usada para ser mais fácil tricotar devido ao grande número de ms/pts). Continuar, arrematando as 2 ms/pts seguintes (= cava). Colocar 1 marcador entre as 2 ms/pts arrematadas. Manter as restantes ms/pts na agulha. Continuar, tricotando as 2 partes (as ms/pts antes e depois da cava) separadamente, mas tricotá-las ao mesmo tempo nas 2 agulhas circulares com 2 novelos diferentes. Isto permite que as carreiras encurtadas fiquem iguais de cada lado da cava. Continuar em M1 com as carreiras encurtadas como antes. A 18-21-23-25 cm de altura da cava, montar 2 ms/pts acima da cava (= entre as 2 partes). Continuar, colocar novamente todas as ms/pts numa agulha = 102-112-124-140 ms/pts. Colocar um marcador depois da 63.ª-69.ª-73.ª-81.ª m/p. Continuar, medindo a partir deste novo marcador. Tricotar então M1 e as carreiras encurtadas em todas as ms/pts. Continuar desta maneira até cerca de 15-17-19-21 cm de altura do marcador. Por esta altura, já se deverá ter um semicírculo. Fazer, então, a outra cava da mesma maneira. Quando todas as ms/pts estão novamente na agulha, colocar um marcador depois da 63.ª-69.ª-73.ª-81.ª m/p. Continuar, medindo a partir deste marcador. Continuar com M1 e as carreiras encurtadas até cerca de 37-40-49-57 cm do marcador (ajustar para depois de 1 motivo inteiro do ponto fantasia com as carreiras encurtadas). Arrematar frouxamente. MANGAS Tricotam-se em idas e voltas na agulha circular. Com o fio Silke-Alpaca ou Air e as agulhas 4,5 mm montar 56-59-65-68 ms/pts (incluindo 1 m/p ourela de cada lado). Tricotar 1 carreira liga/tricô pelo avesso. Continuar em canelado/barra 2 ms/pts meia/1 m/p liga/tricô com 1 m/p ourela de cada lado. A 13-13-14-14 cm de altura total, tricotar 1 carreira meia pelo avesso, distribuindo 10-11-13-14 diminuições = 46-48-52-54 ms/pts. Continuar em liga/tricô até ao fim. A 16 cm de altura total, aumentar 1 m/p de ambos os lados a cada 9-4,5-3,5-3 cm num total de 5-9-11-13 vezes = 56-66-74-80 ms/pts. A 56 cm de altura total, arrematar de ambos os lados a cada 2 carreiras : 1-2-2-2 x 4 ms/pts, depois, 2 ms/pts até cerca de 61-62-62-63 cm de altura total e, por fim, 1 x 4 ms/pts. A manga mede cerca de 62-63-63-64 cm de altura total. Arrematar todas as ms/pts. MONTAGEM : unir o círculo nas alças exteriores das ms/pts da carreira de montagem e da última carreira. Montar as mangas de maneira a que a costura debaixo da manga fique ao nível do marcador colocado abaixo da cava e a parte de cima da manga ao nível do marcador colocado acima da cava. Montar as mangas. |
||||||||||||||||
Explicações do diagrama |
||||||||||||||||
|
||||||||||||||||
 |
||||||||||||||||
 |
||||||||||||||||
Terminou este projecto?Então, identifique as suas fotos com as tags #dropspattern ou mostre-as na galeria #dropsfan. Precisa de ajuda para este modelo?Encontrará 15 turotiais em vídeo, uma rubrica Comentários/Perguntas e muito mais ao visitar a página do modelo em www.garnstudio.com © 1982-2026 DROPS Design A/S. Todos os direitos reservados. Este documento, incluuindo as suas su-secções, tem copyrights. Saia mais o que pode fazer com os nossos modelos no fim de cada uma das páginas do nosso site. |
||||||||||||||||


Com mais de 40 anos no design de modelos de tricô e de croché, a DROPS Design oferece uma das mais vastas colecções demodelos gratuitos na Internet - traduzidos em 17 línguas. Neste dia de hoje, temos 324 catálogos e 12290 modelos - dos quais 12271 estão traduzidos em português.
Trabalhamos com muito empenho para lhe proporcionar o melhor que o tricô e o croché têm para oferecer, para lhe fornecer inspiração e conselhos bem como fios da mais elevada qualidade a preços incríveis! Gostaria de usar os nossos modelos para outros fins que não uso pessoal? Pode ler o que lhe é permitido fazer no Copyright texto que se encontra na parte de baixo de todos os nossos modelos. Bom tricô! Bom croché!
Deixe um comentário acerca do modelo DROPS 102-6
Gostaríamos muito de saber o que tem a dizer-nos acerca deste modelo!
Se deixar uma pergunta acerca do modelo, certifique-se de que escolhe a categoria adequada no formulário abaixo para acelerar o processo relativo à resposta. Os campos obrigatórios estão assinalados com um *.