
Categorias populares
Procura um fio?


Comentários / Perguntas (58)
![]() Kathy escreveu:
Kathy escreveu:
Hello again, I apologize for having multiple questions, and I very much appreciate your help. After knitting the central cable portion, I have 207 rows. If I pick up a stitch on every row, I will have a rib consisting of 444 stitches (207 x 2 + 15 cast on edge + 15 cast off edge) for the rib rather than the 342 to 366 called for in the pattern. I could not determine from the pattern if I am supposed to pick up a stitch at each row. Would you please advise me? thank you.
03.04.2023 - 07:36DROPS Design respondeu:
Hi Kathy, You do not need to pick up 1 stitch in each row - depending on the size you are working, you pick up approx. 310 to 366 stitches in addition to the cast-on and cast-off edges. This will be approx. pick up on first row, skip 1 row, pick up on 3rd and 4th row, skip 1 row, pick up on 6th and 7th row etc. Hope this helps and happy Easter!
04.04.2023 - 06:51
![]() Kathy escreveu:
Kathy escreveu:
Hello, Do you recommend blocking the central cable portion before adding the rib? Thank you.
03.04.2023 - 06:42DROPS Design respondeu:
Hi Kathy, it is not necessary. Block the piece after completing the whole thing. Happy knitting!
04.04.2023 - 07:50
![]() Kathy escreveu:
Kathy escreveu:
I am confused by the increases and decreases. I have two questions. (1) does “inside 1 edge st” mean immediately after the first stitch of the row and immediately before the last stitch of the row? why is the increase done with a yarn over, which is used when you want to make a hole (such as lace). the instructions next say to knit into the back of the stitch to avoid a hole. I found the video confusing. Can I use another form of increase, such as Make One Right or Left? Thank you.
01.04.2023 - 04:47DROPS Design respondeu:
Dear Kathy, yes, inside the edge stitch is immediately after the first stitch or before the last stitch of the row. You can increase in several different ways; yarn overs are the most basic and easier to work, even though there may be a small gap remaining (take into account that, since it's twisted on the next row, the gap will be smaller than in lace patterns). But of course you can use M1R or M1L for this pattern. Happy knitting!
02.04.2023 - 22:45
![]() Freda Corrigan escreveu:
Freda Corrigan escreveu:
Greetings, can I knit this neckwear using knit N purl stitching I really love the style but not good with pattern reading Thank you hope to hear from you soon
23.06.2022 - 14:58DROPS Design respondeu:
Dear Mrs Corrigan, we only have diagrams to this pattern, but this lesson will explain you how to read a knitting diagram. Happy knitting!
23.06.2022 - 16:15
![]() Tanya escreveu:
Tanya escreveu:
I am sorry but i am lost on what this means. Could you lease step by step clarify this. "When Rib measures 2 cm inc every other P section to P2. When piece measures 3 cm inc remaining purl sections to P2. When Rib measures 5 cm inc every other purl section from P2 to P3. Cast off on next row in Rib." Thank you
24.11.2019 - 06:59DROPS Design respondeu:
Dear Tanya, to beginn with you are knitting a K2, P2 rib. At the first increase (when piece is 2 cm) you knit the row like this: * K1, P1, K1, P1, make 1, * and repeat *-*. In the next oncrease row (piece is 3 cm), you knit *K1, 1 P, make1, K2, P2. * and repeat *-*. For the next increase round (piece is 5 cm, you knit like this: K2, P1, K2, P1, make 1, P1 * and repeat *-*. Casting of in rib means that you cast of knit stitches with knit stitches, and purl stitches with purl stitches. I hope this helps. Happy Knitting!
24.11.2019 - 16:16
![]() Tanya escreveu:
Tanya escreveu:
Hello: I see this says a sport weight yarn, would that be sport weight in "Canada" too or would it be classified as DK in Canada. I am also a bit confused as in some places that sell your yarn it says it is 4 ply others say 5 ply..
18.11.2019 - 20:31DROPS Design respondeu:
Dear Tanya, we are glad to inform you that our yarns are available in Canada - please check retailer list in/to Canada here. Happy knitting!
19.11.2019 - 08:51
![]() Joyce Boatman escreveu:
Joyce Boatman escreveu:
Name it Beauty as it is Beautiful
17.11.2019 - 01:22Ngaire escreveu:
Truly love this. Can this be knitted on straight needles
28.03.2018 - 06:19DROPS Design respondeu:
Dear Mrs Ngaire, the main part of the neck warmer can be worked on straight needle, but the edge (ribbingn part) is then worked in the round picking up sts around whole neck warmer. Happy knitting!
28.03.2018 - 15:52
![]() Joana Rodrigues escreveu:
Joana Rodrigues escreveu:
Só uma pequena nota em relação à tradução para Português: Nas dicas para as diminuições, falta acrescentar que, antes da m/p ourela, deve-se tricotar 2 ms/pts juntamente em liga/tricô enfiando a agulha na alça de trás (m/pt liga/tricô torcida/o)
03.12.2016 - 21:06DROPS Design respondeu:
Obrigado pela nota. Vamos editar as explicações. Bom tricô! Boas Festas!
16.12.2016 - 17:06Gwen Schmitt escreveu:
I was wondering how much yarn to buy? I have a customer that wants to use a different yarn called Lions Pride Woolspun for this. Can anyone convert it for me and tell me how much to buy?
16.04.2016 - 06:40DROPS Design respondeu:
Dear Mrs Schmitt, We are able to provide free patterns thanks to our yarns sold throughout the world. You will therefore understand that we can only recomand you to contact our DROPS Storefor any further help & assistance. Thank you for your comprehension.
18.04.2016 - 09:02
|
|||||||||||||
DROPS 98-1 |
|||||||||||||
|
|
|||||||||||||
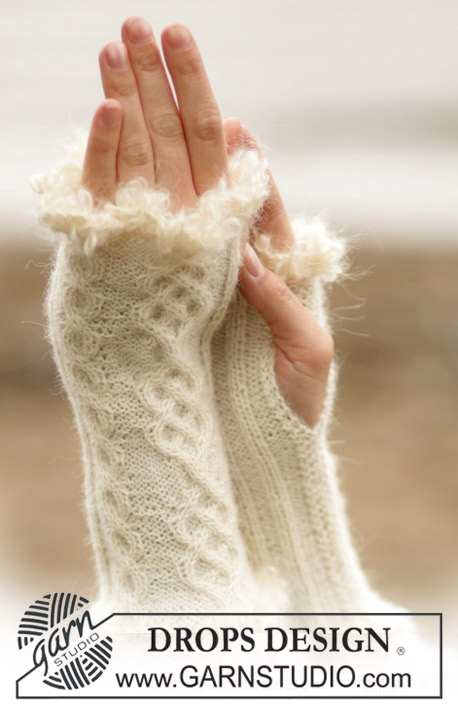
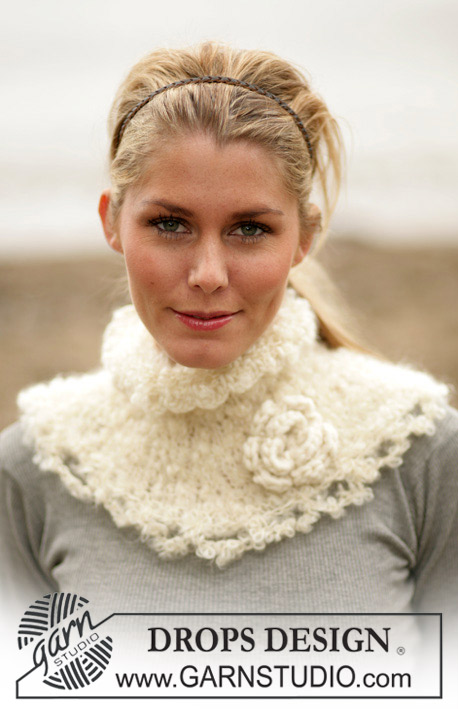
Gola e fita de cabelo DROPS em Alpaca
DROPS 98-1 |
|||||||||||||
|
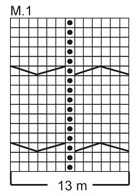
---------------------------------------------------------- NOTA: Existem termos diferentes de tricô e croché em português de Portugal e do Brasil. TRICÔ : Malha = Ponto Canelado = Barra Ponto Jarreteira = Cordões de Tricô Ponto Liga = Ponto Tricô CROCHÉ : mpa – meio ponto alto pa – ponto alto pad – ponto alto duplo pat – ponto alto triplo pb – ponto baixo pbx – ponto baixíssimo pc – ponto corrente ---------------------------------------------------------- AMOSTRA : 19 ms/pts x 25 carreiras = 10 x 10 cm com a agulha 4 mm em ponto meia PONTO FANTASIA : ver diagrama M1. DICA AUMENTO : Aumentar 1 m/p fazendo 1 laçada. Na carreira seguinte, tricotar a laçada torcida enfiando a agulha na alça de trás para evitar um buraco DICA DIMINUIÇÃO : diminuir ao nível das ms/pts ourela ; diminuição depois da m/p ourela : tricotar 2 ms/pts juntamente em liga/tricô ; diminuição antes da m/p ourela : tricotar 2 ms/pts juntamente em liga/tricô torcida (enfiando a agulha na alça de trás e não na alça da frente das ms/pts)- GOLA Começar pela parte central com as tranças, levantar então as ms/pts a toda a volta e tricotar o canelado/barra. Montar 15 ms/pts com a agulha 4 mm e 2 fios Alpaca (tricota-se 2 fios juntamente até ao fim). Tricotar 2 carreiras em ponto jarreteira ; então, seguir o diagrama M1 (= 13 ms/pts) com 1 m/p ourela de cada lado da peça em ponto jarreteira até ao fim. Ao mesmo tempo, aumentar 1 m/p de cada lado da peça a cada 2 carreiras num total de 6 vezes = 27 ms/pts (tricotar os aumentos em meia pelo avesso e em liga/tricô pelo direito). A 65 cm de altura total, diminuir 1 m/p de cada lado da peça a cada 2 carreiras num total de 6 vezes = 15 ms/pts. Tricotar 2 carreiras em ponto jarreteira e arrematar frouxamente CANELADO/BARRA : Tricotar em redondo. Levantar cerca de 342 a 366 ms/pts (número múltiplo de 3) a toda a volta da gola com a agulha circular 4 mm e 2 fios Alpaca. Tricotar 1 carreira liga/tricô, 1 carreira meia e, depois, continuar em canelado/barra : 2 ms/pts meia, 1 m/p liga/tricô A 2 cm de altura de canelado/barra aumentar 1 m/p numa em cada duas secções de ms/pts liga/tricô A 3 cm de altura, aumentar 1 m/p liga/tricô nas restantes secções de ms/pts liga/tricô. A 5 cm de altura de canelado/barra, aumentar 1 m/p liga/tricô numa em cada duas secções de ms/pts liga/tricô Arrematar na carreira seguinte FLOR EM CROCHÉ Com a agulha de croché 7 mm e o fio Snow, montar 4 pc e unir em redondo com 1 pbx 1.ª carreira : 6 pb no aro, unir com 1 pbx no 1.º pb 2.ª carreira : * 4 pc, 1 pa no 1.º desses pc, 1 pb no pb seguinte * repetir de *a* em toda a carreira e unir com 1 pbx = 6 pétalas Cortar o fio. Costurar um pequeno alfinete-de-ama e fixar a flor à gola FITA DE CABELO Montar 4 ms/pts com as agulhas 4 mm e 2 fios Alpaca. Tricotar um tubo da seguinte maneira : *1 m/p meia, passar o fio para a frente da peça, deslizar 1 m/p em liga/tricô, colocar novamente o fio atrás da peça * repetir de *a* Arrematar a cerca de 150 cm de altura total. |
|||||||||||||
Explicações do diagrama |
|||||||||||||
|
|||||||||||||
 |
|||||||||||||
Terminou este projecto?Então, identifique as suas fotos com as tags #dropspattern ou mostre-as na galeria #dropsfan. Precisa de ajuda para este modelo?Encontrará 22 turotiais em vídeo, uma rubrica Comentários/Perguntas e muito mais ao visitar a página do modelo em www.garnstudio.com © 1982-2026 DROPS Design A/S. Todos os direitos reservados. Este documento, incluuindo as suas su-secções, tem copyrights. Saia mais o que pode fazer com os nossos modelos no fim de cada uma das páginas do nosso site. |
|||||||||||||


Com mais de 40 anos no design de modelos de tricô e de croché, a DROPS Design oferece uma das mais vastas colecções demodelos gratuitos na Internet - traduzidos em 17 línguas. Neste dia de hoje, temos 324 catálogos e 12290 modelos - dos quais 12271 estão traduzidos em português.
Trabalhamos com muito empenho para lhe proporcionar o melhor que o tricô e o croché têm para oferecer, para lhe fornecer inspiração e conselhos bem como fios da mais elevada qualidade a preços incríveis! Gostaria de usar os nossos modelos para outros fins que não uso pessoal? Pode ler o que lhe é permitido fazer no Copyright texto que se encontra na parte de baixo de todos os nossos modelos. Bom tricô! Bom croché!
Deixe um comentário acerca do modelo DROPS 98-1
Gostaríamos muito de saber o que tem a dizer-nos acerca deste modelo!
Se deixar uma pergunta acerca do modelo, certifique-se de que escolhe a categoria adequada no formulário abaixo para acelerar o processo relativo à resposta. Os campos obrigatórios estão assinalados com um *.