
Categorias populares
Procura um fio?


Comentários / Perguntas (7)
![]() Deanas escreveu:
Deanas escreveu:
How long the circular needle used in this pattern? 40cm, 60cm, 80cm or 100cm? Answer this please, thank you
08.09.2025 - 10:59DROPS Design respondeu:
Hi Deanas, You will need circular needles length 40 cm and 80 cm in size 3.5 mm and length 80 cm in size 2.5 mm. Regards, Drops Team.
09.09.2025 - 06:50
![]() Joan McLaggan escreveu:
Joan McLaggan escreveu:
Apologies have just realised I have misread the pattern
10.01.2022 - 16:36
![]() Joan McLaggan escreveu:
Joan McLaggan escreveu:
Pattern instructions say cast off 4 stitches for under arm when dividing work for back and front sections, but instructions for under arm on sleeves say cast off 8 stitches, is this correct or should it be 4 stitches cast off for sleeve under arm?
10.01.2022 - 16:29DROPS Design respondeu:
Dear Joan, you cast off 4 stitches on each section on each side. So you cast off 4 for the front and 4 for the back on each side (=8 cast-off stitches). Happy knitting
10.01.2022 - 19:50
![]() Mary Guenther escreveu:
Mary Guenther escreveu:
After casting off 12 stitches (+5 steek) in center for neckline, do I then decrease 1 stitch each side of the castoffs for a total of 2/row? OR 2 STITCHES EACH side for a total of 4/row? Same question for back. Then on front, I can't figure out how to then decrease just 1 st 4 times since there are two sides to the neckline. Do I decrease 1 STITCH EACH SIDE for a total of 2 each row? I don't know how many stitches I'm suppose to end up with when I get to the shoulder seams. Help, please!
26.06.2021 - 06:49DROPS Design respondeu:
Dear Mary, you are right, cast offs (to shape the armhole) are done each side of the piece. Happy Knitting!
26.06.2021 - 09:17
![]() Mary Guenther escreveu:
Mary Guenther escreveu:
I have never made an "edge." beginning of pattern says to knit 1 1/8 inch white and switch to beige, then purl a row. I assume this row is on what would ordinarily be a knit row? At the end of this row do you switch back to white and purl back? Or? Thank you!
18.05.2021 - 04:59DROPS Design respondeu:
Hi Mary, This 'edge' is a coloured edge in off white, worked in stocking stitch for 1 1/8 inch. Then you change to beige, work 1 row in stocking stitch (purl from wrong side) and purl 1 row from the right side as you say. This row will be where you turn up the edge later, now you change back to off white and work another 1 1/8 inch before beginning the body. Happy knitting!
18.05.2021 - 08:02
![]() Mary Guenther escreveu:
Mary Guenther escreveu:
I have never made an "edge". Beginning of pattern says to knit 1 1/8 inches stockinette stitch and change to beige, then purl 1 row - I assume this is on what would ordinarily be the knit row of the stockinette stitch? When you get to the end of that row, do you purl back in white? Or beige? Or do I have it all wrong?
18.05.2021 - 04:57DROPS Design respondeu:
Dear Mrs Guenther, this video shows how to knit such a folded edge, the purl row should be purled from RS so that piece will fold nicely. This row should be worked with beige. To avoid cutting the white yarn to work this folding row, just continue afterwards with off-white (if last row off-white was worked from WS, work now next row from RS with off-white, ie slip all sts back to the other end of the needle and you will work 2 RS row next to each other. Happy knitting!
18.05.2021 - 08:21
![]() Ingerid escreveu:
Ingerid escreveu:
Jeg er i tvivl om forkanterne går helt ned langs kanten, eller om de først starter der hvor selve mønstret starter...kan ikke se det på billedet
25.02.2014 - 18:12DROPS Design respondeu:
Hej Ingerid. Forkanterne gaar helt ned til underkanten.
26.02.2014 - 16:31
|
|||||||||||||
DROPS 38-18 |
|||||||||||||
|
|
|||||||||||||
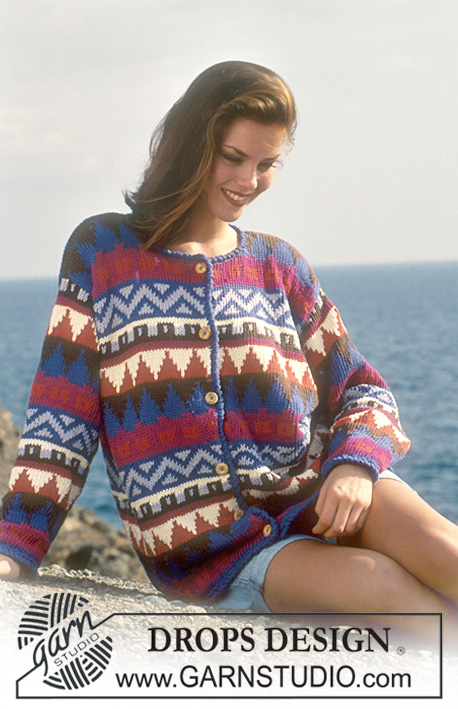
Casaco jacquard DROPS em "Safran". Do S ao L.
DROPS 38-18 |
|||||||||||||
|
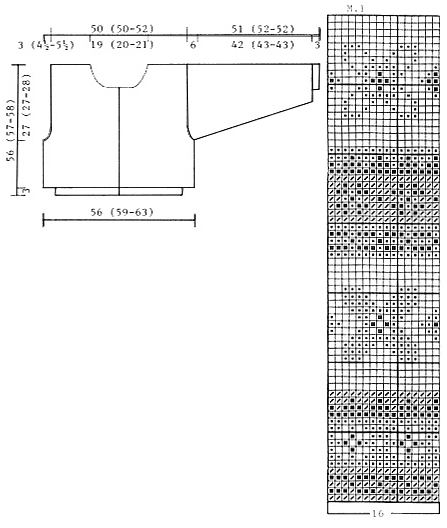
Explicações Jacquard: Ver diagramas M1 abaixo. 1 diagrama = 1 motivo a repetir. O diagrama mostra o motivo pelo direito e tricota-se em ponto meia. Orla: 3 cm em ponto meia, mudar para o fio camel e tricotar 1 carreira liga (carreira de dobra – medir a partir desta carreira), retomar o fio natural e tricotar 3 cm em ponto meia. Costas & frentes: Tricotam-se em redondo na agulha circular depois da orla, com malhas steek a meio da frente (ver os tutoriais em vídeo abaixo). Com a agulha circular 2,5 mm e o fio natural montar 220-232-240 malhas. Tricotar a orla – ver acima – em idas e voltas. Continuar com a agulha circular 3,5 mm, unir e tricotar M1 e, AO MESMO TEMPO, distribuir 36-40-48 aumentos na 1.ª carreira + montar 5 malhas a meio da frente (malhas steek a tricotar em ponto meia não em jacquard) = 256-272-288 (+ 5 malhas steek). MANTER A MESMA TENSÃO DA INDICADA PARA A AMOSTRA! Continuar seguindo M1. A 29-30-30 cm de altura total, arrematar 4 malhas de cada lado da peça para as cavas (centrar as 5 malhas steek do meio da frente) = 124-132-140 malhas + 5 malhas steek para a frente e 124-132-140 malhas para as costas. Terminar cada parte separadamente. Frentes: = 124-132-140 malhas (+ 5 malhas steek). Arrematar para a cava a cada 2 carreiras: 1-3-3 vezes 2 malhas e 3-3-4 vezes 1 malha = 114-114-120 malhas (+ 5 malhas steek). A 46-47-48 cm de altura total, arrematar para o decote as 12-14-16 malhas centrais (+ 5 malhas steek) depois a cada 2 carreiras no lado do decote: 6 vezes 2 malhas e 4 vezes 1 malha. A 56-57-58 cm de altura total, arrematar todas as malhas. Costas: = 124-132-140 malhas. Formar as cavas de cada lado da peça como se fez para as frentes = 114-114-120 malhas. A 54-55-56 cm de altura total, arrematar para o decote as 40-42-44 malhas centrais depois 2 malhas no lado do decote na carreira seguinte. A 56-57-58 cm de altura total, arrematar todas as malhas. Mangas: Com o fio natural e as agulhas de pontas duplas 2,5 mm montar 50-54-58 malhas. Tricotar a orla. Continuar com as agulhas de pontas duplas 3,5 mm seguindo M1 (centrar um motivo na manga), AO MESMO TEMPO, distribuir 12-8-6 aumentos na 1.ª carreira = 62-62-64 malhas. AO MESMO TEMPO, depois da orla, aumentar 2 malhas sob a manga 31-31-32 vezes alternadamente a cada 3 e 4 carreiras = 124-124-128 malhas. A 45-46-46 cm de altura total, arrematar 8 malhas sob a manga e continuar em idas e voltas arrematando de cada lado da peça a cada 2 carreiras: 8 vezes 6 malhas. Arrematar as restantes malhas. A manga mede cerca de 51-52-52 cm de altura total. Montagem Costurar um fio marcador a meio das malhas steek para a orla da frente. Fazer 2 costuras à máquina à volta do marcador, a 1.ª a ½ malha do marcador, a 2.ª a ½ malha da 1.ª costura. Cortar ao meio para a orla da frente. Costurar os ombros. Com o fio natural e a agulha circular 2,5 mm levantar ao longo da frente esquerda cerca de 110 a 120 malhas, tricotar a orla em idas e voltas da seguinte maneira: 3 cm em ponto meia, continuar em camel e tricotar 1 carreira meia, 1 carreira liga (carreira de dobra – medir a partir desta carreira), retomar o fio natural e tricotar 3 cm em ponto meia, arrematar. Repetir ao longo da frente direita, mas a 1 cm, fazer 5 casas (1 casa = arrematar 2 malhas, montar 2 malhas na carreira seguinte – não esquecer de fazer as casas frente a frente na bainha). Com o fio natural e a agulha circular 2,5 mm levantar cerca de 106 a 114 malhas à volta do decote, tricotar a orla como se fez para as frentes em idas e voltas. Dobrar todas as orlas pelo avesso e costurar. Montar as mangas e costurar os botões. |
|||||||||||||
Explicações do diagrama |
|||||||||||||
|
|||||||||||||
 |
|||||||||||||
Terminou este projecto?Então, identifique as suas fotos com as tags #dropspattern ou mostre-as na galeria #dropsfan. Precisa de ajuda para este modelo?Encontrará 27 turotiais em vídeo, uma rubrica Comentários/Perguntas e muito mais ao visitar a página do modelo em www.garnstudio.com © 1982-2026 DROPS Design A/S. Todos os direitos reservados. Este documento, incluuindo as suas su-secções, tem copyrights. Saia mais o que pode fazer com os nossos modelos no fim de cada uma das páginas do nosso site. |
|||||||||||||


Com mais de 40 anos no design de modelos de tricô e de croché, a DROPS Design oferece uma das mais vastas colecções demodelos gratuitos na Internet - traduzidos em 17 línguas. Neste dia de hoje, temos 324 catálogos e 12290 modelos - dos quais 12271 estão traduzidos em português.
Trabalhamos com muito empenho para lhe proporcionar o melhor que o tricô e o croché têm para oferecer, para lhe fornecer inspiração e conselhos bem como fios da mais elevada qualidade a preços incríveis! Gostaria de usar os nossos modelos para outros fins que não uso pessoal? Pode ler o que lhe é permitido fazer no Copyright texto que se encontra na parte de baixo de todos os nossos modelos. Bom tricô! Bom croché!
Deixe um comentário acerca do modelo DROPS 38-18
Gostaríamos muito de saber o que tem a dizer-nos acerca deste modelo!
Se deixar uma pergunta acerca do modelo, certifique-se de que escolhe a categoria adequada no formulário abaixo para acelerar o processo relativo à resposta. Os campos obrigatórios estão assinalados com um *.