
Popular categories
Looking for a yarn?


Comments / Questions (3)
![]() Michèle Boulangier wrote:
Michèle Boulangier wrote:
Goede middag, Hebt u ook een video die toont hoe je platte bolletjes (alsof er confetti op de trui ligt) te mazen? Alvast hartelijk dank. Michèle
25.02.2025 - 11:45DROPS Design answered:
Dag Michèle,
Nee, zo'n video hebben we helaas niet.
02.03.2025 - 10:41
![]() Ragnhild Madsen wrote:
Ragnhild Madsen wrote:
Hvordan feste tråden når man broderer blomster?
09.02.2025 - 20:23DROPS Design answered:
Hej Ragnhild, det kan du gøre på bagsiden, se gerne videoer for hvordan man hæfter tråde :)
12.02.2025 - 11:39
![]() Marisol wrote:
Marisol wrote:
Gracias. Sus enseñsnzas son muy utiles. Saludos
17.01.2023 - 21:05
|
||||||||||
Bee Season#dropsbeeseason |
||||||||||
 |
 |
|||||||||
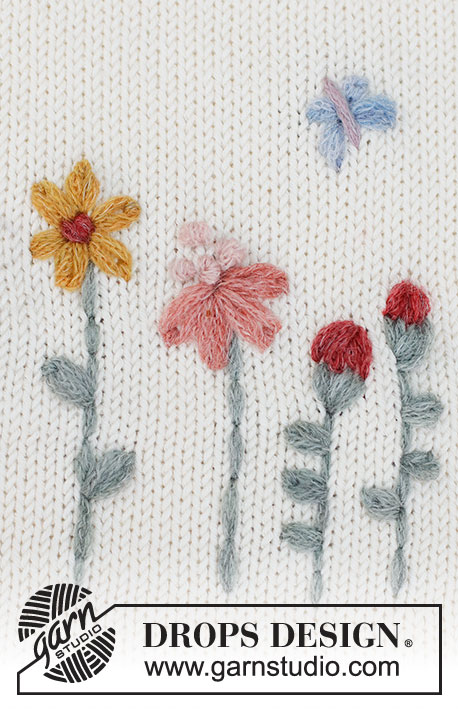
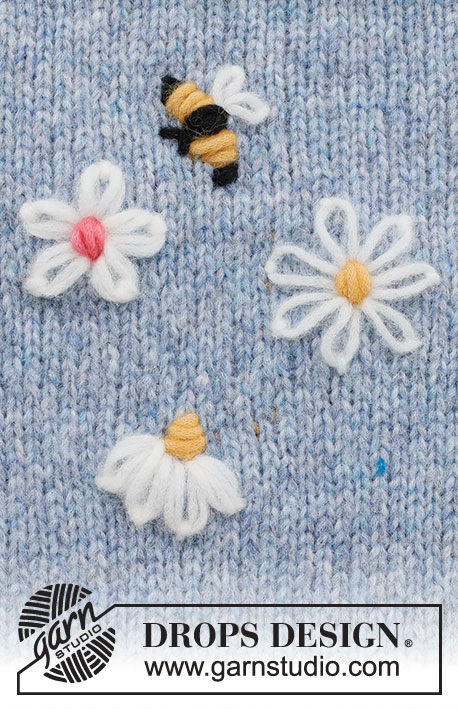
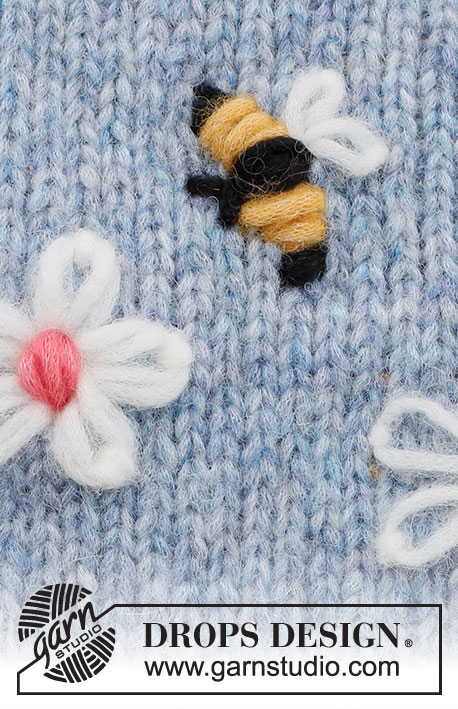
Embroidered flowers and bee in DROPS Air. The flowers are embroidered with chain stitch and back-stitch knot. The bee is embroidered with flat stitch and with chain stitch for the wings. Theme: Embroidery
DROPS 222-44 |
||||||||||
|
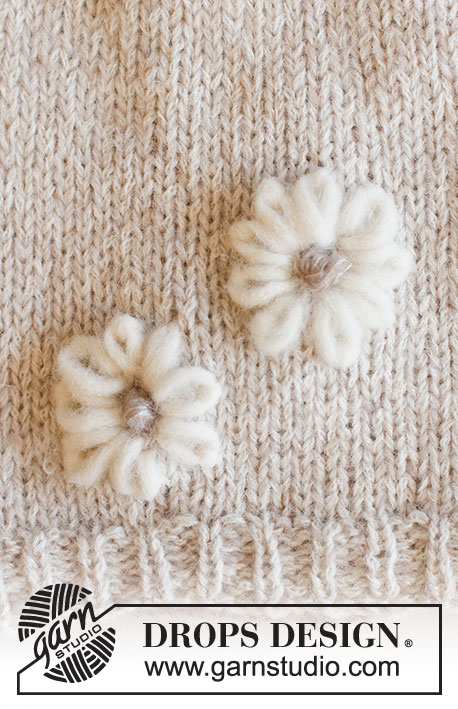
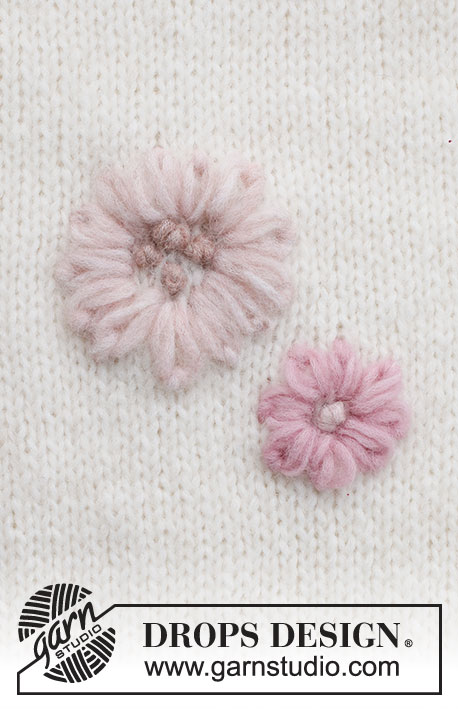
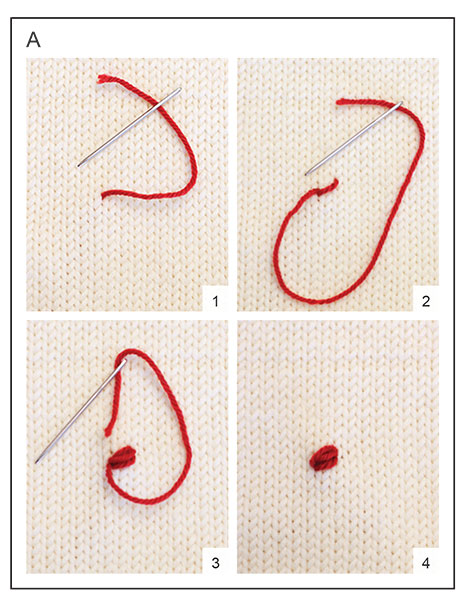
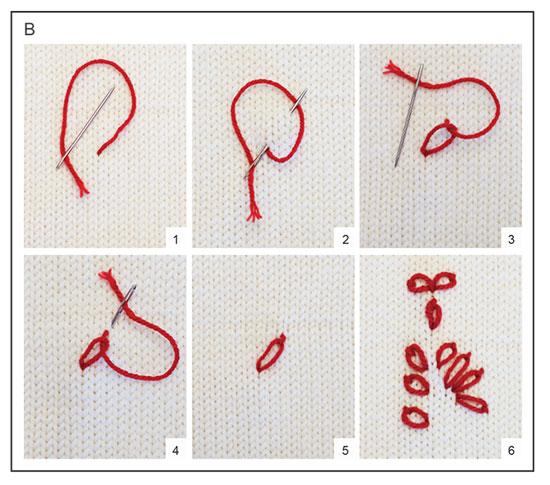
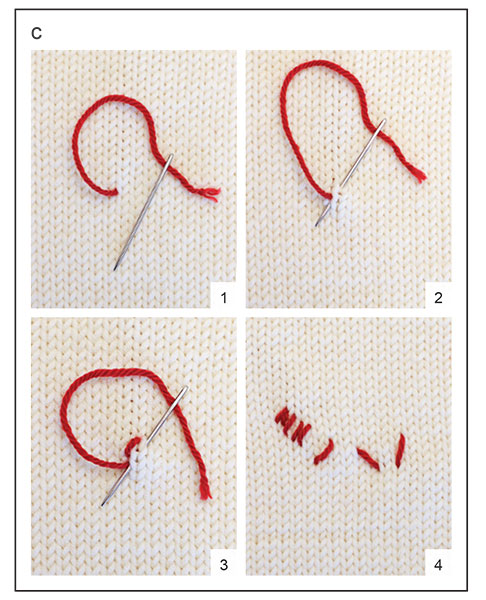
------------------------------------------------------- START THE PIECE HERE: ------------------------------------------------------- FLOWERS AND BEE – SHORT OVERVIEW OF THE PIECE: 3 different flowers are embroidered Flower 1: 5 petals are worked with double strand Flower 2: 7 petals are worked with single strand Flower 3: 4 petals are worked with double strand The bee is embroidered with a single strand and stripes of flat stitch. 2 wings in chain stitch are worked on top. FLOWER 1: Start by working a back-stitch knot with colour rose - see diagram A and diagram explanation - the knot should be approx. 1 cm in diameter. This is the middle of the flower. Then work chain stitches around the knot with colour off-white and double strand - see diagram B and diagram explanation; work 5 chain stitches around the knot, each of length 2 - 2.5 cm. Cut and fasten the strands. FLOWER 2: Start by working a back-stitch knot with colour yellow - see diagram A and diagram explanation - the knot should be approx. 1 cm in diameter. This is the middle of the flower. Then work chain stitches around the knot with colour off white and single strand - see diagram B and diagram explanation. Work 7 chain stitches, each of length 2 – 2.5 cm. Cut and fasten the strands. FLOWER 3: Start by working a back-stitch knot with colour yellow - see diagram A and diagram explanation - the knot should be approx. 1 cm in diameter, then work another knot just above the first. This is the middle of the flower. Then work chain stitches around the bottom of the knots with colour off white and double strand - see diagram B and diagram explanation. Work 4 chain stitches, each of length 2 - 2.5 cm and pointing downwards. Cut and fasten the strands. BEE - BODY WITH BLACK: Start with 1 strand of colour black - see diagram C and diagram explanation. Work 2 flat stitches close together approx. 0.5 cm long, skip 0.5 cm, then work 4 flat stitches close together, parallel to the first 2 stitches and approx.1 cm long (= middle of the bee), skip 0.5 cm, work 2 flat stitches, parallel to the middle stitches approx. 0.5 cm long and close together. Now embroider the legs under the middle of the 4 middle stitches by working 2 flat stitches for the legs approx. 0.5 cm long. BEE - BODY WITH YELLOW: Change to 1 strand of colour yellow. Work flat stitches between the middle and front of the bee - 4 flat stitches, the same length as the black stitches they are next to. Then work flat stitches between the middle and back of the bee - 4 flat stitches, the same length as the black stitches they are next to. BEE - WINGS: Using 1 strand of colour off-white, the wings consist of 2 chain stitches starting from the same hole. Start as follows: STITCH 1: Work 1 chain stitch of length 1-1.5 cm, directed down and out a little towards the back of the bee - see diagram B and diagram explanation. STITCH 2: Work 1 chain stitch of length 1-1.5 cm, directed down and out a little towards the front of the bee. |
||||||||||
Diagram explanations |
||||||||||
|
||||||||||
 |
||||||||||
 |
||||||||||
 |
||||||||||
Have you finished this pattern?Tag your pictures with #dropspattern #dropsbeeseason or submit them to the #dropsfan gallery. Do you need help with this pattern?You'll find 4 tutorial videos, a Comments/Questions area and more by visiting the pattern on garnstudio.com. © 1982-2026 DROPS Design A/S. We reserve all rights. This document, including all its sub-sections, has copyrights. Read more about what you can do with our patterns at the bottom of each pattern on our site. |
||||||||||


With over 40 years in knitting and crochet design, DROPS Design offers one of the most extensive collections of free patterns on the internet - translated to 17 languages. As of today we count 324 catalogues and 12290 patterns translated into English (UK/cm). 12290
We work hard to bring you the best knitting and crochet have to offer, inspiration and advice as well as great quality yarns at incredible prices! Would you like to use our patterns for other than personal use? You can read what you are allowed to do in the Copyright text at the bottom of all our patterns. Happy crafting!
Post a comment to pattern DROPS 222-44
We would love to hear what you have to say about this pattern!
If you want to leave a question, please make sure you select the correct category in the form below, to speed up the answering process. Required fields are marked *.