
Oblíbené kategorie
Hledáte přízi?


Komentáře / Otázky (57)
![]() Michelle napsala:
Michelle napsala:
Bonjour. Ce modèle m interesse... j aimerais savoir si dans le dos vu qu il n y a pas de photo du dos. il y a de la dentelle ou est ce du jersey? merci 😁😁
25.09.2020 - 13:13Odpověď DROPS Design :
Bonjour Michelle, le point fantaisie ajouré est le même dans le dos que devant. Bon tricot!
25.09.2020 - 14:38
![]() Richard napsala:
Richard napsala:
HELP! I am in need of 3 x 50g balls of 'Drops Cotton Merino' - Colour 17- Dye Lot 52848. Any help or suggestions, gratefully received. Also, If I make a hat using Cotton Merino, but the pattern calls for 'Fingering Merino' will it make much difference?? Thank you. Richard.
27.01.2020 - 13:12Odpověď DROPS Design :
Dear Richard, please contact your DROPS store (and more stores if necessary) or even our DROPS Workshop - CottonMerino is a 8 ply/Dk/Worsted yarn - see shadecard - see here all patterns you can use for Cotton Merino. Happy knitting!
27.01.2020 - 14:24
![]() Richard napsala:
Richard napsala:
Sorry, the last comment should read with "I placed the marker to the side (on my RIGHT)!" Thanks.
24.01.2020 - 15:28
![]() Richard napsala:
Richard napsala:
Hi, Thanks for your replies & I've mastered the difficult start - as you say, with double-pointed needles. The raglan decreasing is another matter. As I look at the sleeve (to my left), I have placed a marker on the stitch nearest to the side. I have then placed another marker on the 1st stitch of the side (which is to my left). Now, you say to start 3 stitches before this marker- yes? Where to I start on the sleeve decrease, please.
24.01.2020 - 15:25Odpověď DROPS Design :
Dear Richard, you should have 1 marker between each piece; so if you look at the sleeve, there is 1 marker at the end of body (either back or front piece) = before the first stitch on sleeve and 1 marker at the end of sleeve, after the last stitch on sleeve = before the first stitch on front/back piece. Start 3 sts before the first of these 2 markers, K2 tog, = 1 stitch remain before marker, work this stitch + the next st (= first after marker) and dec = there are 2 sts decreased at the marker and K2 between the dec (with marker in the middle of these K2). Repeat at each marker. Happy knitting!
24.01.2020 - 16:04
![]() Richard napsala:
Richard napsala:
Hi, once more. I've placed markers at the sleeves & sides & now trying to knit the raglan decreases! I understand the pattern for instructions for the sides, but starting 3 stitches before the marker (does this include the marker), I end up, after the decrease, taking the first stitch of the sleeve. Your assistance once again would be very much appreciated. Thank you. Richard.
24.01.2020 - 12:29Odpověď DROPS Design :
Dear Richard, there should be 1 stitch on each side of marker on each piece between the raglan decreases, ie you will work at each transition: K2 tog (1 dec), K2 (= Knit the stitch before marker + the stitch after marker), slip 1 as if to K, K1, psso. So starting at the transition between back and one sleeve, you will start (and end) round with K1, Hope it helps, Happy knitting!
24.01.2020 - 14:23
![]() Richard napsala:
Richard napsala:
Good morning. I have completed the body & both sleeves. But now that I have joined them on one needle, I find that when trying to knit the sleeves, the stitches are stretched (almost impossible to do)! I've had to use double-pointed needles to help me out! I don't remember having this trouble when I made the first one of this pattern (in size medium). Please can you help. Thanks. Richard.
24.01.2020 - 10:15Odpověď DROPS Design :
Dear Richard, that's right, the first few rounds at the beginning of yoke can be somewhat tricky, you can use the double pointed needles or circular needles if you like to, after few rounds, all stitches will have enough place on the circular needle to work them on the round. Happy knitting!
24.01.2020 - 14:08
![]() Richard napsala:
Richard napsala:
Thank you for the reply to my question. I sent a sketch via email, showing how I was knitting the round. So, from what you are saying, I have to knit A1 (1st row), (only for the complete round)! Then for the next round, I have to knit A1 (2nd row), for the complete round! Then 3rd row, 4th row & so on.... This makes sense. Please can you confirm this for me.. Thanks a million. Richard.
13.01.2020 - 20:17Odpověď DROPS Design :
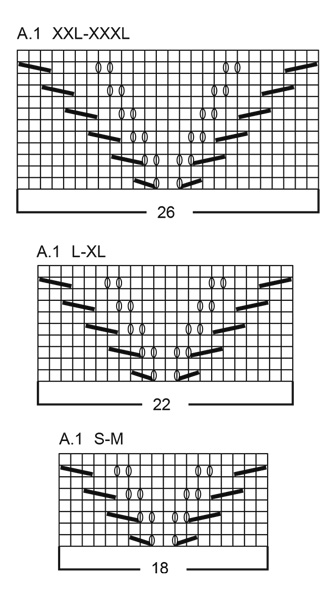
Dear Richard, that's how you should work the diagrams (row 1 in A.1 on all diagrams, then row 2 in A.1 on all diagrams and so on). Happy knitting!
14.01.2020 - 07:50
![]() Richard napsala:
Richard napsala:
Good morning, again. Continuing from the two Ridge rows, I began the round, as per your instructions. But, I find that the *A1* pattern, repeats 3 times (2 with odd row numbers, 1 even row number. in the first half, up to 124 stitches. But for the continuing *A1* pattern, there is only 1 odd number row! But, there are 2 even row numbers! Is this so? Please. Richard. I have made a drawing which explains better. If I may upload it.
13.01.2020 - 11:03Odpověď DROPS Design :
Dear Richard, not sure I'm getting this properly, when working A.1 in the round, you should work same round in each diagram all the round = round 1 A.1 when working round 1 on yoke, then work round 2 in A.1 and so on. What do I misunderstand?
13.01.2020 - 11:34
![]() Richard napsala:
Richard napsala:
Sadly, (Hi again). I'm still struggling after completing the two ridges! It is written that I knit 20, purl 3 (23 stitches), then *A1 (22 stitches, purl 6! (A1 = 10 rows @22 stitches) = 220 stitches. But adding the first 23 stitches to the 220 stitches = 243 stitches? Yet it is written, that I then purl 6! Doing this gives a total of 249 stitches! What am I doing wrong please? Forgive me, I am nearly 78 years old. Have a good day.
09.01.2020 - 12:22Odpověď DROPS Design :
Dear Richard, you should work the 248 sts in size L as follows: knit 20, purl 3, *A.1 (= 22 sts), purl 6*, repeat from *-* a total of 2 times (= 28 sts x 2= 56 sts), A.1 (= 22 sts), purl 3, knit 40 , purl 3, repeat from *-* (= 56 sts), A.1 (= 22 sts), purl 3, knit 20 = 20+3 + 56+22 + 3+40+3 + 56+22 +3+20=248 sts. Try to add markers between each section, it can help you to check the number of stitches. Happy knitting!
09.01.2020 - 14:07
![]() Richard napsala:
Richard napsala:
Hi (once again). This should be the last for awhile. I understand the A1 block now, working from the bottom up! But, please tell me: Do I follow the pattern from left to right or right to left?? I ask this, because, I am reading the block from right to left! I don't believe it makes much difference (but, there again, you are the Expert). Thank you. Richard.
07.01.2020 - 22:07Odpověď DROPS Design :
Dear Richard, diagrams are read bottom up starting from the right corner to the left, ie you will read every row in diagrams from the right towards the left (since you are working in the round) - read more about diagrams here (link is now working). Happy knitting!
08.01.2020 - 09:04
|
|||||||||||||||||||
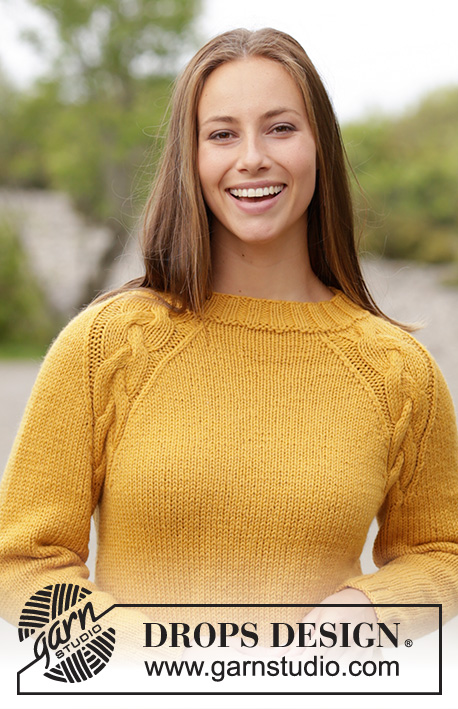
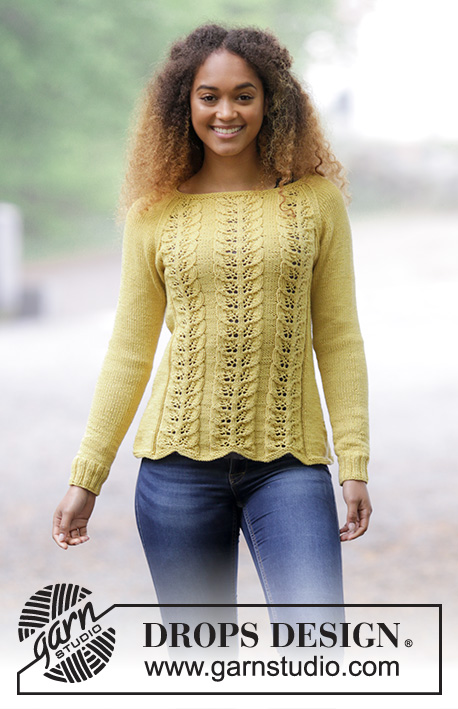
Lemon Parfait#lemonparfaitsweater |
|||||||||||||||||||
 |
 |
||||||||||||||||||
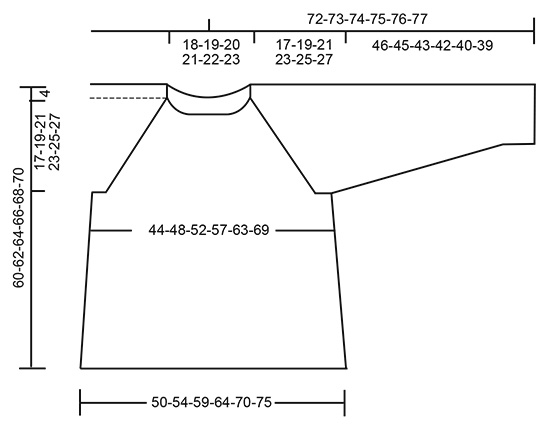
Raglánový pulovr s listovým vzorem pletený z příze DROPS Cotton Merino. Velikost S - XXXL.
DROPS 180-1 |
|||||||||||||||||||
|
VROUBKOVÝ VZOR: Pleteme střídavě 1 kruhovou řadu hladce, 1 obrace. 1 vroubek = 2 kruhové řady. VZOR: Viz schéma A.1. Zvolte si schéma pro požadovanou velikost. TIP – UJÍMÁNÍ (boky): Začínáme 3 oka před značkou na boku: 2 oka spleteme hladce, 2 oka upleteme hladce (značka leží mezi nimi), 1 oko sejmeme hladce, 1 upleteme hladce a sejmuté přes ně přetáhneme. TIP – PŘIDÁVÁNÍ: V podpaží přidáváme takto – začínáme 1 oko před značkou: 1x nahodíme, 2 oka upleteme hladce (značka leží mezi nimi), 1x nahodíme. V následující kruhové řadě pleteme nahození za zadní nit, aby se v pletenině netvořily dírky. RAGLÁNOVÉ ZKOSENÍ: Ujímáme 2 oka v každém raglánovém “švu”, tj. ve všech místech, kde se stýkají rukávy s trupem (= v 1 kruhové řadě ujmeme 8 ok). Začínáme 3 oka před značkou: 2 oka spleteme hladce, 2 oka upleteme hladce (značka leží mezi nimi), 1 oko sejmeme hladce, 1 upleteme hladce a sejmuté přes ně přetáhneme. TIP: Pokud při pletení více utahujete a rozměry vašeho úpletu neodpovídají údajům ze zkušebního vzorku (tj. máte-li úplet hustší – vyšší počet řad na 10 cm výšky pleteniny), může být sedlo moc krátké a raglánový průramek těsný. Tomu lze předejít tím, že mezi raglánovým ujímáním upletete vždy v pravidelných rozestupech 1 kruhovou řadu navíc, bez ujímání. ---------------------------------------------------------- PULOVR: Pleteme v kruhových řadách na kruhové jehlici zdola nahoru. TRUP: Na kruhovou jehlici č.4 nahodíme přízí Cotton Merino 212-228-248-268-292-316 ok a upleteme 2 VROUBKY – viz výše. Pokračujeme takto: 17-21-20-25-25-31 ok hladce, 3 oka obrace, *vzor A.1 (= 18-18-22-22-26-26 ok), 6 ok obrace*, *-* opakujeme celkem 2x, vzor A.1, 3 oka obrace, 34-42-40-50-50-62 ok hladce, 3 oka obrace, *vzor A.1, 6 ok obrace*, *-* opakujeme celkem 2x, vzor A.1, 3 oka obrace, 17-21-20-25-25-31 ok hladce. Označíme si začátek kruhové řady a druhou značku vložíme za 106.-114.-124.-134.-146.-158. oko = boky. V tomto rozvržení vzorů pokračujeme. Ve výši 8 cm ujmeme na obou stranách obou značek na bocích 1 oko (= ujmeme celkem 4 oka) – viz TIP - UJÍMÁNÍ! Takto ujímáme vždy po 4,5 cm výšky, celkem 7x – platí pro všechny velikosti = 184-200-220-240-264-288 ok. Ve výši 39-39-39-39-39-39 cm uzavřeme na každém boku 8-8-10-10-12-14 ok (= 4-4-5-5-6-7 ok na obou stranách obou značek, průramky). Mezi značkami nyní leží 84-92-100-110-120-130 ok předního i zadního dílu. Díl odložíme a upleteme rukávy. RUKÁV: Pleteme v kruhových řadách na ponožkových jehlicích, podle potřeby převedeme pleteninu s přibývajícícm počtem ok na krátkou kruhovou jehlici. Na ponožkové jehlice č.3,5 nahodíme přízí Cotton Merino 48-52-56-56-60-64 ok a upleteme 1 kruhovou řadu hladce. Pokračujeme pružným vzorem 2/2, tj. střídáme 2 oka hladce, 2 obrace. Ve výši 6 cm převedeme pleteninu na ponožkové jehlice č.4. Pleteme 1 kruhovou řadu hladce a SOUČASNĚ ujmeme rovnoměrně 4-6-8-6-8-10 ok = 44-46-48-50-52-54 ok. Označíme si začátek kruhové řady (= střed podpaží). Pleteme lícovým žerzejem. Ve výši 10-7-7-10-7-7 cm přidáme uprostřed podpaží 2 oka – viz TIP - PŘIDÁVÁNÍ. Takto přidáváme vždy po 3-2,5-2-1,5-1,5-1,5 cm výšky, celkem 12-15-18-19-20-21x = 68-76-84-88-92-96 ok. Ve výši 46-45-43-42-40-39 cm uzavřeme uprostřed podpaží 8-8-10-10-12-14 ok = 60-68-74-78-80-82 ok. Díl odložíme a stejným způsobem upleteme i druhý rukáv. SEDLO: Rukávy a trup převedeme na společnou kruhovou jehlici – rukávy přiložíme k trupu v místech uzavřených pro průramky = 288-320-348-376-400-424 ok. Označíme si “raglánové švy”, tj. všechna místa, kde se stýkají rukávy s trupem (= do pleteniny vložíme 4 značky). Pleteme vzorem jako dosud a SOUČASNĚ ujímáme pro RAGLÁN – viz výše: ujmeme 5-5-6-6-6-7x v každé 4. kruhové řadě, pak 14-16-18-21-23-24x v každé 2. kruhové řadě = ujmeme celkem 19-21-24-27-29-31x. Po dokončení veškerého ujímání máme v kruhové řadě 136-152-156-160-168-176 ok. Pleteme 2 vroubky a SOUČASNĚ v 1. kruhové řadě spleteme 22-26-26-24-22-20 ok každého rukávu po 2 dohromady a k tomu ujmeme rovnoměrně 18-28-26-28-34-40 ok v kruhové řadě = 96-98-104-108-112-116 ok. Pak všechna oka hladce uzavřeme. DOKONČENÍ: Sešijeme otvory v podpaží. |
|||||||||||||||||||
Vysvětlivky ke schématu |
|||||||||||||||||||
|
|||||||||||||||||||
 |
|||||||||||||||||||
 |
|||||||||||||||||||
Dokončili jste tento model?Pak označte své fotky tagem #dropspattern #lemonparfaitsweater nebo je pošlete do galerie #dropsfan. Potřebujete s tímto návodem poradit?Otevřete-li si návod na stránce garnstudio.com, najdete tam 25 výukových video-ukázek, Komentáře/Dotazy a další užitečné informace. © 1982-2026 DROPS Design A/S. Vyhrazujeme si veškerá práva. Tento dokument, včetně všech jeho dílčích částí, podléhá autorským právům. Podrobnější komentář k možnostem užití našich návodů najdete dole pod každým návodem na našich stránkách. |
|||||||||||||||||||


V oblasti pletené a háčkované módy působí DROPS Design více než 40 let. Díky tomu vám můžeme nabídnout jednu z nejrozsáhlejších kolekcí modelů s bezplatnými návody dostupnými na internetu - navíc v 17 jazycích. K dnešnímu dni máme na 324 katalogů a 12291 návodů celkem - z nich je už 7611 dostupných v [češtině].
Přidejte komentář k návodu DROPS 180-1
Rádi bychom věděli, co si o tomto modelu myslíte!
Pokud se chcete na něco zeptat, dbejte prosím na to, abyste ve formuláři níže vybrali správnou kategorii - díky tomu se dříve dozvíte, co potřebujete vědět. Povinná pole jsou označena *.