
Hledáte přízi?




























Komentáře / Otázky (164)
 Christina napsala:
As soon as I posted my last comment/ question the answer appeared below my original question. It definitely wasnt there before cos I looked carefully. Anyway thank you.
28.09.2026 - 22:06
Christina napsala:
Please could someone answer my question from the 23/9 as it doesnt say which size hook to use for the loops. Is it a 3mm or a 5mm. Really this pattern is not at all clear.
28.09.2026 - 22:03Odpověď DROPS Design :
Hi Christina, We have answered your question and you should have been notified via e mail. If you look at the comments and answers at the bottom of the page, you will see our answer - you work the loops with a 5 mm hook. Regards, Drops Team.
29.09.2026 - 06:12
Christina napsala:
I'm about to crochet the loops but it doesnt say what size hook to use. Is it the 3mm or 5mm hook. I take it that I use a 5mm for the ties in chain stitch as I did for the ties at the neck/shoulder.
23.09.2026 - 22:45Odpověď DROPS Design :
Hi Christina, Yes, the loops are worked using crochet hook size 5 mm. Regards, Drops Team.
24.09.2026 - 07:29
Christina napsala:
Ok, thanks. I just did slip stitches at the beginning of M2 to get to M3 and also slip stitches at each beginning row of M3 to decrease and for each new shorter row.Your previous reply on 10/9 said to turn when I have done M3. But then when should I do M4? I went straight from M3 to crochet halfway across M4 to the central point and then turned and went crocheted back across M4 and M3. I couldnt see any other way to do it.
23.09.2026 - 22:41
Christina napsala:
Ok, I'll work dble crochet AGAIN along the top of M2 to get to the start of M3 but this will be row 6 of M2. Why doesnt it show this on the graph? But then you say to turn after M3. Dont I have to work M4 after M3 to get to the halfway point. None of this makes any sense to me!
13.09.2026 - 01:17Odpověď DROPS Design :
Dear Christina, we don't show it in the chart because you can simply cut the thread and rejoin it in M.3. Otherwise, you could also work slip stitches, to avoid cutting the thread but still stitches small enough that it won't look as if M.2 has a 6th row. The M.3 after this first M.2 is worked as before; however, there is an M.3 which is worked before M.2, at the end of the row, previously. For this M.3, instead of working slip stitches, you simply turn the piece and leave unworked the stitches in the final M.2 (as opposed to the initial M.2, which was explained above). Happy crochetting!
14.09.2026 - 00:06
Christina napsala:
Thanks for your reply but I still dont understand. Im at ghe end of row5 so if I work a double crochet in each M2 stitch now, then I will have two rows of double crochet instead of one as shown on the pattern. It clearly says in the instructions that M2 has only 5 rows. How do I get to the start of M3 without doing another M2 row? There's nothing to say in the instructions.
09.09.2026 - 22:18Odpověď DROPS Design :
Dear Christina, at the beginning of the row you work M.2 = 1 dc in each st to the beg of M.3, then when you have done M.3, just turn leaving the last stitches M.2 unworked at the end of the row and continue with M.3 as shown in the diagram. Happy crocheting!
10.09.2026 - 09:45
Christina napsala:
I dont want to break and rejoin the yarn as that's a bit messy but the pattern doesn't show to do any slip stitches to make my way from the end of M2 to the beginning of row 6 of M3.
08.09.2026 - 01:18
Christina napsala:
I dont want to break and rejoin the yarn as that's a bit messy but the pattern doesn't show to do any slip stitches to make my way from the end of M2 to the beginning of row 6 of M3.
07.09.2026 - 22:52
Christina napsala:
Sorry didnt mean to send it twice. I thought it hadnt been sent
07.09.2026 - 22:49
Christina napsala:
I'm at the end of row 5 of M2. How to I get to the beginning of row 6 of M3 and M4? Do I have to break off the yarn and retie each time or can I slip stitch until I get to the start of M3? Also what do I do when I reach the middle of M4? Do I turn and work back and forth over that half and then crochet the other half separately.
07.09.2026 - 22:44Odpověď DROPS Design :
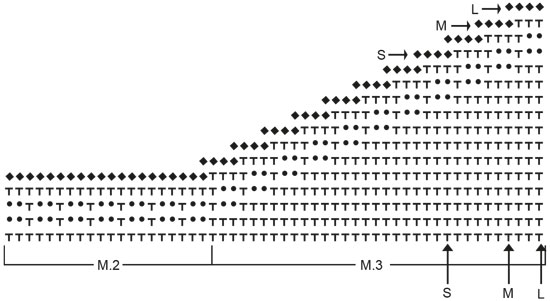
Dear Christina, work 1 double crochet (UK crochet terminology - see 2nd symbol under diagram text) in each stitch in M.2 to M.3 - when you reach the middle of M.4 you will finish each part separately, without breaking yarn just work one side to the end then join yarn again to finish the 2nd side. Happy crocheting!
08.09.2026 - 09:24
|
|||||||||||||
Sidney |
|||||||||||||
 |
 |
||||||||||||
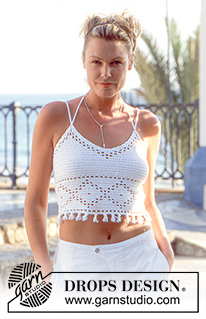
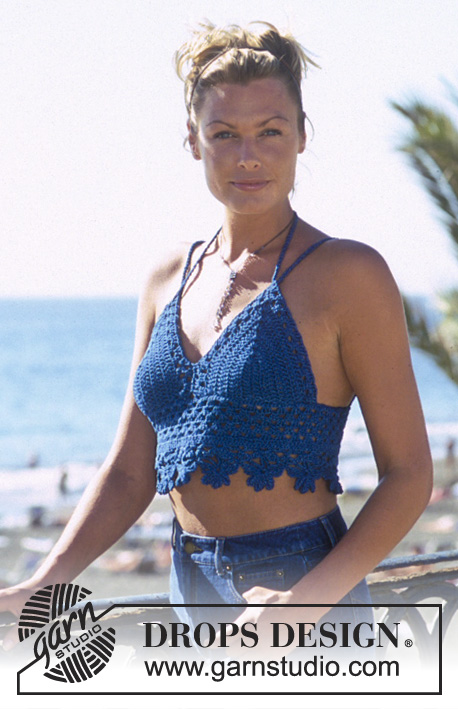
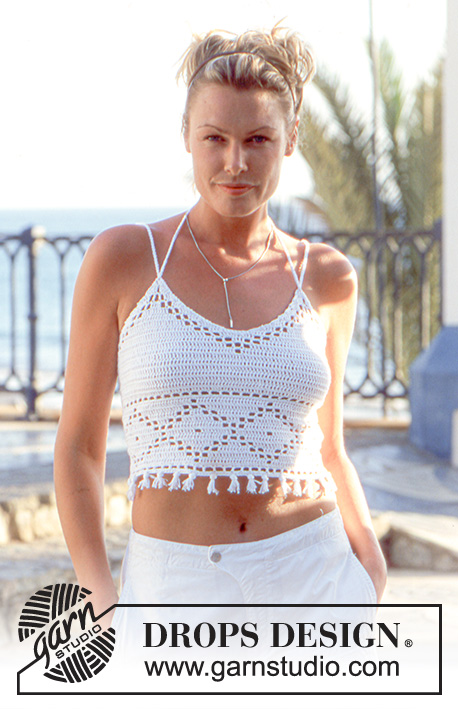
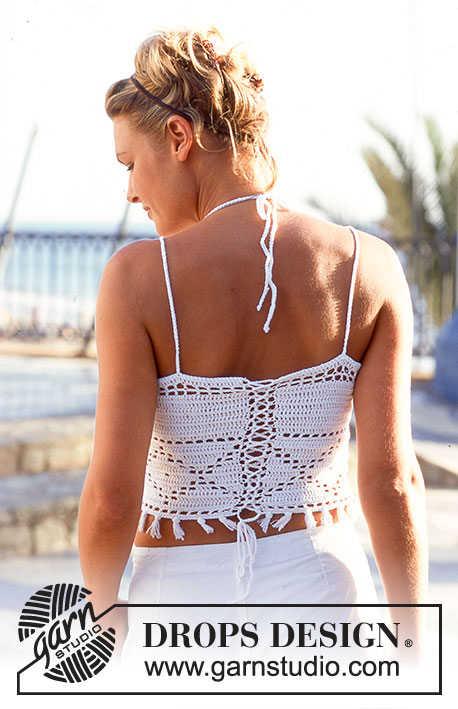
DROPS top - živůtek háčkovaný z příze "Safran". Velikost: S-L.
DROPS 69-1 |
|||||||||||||
|
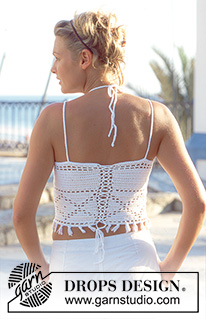
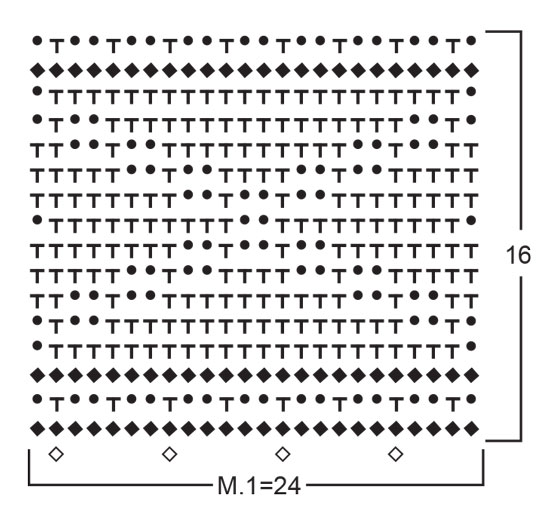
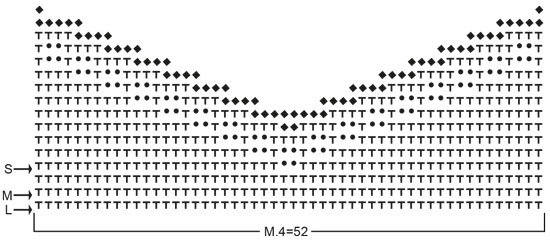
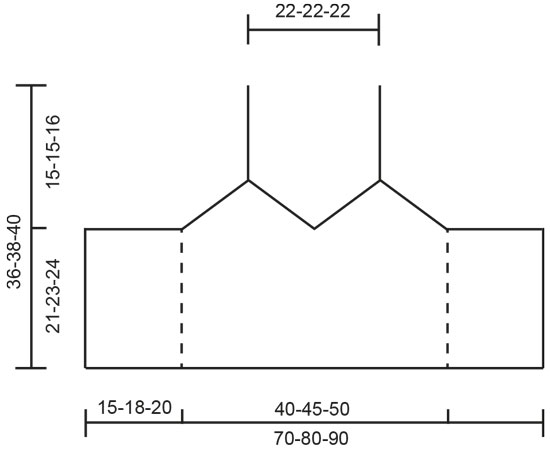
VZOR: Viz schémata M.1, M.2, M.3 a M.4. Schémata M.1 a M.2 = 1 sekvence. Schéma M.3 a M.4 háčkujeme podle uvedených instrukcí pro jednotlivé velikosti. TIP: Při otáčení práce postupujeme takto: 2 řo nahrazují 1 DS a 1 řo nahrazuje 1 KS. ------------------------------------------ TOP: Háčkem č.3 uháčkujeme přízí Safran 169-193-217 řo (včetně 1 řo na otočení). Pokračujeme vzorem M.1 – viz TIP. Po dokončení celé sekvence vzoru M.1 (na výšku) háčkujeme DS a SOUČASNĚ pro velikost S a M přidáme v 1. řadě za vzorem M.1 rovnoměrně 4 oka; pro velikost L ujmeme v 1. řadě za vzorem M.1 rovnoměrně 2 oka = 172-196-214 ok. Po uháčkování celkem 22-24-25 řad (včetně vzoru M.1) měří díl asi 18-20-21 cm. Pokračujeme takto: háčkujeme vzor M.2 – začínáme v levém dolním rohu schématu a postupujeme doprava - nad 36-42-48 oky, pak začneme vzor M.3 v levém dolním rohu schématu a postupujeme doprava – nad dalšími 24-30-33 oky, pak vzor M.4 = 52-52-52 ok, dále vzor M.3 – začneme vpravo na dolní straně schématu u šipky pro zvolenou velikost a postupujeme směrem doleva – nad 24-30-33 oky a poté začneme vzor M.2 na pravé dolní straně schématu a postupujeme směrem doleva – nad posledními 36-42-48 oky. V tomto rozvržení vzorů pokračujeme dle schémat. Po uháčkování 5 řad vzorem M.2, dokončíme celou sekvenci vzoru M.3 a M.4 (dle schématu). DOKONČENÍ: RAMÍNKA: Ramínka uháčkujeme takto: začínáme asi 9 cm od horního okraje dílu na pravé straně (= zadní díl). Háčkem č.5 uháčkujeme dvojitou přízí řetízek dlouhý asi 90 cm a protáhneme jej vrcholkem nejbližšího cípu na předním dílu. Totéž zopakujeme na druhé straně. Ramínka pak zavážeme za krkem – můžeme jejich pomocí také regulovat výšku podprsenky. POUTKA: Podél obou okrajů dílu na zádech uháčkujeme poutka na provlečení šněrování. Začínáme nahoře a postupujeme k dolnímu okraji, takto: *1 KS, 3 řo, 1 cm vynecháme*, *-* opakujeme až k dolnímu okraji. Pak uháčkujeme řetízek dlouhý asi 150 cm = vázačka. Vázačku provlečeme křížem poutky a vytvoříme šněrování na zádech. TŘÁSNĚ: 1 třásnička = ustřihneme si 4 vlákna příze, každé dlouhé 8 cm. Svazek vláken přeložíme napolovic, protáhneme první řadou řo, konce přízí pak provlečeme vzniklou smyčkou a utáhneme – viz schéma M.1. Takto navážeme podél okraje topu 28-32-36 třásní. |
|||||||||||||
Vysvětlivky ke schématu |
|||||||||||||
|
|||||||||||||
 |
|||||||||||||
 |
|||||||||||||
 |
|||||||||||||
 |
|||||||||||||
Dokončili jste tento model?Pak označte své fotky tagem #dropspattern nebo je pošlete do galerie #dropsfan. Potřebujete s tímto návodem poradit?Otevřete-li si návod na stránce garnstudio.com, najdete tam 7 výukových video-ukázek, Komentáře/Dotazy a další užitečné informace. © 1982-2026 DROPS Design A/S. Vyhrazujeme si veškerá práva. Tento dokument, včetně všech jeho dílčích částí, podléhá autorským právům. Podrobnější komentář k možnostem užití našich návodů najdete dole pod každým návodem na našich stránkách. |
|||||||||||||






V oblasti pletené a háčkované módy působí DROPS Design více než 40 let. Díky tomu vám můžeme nabídnout jednu z nejrozsáhlejších kolekcí modelů s bezplatnými návody dostupnými na internetu - navíc v 17 jazycích. K dnešnímu dni máme na 333 katalogů a 12525 návodů celkem - z nich je už 7971 dostupných v [češtině].
Přidejte komentář k návodu DROPS 69-1
Rádi bychom věděli, co si o tomto modelu myslíte!
Pokud se chcete na něco zeptat, dbejte prosím na to, abyste ve formuláři níže vybrali správnou kategorii - díky tomu se dříve dozvíte, co potřebujete vědět. Povinná pole jsou označena *.