
Beliebte Kategorien
Suchen Sie nach einem Garn?


Kommentare / Fragen (37)
![]() Labiche Odette hat geschrieben:
Labiche Odette hat geschrieben:
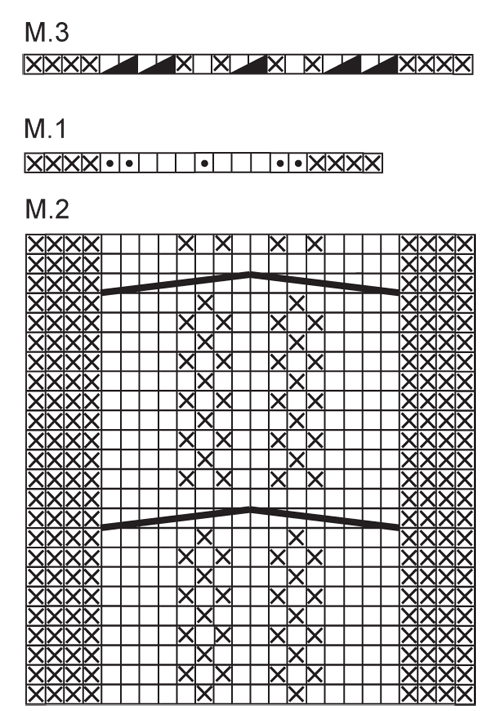
Bonjour, pourriez vous me dire si le diagramme n°2 je fais un rang endroit et un rang envers donc le total est de 22 rangs ? Pour la torsade je la fais avant le diagramme n°3 ou après ? En attendant votre réponse je vous souhaite une bonne journée.
17.09.2025 - 17:02DROPS Design hat geantwortet:
Bonjour Mme Labiche, vous tricotez dle diagramme M.2 en commençant sur l'envers (car M.1 se tricote sur l'endroit et ainsi les torsades de M.2 sont sur l'endroit) et vous répétez la totalité des rangs de M.2: sur l'endroit lisez de droite à gauche et sur l'envers, de gauche à droite; quand le diagramme est terminé en hauteur, reprenez-le au 1er rang. Quand vous aurez atteint la hauteur souhaitée, tricotez M.3. Bon tricot!
18.09.2025 - 18:12
![]() Diane Songer hat geschrieben:
Diane Songer hat geschrieben:
I don’t understand why with this headband, you only cast on 27 sets. Isn’t that too little?
19.11.2024 - 22:24DROPS Design hat geantwortet:
Dear Mrs Songer, if your tension is right you should get the correct finished measurements - note that you will increase on the first row in M.1 to compensate the number of stitches required for the cable. Happy knitting!
20.11.2024 - 08:13
![]() Gladys Freer hat geschrieben:
Gladys Freer hat geschrieben:
What is the yardage needed to make this head band? Thank you.
14.11.2022 - 21:39DROPS Design hat geantwortet:
Hi Gladys, The Drops yarn has approx. 82 yards per ball and you need 2 balls. Happy knitting!
15.11.2022 - 07:00
![]() Nicole Rivard hat geschrieben:
Nicole Rivard hat geschrieben:
Comment fait-on pour ajuster au 11 e ou 23e rang du M2? Et le M3, est-ce qu\'il se tricote quand on a finit au complet le diagramme M2? Merci
02.11.2021 - 16:53
![]() Marie hat geschrieben:
Marie hat geschrieben:
Danke für die schnelle Antwort !
09.10.2019 - 13:50
![]() Marie hat geschrieben:
Marie hat geschrieben:
Muß die 1. Reihe von M2 eine Rückreihe nach der Reihe M1 sein?
09.10.2019 - 10:48DROPS Design hat geantwortet:
Liebe Marie, ja genau, M.1 wird eine Hin-Reihe, so daß M.2 beginnt mit einer Rückreihe, so daß die Zöpfe bei Hinreihen gestrickt werden. Viel Spaß beim stricken!
09.10.2019 - 11:17
![]() Luisa hat geschrieben:
Luisa hat geschrieben:
Sorry one question how do I work the wrong side or it is on the diagrams for both sides wrong and right sides thanks much
25.08.2019 - 13:04DROPS Design hat geantwortet:
Dear Luisa, this pattern is worked flat, back and forth on needles. The diagram shows both right and wrong rows: start to read it from bottom right corner to left for right side rows and from left to right for wrong side rows. Happy knitting!
25.08.2019 - 15:32
![]() Tammy hat geschrieben:
Tammy hat geschrieben:
This ear warmer looks soooo cute. Is there a written pattern or only the chart? I’ve tried to do charts but I just haven’t been able to do them successfully.
18.11.2018 - 22:53DROPS Design hat geantwortet:
Dear Tammy, there are only diagrams to this pattern - 1 square in diagram = 1 row - both RS and WS rows are shown in diagram. Start M.1 from the right side reading from the right towards the left (= you increase 5 sts) then work M.2 starting on the bottom corner on the left sdie from WS towards the right - and work RS rows from the right towards the left. See diagram key to know how to work each stitch. Happy knitting!
19.11.2018 - 09:19
![]() Patty hat geschrieben:
Patty hat geschrieben:
I actually figured it out how to get 30 stitches. Please clarify which direction to read the different rows on the chart. Thanks much!
18.09.2018 - 19:14DROPS Design hat geantwortet:
Dear Patty, M.1 is worked from RS = from the right towards the left. M.2 is worked beginning from WS = start on the bottom corner on the left side and read WS rows from the left towards the right and the RS rows from the right towards the left. M.3 will be then worked from RS = from the right towards the left. Happy knitting!
19.09.2018 - 09:28
![]() Patty hat geschrieben:
Patty hat geschrieben:
I have read over this several times. After M1, I am not sure how you get 30 stitches?? the 3 garter stitches, M1 (19 stitches) and 3 garter stitches = 19 + 6 = 25. So after M1 I end up with 25 stitches. Please clarify. It seems like many people have had the same question. Thank you
18.09.2018 - 19:02DROPS Design hat geantwortet:
Hi Patty. It is correct that M.1 is worked across 19 stitches, but in 5 of those stitches you'll work 2 stitches in one = 5 stitches increased. So after M.1 is worked once, you'll have 30 stitches on the needle: 3 garter + 24 M.1 (including 5 increased) + 3 garter. Happy knitting.
01.10.2018 - 15:47
|
|||||||||||||||||||
Hot Line#hotlineheadband |
|||||||||||||||||||
|
|
|||||||||||||||||||
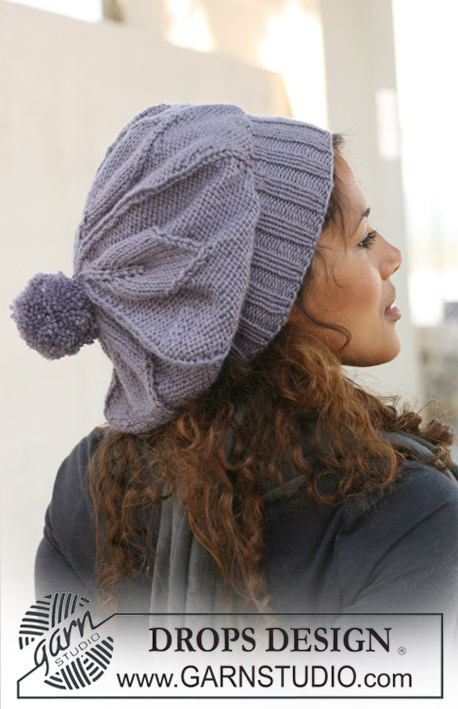
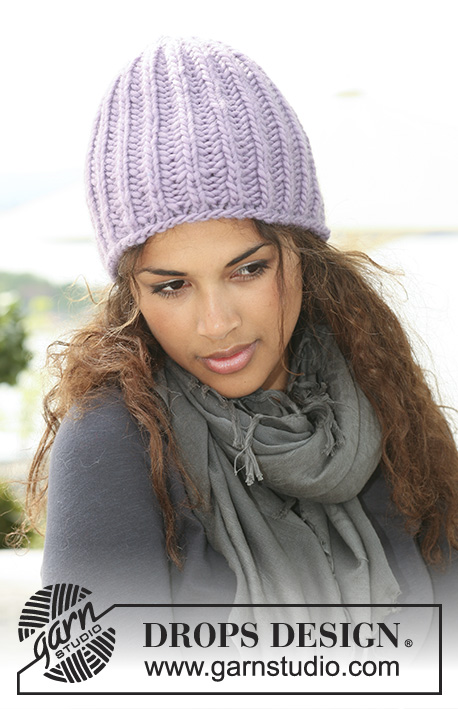
Gestricktes DROPS Stirnband mit Zopf in ”Nepal”.
DROPS 126-24 |
|||||||||||||||||||
|
KRAUSRIPPE (hin und zurück): 1 Krausrippe = 2 R. re. MUSTER: Siehe M1, M2 und M3. Das Diagramm zeigt das Muster von der Vorderseite. -------------------------------------------------------- STIRNBAND: Die Arbeit wird hin und zurück gestrickt. Mit Nepal auf Nadel Nr. 4,5, 25 M. anschlagen und 1 Krausrippe stricken - siehe oben. Die nächste R. von der Vorderseite wie folgt: 3 M. Krausrippe, M1 (= 19 M.), 3 M. Krausrippe. Nach M1 sind 30 M. auf der Nadel. Danach M2 mit je 3 M. Krausrippe auf beiden Seiten stricken bis die Arbeit ca. 52 bis 57 cm misst – nach einer 11. oder 23. R. in M2. Danach M3 mit 3 M. Krausrippe auf beiden Seiten stricken = 25 M. auf der Nadel. 1 Krausrippe stricken und danach abk. Das Stirnband hinten zusammennähen sodass die 2 Krausrippen gegeneinander zu liegen kommen. |
|||||||||||||||||||
Erklärungen zum Diagramm |
|||||||||||||||||||
|
|||||||||||||||||||
 |
|||||||||||||||||||
Haben Sie diese Anleitung nachgearbeitet?Dann taggen Sie Ihre Fotos mit #dropspattern #hotlineheadband oder schicken Sie sie an die #dropsfan Galerie Brauchen Sie Hilfe bei dieser Anleitung?Sie finden 11 Videotutorials, einen Kommentar/Fragen-Bereich und vieles mehr, wenn sie die Anleitung bei garnstudio.com aufrufen. © 1982-2026 DROPS Design A/S. Wir besitzen alle Rechte. Dieses Dokument, einschließlich aller Untersektionen, hat Urheberrechte. Mehr dazu, was Sie mit unseren Anleitungen machen können, finden Sie ganz unten auf der Seite zu jeder Anleitung. |
|||||||||||||||||||


Mit über 40 Jahren Tätigkeit im Entwerfen von Strick- und Häkelmustern bietet Ihnen DROPS Design eine der umfangreichsten Sammlungen von kostenlosen Anleitungen im Internet - in 17 Sprachen übersetzt. Zum jetzigen Zeitpunkt haben wir insgesamt 324 Handarbeitshefte und 12290 Anleitungen auf Deutsch. 12202
Unser Ziel ist es, Ihnen die besten Angebote zum Stricken und Häkeln, Inspirationen und Ratschläge sowie qualitativ hochstehende Garne zu unglaublichen Preisen zu bieten! Möchten Sie unsere Anleitungen nicht nur für den persönlichen Gebrauch nutzen? Unsere Copyright Bedingungen finden Sie bei allen unseren Anleitungen ganz unten auf der jeweiligen Seite. Viel Spaß beim Handarbeiten!
Kommentieren Sie die Anleitung DROPS 126-24
Wir würden gerne Ihre Meinung zu diesem Modell erfahren!
Wenn Sie eine Frage stellen möchten, prüfen Sie bitte, dass Sie die richtige Kategorie im unten stehenden Formular gewählt haben - so bekommen Sie schneller eine Antwort. Die obligatorischen Felder sind mit einem * gekennzeichnet.