
Popular categories
Looking for a yarn?


Comments / Questions (34)
![]() Lisen Hillestad wrote:
Lisen Hillestad wrote:
Headband 214 /68 Selv denne superenkle oppskriften fiiner jeg ikke ut av! Det skal legges opp 36 masker på fire settpinner - det må vel være 36 på hver av de fire pinnene?
01.02.2021 - 22:28DROPS Design answered:
Hei Lisen. Du ska legge opp totalt 36 m på settpinner 5 (ikke 36 m på hver av de fire pinnene) med 1 tråd Alpaca og 1 tråd Kid-Silk (= 2 tråder). Mvh DROPS Design
02.02.2021 - 10:26
![]() Anika wrote:
Anika wrote:
Nagyon szeretem! Érthető, színvonalas! "Kezdő-haladó" vagyok 😊sok minta... Gyönyörűek! Köszönöm! 🤗💖
31.01.2021 - 11:56
![]() Sara wrote:
Sara wrote:
Ho realizzato questa fascia ma mi prude leggermente.. .secondo voi a quale dei due filati è dovuto?
30.01.2021 - 15:48DROPS Design answered:
Buonasera Sara, entrambi i filati sono leggermente pelosi, per cui possono dare questa sensazione. Buon lavoro!
30.01.2021 - 18:33
![]() Marleen Goussaert wrote:
Marleen Goussaert wrote:
Beste, kan je bij dit patroon (DROPS / 214 / 68) ook gebruik maken van rondbreinaalden ipv naalden zonder knop ?
27.01.2021 - 13:14DROPS Design answered:
Dag Marleen,
Jazeker, je kunt ook een rondbreinaald gebruiken in plaats van naalden zonder knop.
31.01.2021 - 19:52
![]() Anja Ellehave wrote:
Anja Ellehave wrote:
Hvorfor skal man strikke med 2 typer garn? Jeg har et nøgle Alpaca Bris fra Viking garn 50 g som jeg gerne vil bruge det i stedet for - skal jeg stadig kombinere det med Kids Silk?
21.01.2021 - 19:04DROPS Design answered:
Hei Anja. Man strikker med 2 typer garn for å oppnå en fin effekt. Alpaca Bris fra Viking kjenner jeg ikke til. Du må selv sjekke at det garnet tilsvarer strikkefasthten mm med det garnet vi anbefaler. mvh DROPS design
27.01.2021 - 08:37
![]() Malene wrote:
Malene wrote:
Hej Drops Design Jeg er helt grøn i strik, men er faldet over denne fine opskrift. Det fremgår at man skal bruge strømpepinde nr. 5, men der står også at man skal strikke rundt? Er det så ikke rundpinde str. 5. Hvis man bruger Drops Alaska garn, skal pinde størrelse så ændres? Hertil kan jeg heller ikke lurer, hvorfor der står 50 gram 3 gange. Skal der kun bruges 50 gram garn i alt til pandebåndene i alle tre størrelser? Mange hilsner Malene
13.01.2021 - 20:56DROPS Design answered:
Hei Malene. Pannebåndet er strikket som en tube med bare 36, 40 eller 44 masker (str. S/M, M/L eller L/XL). Da er det for få masker til å strikke rundt på en rundpinne, derfor strikkes det rundt på settpinner. Om du skal bruke DROPS Alaska, 1 tråd, må du sjekke at strikkefastheten din stemmer med det som er oppgitt i oppskriften, altså 17 masker x 22 pinner i høyden = 10 x 10 cm. Det brukes 50 g til str. S/M, 50 gram til str. M/L og 50 gram til str. L/XL. I oppskriften henviser det første tallet til str. S/M, neste tall til str. M/L og det 3. tallet til str, L/XL. God Fornøyelse!
18.01.2021 - 09:27
![]() Vicki wrote:
Vicki wrote:
Does the head band have much stretch or does it depend on the yarn? I am using Drops baby merino. Thanks
14.12.2020 - 13:13
![]() Sara wrote:
Sara wrote:
Sto provando a fare questo modello coi ferri circolari ma essendo pochi punti ho dovuto usare la tecnica del magic loop....va bene cmq?
12.12.2020 - 21:57DROPS Design answered:
Buonasera Sara, si può procedere con il magic loop. Buon lavoro!
12.12.2020 - 22:37
![]() Sonja wrote:
Sonja wrote:
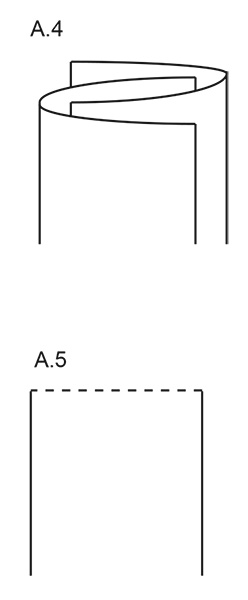
Hei! Skal en strikke en sylinder eller et rektangel? I teksten står det at en skal strikke en tube med åpning i hver ende. Men, på bildene ser det ut som et rektangel som en brettet. Om en strikker en tube eller sylinder, hvordan skal en klare å brette arbeidet slik en ser på A.4?
29.11.2020 - 12:54DROPS Design answered:
Hej Sonja Du ska sticka en tube, i denna video ser du hur du ska göra. Mvh DROPS Design
30.11.2020 - 13:29
![]() Maria wrote:
Maria wrote:
Hallo, wenn ich ein Garn der Garngruppe C verwende, wie viel Wolle benötige ich dann? Vielen Dank
23.11.2020 - 19:42DROPS Design answered:
Liebe Maria, hier wird es erklärt, wie man die neuge Menge kalkuliert. Viel Spaß beim stricken!
24.11.2020 - 09:25
|
|
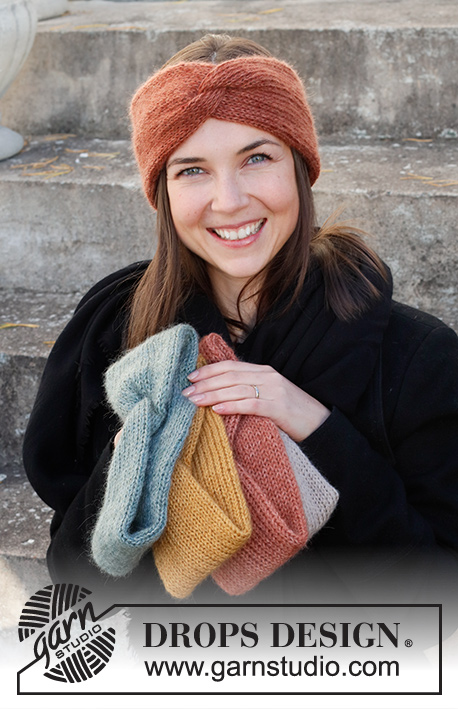
Winter Smiles Headband#wintersmilesheadband |
|
 |
 |
Knitted head band with cable in DROPS Alpaca and DROPS Kid-Silk. Sizes S - XL.
DROPS 214-68 |
|
|
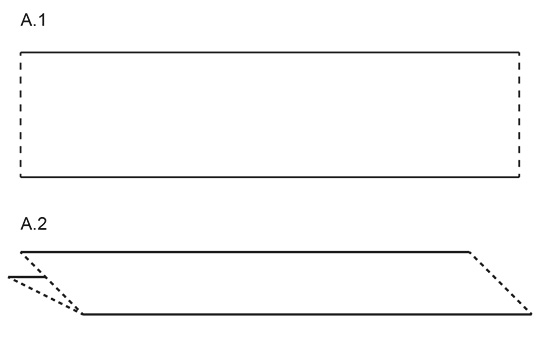
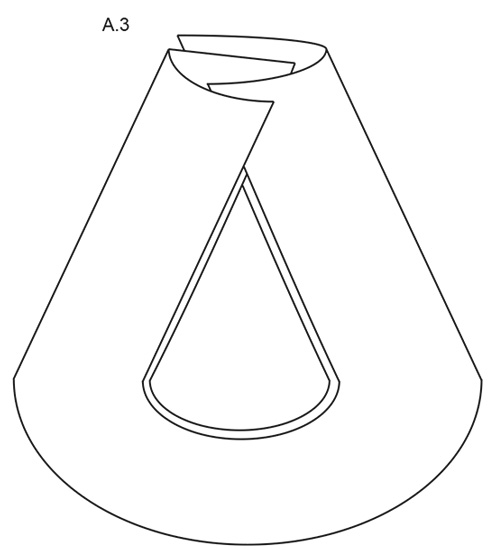
------------------------------------------------------- EXPLANATIONS FOR THE PATTERN: ------------------------------------------------------- DIAGRAM: See diagram A.1 to A.5. The diagrams are used when the head band is to be assembled. ------------------------------------------------------- START THE PIECE HERE: ------------------------------------------------------- HEAD BAND – SHORT OVERVIEW OF THE PIECE: The piece is worked in the round, with double pointed needles in a tube. The ends are then sewn together in such a way as to make a cable mid-front. HEAD BAND: Cast on 36-40-44 stitches with double pointed needles size 5 mm and 1 strand Alpaca and 1 strand Kid-Silk (= 2 strands). Work stocking stitch in the round for 49-51-53 cm. Cast off with knit. ASSEMBLY: The piece is now shaped as a tube with opening in each end, lay the tube flat – make sure that the tube is not twisted. Now close the openings at the ends with a seam on each side, sew in the outermost loop of the outermost stitch so that the seam does not become thick - see dashed lines in diagram A.1. The piece is now a flat rectangle, fold the rectangle lengthwise so that it lies double - see diagram A.2. Now lay the long sides of the head band together in layers without twisting the work - see diagram A.3. The ends of the head band now lies alternately inside and outside each other, and the edges lies edge to edge – see diagram A.4. Now sew through all layers as follows: Sew along the dotted line in diagram A.5 (ie over the edges of the piece), sew with tight whip stitches with 1 stitch in each stitch - it is important that it is sewn through all layers so that the seam do not show when the work is turned inside out. Cut and fasten the thread. Turn the work inside out, so that the seam is on the inside of the headband. |
|
 |
|
 |
|
 |
|
Have you finished this pattern?Tag your pictures with #dropspattern #wintersmilesheadband or submit them to the #dropsfan gallery. Do you need help with this pattern?You'll find 9 tutorial videos, a Comments/Questions area and more by visiting the pattern on garnstudio.com. © 1982-2026 DROPS Design A/S. We reserve all rights. This document, including all its sub-sections, has copyrights. Read more about what you can do with our patterns at the bottom of each pattern on our site. |
|


With over 40 years in knitting and crochet design, DROPS Design offers one of the most extensive collections of free patterns on the internet - translated to 17 languages. As of today we count 324 catalogues and 12290 patterns translated into English (UK/cm). 12290
We work hard to bring you the best knitting and crochet have to offer, inspiration and advice as well as great quality yarns at incredible prices! Would you like to use our patterns for other than personal use? You can read what you are allowed to do in the Copyright text at the bottom of all our patterns. Happy crafting!
Post a comment to pattern DROPS 214-68
We would love to hear what you have to say about this pattern!
If you want to leave a question, please make sure you select the correct category in the form below, to speed up the answering process. Required fields are marked *.