
Leder du efter et garn?


Kommentarer / Spørgsmål (123)
Lisa skrev:
Hi, I am working on the sleeve for size S, and after the third increase I already have the total 57 tr/ch stitches , because increasing by 1tr+1ch at each end of the row means there is an increase of 4 stitches for the row, but the pattern only counts 2 to calculate the total. Is that correct, and if so should I end up with a total of 69 stitches? Or am I doing something wrong? thanks
30.04.2017 - 16:33DROPS Design svarede:
Dear Lisa, number of sts after increase will be check, thank you. Happy crocheting!
02.05.2017 - 10:35
![]() Sylvia skrev:
Sylvia skrev:
What does, A.1B stands for. First time doing symbols. Thanks
02.04.2017 - 07:12DROPS Design svarede:
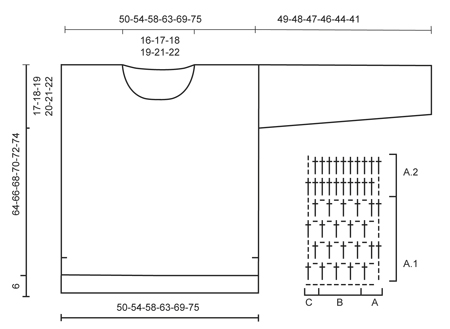
Dear Sylvia, diagram A.1 is divided into 3 parts: A.1A = beg of row from RS (= row1: 3 ch, 1 ch, skip 1 st, 1 dc in next st) and end of row from WS, then A.1B to repeat until last 3 sts on row 1 (= *1 ch, skip 1 st, 1 dc in next ch*, repeat from *-* a total of 3 times for 1 repeat of A.1B, repeat these until 2 sts remain on row, and A.1C = end of row from RS, beg of row from WS (row 1 = 1 ch, 1 dc in last st). Your DROPS store will provide you any further invidivual assistance required for reading charts. Happy crocheting!
03.04.2017 - 10:39
![]() Tommie skrev:
Tommie skrev:
Can you send me the pattern for this. I would be happy to pay for a pdf or written out.
03.11.2016 - 02:33DROPS Design svarede:
Dear Tommie, you will find the pattern for free scrolling down the page. Happy crocheting!
03.11.2016 - 09:45Eva skrev:
Hello!!!Can you tell me the size of the jumper on picture?Thank you.
10.08.2016 - 00:13DROPS Design svarede:
Dear Eva, our models are usually wearing size M - read more about sizing here. Happy crocheting!
10.08.2016 - 08:45
![]() Wendy skrev:
Wendy skrev:
I am on the back section starting A2 which seems to be a row of treble's. I've done that and I have 5 extra trebles which I don't know how to get rid of but also, because it has gone from a mesh pattern to all treble's, it is very curly. Am I reading the pattern correctly, is it a row of all treble's?
04.08.2016 - 23:51DROPS Design svarede:
Dear Wendy, A.2 is all trebles - remember to check and keep gauge (17 tr = 10 cm) when working A.1, and do not work too tight the rows with ch and tr. Happy crocheting!
05.08.2016 - 09:45
![]() Wendy skrev:
Wendy skrev:
I really want to make this and looking at it, it appears easy, however, I don't understand the pattern at all. On the back piece, after the foundation row, I've done a treble in the 6th chain from the hook as instructed. It tells me that is A.1A, but the diagram shows it as two chains and a treble. Is it possible to get the written pattern instructions as opposed to looking at the diagram? If not, can you tell me what to do after the first treble in row 2.
31.07.2016 - 01:57DROPS Design svarede:
Dear Wendy, when you work first row you skip first 5 ch (working in the 6th ch from hook), these first 5 ch are : 1st tr (= 3 ch), 1 ch before next tr + 1 ch skipped before crocheting next tr). At the beg of row 2 work A.1C: 3ch, 1 tr around next ch, then repeat A.1B and finish with A.1C. Happy crocheting!
01.08.2016 - 09:35
![]() Sarah skrev:
Sarah skrev:
I need further clarification on the sleeve increases, inadvertently I am acquiring an extra two stitches when increasing the sleeves leading to too many stitches. I have looked at the pattern to see how I can prevent the extra stitches from occurring but having great difficulty in figuring out how, can you advise further? The first increase stitch is placed at A.1 A and at the end however the extra stitches are occurring in every third row following this, hope this makes sense, Thanks Sarah
11.03.2016 - 23:30DROPS Design svarede:
Dear Sarah, you inc for sleeve 1 st in each side, ie you will have a total of 2 tr more on every inc row - increase should be done by working 1 tr + 1 ch more in outermost tr in each side. On next row, work in A.1 as before, you will have same as before, but just 2 more tr per inc row. Happy crocheting!
12.03.2016 - 18:03Trishy skrev:
I'm new to the Crotchet world. And was wondering, if I try to make a large size in this jumper, how do I know how many stitches do I need for the back, & front etc?
31.10.2015 - 04:23DROPS Design svarede:
Dear Trishy, you will find at the bottom of the pattern a measurement chart, compare the measurements (in cm) to a similar garment you have and like the shape and find out the matching size - you can then follow this size in the pattern. Read more about sizing here. Happy crocheting!
31.10.2015 - 18:09
![]() Federica Piucci skrev:
Federica Piucci skrev:
Buon pomeriggio, io intendo confezionare questa maglia in con due colori diversi, uno per la parte superiore e uno per quella inferiore. Indicativamente quanti grammi potrebbero servire per le due parti prese separatamente?
12.10.2015 - 15:06DROPS Design svarede:
Buongiorno Federica. Non riusciamo ad essere precisi sul quantitativo di filato necessario per lavorare con due colori. Lavorare un piccolo campione con i due diversi motivi potrebbe dare una prima indicazione. Il suo rivenditore di fiducia è a sua disposizione per consigliarla. Se possibile e non troppo oneroso, si informi anche sulla possibilità di restituire eventuali gomitoli di filato integri e non utilizzati. Buon lavoro!
16.10.2015 - 23:39Dalia skrev:
When piece measures 53-54-55-56-57-58 cm / 21''-21¼''-21 5/8''-22''-22½''-22¾'', insert 1 marker in each side (marks where armhole beg). where exactly do I insert my markers?
14.07.2015 - 10:29DROPS Design svarede:
Dear Dalia, see answer below. Happy crocheting!
27.07.2015 - 11:29
|
|||||||
Donna#donnasweater |
|||||||
 |
 |
||||||
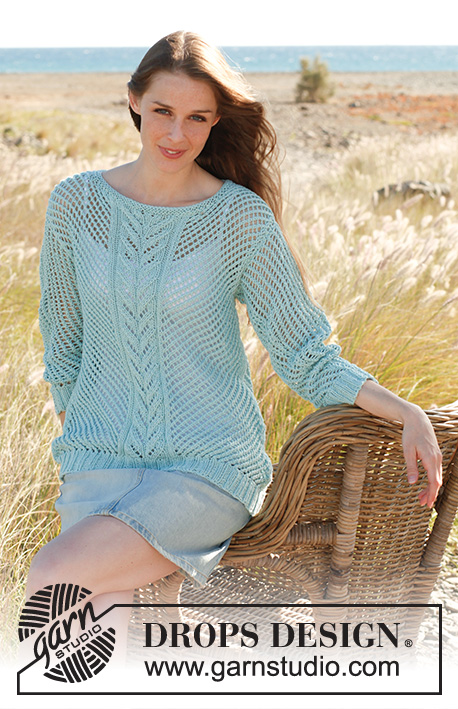
Hæklet DROPS bluse i ”Cotton Light”. Str S - XXXL.
DROPS 145-19 |
|||||||
|
MØNSTER: Der hækles efter A.1 og A.2. LUKKETIPS: Vend når der er en st tilbage = 1 st lukket af. UDTAGNINGSTIPS: Der tages ud ved at hækle 1 st + 1 lm ekstra i yderste st i hver side. De nye m hækles løbende som A.1. ---------------------------------------------------------- RYGSTK: Rygstk hækles frem og tilbage. Rygstk hækles 6 cm længere end forstk. Hækl en række med 88-94-102-110-120-130 LØSE lm (det er vigtigt at lm er løse så kanten ikke strammer) på nål 4 med Cotton Light. Vend og hækl 1 st i den 6.lm fra nålen (A.1 A er nu hæklet – se Diagram). Hækl A.1 B over de næste 80-86-94-102-112-122 lm, og afslut med A.1 C i de 2 sidste lm. Videre fortsættes der at hækle efter A.1. Når arb måler 47-48-49-50-51-52 cm hækles der videre således: A.2 A, gentag A.2 B til der er 2 st/lm tilbage, hækl A.2 C = 85-91-99-107-117-127 st. Fortsæt med A.2 til færdig mål. Når arb måler 53-54-55-56-57-58 cm sættes der 1 mærketråd i hver side (markerer begyndelsen på ærmegabet). Når arb måler 68-70-72-74-76-78 cm hækles der ikke over de midterste 27-29-31-33-35-37 st = 29-31-34-37-41-45 st tilbage på hver skulder. Hver skulder hækles nu færdig for sig. Fortsæt med A.2, klip og hæft tråden når arb måler 70-72-74-76-78-80 cm. FORSTK: Slå op og hækl som rygstk til arb måler 41-42-43-44-45-46 cm - OBS! Bagstykket skal være 6 cm længere end forstk – derfor er længdemålene forskellige. Nu hækles der videre således: A.2 A, gentag A.2 B til der er 2 st/lm tilbage, hækl A.2 C = 85-91-99-107-117-127 st. Fortsæt med A.2 til færdig mål. Når arb måler 47-48-49-50-51-52 cm sættes der 1 mærketråd i hver side (markerer begyndelsen på ærmegabet). Når arb måler 56-58-60-62-64-66 cm hækles der ikke over de midterste 23-25-27-29-31-33 st. Hver skulder hækles nu færdig for sig, samtidig lukkes der 1 st af på hver række mod halsen totalt 2 gange – læs LUKKETIPS = 29-31-34-37-41-45 st tilbage på hver skulder. Fortsæt med A.2, klip og hæft tråden når arb måler 64-66-68-70-72-74 cm. ÆRME: Ærmet hækles frem og tilbage. Hækl en række med 48-48-50-52-54-56 LØSE lm (det er vigtig at lm er løse så kanten ikke strammer) på nål 4 med Cotton Light. Vend og hækl 1 st i den 6.lm fra nålen (A.1 A er nu hæklet). Hækl A.1 B over de næste 40-40-42-44-46-48 lm, og afslut med A.1 C i de 2 sidste lm = 45-45-47-49-51-53 st/lm. Videre fortsættes der at hækle efter A.1. Når arb måler 8 cm, tages der 1 m ud i hver side - læs UDTAGNINGSTIPS. Gentag udtagningen på hver 7.-5.-4½.-3½.-3½.-3.cm 5-7-8-9-9-10 gange til (totalt 6-8-9-10-10-11 udtagninger) = 57-61-65-69-71-75 st/lm. Klip og hæft tråden når arb måler 49-48-47-46-44-41 cm (kortere mål i større str pga bredere skuldervidde). MONTERING: Sy skuldersømmene. Sy ærmerne i – fra skulderen og ned til mærketrådene på for – og rygstk. Sy underærmesømmene og sidesømmene i et, stop når der er 26 cm tilbage på rygstk og 20 cm på forstk = slids. |
|||||||
Diagram forklaring |
|||||||
|
|||||||
 |
|||||||
Har du lavet denne opskrift?Så tagger du dine billeder med #dropspattern #donnasweater eller send dem til #dropsfan galleriet. Behøver du hjælp med opskriften?Du finder 5 instruktionsvideoer, kommentarer/spørgsmål og mere i opskriften på www.garnstudio.com © 1982-2026 DROPS Design A/S. Alle rettigheder er reserveret. Dette dokument med tilhørende underdokumenter har copyright. Læs mere om hvad du kan gøre med vore opskrifter, nedert i alle vore opskrifter på hjemmesiden. |
|||||||


Med over 40 år i strikke- og hæklebranchen tilbyder DROPS Design en af de mest omfattende kollektioner med gratis opskrifter på internettet - oversat til 17 sprog. Dags dato har vi 324 kataloger og 12290 opskrifter på Dansk.
Vi arbejder hårdt for at kunne tilbyde Dig det bedste man kan få af strik og hækling, inspiration og gode råd men også kvalitetsgarn til fantastiske priser! Vil du bruge vore opskrifter til andet end for privat brug? Du kan læse om hvilke regler som gælder under teksten Copyright nederst på siden i alle vore opskrifter. God fornøjelse!
Kommentere opskrift DROPS 145-19
Vi vil gerne høre din mening om denne model!
Hvis du ønsker at stille et spørgsmål, så husk at vælge rigtig kategori i menuen under - det vil give dig hurtigere svar. Obligatoriske felter er markeret med *.