
Leder du efter et garn?


Kommentarer / Spørgsmål (37)
![]() Labiche Odette skrev:
Labiche Odette skrev:
Bonjour, pourriez vous me dire si le diagramme n°2 je fais un rang endroit et un rang envers donc le total est de 22 rangs ? Pour la torsade je la fais avant le diagramme n°3 ou après ? En attendant votre réponse je vous souhaite une bonne journée.
17.09.2025 - 17:02DROPS Design svarede:
Bonjour Mme Labiche, vous tricotez dle diagramme M.2 en commençant sur l'envers (car M.1 se tricote sur l'endroit et ainsi les torsades de M.2 sont sur l'endroit) et vous répétez la totalité des rangs de M.2: sur l'endroit lisez de droite à gauche et sur l'envers, de gauche à droite; quand le diagramme est terminé en hauteur, reprenez-le au 1er rang. Quand vous aurez atteint la hauteur souhaitée, tricotez M.3. Bon tricot!
18.09.2025 - 18:12
![]() Diane Songer skrev:
Diane Songer skrev:
I don’t understand why with this headband, you only cast on 27 sets. Isn’t that too little?
19.11.2024 - 22:24DROPS Design svarede:
Dear Mrs Songer, if your tension is right you should get the correct finished measurements - note that you will increase on the first row in M.1 to compensate the number of stitches required for the cable. Happy knitting!
20.11.2024 - 08:13
![]() Gladys Freer skrev:
Gladys Freer skrev:
What is the yardage needed to make this head band? Thank you.
14.11.2022 - 21:39DROPS Design svarede:
Hi Gladys, The Drops yarn has approx. 82 yards per ball and you need 2 balls. Happy knitting!
15.11.2022 - 07:00
![]() Nicole Rivard skrev:
Nicole Rivard skrev:
Comment fait-on pour ajuster au 11 e ou 23e rang du M2? Et le M3, est-ce qu\'il se tricote quand on a finit au complet le diagramme M2? Merci
02.11.2021 - 16:53
![]() Marie skrev:
Marie skrev:
Danke für die schnelle Antwort !
09.10.2019 - 13:50
![]() Marie skrev:
Marie skrev:
Muß die 1. Reihe von M2 eine Rückreihe nach der Reihe M1 sein?
09.10.2019 - 10:48DROPS Design svarede:
Liebe Marie, ja genau, M.1 wird eine Hin-Reihe, so daß M.2 beginnt mit einer Rückreihe, so daß die Zöpfe bei Hinreihen gestrickt werden. Viel Spaß beim stricken!
09.10.2019 - 11:17
![]() Luisa skrev:
Luisa skrev:
Sorry one question how do I work the wrong side or it is on the diagrams for both sides wrong and right sides thanks much
25.08.2019 - 13:04DROPS Design svarede:
Dear Luisa, this pattern is worked flat, back and forth on needles. The diagram shows both right and wrong rows: start to read it from bottom right corner to left for right side rows and from left to right for wrong side rows. Happy knitting!
25.08.2019 - 15:32
![]() Tammy skrev:
Tammy skrev:
This ear warmer looks soooo cute. Is there a written pattern or only the chart? I’ve tried to do charts but I just haven’t been able to do them successfully.
18.11.2018 - 22:53DROPS Design svarede:
Dear Tammy, there are only diagrams to this pattern - 1 square in diagram = 1 row - both RS and WS rows are shown in diagram. Start M.1 from the right side reading from the right towards the left (= you increase 5 sts) then work M.2 starting on the bottom corner on the left sdie from WS towards the right - and work RS rows from the right towards the left. See diagram key to know how to work each stitch. Happy knitting!
19.11.2018 - 09:19
![]() Patty skrev:
Patty skrev:
I actually figured it out how to get 30 stitches. Please clarify which direction to read the different rows on the chart. Thanks much!
18.09.2018 - 19:14DROPS Design svarede:
Dear Patty, M.1 is worked from RS = from the right towards the left. M.2 is worked beginning from WS = start on the bottom corner on the left side and read WS rows from the left towards the right and the RS rows from the right towards the left. M.3 will be then worked from RS = from the right towards the left. Happy knitting!
19.09.2018 - 09:28
![]() Patty skrev:
Patty skrev:
I have read over this several times. After M1, I am not sure how you get 30 stitches?? the 3 garter stitches, M1 (19 stitches) and 3 garter stitches = 19 + 6 = 25. So after M1 I end up with 25 stitches. Please clarify. It seems like many people have had the same question. Thank you
18.09.2018 - 19:02DROPS Design svarede:
Hi Patty. It is correct that M.1 is worked across 19 stitches, but in 5 of those stitches you'll work 2 stitches in one = 5 stitches increased. So after M.1 is worked once, you'll have 30 stitches on the needle: 3 garter + 24 M.1 (including 5 increased) + 3 garter. Happy knitting.
01.10.2018 - 15:47
|
|||||||||||||||||||
Hot Line#hotlineheadband |
|||||||||||||||||||
|
|
|||||||||||||||||||
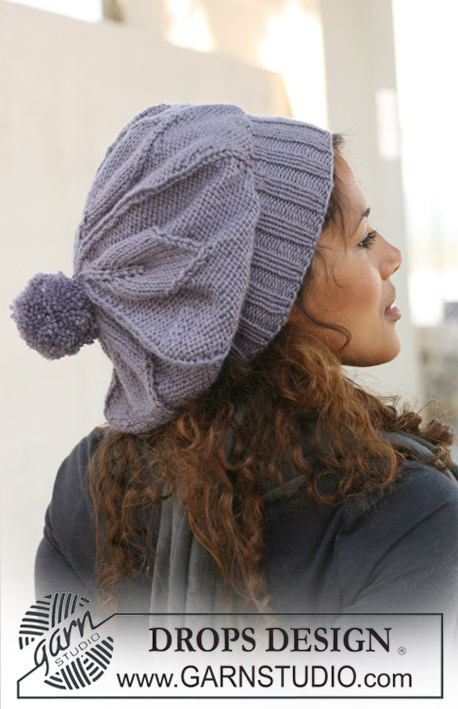
Strikket DROPS pandebånd med snoning i ”Nepal”.
DROPS 126-24 |
|||||||||||||||||||
|
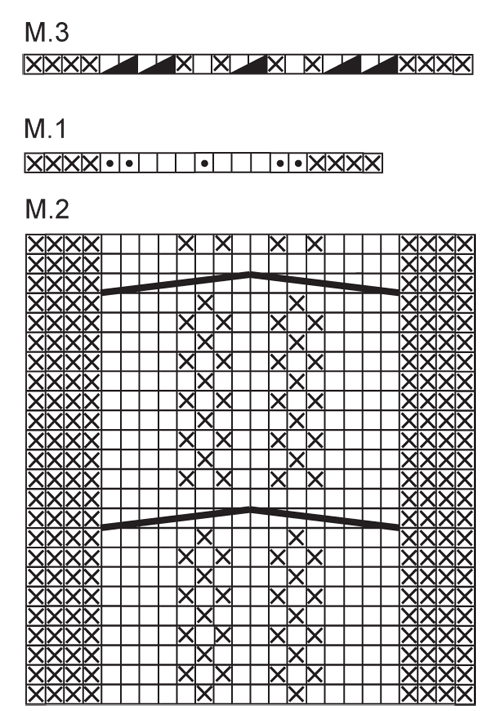
RETSTRIK (frem og tilbage på p): Strik ret på hver p. MØNSTER: Se diag M.1, M.2 og M.3. Diag viser mønsteret set fra retsiden. -------------------------------------------------------- PANDEBÅND: Arb strikkes frem og tilbage på p. Slå 25 m op på p 4,5 med Nepal og strik 2 p retstrik – se forkl over. Næste p strikkes således fra retsiden: 3 m retstrik, M.1 (= 19 m), 3 m retstrik. Efter M.1 er der 30 m på p. Videre strikkes M.2 med 3 m retstrik i hver side til arb måler ca 52 til 57 cm – afpas efter 11. eller 23.p i M.2. Derefter strikkes M.3 med 3 m retstrik i hver side = 25 m på p. Strik 2 p retstrik og luk af. Sy pandebåndet sammen midt bagpå så de 2 retriller ligger mod hinanden. |
|||||||||||||||||||
Diagram forklaring |
|||||||||||||||||||
|
|||||||||||||||||||
 |
|||||||||||||||||||
Har du lavet denne opskrift?Så tagger du dine billeder med #dropspattern #hotlineheadband eller send dem til #dropsfan galleriet. Behøver du hjælp med opskriften?Du finder 11 instruktionsvideoer, kommentarer/spørgsmål og mere i opskriften på www.garnstudio.com © 1982-2026 DROPS Design A/S. Alle rettigheder er reserveret. Dette dokument med tilhørende underdokumenter har copyright. Læs mere om hvad du kan gøre med vore opskrifter, nedert i alle vore opskrifter på hjemmesiden. |
|||||||||||||||||||


Med over 40 år i strikke- og hæklebranchen tilbyder DROPS Design en af de mest omfattende kollektioner med gratis opskrifter på internettet - oversat til 17 sprog. Dags dato har vi 324 kataloger og 12290 opskrifter på Dansk.
Vi arbejder hårdt for at kunne tilbyde Dig det bedste man kan få af strik og hækling, inspiration og gode råd men også kvalitetsgarn til fantastiske priser! Vil du bruge vore opskrifter til andet end for privat brug? Du kan læse om hvilke regler som gælder under teksten Copyright nederst på siden i alle vore opskrifter. God fornøjelse!
Kommentere opskrift DROPS 126-24
Vi vil gerne høre din mening om denne model!
Hvis du ønsker at stille et spørgsmål, så husk at vælge rigtig kategori i menuen under - det vil give dig hurtigere svar. Obligatoriske felter er markeret med *.