
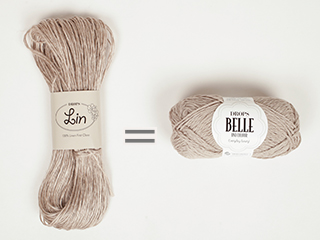
Looking for a yarn?


|
||||||||||||||||
Melanie |
||||||||||||||||
 |
 |
|||||||||||||||
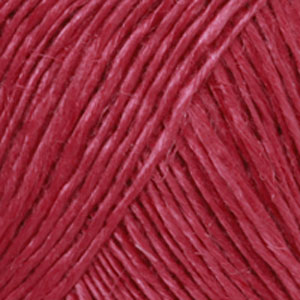
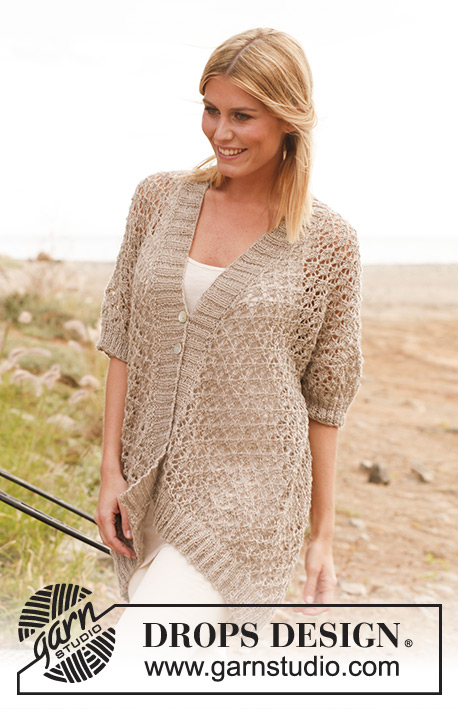
Knitted DROPS jacket with lace pattern in “Lin” and "Belle".
DROPS 139-7 |
||||||||||||||||
|
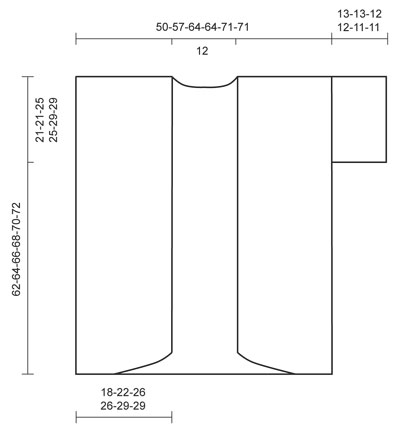
GARTER ST (back and forth on needle): K all rows. NOTE: All edge sts are worked in garter st. PATTERN: See diagrams M.1, M.1A = 3 sts, M.1B = 6 sts and M.1C = 4 sts. Diagrams show the pattern from RS. DECREASE TIP: Dec 1 st by working 2 sts tog. BUTTON HOLES: Cast off for 2 button holes on right band, approx. 33-34-35-36-37-38 cm and approx. 38-39-40-41-42-43 cm from the top of shoulder. 1 BUTTON HOLE = cast off 2 sts and cast on 2 new sts on next row over these sts. -------------------------------------------------------- BACK PIECE: Worked back and forth on needle. Cast on 172-196-220-220-244-244 sts (incl 1 edge st in each side) on circular needle size 4 mm with Lin or Belle. Then work rib as follows (1st row = RS): 1 edge sts in garter st - See explanation above, * K 2, P 4 *, repeat from *-*, finish with K 2 and 1 edge st in garter st = 28-32-36-36-40-40 P-sections (seen from RS). When piece measures 3-3-3-4-4-4 cm, dec 1 st in every P-section (seen from RS) - Read DECREASE TIP = 144-164-184-184-204-204 sts. Continue in rib with K 2/P 3 with 1 edge st in each side. When piece measures 5-5-5-6-6-6 cm, dec 1 more st in every P-section (seen from RS) = 116-132-148-148-164-164 sts. Continue in rib with K 2/P 2 with 1 edge st in each side. When piece measures 6-6-6-7-7-7 cm, dec 29-33-37-37-41-41 sts evenly on last row from WS = 87-99-111-111-123-123 sts. On next row from RS switch to circular needle size 5 mm and work as follows: 1 edge st, work diagram M.1A 1 time (= 3 sts), then diagram M.1B a total of 13-15-17-17-19-19 times and finally diagram M.1C 1 time (= 4 sts), finish with 1 edge st. Continue diagram M.1 with 1 edge st in each side until piece measures 41-43-41-43-41-43 cm. REMEMBER THE KNITTING TENSION! Now insert a marker in each side of piece (= armhole starts here). Continue to work until piece measures 60-62-64-66-68-70 cm. Then work in garter st over all sts until finished measurements - AT THE SAME TIME on 1st row from RS cast off the middle 17 sts for neck and finish each shoulder separately. Cast off 2 sts on next row from neck = 33-39-45-45-51-51 sts remain on shoulder. Loosely cast off all sts when piece measures 62-64-66-68-70-72 cm. LEFT FRONT PIECE: Worked back and forth on needle. Cast on 62-74-86-86-98-98 sts (incl 1 edge st in each side) on circular needle size 4 mm. Then work rib as follows (1st row = RS): 1 edge st, * P 4, K 2 *, repeat from *-*, finish with 1 edge st towards mid front = 10-12-14-14-16-16 P-sections (seen from RS). When piece measures 3-3-3-4-4-4 cm, dec 1 st in every P-section (seen from RS) = 52-62-72-72-82-82 sts. Continue in rib with K 2/P 3 with 1 edge st in each side. When piece measures 5-5-5-6-6-6 cm, dec 1 more st in every P-section (seen from RS) = 42-50-58-58-66-66 sts. Continue in rib with K 2/P 2 with 1 edge st in each side. When piece measures 6-6-6-7-7-7 cm, dec 9-11-13-13-15-15 sts evenly on last row from WS = 33-39-45-45-51-51 sts. On next row from RS switch to circular needle size 5 mm and work short rows for diagonal front edge as follows: 1 edge st, work diagram M.1A 1 time (= 3 sts), diagram M.1B a total of 1-2-3-3-4-4 times (= 6-12-18-18-24-24 sts) = 10-16-22-22-28-28 sts on needle, turn piece, tighten thread and work back. Work next row from RS as follows: 1 edge st, work diagram M.1A 1 time, diagram M.1B a total of 2-3-4-4-5-5 times = 16-22-28-28-34-34 sts on needle, turn piece, tighten thread and work back. Work next row from RS as follows: 1 edge st, work diagram M.1A 1 time, diagram M.1B a total of 3-4-5-5-6-6 times = 22-28-34-34-40-40 sts on needle, turn piece, tighten thread and work back. On next row from RS work all sts as follows: 1 edge st, work diagram M.1A 1 time, diagram M.1B a total of 4-5-6-6-7-7 times, then work diagram M.1C 1 time, finish with 1 edge st = 33-39-45-45-51-51 sts. Continue diagram M.1 with 1 edge st in each side until piece measures 41-43-41-43-41-43 cm. Now insert a marker in the right side of piece seen from RS (armhole starts here). Continue to work until piece measures 60-62-64-66-68-70 cm. Now work in garter st over all sts until finished measurements. Loosely cast off all sts when piece measures 62-64-66-68-70-72 cm. RIGHT FRONT PIECE: Work as left front piece but reversed. ASSEMBLY: Sew the shoulder seams. SLEEVE: Worked back and forth on needle. Knit up from RS on circular needle size 5 mm approx. 80 to 100 sts between markers along one armhole. K next row from WS - AT THE SAME TIME adjust no of sts to 75-75-87-87-99-99 (incl 1 edge st in each side). On next row from RS work as follows: 1 edge st, work diagram M.1A 1 time (= 3 sts), then diagram M.1B a total of 11-11-13-13-15-15 times, work diagram M.1C 1 time (= 4 sts), finish with 1 edge st. Continue to work diagram M.1 with 1 edge st in each side until piece measures approx. 9-9-8-8-7-7 cm (shorter measurements in the larger sizes because of broader shoulder width). On next row from RS switch to circular needle size 4 mm and dec 1 st on row - while AT THE SAME TIME working rib (K 2, P 2) with 1 edge st in each side = 74-74-86-86-98-98 sts. When sleeve measures 13-13-12-12-11-11 cm, loosely cast off sts with K over K and P over P. Knit another sleeve the same way. ASSEMBLY: Sew sleeve and side seams in one inside 1 edge st. RIGHT BAND: Worked back and forth on needle. Knit up from RS on circular needle size 4 mm approx. 110 to 130 sts along the entire right front piece, at the end of row cast on 15 new sts for collar at the back. K next row from WS - AT THE SAME TIME adjust no of sts along right front piece to 112-116-120-124-128-132 (do not inc/dec over the collar sts at the back) = 127-131-135-139-143-147 sts in total. Then work rib from RS as follows: * K 2, P 2 *, repeat from *-*, finish with K 2 and 1 edge st in garter st (= 31-32-33-34-35-36 P-sections). Continue in rib until band measures 3 cm, then inc from RS 1 P st in the last 12-12-14-14-16-16 P-sections (= inc around the neck) = 139-143-149-153-159-163 sts. When band measures 5-5-5-6-6-6 cm, cast off for button holes - see explanation above. Continue with K over K and P over P until band measures 6-6-6-7-7-7 cm, loosely cast off all sts with K over K and P over P. LEFT BAND: Cast on 15 sts on circular needle size 4 mm for collar at the back, then knit up sts along left front band as on right band. Work as right band but reversed and without button holes. ASSEMBLY: Sew collar tog mid back inside 1 edge st (with WS against WS), and sew collar to neck line at the back of neck. Sew the buttons on to the left band. |
||||||||||||||||
Diagram explanations |
||||||||||||||||
|
||||||||||||||||

|
||||||||||||||||
|
||||||||||||||||
|
Have you made this or any other of our designs? Tag your pictures in social media with #dropsdesign so we can see them! Do you need help with this pattern?You'll find tutorial videos, a Comments/Questions area and more by visiting the pattern on garnstudio.com. © 1982-2024 DROPS Design A/S. We reserve all rights. This document, including all its sub-sections, has copyrights. Read more about what you can do with our patterns at the bottom of each pattern on our site. |
||||||||||||||||


With over 40 years in knitting and crochet design, DROPS Design offers one of the most extensive collections of free patterns on the internet - translated to 17 languages. As of today we count 309 catalogues and 11518 patterns translated into English (UK/cm). 11518
We work hard to bring you the best knitting and crochet have to offer, inspiration and advice as well as great quality yarns at incredible prices! Would you like to use our patterns for other than personal use? You can read what you are allowed to do in the Copyright text at the bottom of all our patterns. Happy crafting!
Comments / Questions (86)
Ik bedoel de (enige) video die hieronder (op 26.04.2016) is geplaatst, exact het zelfde telpatroon als bij 139-7, maar naar mijn idee toch een heel ander patroon dan op de foto. Of zie ik het verkeerd?
25.04.2017 - 10:26Hallo, Bedankt voor de reactie, maar toch begrijp ik het nog niet. De "hulp-video" en de beschrijving 139-7 hebben hetzelfde telpatroon. Als ik het telpatroon van de beschrijving brei, krijg ik niet die mooie open steek van de foto, maar inderdaad het patroon van de "hulp-video". Hoe krijg ik dat "gatenpatroon"? Ik hoor het graag. M vr gr Bianca
24.04.2017 - 17:15DROPS Design answered:
Hallo Bianca, Kun je evt. een link geven van welke hulpvideo je gebruikt? Het is namelijk de bedoeling dat je het telpatroon gebruikt welke bij de beschrijving in het patroon staat. Dan krijg je wel het open kantpatroon. In de video's die bij het patroon staan, zijn alleen algemene instructies te vinden over hoe je meerdert en mindert etc, en er is geen specifieke video voor dit kantpatroon.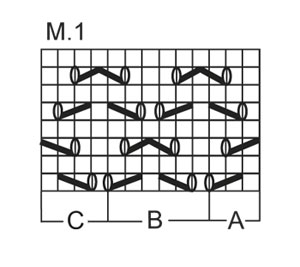
25.04.2017 - 09:00Wordt in het filmpje dat op 26.04.2016 is geplaatst dezelfde steek gebreid als die op de foto bij patroon 139-7? Het lijken 2 verschillende patronen.
21.04.2017 - 16:11DROPS Design answered:
Hallo Bianca, Bij de filmpjes die onderaan dit patroon geplaatst zijn is niet een filmpje specifiek voor dit patroon, maar wel voor de verschillende steken die in dit patroon gebruikt worden.
24.04.2017 - 16:00Hei! Jeg skal strikke forstykkene nå, men lurer på om jeg skal strikke hele diagrammet (8 rader) m1A før jeg fortsetter og "henter opp" neste m1B 2g, for å strikke disse hele diagrammet (8 rader)osv. Eller skal de kun strikkes en rad og tilbake, forsette på rad 3 og " hente opp" m1b 2g og så tilbake.. .
21.04.2017 - 14:34DROPS Design answered:
Hei Lisa, På den første rad med bruk av diagram på forstykket, skal du strikke M.1A først (3 masker) også fortløpende M.1B, antall ganger du trenger og dermed snu arbeidet og strikke tilbake. På neste rad - begynne med kantmaske og M.1A (3 masker) og M.1B tilbake, osv. Håper dette hjelper, Mvh, Deirdre
24.04.2017 - 10:55Kats wrote:
Hi, I have managed to work out the reverse pattern, now have full written out chart for further ones.
11.02.2017 - 16:13Kats wrote:
Hi, I am struggling on how to reverse the pattern for the right front, can you list the instructions for me. Thanks
10.02.2017 - 20:44DROPS Design answered:
Dear Kats, right front piece will be worked as left front piece, but short rows will start from WS and marker for armhole will be inserted on the left-hand side. Happy knitting!
13.02.2017 - 09:14Det er stadig de forkortede pinde på højre forstykke ( tænker mønstret gir sig selv når de forkortede pinde er strikket) Det skal lige siges at jeg har strikket rib stykket som på venstre, det ved jeg ikke om er korrekt.
12.01.2017 - 15:22DROPS Design answered:
Hej Mona. Du strikker höjre forstk fra retten, saa begynder du midt foran. Dvs, mönstret strikkes i spejlbillede i forhold til det venstre. Strik fra retten: M.1B, M.1A og 1 kantmaske i siden. Saa strikker du f.eks. den mindste, saa skal du vende fra vrangen: 1 kantm, M.1A 1 gang og M.1B 2 gange, vend og strik tilbage (retten). Osv.
08.03.2017 - 14:00Hej igen Kan i uddybe svaret lidt nærmere, da jeg syntes jeg har prøvet den måde og stadig ikke kan få det til at passe. sådan som jeg læser svaret vil højre forstykke strikkes fra c til a i diagrammet. eller har jeg misforstået det.
12.01.2017 - 06:24DROPS Design answered:
Hej Mona. Er det stadig de forkortede pinde eller er det nu hvordan du strikker diagrammerne paa höjre forst?
12.01.2017 - 14:44Hvordan strikker jeg de forkortede pinde på højre forstykke? Fra ret eller vrang siden? Syntes ikke jeg kan få det til at passe på nogen måde
26.12.2016 - 14:19DROPS Design answered:
Hej Mona. Du strikker de forkortede p fra siden (= retten paa venstre forstk), saa det vil blive fra vrangen paa de höjre forstk
30.12.2016 - 12:48Kan ikke diagrammet til at passe med 109 masker + 2 kantmasker efter jeg har skiftet fra ribstykket. Og hvordan strikkes pind 7 i diagrammet? kan i hjælpe, da jeg ikke helt forstår det som det er beskrevet i opskriften
20.08.2016 - 11:36DROPS Design answered:
Hej Mona. Jo, du strikker som fölger: 1 kantm, A.1 (= 3 m), A.1B 17 ganger (17 x 6 m = 102) og afslut med M.1C (= 4 m) og 1 kantmaske: 1+3+102+4+1 = 111 m. Du strikker p som fölger: 1 kantmaske, Saa A.1: 2 r, 1 kast (og nu gaar du automatisk over i M.1B) og strikker: ta 1 m løst av p som om den strikkes r, 2 r sammen, løft den løse m over, 1 kast, 3 r, 1 kast, ta 1 m løst av p som om den strikkes r, 2 r sammen, løft den løse m over, 1 kast osv. Dette gentages til du kommer til sidste gentagelse hvor du automatisk vil gaa over i M.1C, afslut med ta 1 m løst av p som om den strikkes r, 2 r sammen, løft den løse m over, 1 kast, 2 r og 1 kantmaske.
25.08.2016 - 15:58