
Beliebte Kategorien
Suchen Sie nach einem Garn?


Kommentare / Fragen (71)
![]() Josefine Fjordvald Lund hat geschrieben:
Josefine Fjordvald Lund hat geschrieben:
Kan man stadig følge diagrammet på A1 for indtagninger hvis man har 64 masker, altså det halve? Og hvis man har riv (1 ret, 1 vrang)? :-)
21.01.2020 - 15:29DROPS Design hat geantwortet:
Hej Josefine, ja det bør du kunne, men da med 1r,1vr istedet :)
30.01.2020 - 08:18
![]() Moa Holmberg hat geschrieben:
Moa Holmberg hat geschrieben:
Förstår inte vad ni menar med ”a.1 (=30 maskor), 2 avigmaskor*, upprepa *-* totalt 4ggr, vad exakt menar ni med?
20.01.2020 - 09:52DROPS Design hat geantwortet:
Hei Moa. Du strikket etter diagram * A.1 (som består av 30 masker), så strikker du 2 vrangmasker *, så gjentar du det som står mellom stjernene (*-*) 4 gagner totalt. Altså du strikker A.1+2 vrangmasker+A.1+ 2 vrangmasker+ A.1+ 2 vrangmasker+ A.1+ 2 vrangmasker. God Fornøyelse!
27.01.2020 - 13:24
![]() Carole hat geschrieben:
Carole hat geschrieben:
Après 20 cm de côtes, je ne comprends pas le tour suivant...=30 mailles, que dois-je répéter 4 fois. Est-ce que je suis le diagramme dès ce tour ?? Merci beaucoup
18.12.2019 - 22:20DROPS Design hat geantwortet:
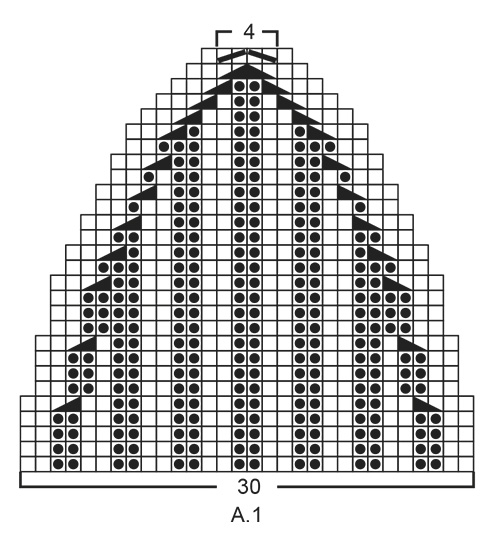
Bonjour Carole, vous tricotez maintenant le diagramme A.1 pour diminuer en haut du bonnet, tricotez ainsi *A.1 (= les 30 mailles du diagramme en commençant en bas à droite et en lisant vers la gauche tous les tours), 2 mailles envers*, répétez ces 32 mailles 4 fois au total (=4x32 = 128). A.1 montre comment diminuer (les diminutions commencent au 5ème tour). Bon tricot!
19.12.2019 - 07:57
![]() Ewa hat geschrieben:
Ewa hat geschrieben:
Hej! Jag förstår inte hur jag ska göra intagningarna. Har maskorna jämt fördelade på strumpstickor, dvs 32 m per sticka.
04.12.2019 - 20:53DROPS Design hat geantwortet:
Hej Ewa, når arbejdet måler 20 cm strikker du ifølge A.1, indtagningerne er tegnet ind på varv 5,9,13,osv i A.1. God fornøjelse!
05.12.2019 - 08:13
![]() Manon Bourassa hat geschrieben:
Manon Bourassa hat geschrieben:
I also have trouble with the first 4 rows of decreasing. On the second row, the pattern stars with one knit stitch than 2 purl stitches. When do you start counting the 30 stitches in order to decrease and purl 2 stitches together 4 times. A row by row explanation and count would be greatly appreciated.
18.11.2019 - 22:07DROPS Design hat geantwortet:
Dear Mrs Bourassa, start reading diagram from the bottom corner on the right side towards the left on every round = 30 sts starting and ending with K2. You will start to decrease on round 5 in A.1: K2, P2 twisted tog, work K over K and P over P and end each repeat with P2 tog, K2. See how to read knitting diagrams here. Happy knitting!
19.11.2019 - 09:09
![]() Irina hat geschrieben:
Irina hat geschrieben:
Hi, I dont understand your decreasing in U-831. In raw 6 in A.1 diagram you have 1 knit instead of 1 purl as it should be after decreasing 2P in raw 5.Your pattern shows as you knit 2 together not purl 2 together. Please help. Where the second knit stitch gone in raw 6??
01.11.2019 - 23:39DROPS Design hat geantwortet:
Hello Irina! On next row, after the decrease, you shift pattern by knitting 2 purl stitches and 1 knit stitch. DROPS Design patterns are only for inspiration, you can always do it differently! Happy knitting!
02.11.2019 - 21:31
![]() Asma hat geschrieben:
Asma hat geschrieben:
Bonjour, je ne suis pas sûre de bien comprendre, dois-je utiliser des aiguilles plus grosses? merci!
07.10.2019 - 19:23DROPS Design hat geantwortet:
Bonjour Asma, chacune tricote différemment et vous devez adapter la taille de vos aiguilles si besoin pour obtenir l'échantillon - plus d'infos sur l'échantillon ici. Bon tricot!
08.10.2019 - 09:56
![]() Asma hat geschrieben:
Asma hat geschrieben:
Bonjour, j'ai retrouvé 2 pelottes "drops lima" et j'ai commencé á tricoter le bonnet avec la petite aiguille circulaire 3,5, j'ai á peine tricoté 10 cm avec une seule pelotte... j'en déduis que les 2 pelottes me suffiront pour les 20 premiers centimètres du bonnet. pourtant karisma et lima on exactement la même quantité, ne vous êtes vous pas trompé dans la quantité? pouvez-vous m'expliquer, merci!
06.10.2019 - 19:01DROPS Design hat geantwortet:
Bonjour Asma, avez-vous bien le bon échantillon? soit 22 m x 30 rangs jersey ou 32 m x 30 rangs côtes = 10 x 10 cm? Ce bonnet a déjà été réalisé de nombreuses fois en Karisma ou en Lima, et 100 g suffisaient à chaque fois. Bon tricot!
07.10.2019 - 09:53
![]() Sandie Almond hat geschrieben:
Sandie Almond hat geschrieben:
Thank you for a very quick response. Just to clarify, I purl 2 together only on the fourth set of A1 within the round?
01.10.2019 - 15:51DROPS Design hat geantwortet:
Dear Mrs Almond, you P2 tog only when you work the last round in A.1 (when 4 sts are left after having worked this round) and these P2 together are worked between each A.1, ie on last round in A.1 work: *A.1 (= 6 sts decreased to 4), P2 tog*, repeat from *-* a total of 4 times in the round (= over all stitches). Happy knitting!
01.10.2019 - 17:22
![]() Sandie Almond hat geschrieben:
Sandie Almond hat geschrieben:
I don’t understand what the “round” is. Is it, 30 stitches plus purl 2 or, is a round 30 stitches , purl 2 times 4? I am at the stage where the hat is decreasing and the instructions say “at the same time” and reference purl 2 stitches together between each A1. Please can you help
01.10.2019 - 15:07DROPS Design hat geantwortet:
Dear Mrs Almond, on the first round in A.1 there are 128 stitches on the needle, you work these 128 sts as follows: *A.1 (= 30 sts), P2*, repeat these 32 sts a total of 4 times (4x32=128 sts). You will decrease in each A.1 in the round as shown in the diagram. When you work last round in A.1, decrease with P2 tog the P2 between each A.1. Happy knintting!
01.10.2019 - 15:36
|
|||||||||||||||||||
Eiken#eikenhat |
|||||||||||||||||||
 |
 |
||||||||||||||||||
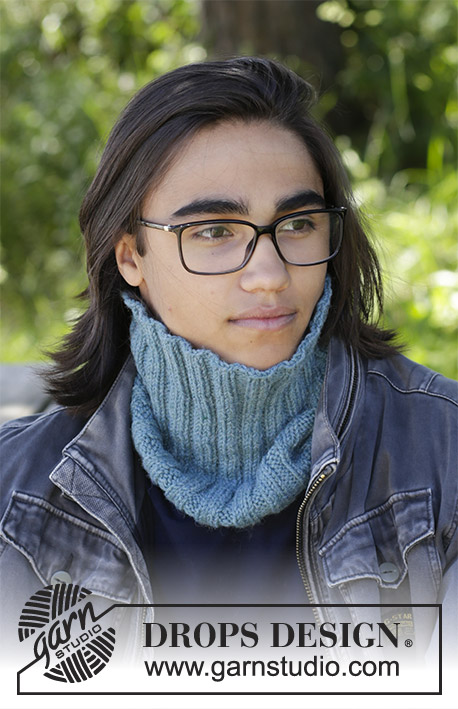
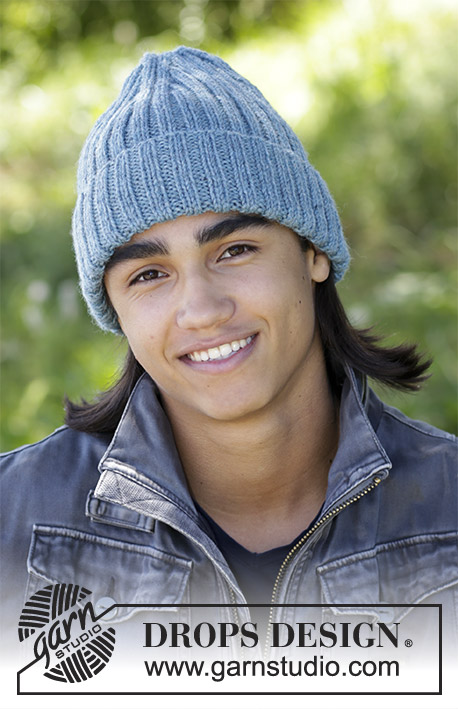
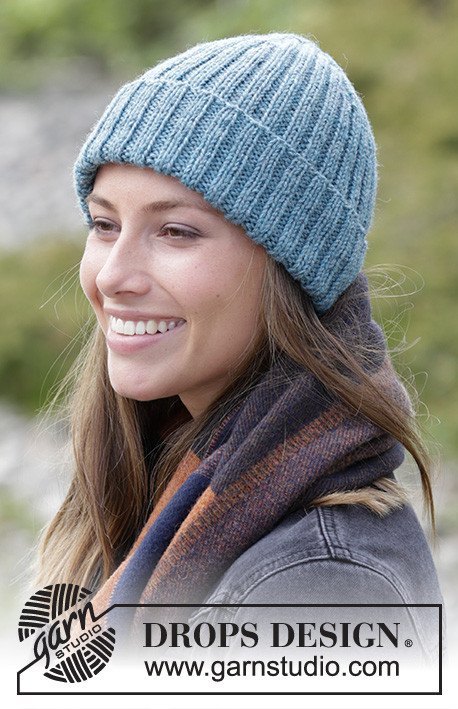
Gestrickte Mütze / Hipster - Mütze mit Rippenmuster. Die Arbeit wird gestrickt in DROPS Karisma.
DROPS 182-4 |
|||||||||||||||||||
|
HINWEISE ZUR ANLEITUNG: MUSTER: Siehe Diagramm A.1. ---------------------------------------------------------- MÜTZE: Die Arbeit wird in Runden auf der kurzen Rundnadel gestrickt, von unten nach oben. Im Laufe der Abnahmen zum Nadelspiel wechseln. 128 Maschen auf der kurzen Rundnadel Nr. 3,5 mit Karisma anschlagen. Im Rippenmuster stricken (= 2 Maschen rechts / 2 Maschen links), bis die Arbeit eine Länge von 20 cm hat. MASCHENPROBE BEACHTEN! Die nächste Runde wie folgt stricken: * A.1 (= 30 Maschen), 2 Maschen links *, von *-* insgesamt 4 x arbeiten. In dieser Weise weiterstricken und dabei wie in A.1 gezeigt abnehmen – GLEICHZEITIG in der letzten Runde von A.1 die 2 Links-Maschen zwischen jedem A.1 links zusammenstricken = 20 Maschen übrig. In der nächsten Runde stets 2 Maschen rechts zusammenstricken = 10 Maschen. Den Faden abschneiden, durch die restlichen Maschen fädeln, zusammenziehen und gut vernähen. Die Mütze hat eine Länge von ca. 29 cm von oben nach unten. Den unteren Rand ca. 5-7 cm umschlagen. |
|||||||||||||||||||
Erklärungen zum Diagramm |
|||||||||||||||||||
|
|||||||||||||||||||
 |
|||||||||||||||||||
Haben Sie diese Anleitung nachgearbeitet?Dann taggen Sie Ihre Fotos mit #dropspattern #eikenhat oder schicken Sie sie an die #dropsfan Galerie Brauchen Sie Hilfe bei dieser Anleitung?Sie finden 14 Videotutorials, einen Kommentar/Fragen-Bereich und vieles mehr, wenn sie die Anleitung bei garnstudio.com aufrufen. © 1982-2026 DROPS Design A/S. Wir besitzen alle Rechte. Dieses Dokument, einschließlich aller Untersektionen, hat Urheberrechte. Mehr dazu, was Sie mit unseren Anleitungen machen können, finden Sie ganz unten auf der Seite zu jeder Anleitung. |
|||||||||||||||||||


Mit über 40 Jahren Tätigkeit im Entwerfen von Strick- und Häkelmustern bietet Ihnen DROPS Design eine der umfangreichsten Sammlungen von kostenlosen Anleitungen im Internet - in 17 Sprachen übersetzt. Zum jetzigen Zeitpunkt haben wir insgesamt 324 Handarbeitshefte und 12245 Anleitungen auf Deutsch. 12157
Unser Ziel ist es, Ihnen die besten Angebote zum Stricken und Häkeln, Inspirationen und Ratschläge sowie qualitativ hochstehende Garne zu unglaublichen Preisen zu bieten! Möchten Sie unsere Anleitungen nicht nur für den persönlichen Gebrauch nutzen? Unsere Copyright Bedingungen finden Sie bei allen unseren Anleitungen ganz unten auf der jeweiligen Seite. Viel Spaß beim Handarbeiten!
Kommentieren Sie die Anleitung DROPS 182-4
Wir würden gerne Ihre Meinung zu diesem Modell erfahren!
Wenn Sie eine Frage stellen möchten, prüfen Sie bitte, dass Sie die richtige Kategorie im unten stehenden Formular gewählt haben - so bekommen Sie schneller eine Antwort. Die obligatorischen Felder sind mit einem * gekennzeichnet.