
Beliebte Kategorien
Suchen Sie nach einem Garn?


Kommentare / Fragen (46)
![]() Sarah LEBIGOT hat geschrieben:
Sarah LEBIGOT hat geschrieben:
Bonjour, Pour la seconde partie, il est indiqué de la faire en sens inverse et je ne comprend pas comment lire les diagrammes en sens inverse? Merci pour vos explications.
10.01.2017 - 00:11DROPS Design hat geantwortet:
Bonjour Mme Lebigot, la 2ème partie doit se faire en miroir, c'est-à-dire tricotez les diagrammes comme la 1ère partie, mais montez la maille de la fente de l'autre côté pour avoir 2 m point mousse en fin de rang sur l'endroit et plus en début de rang sur l'endroit. Bon tricot!
10.01.2017 - 09:47
![]() LeeAnn hat geschrieben:
LeeAnn hat geschrieben:
Ok this still did not help me please type out how to start the second piece where in the pattern chart is it started ????? Sorry to be such a pain but I have already ripped out second piece 3 times and am frustrated.
15.09.2016 - 16:43DROPS Design hat geantwortet:
Dear LeeAnn, work A.1,A.2, A.3 as on 1st piece, but after they have been worked 1 time in height, work A.4 and A.5 reversed, ie instead of working A.4, stocking st, A.5, work from RS on 2nd piece: A.5, stocking st and A.4. When piece measures 30 cm, cast on 1 st at the end of next row from RS (instead of from WS) an work this st in garter st. Hope this will help. Remember you can also get further individual assistance from the store where you bought your yarn. Happy knitting!
15.09.2016 - 17:25
![]() LeeAnn hat geschrieben:
LeeAnn hat geschrieben:
I am even more confused regarding so classy please read all my questions which basically the same except the last one being is the second piece starting with RS or WS. the answer I got was not answering my question but rather telling me how to do the second piece . there were 2 answers telling me how to do the second piece both different , so which one is correct lPease advise how to correctly do second piece and if I am starting the chart on the RS or the WS Thank you
15.09.2016 - 15:14DROPS Design hat geantwortet:
Dear LeeAnn, you are right, sorry for very first answer, at the beg of 2nd piece, work as first piece, but then work reversed all inc/moss sts so that both pieces will be mirrored. Read diagram from the bottom corner on the right side towards the left from RS and from the left towards the right from WS, ie as on 1st piece. Happy knitting!
15.09.2016 - 16:12
![]() LeeAnn hat geschrieben:
LeeAnn hat geschrieben:
I am making the So classy poncho, and I know the second piece is worked in reverse, does that also mean I will be starting the chart with the wrong side of the garment?
15.09.2016 - 03:19DROPS Design hat geantwortet:
Dear LeeAnn, on 2nd piece work diagrams A.1-A.3 as for 1st piece, but when you work A.4 and A.5, work A.5 over the first 10 sts, stocking st and finish with A.4. Then cast on 1 st at the end of row from RS (instead of at the end of row from WS). Then work A.1,A.2 and A.3 with 1 st in garter st at the beg of row and 2 sts in garter st at the end of row. Happy knitting!
15.09.2016 - 08:59
![]() LeeAnn hat geschrieben:
LeeAnn hat geschrieben:
I am confused for the second piece of the poncho, the pattern says Cast on and work the same way but reversed. So where am I starting and what is meant by reversed? Thank You.
01.09.2016 - 04:38DROPS Design hat geantwortet:
Dear LeeAnn, when working reversed you will work 2nd piece as follows from RS: 1 edge st, A.3, repeat A.2, A.1 and 1 edge st - then when casting on 1 st when piece measures 30, cast on at the end of a row from RS (instead of from WS). Happy knitting!
01.09.2016 - 10:01
![]() Yuliya hat geschrieben:
Yuliya hat geschrieben:
Thank you so much for the wonderful pattern!! The yarn was so light with heavenly texture. When ordering yarn from you for size in S-M to be on the safe side I ordered 50 gr more than you recommended. But actually used only 250gr for the whole Poncho, 50gr less was suggested. Yay!!!! It's so-so soft and Weat - such a lovely natural color. Love it!
20.06.2016 - 05:29
![]() Claudia hat geschrieben:
Claudia hat geschrieben:
I am a bit confused about beginning this pattern, is row 1 and 2 knitted to make the edge or does it start with the A1 and A2 combination. Also A1 =5 stitch and A2 is 8 therefore if cast on 107 I cannot have 12 times A1 and A2 in the width since (5+8) x 12 =156. Is that correct?
30.05.2016 - 03:02DROPS Design hat geantwortet:
Dear Claudia, you work on 1st round diagrams A.1, A.2 and A.3 with 1 edge st in garter st, ie in size M: 1 edge st, A.1 1 time in width (= 5 sts), repeat A.2 a total of 12 times in width (= 12 x 8 sts), A.3 1 time in width (= 4 sts) and 1 edge st in garter st = 107 sts. Happy knitting!
30.05.2016 - 10:32
![]() Tonje hat geschrieben:
Tonje hat geschrieben:
Da forstår jeg ikke når A2 og A3 skal strikkes?
14.03.2016 - 15:20DROPS Design hat geantwortet:
Hej Tonje, jo du strikker A1 en gang i bredden, A2 11-12-13-14 ganger i bredden og sidst A3 en gang i bredden. Spørg gerne hos din lokale DROPS forhandler hvis du har købt garnet der. God fornøjelse!
15.03.2016 - 15:52
![]() Tora hat geschrieben:
Tora hat geschrieben:
1+5+(11x8)+4+1=99.
14.03.2016 - 13:14
![]() Tonje hat geschrieben:
Tonje hat geschrieben:
Jeg får ikke mønsteret til å stemme med forklaring. A1 og A2 er til sammen 13 masker. Det står at dette skal strikkes 11 ganger i bredden, men det går altså ikke opp når man i utgangspunktet har 99 masker. Hva er det jeg gjør feil her eller ikke forstår?
14.03.2016 - 12:24DROPS Design hat geantwortet:
Hej. Det är kun A.2 som du stickar 11 gånger på bredden (A.1 stickas 1 gång). Lycka till!
14.03.2016 - 13:44
|
||||||||||||||||||||||
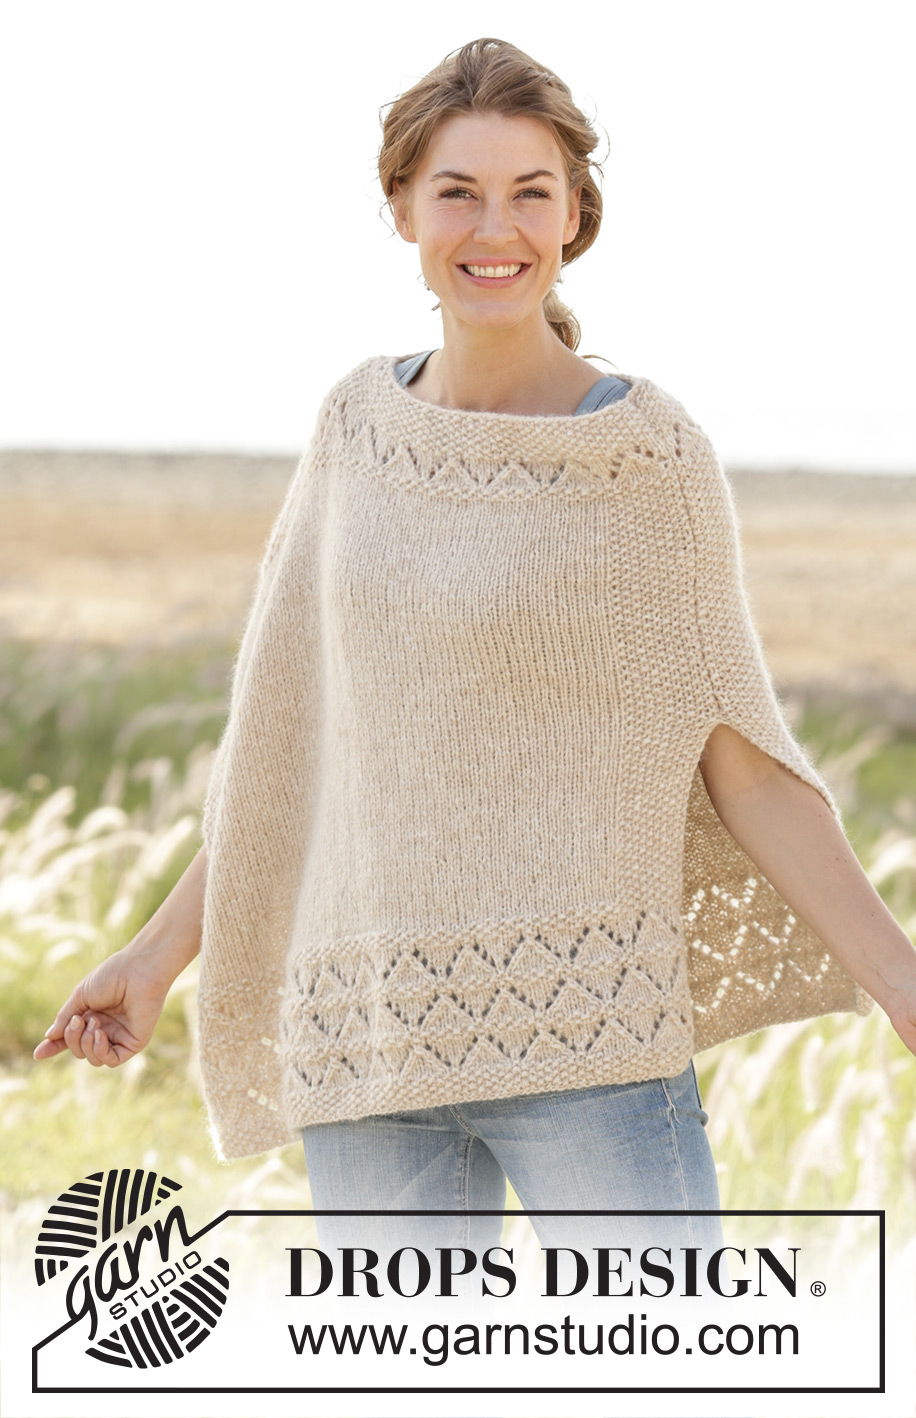
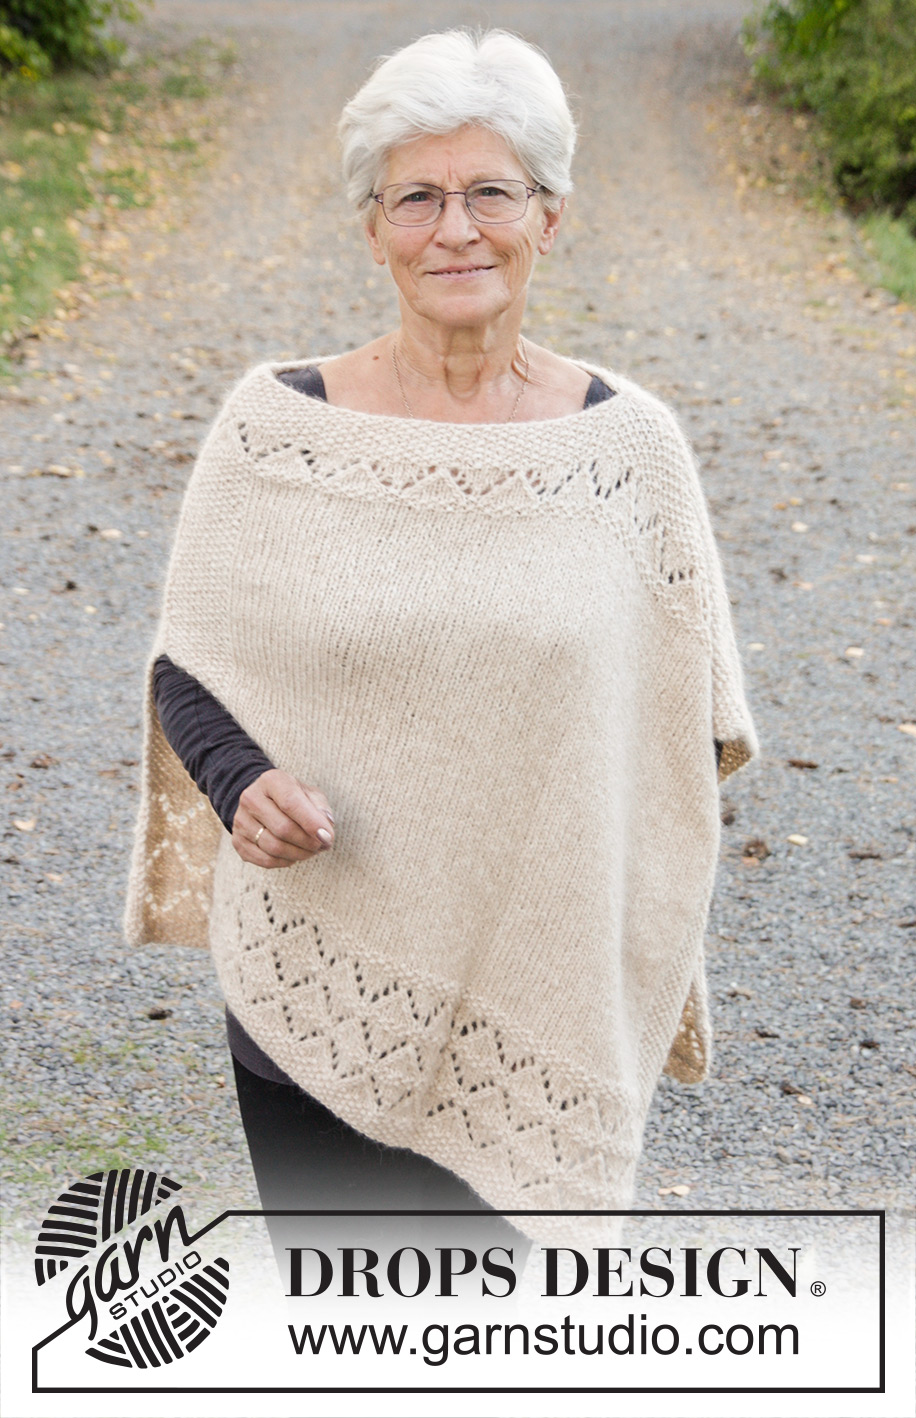
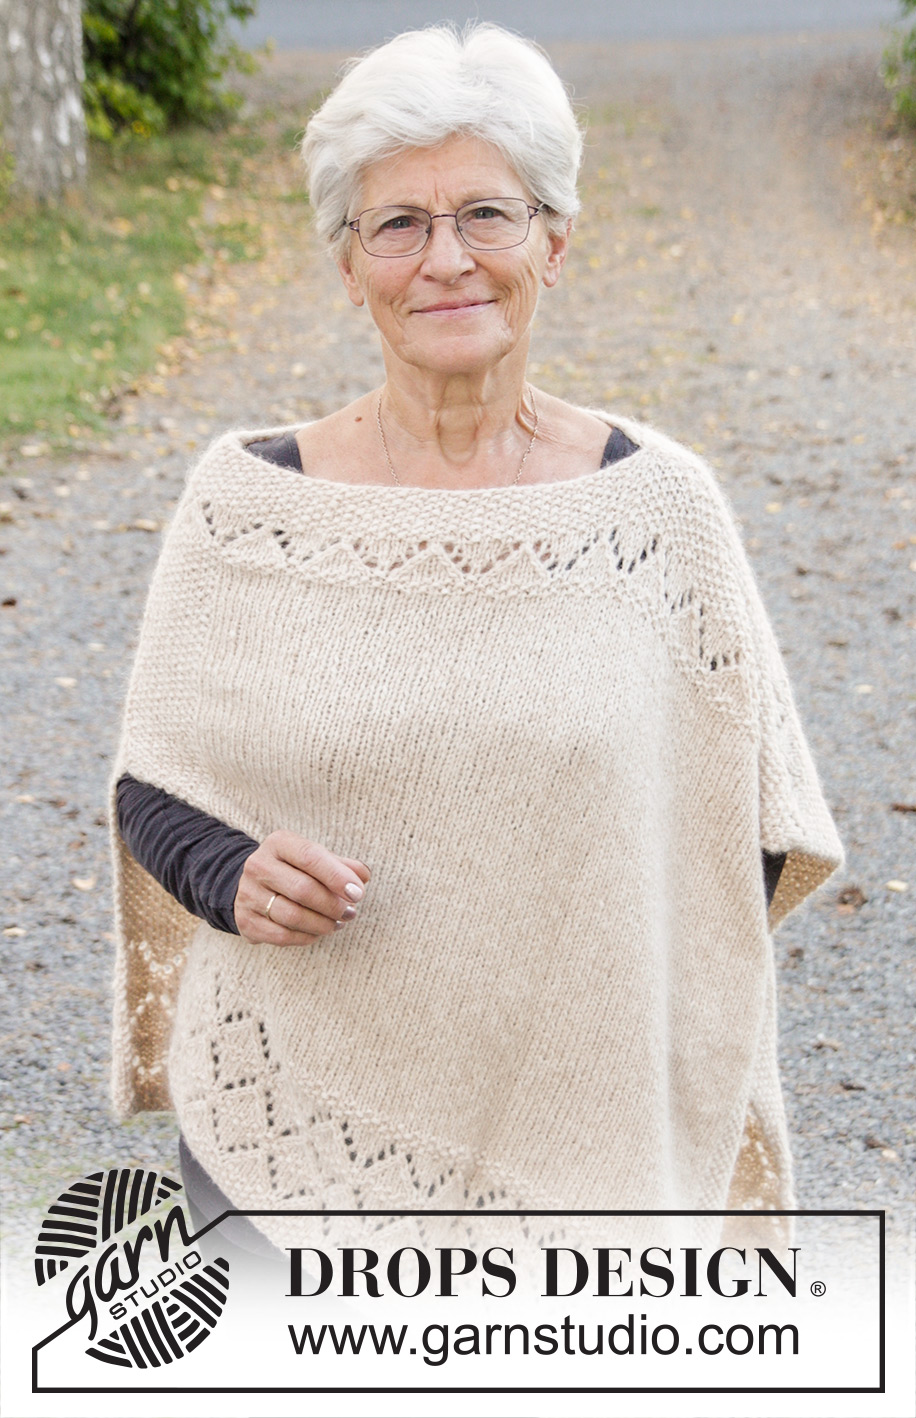
So Classy!#soclassyponcho |
||||||||||||||||||||||
 |
 |
|||||||||||||||||||||
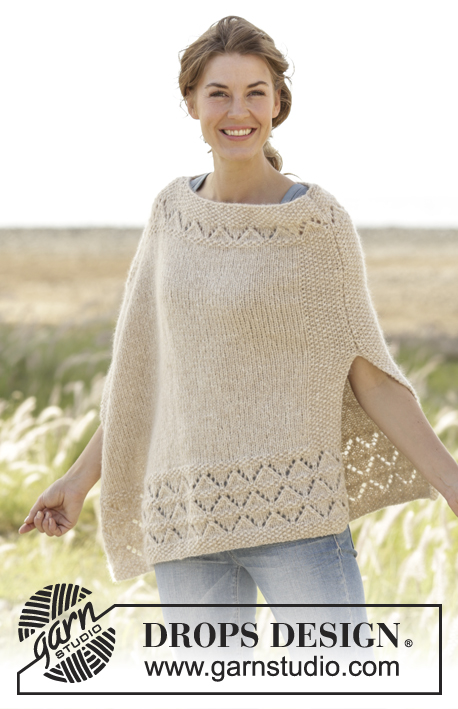
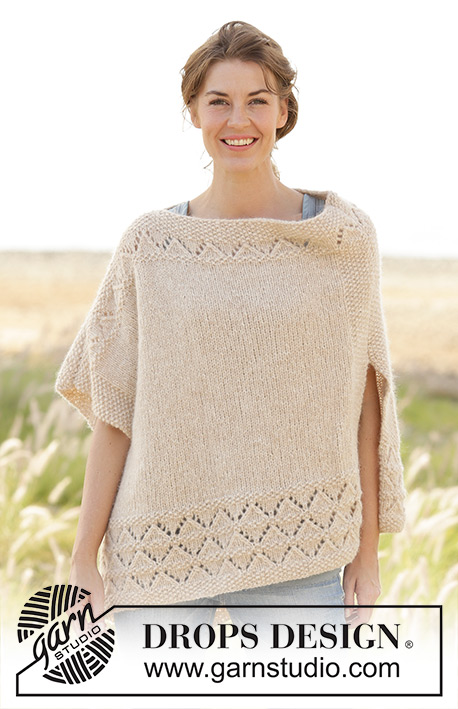
Gestrickter DROPS Poncho in ”Air” mit Lochmuster und Perlmuster. Größe S - XXXL.
DROPS 170-28 |
||||||||||||||||||||||
|
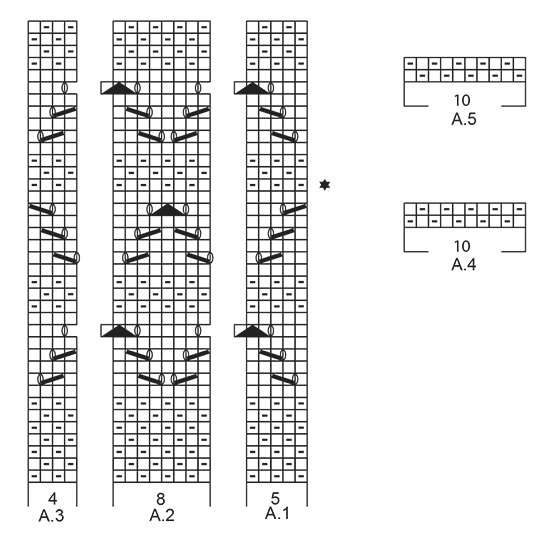
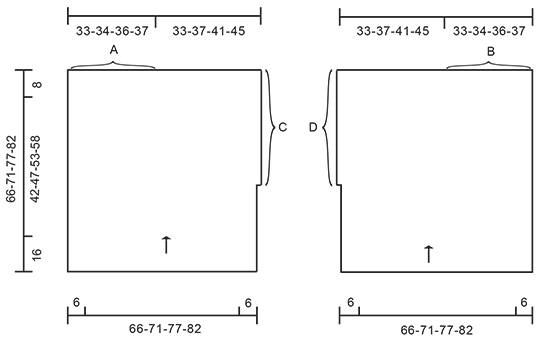
KRAUS RECHTS (in Hin- und Rück-R): Jede R re str. 1 Krausrippe = 2 R kraus re = 2 R re. MUSTER: Siehe Diagramme A.1 bis A.5. Die Diagramme zeigen alle Hin- und Rück-R, Hin-R werden von rechts nach links, Rück-R von links nach rechts gelesen. ---------------------------------------------------------- PONCHO: Die Arb wird in Hin- und Rück-R auf der Rundnadel gestr, in 2 Teilen, die anschließend zusgenäht werden. 99-107-115-123 M (einschl. je 1 Rand-M kraus re beidseitig) auf Rundnadel Nr. 6 mit Air anschlagen. Im Muster wie folgt str: 1 Rand-M KRAUS RECHTS (siehe oben), Muster A.1 (= 5 M) 1 x, Muster A.2 (= 8 M) 11-12-13-14 x in der Breite, A.3 (= 4 M) 1 x, 1 Rand-M kraus re. BITTE BEACHTEN: Die Rand-M wird beidseitig bis zum fertigen Maß kraus re gestr und wird später ein Teil des Perlmusters (= A.4 und A.5). MASCHENPROBE BEACHTEN! Wenn A.1 bis A.3 1 x in der Höhe gestr wurden, wie folgt ab der Hin-R im Muster weiterstr: A.4 (BITTE BEACHTEN: die 1. M im Diagramm = Rand-M!), 79-87-95-103 M glatt re, A.5 über die letzten 10 M (BITTE BEACHTEN: Letzte M im Diagramm = Rand-M!). In dieser Weise weiterarb, bis die Arb eine Gesamtlänge von 30 cm ab dem Anschlagrand hat. Am Ende der nächsten Rück-R 1 neue M anschlagen (kennzeichnet den Schlitz) = 100-108-116-124 M. Die neue M kraus re str. D.h. nun sind am Anfang der Hin-R 2 M kraus re vorhanden! Bei einer Gesamtlänge von 58-63-69-74 cm im Muster mit Beginn ab der mit dem Stern gekennzeichneten R wie folgt str: 2 M kraus re, A.1 1 x, A.2 11-12-13-14 x in der Breite, A.3 1 x, 1 Rand-M kraus re. Wenn die Diagramme in der Höhe zu Ende gestr wurden, die letzten 2 R der Diagramme wdh, bis die Arb eine Gesamtlänge von 66-71-77-82 cm hat. Die M abketten, wie sie erscheinen, d.h. re M re und li M li abketten. Den 2. Teil ebenso str, jedoch gegengleich. FERTIGSTELLEN: Siehe Maßskizze! Naht A + B im Maschenstich schließen. Dann Naht C + D am äußeren M-Glied der äußersten M schließen. Es besteht nun ein Schlitz von 30 cm an der einen Seite und ein Schlitz über die ganze Länge an der anderen Seite des Ponchos. Die Fäden vernähen. |
||||||||||||||||||||||
Erklärungen zum Diagramm |
||||||||||||||||||||||
|
||||||||||||||||||||||
 |
||||||||||||||||||||||
 |
||||||||||||||||||||||
Haben Sie diese Anleitung nachgearbeitet?Dann taggen Sie Ihre Fotos mit #dropspattern #soclassyponcho oder schicken Sie sie an die #dropsfan Galerie Brauchen Sie Hilfe bei dieser Anleitung?Sie finden 20 Videotutorials, einen Kommentar/Fragen-Bereich und vieles mehr, wenn sie die Anleitung bei garnstudio.com aufrufen. © 1982-2026 DROPS Design A/S. Wir besitzen alle Rechte. Dieses Dokument, einschließlich aller Untersektionen, hat Urheberrechte. Mehr dazu, was Sie mit unseren Anleitungen machen können, finden Sie ganz unten auf der Seite zu jeder Anleitung. |
||||||||||||||||||||||


Mit über 40 Jahren Tätigkeit im Entwerfen von Strick- und Häkelmustern bietet Ihnen DROPS Design eine der umfangreichsten Sammlungen von kostenlosen Anleitungen im Internet - in 17 Sprachen übersetzt. Zum jetzigen Zeitpunkt haben wir insgesamt 324 Handarbeitshefte und 12291 Anleitungen auf Deutsch. 12203
Unser Ziel ist es, Ihnen die besten Angebote zum Stricken und Häkeln, Inspirationen und Ratschläge sowie qualitativ hochstehende Garne zu unglaublichen Preisen zu bieten! Möchten Sie unsere Anleitungen nicht nur für den persönlichen Gebrauch nutzen? Unsere Copyright Bedingungen finden Sie bei allen unseren Anleitungen ganz unten auf der jeweiligen Seite. Viel Spaß beim Handarbeiten!
Kommentieren Sie die Anleitung DROPS 170-28
Wir würden gerne Ihre Meinung zu diesem Modell erfahren!
Wenn Sie eine Frage stellen möchten, prüfen Sie bitte, dass Sie die richtige Kategorie im unten stehenden Formular gewählt haben - so bekommen Sie schneller eine Antwort. Die obligatorischen Felder sind mit einem * gekennzeichnet.