
Beliebte Kategorien
Suchen Sie nach einem Garn?


Kommentare / Fragen (119)
![]() Carol Cooley hat geschrieben:
Carol Cooley hat geschrieben:
Thank for your helpful comments. Naturally I would consider ordering from yourselves as you make it very easy to find a substitute. I cannot say the same about Captcha which is always a struggle, with blurred small images and often using items a non-USA person would not necessarily recognize. At my time of life anything to m ake life easier helps. Have a nice day. Is that last image a store front or garage?
26.05.2019 - 09:01
![]() Carol Cooley hat geschrieben:
Carol Cooley hat geschrieben:
Is there either another similar pattern or has this one being rewritten please? *Cassie by DROPS Design Knitted DROPS bolero with lace pattern in ”Big Merino”. Size: S - XXXL* I use mainly acrylic as wool can irritate, alpaca-etc are ok. Any low cost substitutes for wool are welcomed for a practice piece. Maybe garter and st.st to start off then go ahead for lace. Thank you.
14.05.2019 - 13:29DROPS Design hat geantwortet:
Dear Carol, you can find many patterns for bloeros on our site with the search word "bolero". https://www.garnstudio.com/search.php?action=search&w=bolero&c=0&k=0&y=0&lang=en You have to understand that these patterns are written to suppoirt DROPS yarns, we cannot make alterations or suggestions for other yarns, sorry. Happy Crafting!
25.05.2019 - 10:27
![]() Pam hat geschrieben:
Pam hat geschrieben:
I'm having trouble with row 15 could you please write it in full for me
10.05.2019 - 20:07DROPS Design hat geantwortet:
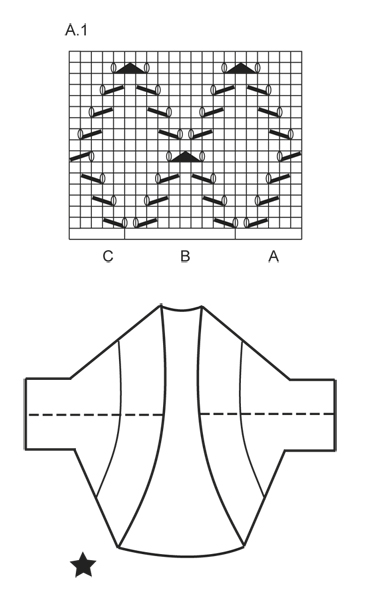
Hi Pam, Row 15 reading from right to left, so from the right side, - K4, 1 yarn over, slip 1 stitch, knit 2 together and pass the slipped stitch over the knitted together stitches, 1 yarn over, K7, 1 yarn over, slip 1 stitch, K2 together and pass the slipped stitch over the knitted together stitches, 1 yarn over and finally K4. Happy knitting!
11.05.2019 - 11:47
![]() Ava Goei-Vujovich hat geschrieben:
Ava Goei-Vujovich hat geschrieben:
I have tried a sample swatch: using 21 stitches and interpreting A1. Its a total of 21 stitches but using your explanation above: first row in A: K3, K2 tog, YO - then B: YO, slip 1 as if to K, K1, psso, K5, K2 tog, YO, K1, and C: YO, slip 1 as if to K, K1, psso, K3. I end up with 23 sts and not 21 sts
07.03.2019 - 12:40DROPS Design hat geantwortet:
Dear Mrs Goei-Vujovich, on first row A.1A is worked as follows: K3, K2 tog, YO, K1 (= 6 sts), then work B over the next 10 sts: YO, slip 1 as if to K, K1, psso, K5, K2 tog, YO, K1, then work C: YO, slip 1 as if to K, K1, psso, K3 (= 5 sts) = 21 sts in total. You can insert a marker between each repeat to make sure you always get the correct number of sts in each part of the diagram. Happy knitting!
07.03.2019 - 14:19
![]() Ava Goei-Vujovich hat geschrieben:
Ava Goei-Vujovich hat geschrieben:
I don't understand why a K1 is added at the end of section B - there isn't a K1 added at the end of section A if I am to read the diagram explanation as shown in A1 Row 1. I understand B is a 10 sts repeat: *YO, slip 1 as if to K, K1, psso, K5, K2 tog, YO, K1*, repeat from *-*.
07.03.2019 - 12:35
![]() Ava Goei-Vujovich hat geschrieben:
Ava Goei-Vujovich hat geschrieben:
First row in A: K3, K2 tog, YO = 6sts. then B: YO, slip 1 as if to K, K1, psso, K5, K2 tog, YO, K1 = 12 sts (repeat B), and work C: YO, slip 1 as if to K, K1, psso, K3 = 5sts. B should only be multiples of 10, not 12.
07.03.2019 - 11:35DROPS Design hat geantwortet:
Dear Mrs Goei-Vujovich, when working B you decrease 1 stitch 2 times (slip 1, K1, psso + K2 tog) and increase with 2 YOs = number of sts is the same = 10 sts. See previous answer for whole repeats on the row. Happy knititng!
07.03.2019 - 12:19
![]() Ava Goei-Vujovich hat geschrieben:
Ava Goei-Vujovich hat geschrieben:
I believe your reply at 9:43 is incorrect. I have just tried in in a total of 21 stitches for a A,B,C section. It makes the entire section of section B : 12 stitches for a standard repeat when it should be 10! Standard repeat of 10 stitches and section C is 5.
07.03.2019 - 11:27DROPS Design hat geantwortet:
Dear Mrs Goei-Vujovich, B is a 10 sts repeat: *YO, slip 1 as if to K, K1, psso, K5, K2 tog, YO, K1*, repeat from *-*. And you will work: 3 sts in garter st, A.1A (= 6 sts), repeat A.1B a total of 9-10-11-12 times (= over the 90-100-110-112 next sts), work A.1C (= 5 sts) and finish with 3 sts in garter st. Happy knitting!
07.03.2019 - 12:18
![]() Ava Goei-Vujovich hat geschrieben:
Ava Goei-Vujovich hat geschrieben:
In section B, row 1, I start off with a *1 YO, sl1, K1, psso, k5, k2tog, 2 YO*, and then repeat from* to * for the next 90-100-etc stitches, until the last 5 stitches of that row?
07.03.2019 - 06:16DROPS Design hat geantwortet:
Hi Ava, You are right, apart from at the end of the sequence it is 1 YO, K1, 1 YO, not 2 YOs. This sequence is repeated until the last 8 stitches, finishing with A.1 C (5 stitches) and 3 stitches in garter stitch. Happy knitting!
07.03.2019 - 08:06
![]() Ava Goei-Vujovich hat geschrieben:
Ava Goei-Vujovich hat geschrieben:
Agree not a well worded pattern & diagram explanations. In section A, I K2tog (4 & 5th stitch together), then immediately following: do I do 2 times YO followed by a sl1, K1, psso?
07.03.2019 - 06:07DROPS Design hat geantwortet:
Dear Mrs Goei-Vujovich, on first row in A.1, work A.1A as follows: K3, K2 tog, YO - then work B: YO, slip 1 as if to K, K1, psso, K5, K2 tog, YO, K1 (repeat B), and work C: YO, slip 1 as if to K, K1, psso, K3. On row 15, work the last 2 sts in A tog with the next st in B, then work the last 2 sts in B with next st in next B / in C. Happy knitting!
07.03.2019 - 09:43
![]() Marcia Ebert hat geschrieben:
Marcia Ebert hat geschrieben:
I have started knitting this pattern and realize that there are directions for knitting the RS but not for wrong side. Is this done in stockinette stitch except for pattern stitches? Garter stitch is the border stitches but what do you do on the wrong side in the middle. It looks like every other row of the pattern stitch on the diagram is plain so is it purl on the wrong side. Is this correct?
21.01.2019 - 04:51DROPS Design hat geantwortet:
Hi Marcia, All the rows in the diagram show the stitches from the right side, so between the lace pattern you work stocking stitch (knit from the right side and purl from the wrong side). Happy knitting!
21.01.2019 - 07:01
|
|||||||||||||||||||
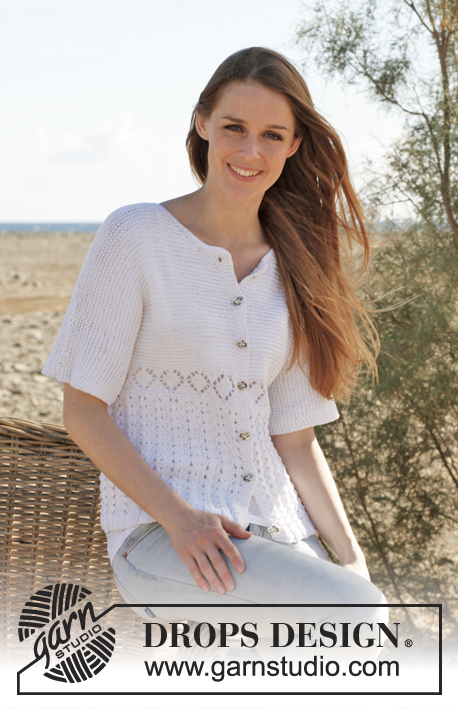
Cassie#cassiebolero |
|||||||||||||||||||
 |
 |
||||||||||||||||||
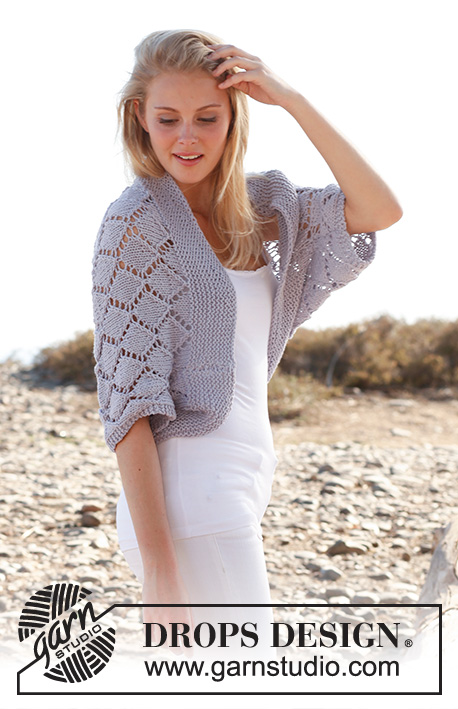
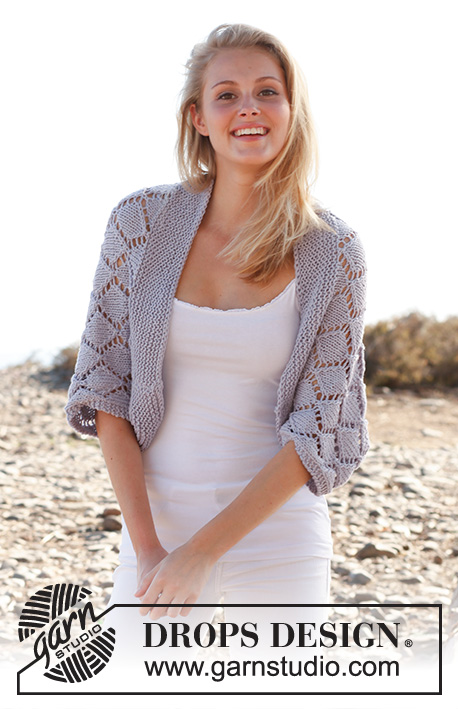
Gestrickter DROPS Bolero in „Big Merino“ mit Lochmuster. Größe S - XXXL.
DROPS 146-16 |
|||||||||||||||||||
|
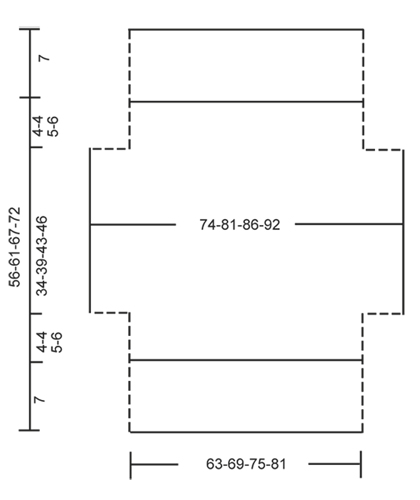
KRAUS RECHTS (in Hin- und Rückreihen gestrickt): 1 Krausrippe = 2 R re MUSTER: Siehe Diagramm A.1 – Das Diagramm zeigt alle R., wie sie auf der Vorderseite erscheinen. --------------------------------------------------------- BOLERO: Die Arbeit wird auf einer Rundnadel in Hin- und Rückreihen gestrickt. 107-117-127-137 M auf Rundnadel 5 anschlagen und 7 cm kraus re stricken. Dann wie folgt weiterstricken (Hin-R): 3 M kraus re - siehe oben, A.1A (= 6 M), A.1 B über die nächsten 90-100-110-120 M, schließen mit A.1 C (= 5 M) und 3 M kraus re. Weiter mit A.1 und 3 M kraus re auf jeder Seite. BEACHTEN SIE DIE MASCHENPROBE! Nach 11-11-12-13 cm am Ende der nächsten 2 Reihen für die ÄRMEL je 10 M anschlagen = 127-137-147-157 M. Dann wie folgt stricken: 3 M kraus re, A.1A (= 6 M), A.1 B über die nächsten 110-120-130-140 M, schließen mit A.1 C (= 5 M) und 3 M kraus re. Achten Sie darauf, dass das Muster A.1 nicht verrutscht (muss mit dem Muster vor den Ärmelaufnahmen übereinstimmen). Nach 45-50-55-59 cm am Anfang der nächsten beiden Reihen je 10 M abk = 107-117-127-137 M und wie folgt stricken: 3 M kraus re, A.1A (= 6 M), A.1 B über die nächsten 90-100-110-120 M, schließen mit A.1 C (= 5 M) und 3 M kraus re. Nach 49-54-60-65 cm kraus re über alle M stricken und nach 56-61-67-72 cm abk. FERTIGSTELLEN: Die Seiten- und Unterarmnaht in einem knappkantig zusammennähen – siehe gestrichelte Linie in der Skizze. |
|||||||||||||||||||
Erklärungen zum Diagramm |
|||||||||||||||||||
|
|||||||||||||||||||
 |
|||||||||||||||||||
 |
|||||||||||||||||||
Haben Sie diese Anleitung nachgearbeitet?Dann taggen Sie Ihre Fotos mit #dropspattern #cassiebolero oder schicken Sie sie an die #dropsfan Galerie Brauchen Sie Hilfe bei dieser Anleitung?Sie finden 15 Videotutorials, einen Kommentar/Fragen-Bereich und vieles mehr, wenn sie die Anleitung bei garnstudio.com aufrufen. © 1982-2026 DROPS Design A/S. Wir besitzen alle Rechte. Dieses Dokument, einschließlich aller Untersektionen, hat Urheberrechte. Mehr dazu, was Sie mit unseren Anleitungen machen können, finden Sie ganz unten auf der Seite zu jeder Anleitung. |
|||||||||||||||||||


Mit über 40 Jahren Tätigkeit im Entwerfen von Strick- und Häkelmustern bietet Ihnen DROPS Design eine der umfangreichsten Sammlungen von kostenlosen Anleitungen im Internet - in 17 Sprachen übersetzt. Zum jetzigen Zeitpunkt haben wir insgesamt 324 Handarbeitshefte und 12285 Anleitungen auf Deutsch. 12197
Unser Ziel ist es, Ihnen die besten Angebote zum Stricken und Häkeln, Inspirationen und Ratschläge sowie qualitativ hochstehende Garne zu unglaublichen Preisen zu bieten! Möchten Sie unsere Anleitungen nicht nur für den persönlichen Gebrauch nutzen? Unsere Copyright Bedingungen finden Sie bei allen unseren Anleitungen ganz unten auf der jeweiligen Seite. Viel Spaß beim Handarbeiten!
Kommentieren Sie die Anleitung DROPS 146-16
Wir würden gerne Ihre Meinung zu diesem Modell erfahren!
Wenn Sie eine Frage stellen möchten, prüfen Sie bitte, dass Sie die richtige Kategorie im unten stehenden Formular gewählt haben - so bekommen Sie schneller eine Antwort. Die obligatorischen Felder sind mit einem * gekennzeichnet.