
Beliebte Kategorien
Suchen Sie nach einem Garn?


Kommentare / Fragen (9)
![]() Sally Ann hat geschrieben:
Sally Ann hat geschrieben:
Kan ikke forstå i siger kanterne i perlestrik,når jeg forstørrer billedet, ser det ud som glatstrik på kanterne?
15.04.2026 - 11:54
![]() Roz Sherris hat geschrieben:
Roz Sherris hat geschrieben:
Thanks very much for your reply - I understand better now. But it means that 3 stitches are worked then moved to holder/thread at the beginning of EVERY row, not 'every 2nd row' as the pattern currently states.
24.05.2024 - 17:33DROPS Design hat geantwortet:
Dear Mrs Sherris, slipping stitches at the beginning of the row on each side is the same as slipping stitches one every other row on each side, just a different way to say this, but same effect. Happy knitting!
27.05.2024 - 09:11
![]() Roz Sherris hat geschrieben:
Roz Sherris hat geschrieben:
Hello Drops. Lovely pattern but don't understand this: "Then put sts on the holder for sleeve caps every 2nd row: 3 (3) sts 8 (12) times, 5 (3) sts 2 (1) times. " Do I add 3 stitches at BOTH ends of every second row to the holder with the 6 stitches around the marker? My holders only open at one end. I can't visualise it nor find a diagram or video to help me. Thanks!
24.05.2024 - 14:43DROPS Design hat geantwortet:
Dear Sherris, so that the sleeve cap is symmetrical you should add the same number of stitches on the thread on each side, ie at the beg of each row, work the first 3 stitches from right side and place them on a stitch holder/thread (it can be the same as the one with the middle 6 sts mid under sleeve) then continue row as before, turn work the first 3 stitches from wrong side on a stitch holder/thread then continue row as before, turn, repeat these 2 rows a total of 8 or 12 times, then repeat with 5 sts in first size a total of 2 times and 1 more time with 3 sts on each side in the 2nd size. Now work 2 cm reverse stocking stitch for 2 cm. Happy knitting!
24.05.2024 - 16:04
![]() Andreea hat geschrieben:
Andreea hat geschrieben:
Hi,please tell me if the whole sweater is worked in seed stitch or only the 2 cm from the beginning and then continue in stockinette stitch. Thank you.
25.03.2024 - 12:20DROPS Design hat geantwortet:
Dear Andrea, only the edging is knitted with seed stitch, the stranded pattern is knitted with stocking stitch. I hope this helps. Happy Knitting!
26.03.2024 - 22:15
![]() Sue hat geschrieben:
Sue hat geschrieben:
Hi. I have purchased the yarn and ready to start this lovely pattern. However I haven’t done steeking before and wondered how I can adapt it so I don’t have to. Hope you can help Thank you
14.07.2023 - 13:35DROPS Design hat geantwortet:
Hi Sue, if you don’t want to steek, you will have to knit all pieces (2 fronts, back and both sleeves) separately, adding 1 stitch from each side for seems. All the patterns will be worked in flat (how we do that see HERE). If you knit in a continental way, see HERE. If your yarn is not too smooth and slippery, steeking is not so difficult. If you decide to do steeking, please see our video HERE. Happy knitting!
15.07.2023 - 15:45
![]() Jenny hat geschrieben:
Jenny hat geschrieben:
Kate had a question about the 2nd line of the pattern which states to knit 7.5" of seed stitch. You said this was incorrect and the pattern would be corrected. That was in 2017 and I recently downloaded the pattern and the error has not been corrected. Regards.
06.08.2022 - 15:21DROPS Design hat geantwortet:
Dear Jenny, thanks for your feedback UK pattern has now been edited, US pattern should be edited soon. Happy knitting!
08.08.2022 - 08:16
![]() Monica hat geschrieben:
Monica hat geschrieben:
Ik vroeg me af hoeveel mm de knopen zijn, want helaas is dit nummer knoop nergens meer te koop.
30.05.2022 - 16:15DROPS Design hat geantwortet:
Dag Monica,
Eerlijk gezegd weet ik niet wat de diameter van de knopen zijn. Het is vaak het handigst om met je kledingstuk naar een verkooppunt te gaan er daar knopen bij te zoeken die door de gaatjes passen.
04.06.2022 - 21:45
![]() Francoise Decourt hat geschrieben:
Francoise Decourt hat geschrieben:
Bonjour je suis au niveau encolure a 36 cm de hauteur totale je diminue les 11mailles centrales soit 3 de chaque cote des 5 mailles steek. Ma question : dois je continuer en rang aller retour ensuite et dans ce cas continuer le jacquard sur les rangs envers ce qui est complexe ou me suis je trmpee dans l'interpretation du modele Merci pour votre reponse - desolee pour l accentuation mais impossible poster cette question avec accentuation depuis hier
02.02.2019 - 09:23DROPS Design hat geantwortet:
Bonjour Mme Decourt, effectivement, après avoir rabattu les mailles de l'encolure, vous continuez en allers et retours à partir de l'encolure, sur l'envers, lisez les diagrammes de gauche à droite, en commençant bien à la maille par laquelle vous avez terminé sur l'endroit pour que le motif tombe juste. Bon tricot!
04.02.2019 - 11:00
![]() Kate hat geschrieben:
Kate hat geschrieben:
When I made this years ago, but adjusted the pattern so I did not use a steek. It is one of my favorite sweaters. But in the 2d line of the instructions for the body. But neither the photo (nor my first jacket) shows a seed stitch or 7" in white before Pattern 1 starts. Instead, it looks like a border of no more than a few inches at most. I must be missing something! Please advise.
26.07.2017 - 22:01DROPS Design hat geantwortet:
Dear Kate, you are correct, you should work the seed stitch edge for only 2 cm (= approx. 0.79 inch). Correction will be made. Thank you. Happy knitting!
27.07.2017 - 09:12
|
|||||||
DROPS 50-14 |
|||||||
|
|
|||||||
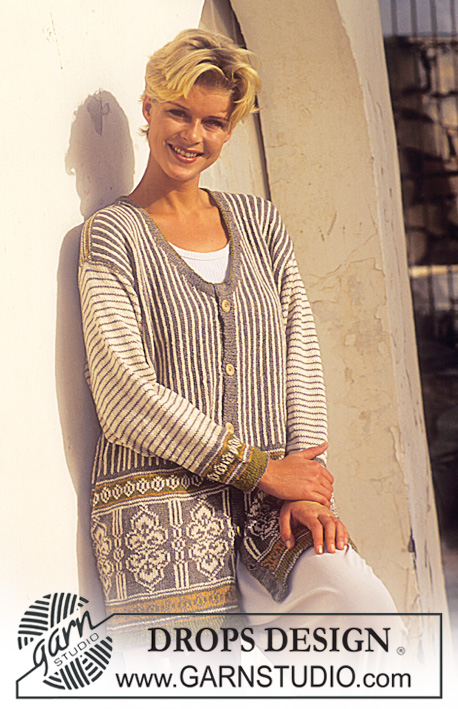
DROPS Jacke mit Blumenmuster in „Safran“
DROPS 50-14 |
|||||||
|
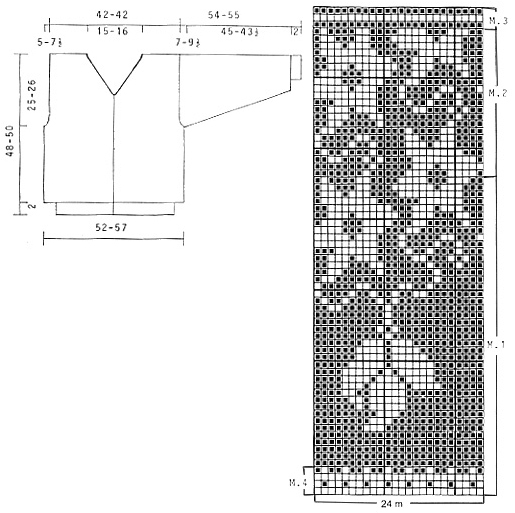
Muster: Siehe Diagramm. Das Diagramm zeigt das Muster von der rechten Seite. Perlmuster: * 1. R.: 1 re., 1 li. 2. R: re. über li. und li. über re. * 2. R. wiederholen. Vorder- und Rückenteil: Die Jacke wird, nach der Kante, rund gestrickt und beim Armloch und Vorne aufgeschnitten *. Mit naturweiss auf Rundstricknadel Nr. 2, 230 (250) M. anschlagen und 2 cm Perlmuster stricken. Zu Rundstricknadel Nr. 3,5 wechseln und vorne in der Mitte 5 neue M. anschlagen (diese Maschen werden zum Aufschneiden gebraucht und nicht im Muster gestrickt). Danach M1 rund stricken (nach den 5 neue M. anfangen und gleichzeitig gleichmässig verteilt 10 (14) M. aufnehmen = 240 (264) + 5 M. Stimmt die Maschenprobe? Nach M1 mit M2 weiterfahren bis noch 1 cm zu stricken ist. Nach 23 (24) cm wie folgt stricken: 5 M. zum Aufschneiden, 57 (63) M. für das Vorderteil stricken, 6 M. für das Armloch abk., 114 (126) M. für das Rückenteil stricken, 6 M. für das Armloch abk., 57 (63) M. für das Vorderteil. Bei der nächsten R. über den M. für das Armloch je 5 neue M. anschlagen (diese Maschen werden zum Aufschneiden gebraucht und nicht im Muster gestrickt). Weiter auf beiden Seiten dieser neuen M. bei jeder 2. R. für das Armloch abk.: 1 M. x 8 (14) (Vorderteile je = 49 (49) M. + 5 M. vorne in der Mitten), (Rückenteil = 98 (98) M.). Nach 34 (36) cm vorne die mittleren 9 (11) M. abk. (inkl. den 5 M. zum Aufschneiden). Danach bei jeder 2. R. gegen den Hals abk.: 2 M. x 2, 1 M. x 9, und alle 4 R.: 1 M. x 3. Nach 46 (48) cm die mittleren 32 (34) M. für den Hals abk. Bei der nächsten R. 2 M. gegen den Hals abk. Gleichzeitig M3 stricken. Nach M3 abk. Die Arbeit misst ca. 48 (50) cm. Ärmel: Mit naturweiss auf Nadelspiel Nr. 2, 56 (58) M. anschlagen und 2 cm Perlmuster stricken. Zu Nadelspiel Nr. 3,5 wechseln und M4 stricken. Danach mit braun, glatt stricken. Gleichzeitig nach der Perlmusterkante unter dem Ärmel aufnehmen: 2 M. x 30 (31) alle 4 R. = 116 (120) M. Nach 47 (45,5) cm unter dem Ärmel 6 M. auf einen Hilfsfaden legen und danach bei jeder 2. R. weitere M. auf den Hilfsfaden legen: 3 (3) M. x 8 (12), 5 (3) M. x 2 (1). Die Arbeit misst ca. 54 (55) cm. Alle M. wieder auf die Nadel legen und 2 cm glatt mit der linken Seite nach aussen stricken (Nahtzugabe für das hinein nähen der Ärmel). Danach abk. Zusammennähen: Ziehen Sie, in der Mitte der erhöhten M., einen Heftfaden ein. Nähen Sie jetzt 2 Maschinennähte entlang der Heftfäden, 1. Naht = 1/2 M. vom Heftfaden, 2. Naht = 1/2 M. von der 1. Naht. Am Armloch und in der Mitte aufschneiden. Die Schulternaht zusammennähen. Am linken Vorderteil mit naturweiss auf Rundstricknadel Nr. 2, ca. 75-80 M. aufnehmen und 3 cm Perlmuster stricken. Auf der rechten Seite wiederholen jedoch nach 1 cm gleichmässig verteilt 5 Knopflöcher einstricken – 1 Knopfloch = 2 M. abk. und bei jeder nächsten R. darüber 2 neue M. anschlagen. Rund um den Hals mit Rundstricknadel Nr. 2, ca. 140-144 M. aufnehmen und 2 cm Perlmuster stricken. Die Knöpfe annähen. |
|||||||
Erklärungen zum Diagramm |
|||||||
|
|||||||
 |
|||||||
Haben Sie diese Anleitung nachgearbeitet?Dann taggen Sie Ihre Fotos mit #dropspattern oder schicken Sie sie an die #dropsfan Galerie Brauchen Sie Hilfe bei dieser Anleitung?Sie finden 26 Videotutorials, einen Kommentar/Fragen-Bereich und vieles mehr, wenn sie die Anleitung bei garnstudio.com aufrufen. © 1982-2026 DROPS Design A/S. Wir besitzen alle Rechte. Dieses Dokument, einschließlich aller Untersektionen, hat Urheberrechte. Mehr dazu, was Sie mit unseren Anleitungen machen können, finden Sie ganz unten auf der Seite zu jeder Anleitung. |
|||||||


Mit über 40 Jahren Tätigkeit im Entwerfen von Strick- und Häkelmustern bietet Ihnen DROPS Design eine der umfangreichsten Sammlungen von kostenlosen Anleitungen im Internet - in 17 Sprachen übersetzt. Zum jetzigen Zeitpunkt haben wir insgesamt 324 Handarbeitshefte und 12290 Anleitungen auf Deutsch. 12202
Unser Ziel ist es, Ihnen die besten Angebote zum Stricken und Häkeln, Inspirationen und Ratschläge sowie qualitativ hochstehende Garne zu unglaublichen Preisen zu bieten! Möchten Sie unsere Anleitungen nicht nur für den persönlichen Gebrauch nutzen? Unsere Copyright Bedingungen finden Sie bei allen unseren Anleitungen ganz unten auf der jeweiligen Seite. Viel Spaß beim Handarbeiten!
Kommentieren Sie die Anleitung DROPS 50-14
Wir würden gerne Ihre Meinung zu diesem Modell erfahren!
Wenn Sie eine Frage stellen möchten, prüfen Sie bitte, dass Sie die richtige Kategorie im unten stehenden Formular gewählt haben - so bekommen Sie schneller eine Antwort. Die obligatorischen Felder sind mit einem * gekennzeichnet.