
Beliebte Kategorien
Suchen Sie nach einem Garn?


Kommentare / Fragen (16)
![]() Sharon Hunt-Edwards hat geschrieben:
Sharon Hunt-Edwards hat geschrieben:
Hello, I would have worked the pattern as written until my Polaris yarn became scrap yarn and it would not have worked. Hopped onto ravelry got som help and am finished the increases after trying for about 3 days and am not a beginner knitter. Have knitted complicated lace patterns . Am one happy knitter. So I would agree with FS that the pattern as written is notcorrect.
27.02.2024 - 19:30
![]() FS hat geschrieben:
FS hat geschrieben:
Sorry but you are wrong. Try knitting it or charting it and you will see. (k3 yo k1 k1 yo) x3 is 15 sts not 12 and doesn't put the yo either side of the markers. k3 yo k1 sm k1 yo k2 yo k1 sm k1 yo k2 yo k1 sm will work but is 5 increases not 6. There needs to be k1 yo after the 1st/last marker as well. Either you do this at the start of round 1 or you go into round 2 and do it there. In this case the pattern needs to specify that.
27.02.2024 - 18:55
![]() FS hat geschrieben:
FS hat geschrieben:
The instructions for round 1 do not work. This has been mentioned above by Sharon HUnt. Your response to her question does not work either. In fact, it is even more incorrect. Round 1 should be * K1, yo, k to 1 st before marker, yo, k1 * repeat from * to * three times in total. In your reply to her question about the stitch count of the smaller size you say increase twice but the pattern says only once
27.02.2024 - 11:54DROPS Design hat geantwortet:
Dear Fs, in the previous answer, the markers were supposed to be inserted after the first 4 sts then after every 4th stitch, then you increase on each side of 2 sticches (where the marker is between these both stitches), so that you work: *K3, YO, K1 (last of the 4th st before 1st marker), K1 (first of the 4 sts after marker), YO*, after you have worked from *-* you have 3 sts left before next marker, repeat from *-*. On next repeat, you will work the same way with 1 extra st before each increase, ie; *K4, YO, K2 (with marker between both K2), YO*, and so on. Happy knitting!
27.02.2024 - 13:39
![]() Sharon Hunt-Edwards hat geschrieben:
Sharon Hunt-Edwards hat geschrieben:
As the increases er completed on row 2. The marker remains at its original position? Correct. Thanks
26.02.2024 - 11:36DROPS Design hat geantwortet:
Dear Mrs Hunt-Edwards, let the marker follow piece so that the increase will be worked on either side of the markers (on each side of the 2 sts with the marker inbetween); work the rounds 1+2 a total of 4-5 times, this means you will work a total of 8-10 rows increasing every other round (every time you work round 2). Happy knitting!
26.02.2024 - 13:58
![]() Sharon Hunt hat geschrieben:
Sharon Hunt hat geschrieben:
Hello is there a mistake in this pattern. The pattern says to knit row 1 and to 4-5 times and the amount of sts on the needle should be 42. Then ie says further to knit 1 more time and the sts count is 40. Last part of the increase says the final stitch count is 40. Which is it? Please note this is an additional question. Hope i don’t be designated as as a spammer. Am make the largest size.
26.02.2024 - 06:59DROPS Design hat geantwortet:
Dear Mrs Hunt, in the first size you get 36 sts then increase only 4 sts (at 2 markers only) to get 40 sts; but in the 2nd size, you get 42 sts after the increases are done. So in the larger size when you get 42 sts just work without increasing anymore until piece measure 22 cm. Happy knitting!
26.02.2024 - 10:03
![]() Sharon HUnt hat geschrieben:
Sharon HUnt hat geschrieben:
Hello Drops am not understanding roun one in this pattern. The pattern says to knit until l sts before the maker, make 1 yarn over, knit 2, make 1 yarn over*, repeat from *-* I end up on the next group of sts. without completing the repeat. Seems like something is not quite correct here. Not sure what am doing wrong. Thanks for your help.
25.02.2024 - 12:47DROPS Design hat geantwortet:
Dear Mrs Hunt, you have inserted 3 markers like this (4 sts, 1 marker) x 3; work now as follows: (knit 3, 1 yo, k2 (marker is between these 2 sts), YO), repeat from (to) to the end of the round. Happy knitting!
26.02.2024 - 09:26
![]() Luisa hat geschrieben:
Luisa hat geschrieben:
C’è un errore: GIRO 1: * lavorare a diritto fino a quando rimane 1 maglia prima del segnapunti, 1 gettato, 2 maglie diritto, 1 gettato *, ripetere *-* fino alla fine del giro (6 aumenti). sono 5 aumenti non 6, manca il gettato dopo la prima maglia del giro
23.01.2024 - 20:33DROPS Design hat geantwortet:
Buonasera Luisa, gli aumenti sono corretti, si lavorano 3 ripetizioni sul giro. Buon lavoro!
17.03.2024 - 19:00
![]() Emmanuelle Poirier hat geschrieben:
Emmanuelle Poirier hat geschrieben:
Concernant la grosseur de l'aiguille, vous mentionner des aiguilles no 12. Est-ce que vos mesure sont en mm ou en us? Car je cherche des 12us et ne trouve pas cette grosseur. Merci
27.01.2023 - 12:46DROPS Design hat geantwortet:
Bonjour Mme Poirier, dans les modèles français, c'est le système métrique qui a été retenu pour la taille des aiguilles - vous pouvez filtrer les modèles par nombre de mailles pour 10 cm (plus simple car la taille des aiguilles dépend aussi de la tension de chacune). Bon tricot!
27.01.2023 - 14:23
![]() Mari hat geschrieben:
Mari hat geschrieben:
Når jeg vrenger lua til rettsiden på slutten, så "hopper" den fire cm lange, vrange stripen som er strikket etter den første vrengingen med opp og er synlig under vrangborden. Hvordan unngår dere det?
28.12.2022 - 21:53DROPS Design hat geantwortet:
Hej Mari, gør det noget? ... du kan evt strikke en vrangpind inden du vender, da vil det blive en glatpind i kanten.
04.01.2023 - 12:18
![]() Laura hat geschrieben:
Laura hat geschrieben:
Cuando aumento me quedan agujeros en las lazadas, el patrón es así o lo estoy haciendo mal? Si lo estoy haciendo mal, qué puedo hacer para que no queden agujeros? Gracias de antemano
25.10.2022 - 19:16DROPS Design hat geantwortet:
Hola Laura, para evitar que se formen agujeros hay que tener el hilo muy tenso al trabajar las lazadas.
06.11.2022 - 23:46
|
|
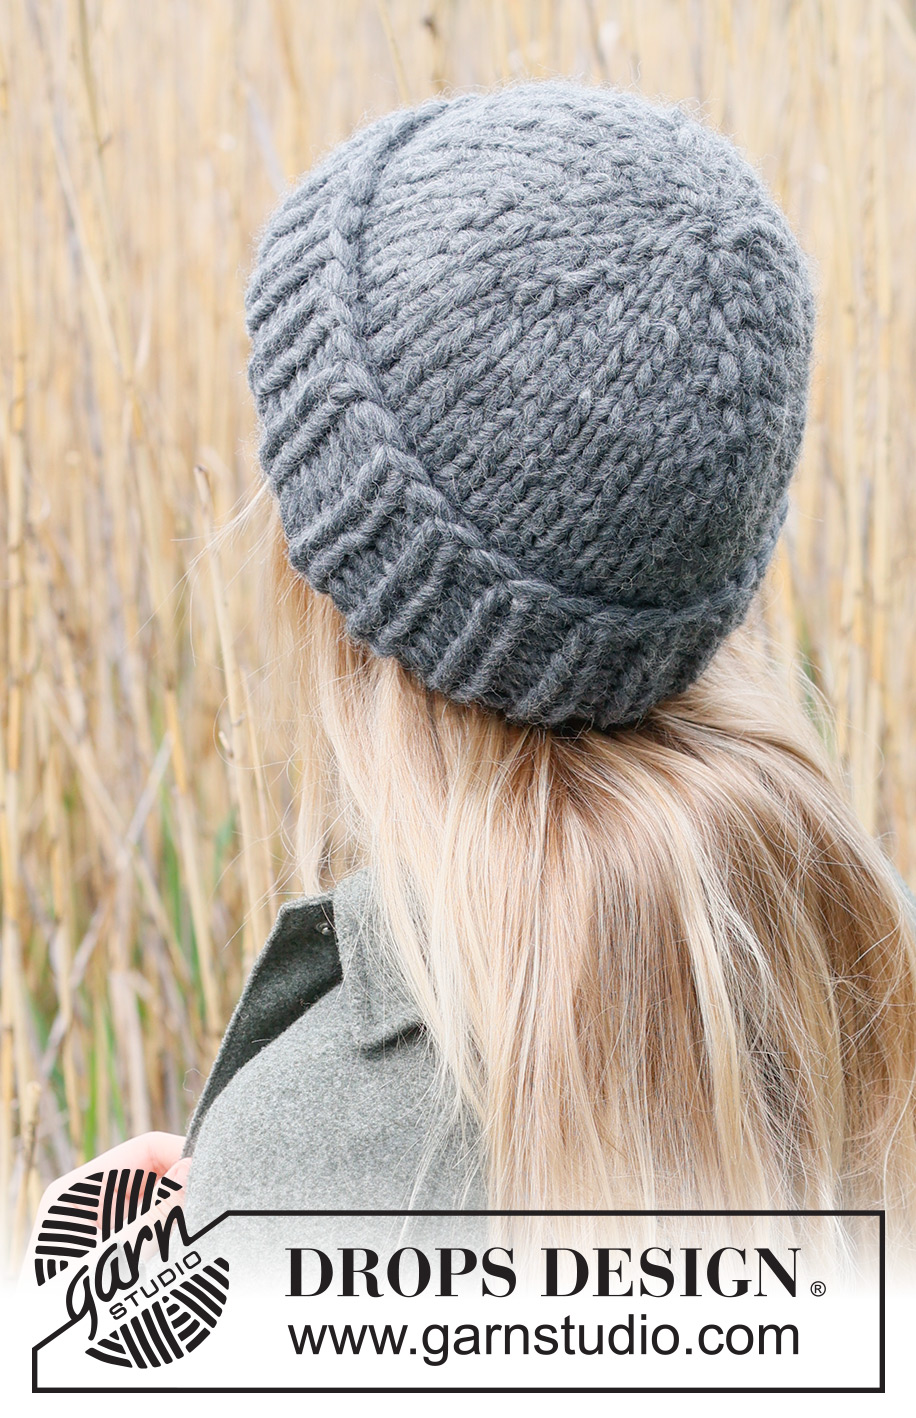
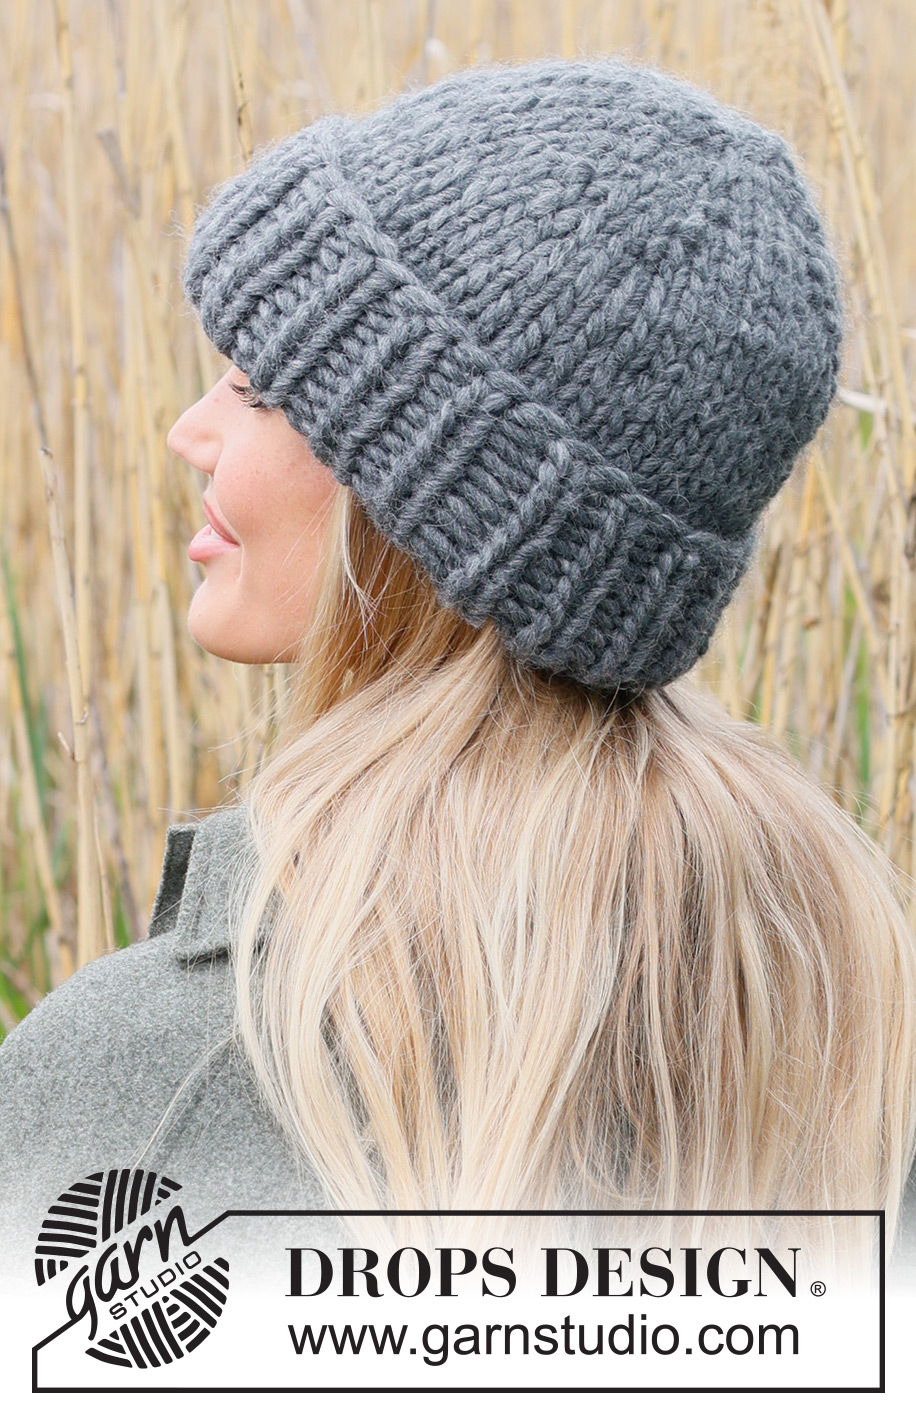
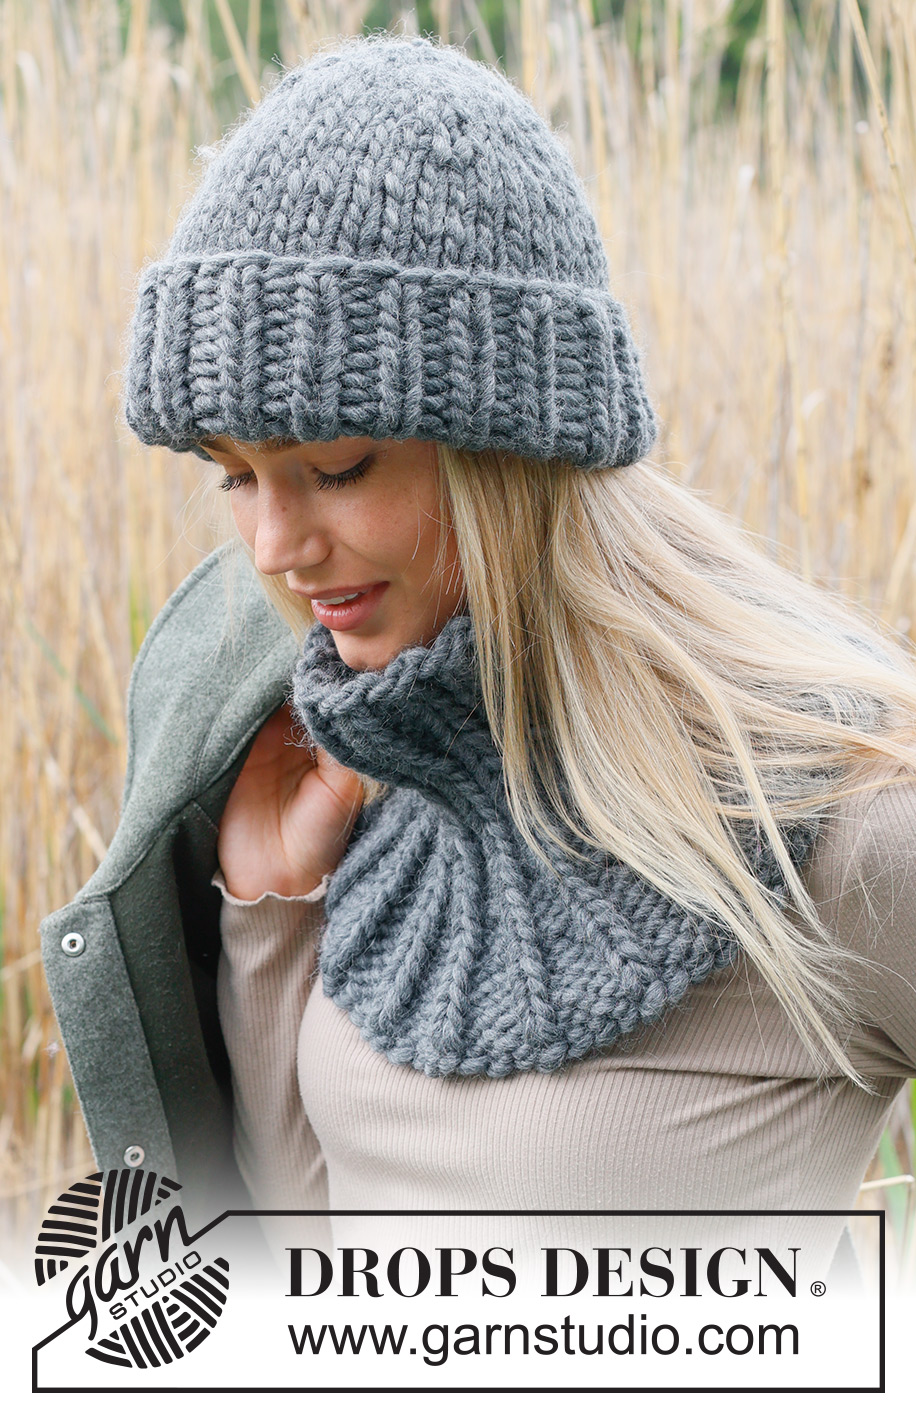
Polar Night Hat#polarnighthat |
|
 |
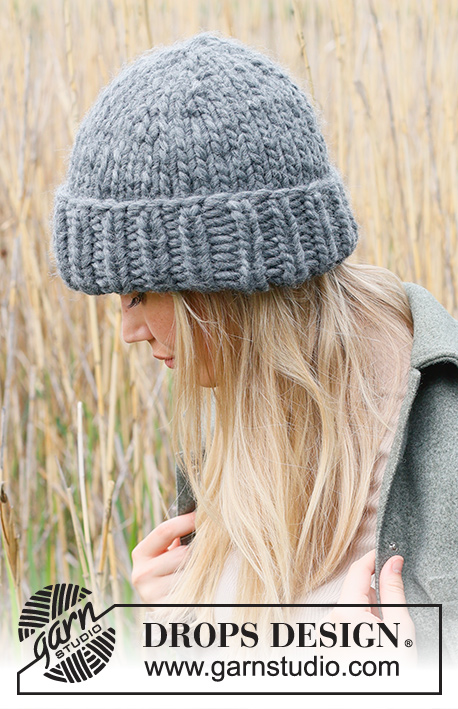 |
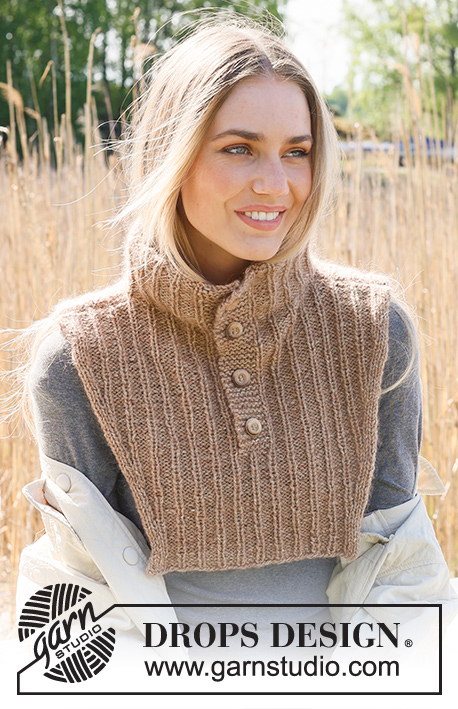
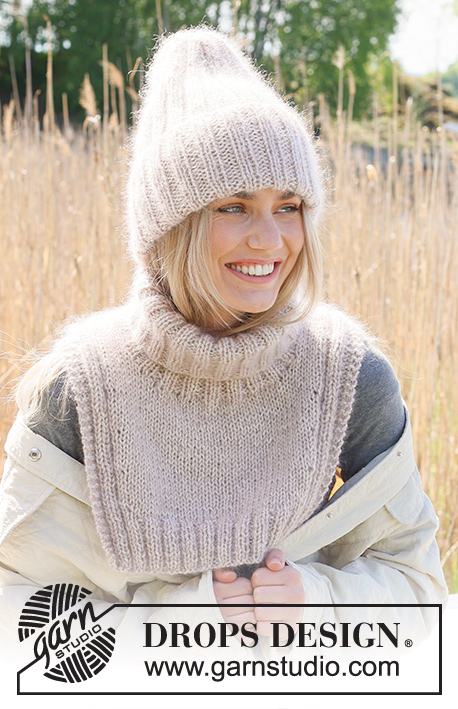
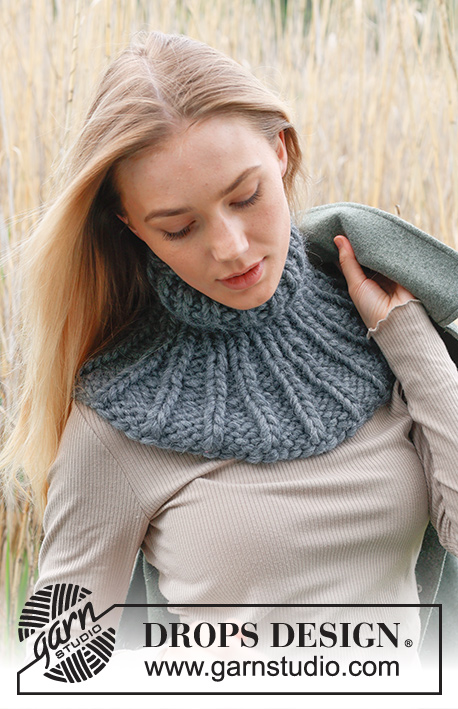
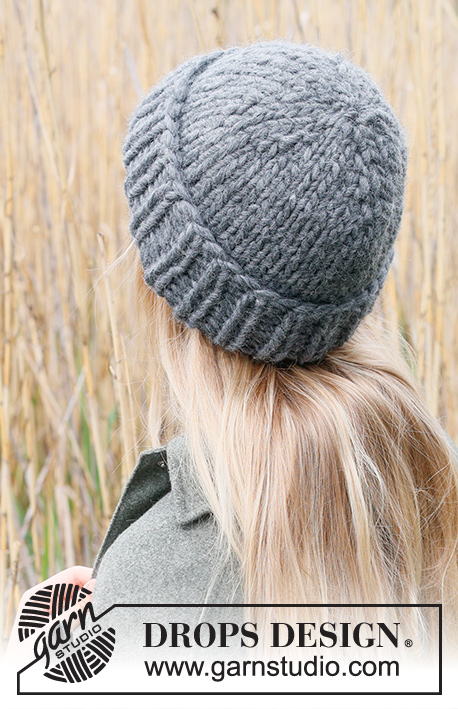
Gestrickte Mütze / Hipster – Mütze in DROPS Polaris. Die Arbeit wird von oben nach unten glatt rechts mit Mützenaufschlag im Rippenmuster gestrickt.
DROPS 234-34 |
|
|
------------------------------------------------------- DIE ARBEIT BEGINNT HIER: ------------------------------------------------------- MÜTZE – KURZBESCHREIBUNG DER ARBEIT: Die Arbeit wird von oben nach unten in Runden auf dem Nadelspiel gestrickt. MÜTZE: Anschlag: 12 Maschen auf Nadelspiel Nr. 12 mit DROPS Polaris, dabei das Fadenende ca. 20 cm lang lassen (es wird später benötigt, um das Loch oben an der Mütze zusammenzuziehen). Die Maschen gleichmäßig auf dem Nadelspiel verteilen und 3 Markierungsfäden so anbringen, dass je 4 Maschen zwischen den Markierungsfäden sind. 1. RUNDE: * Rechts stricken bis noch 1 Masche vor dem Markierungsfaden übrig ist, 1 Umschlag arbeiten, 2 Maschen rechts und 1 Umschlag arbeiten*, von *-* bis Rundenende wiederholen (= 6 Maschen zugenommen). 2. RUNDE: * bis zum Umschlag rechts stricken, den Umschlag von der linken Nadel heben und verschränkt wieder auf die linke Nadel zurückheben, in das vordere Maschenglied des Umschlags einstechen und 1 Masche rechts stricken (die Masche neigt sich nach rechts), 2 Maschen rechts, in das hintere Maschenglied des nächsten Umschlags einstechen und 1 Masche rechts stricken (die Masche neigt sich nach links) *, von *-* bis Rundenende wiederholen. Die 1. und 2. Runde insgesamt 4-5 x arbeiten = 36-42 Maschen in der Runde. Die Arbeit hat eine Länge von ca. 8-10 cm. MASCHENPROBE BEACHTEN! GRÖSSE S/M: Wie die 1. und 2. Runde noch 1 x stricken, jedoch nun nur an 2 der Markierer zunehmen = 40 Maschen. ALLE GRÖSSEN: = 40-42 Maschen. Glatt rechts ohne Zunahmen stricken, bis die Arbeit eine Länge von 21-22 cm hat. Die Arbeit von rechts auf links wenden (d.h. die Rückseite zeigt nun nach außen) und 4 cm glatt rechts stricken (erscheint auf der Vorderseite als glatt links). Zu Nadelspiel Nr. 10 wechseln. 8 cm im Rippenmuster stricken (1 Masche rechts/1 Masche links). Die Maschen mustergemäß abketten (d.h. rechte Maschen rechts und linke Maschen links abketten), dabei darauf achten, dass die Abkettkante nicht spannt. Die Mütze hat eine Höhe von ca. 33-34 cm ab dem Anschlagrand. Die Mütze von links auf rechts wenden und das Rippenmuster nach oben umschlagen. FERTIGSTELLEN: Mit dem Anfangsfaden das Loch oben an der Mütze zusammenziehen. |
|
Haben Sie diese Anleitung nachgearbeitet?Dann taggen Sie Ihre Fotos mit #dropspattern #polarnighthat oder schicken Sie sie an die #dropsfan Galerie Brauchen Sie Hilfe bei dieser Anleitung?Sie finden 19 Videotutorials, einen Kommentar/Fragen-Bereich und vieles mehr, wenn sie die Anleitung bei garnstudio.com aufrufen. © 1982-2026 DROPS Design A/S. Wir besitzen alle Rechte. Dieses Dokument, einschließlich aller Untersektionen, hat Urheberrechte. Mehr dazu, was Sie mit unseren Anleitungen machen können, finden Sie ganz unten auf der Seite zu jeder Anleitung. |
|


Mit über 40 Jahren Tätigkeit im Entwerfen von Strick- und Häkelmustern bietet Ihnen DROPS Design eine der umfangreichsten Sammlungen von kostenlosen Anleitungen im Internet - in 17 Sprachen übersetzt. Zum jetzigen Zeitpunkt haben wir insgesamt 325 Handarbeitshefte und 12291 Anleitungen auf Deutsch. 12203
Unser Ziel ist es, Ihnen die besten Angebote zum Stricken und Häkeln, Inspirationen und Ratschläge sowie qualitativ hochstehende Garne zu unglaublichen Preisen zu bieten! Möchten Sie unsere Anleitungen nicht nur für den persönlichen Gebrauch nutzen? Unsere Copyright Bedingungen finden Sie bei allen unseren Anleitungen ganz unten auf der jeweiligen Seite. Viel Spaß beim Handarbeiten!
Kommentieren Sie die Anleitung DROPS 234-34
Wir würden gerne Ihre Meinung zu diesem Modell erfahren!
Wenn Sie eine Frage stellen möchten, prüfen Sie bitte, dass Sie die richtige Kategorie im unten stehenden Formular gewählt haben - so bekommen Sie schneller eine Antwort. Die obligatorischen Felder sind mit einem * gekennzeichnet.