
Populære kategorier
Ser du etter et garn?


Kommentarer / Spørsmål (23)
![]() Leeanne skrev:
Leeanne skrev:
Addtnl. info for my last comments: I was confused by the first sentence in the short rows instructions stating to do 6 rows over all stitches. I thought that was part of the directions and the piece started with 6 rows before starting the short row repeat cycle but that is incorrect. This sentence is just telling you that there are 6 rows included in the short row instruction cycle that are not, in fact, short rows – 6 full rows and 2 short rows (not in that order) are listed in the row cycle.
06.09.2025 - 15:15
![]() Leeanne skrev:
Leeanne skrev:
(Cont. from previous two comments) next row starts with R3 and finishes with L3 and last row starts with L4 and finishes with R4. Then you start the cycle again with the first short row. So yes, the short row cycle is short row, full row, short row, full row, full row, full row, full row, full row as the pattern states (1 SR followed by 1 full row followed by 1 SR followed by 5 full rows). There are no edges in which you are not doing a picot edge instruction which allows for an even 8 row cycle
06.09.2025 - 15:08
![]() Leeanne skrev:
Leeanne skrev:
(continued from my previous comment) work the L2 row to the first marker and turn to work back to the “beginning” of the left side row, ending with L3, turn and start a new row with L4, working all the way across, ending with R4, (all the remaining rows in the cycle go all the way across – no more short rows) next row begins with R1 and goes all the way across to the last 4 stitches, ending in L1, turn and start with L2 and go all the way across to finish with R2, (cont. in next comment)
06.09.2025 - 15:03
![]() Leeanne skrev:
Leeanne skrev:
For anyone that needs it, here is the cycle of rows, combining picot edge with short rows instructions (it helps to draw this out on paper): start with right side 1 (R1) and work a short row (to first marker only, not all the way across), turn and work back to the beginning and knit the last four with R2, turn to start next row beginning with R3 and knit all the way across, ending this row with L1, then start the second short row with L2, (continued in next comment)
06.09.2025 - 14:58
![]() Leeanne skrev:
Leeanne skrev:
I figured it out! It is definitely not too complicated but they could have written this pattern differently so it wouldn’t take weeks or trial and error to figure out how to work the short rows in with the picot edge. Maybe we were just making it too complicated. I don’t have enough room to write the pattern in this comment so I’ll start a new one. It is easier to draw your lines and mark each end with the picot line number but I’ll try to write it here in my next comment.
06.09.2025 - 14:55
![]() Leeanne skrev:
Leeanne skrev:
I think I get it! I will test it in the morning and comment again trying to explain it for others if I have it right. My last two comments are wrong for sure. It helps to draw the rows as a picture on paper and mark the ends with the line number.
06.09.2025 - 05:10
![]() Leeanne skrev:
Leeanne skrev:
Revising my last comment: I now have it written as: short row, R1 &L1 on the same row, short row, R2 & L2, short row, R3 & L3, short row, R4 & L4. But this adds up to 8 rows on the sides and only 4 rows in the middle, not 6. Also not sure why the short rows directions refers to the middle stitches as being 70 (for the second size) when it’s only 30 (if excluding 25 on each end) or 72 (if excluding only the outermost 4 on each end).
06.09.2025 - 04:26
![]() Leanne skrev:
Leanne skrev:
The directions for the short rows are difficult to figure out. I’ve been working at this for a few weeks with my MIL, have restarted my project 7 times and we still don’t have it right. So we are alternating between right and left rows 1, 2, etc. when doing full rows? We are not doing any picot edge instructions when doing short rows, correct? To incoorporate the short rows, does it go: left row 1, right row 1, short row, left row 2, right row 2, short row, etc. through all four edge rows?
06.09.2025 - 02:40
![]() Leeanne skrev:
Leeanne skrev:
In addition to my last comment, I’m also confused because it says for garter stitch to knit two rows. The main directions says start with the right Picot edge, then knit the directions for garter stitch for the rest of the row, except for the last four and then knit the directions for the left edge on the last four. How do you knit two rows for the garter stitch directions in between doing the right and left edges?
14.07.2025 - 19:22DROPS Design answered:
Dear Leeanne, the garter stitch structure is 2 knit rows. So whenever most of the stitches in the row are knitted, both from the right side and the wrong side, the resulting texture will be garter stitch. In the picot edges we are already using garter stitch, since all other stitches except for the 4 stitches on each side for the picot are knitted from the right side and the wrong side. So you just need to work as indicated; the edges will have the picot texture while the remaining stitches are knitted. Happy knitting!
19.07.2025 - 17:47
![]() Leeanne skrev:
Leeanne skrev:
A video of the actual pattern, please! This is so confusing. I’ve now learned how to do picot edges and short rows, but I can’t understand how to do both at the same time. How do you know which row of the picot edge you’re on if you’ve turned around and gone the other direction halfway through a row? And then when you start the next row do you count as if half the row is row 5 and half is row 6 or just continue with the next direction for that edge in sequence, ignoring row numbers?
14.07.2025 - 19:18DROPS Design answered:
Dear Leeanne, please remember to mark your comments as questions so that we can see them and answer sooner. When you are combining the short rows and the picot edges, count only the rows where you reach the edges; those rows where you turn before reaching the edges are not taken into account for the picot edges on that side. Happy knitting!
19.07.2025 - 17:48
|
|
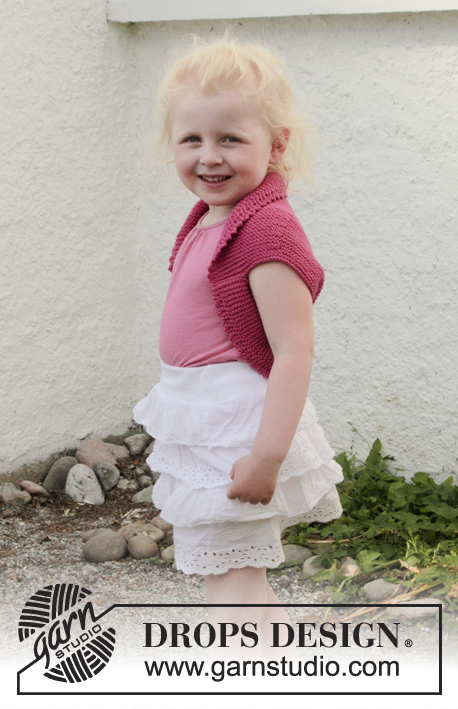
Berry Kiss#berrykissvest |
|
 |
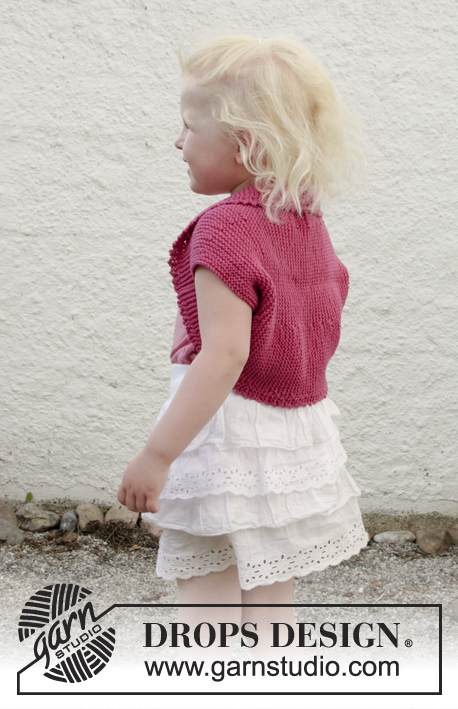 |
Strikket bolero med forkortede pinner, picotkant og riller i DROPS Cotton Merino. Størrelse 3 - 12 år.
DROPS Children 28-7 |
|
|
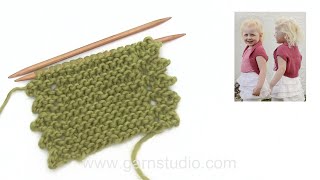
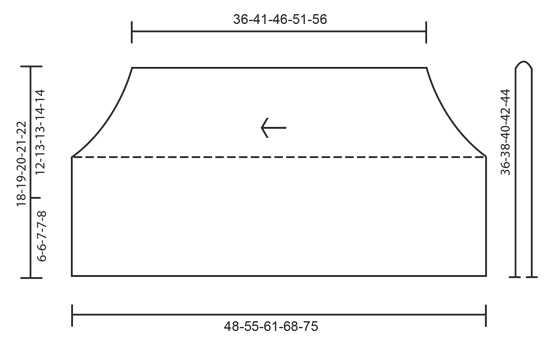
RILLE (strikkes frem og tilbake): 1 rille = 2 pinner rett. PICOTKANT (frem og tilbake på pinnen): HØYRE SIDE: 1.PINNE (= retten): Strikk rett. 2.PINNE (= vrangen): Strikk rett til det gjenstår 4 masker, disse strikkes slik: 2 rett sammen, 1 kast, i hver av de 2 siste maskene strikkes det 2 masker = 2 nye masker på pinnen. 3.PINNE (= retten): Ta 1.maske løs av pinnen som om den skulle strikkes rett, 1 rett, løft den løse masken over, 1 rett, og løft den bakerste maske på høyre pinne over den fremste, 2 masker er nå felt - deretter strikkes det rett ut pinnen. 4.PINNE (= vrangen): Strikk rett. Gjenta 1. til 4.pinne. VENSTRE SIDE: 1.PINNE (= retten): Strikk rett til det gjenstår 4 masker, disse strikkes slik: 2 rett sammen, 1 kast, i hver av de 2 siste maskene strikkes det 2 masker = 2 nye masker på pinnen. 2.PINNE (= vrangen): Ta 1.maske løs av pinnen som om den skulle strikkes rett, 1 rett, løft den løse masken over, 1 rett, og løft den bakerste masken på høyre pinne over den fremste, 2 masker er nå felt - deretter strikkes pinnen rett ut. 3.PINNE (= retten): Strikk rett. 4.PINNE (= vrangen): Strikk rett. Gjenta 1. til 4.pinne. FORKORTEDE PINNER: Strikk 6 pinner over alle masker, * strikk 24-25-26-27-28 masker (frem til det første merket), snu, stram tråden og strikk ut pinnen. Strikk 1 pinne over alle masker, snu, strikk 24-25-26-27-28 masker (frem til det andre merket), snu, stram tråden og strikk ut pinnen. Strikk 5 pinner over alle masker *, gjenta fra *-*. Dvs at det strikkes 6 pinner (= 3 riller) over de midterste 66-70-72-80-86 maskene og 8 pinner (4 riller) over maskene i hver side i hver rapport. -------------------------------------------------------- BOLERO: Arbeidet strikkes sidelengs frem og tilbake på rundpinne fra ermhull til ermhull. Deretter brettes boleroen dobbelt og sidesømmer syes. Legg opp 76-80-84-88-92 masker med Cotton Merino på rundpinne 4. Sett 1 merke i arbeidet 24-25-26-27-28 masker inn fra hver side (= 28-30-32-34-36 masker mellom merkene). Strikk slik – fra retten: PICOTKANT HØYRE SIDE, RILLER – se forklaring over, over de neste 68-72-76-80-84 maskene, PICOTKANT VENSTRE SIDE over de siste 4 maskene. HUSK PÅ STRIKKEFASTHETEN! Fortsett med riller og picotkant over de ytterste 4 maskene i hver side, SAMTIDIG strikkes det FORKORTEDE PINNER – se forklaring over! Når arbeidet måler ca 36-41-46-51-56 cm (målt på det korteste) felles det løst av. MONTERING: Brett boleroen dobbelt – målskissen viser arbidet når det er brettet. Sy sammen de nederste 6-6-7-7-8 cm kant i kant i hver side (= 12-13-13-14-14 cm ermhull). |
|
 |
|
Har du fullført dette mønsteret?Tagg bildene dine med #dropspattern #berrykissvest eller send dem til #dropsfan-galleriet. Trenger du hjelp med denne oppskriften?Du finner 18 instruksjonsvideoer, kommentarer/spørsmål og mer i oppskriften på www.garnstudio.com © 1982-2026 DROPS Design A/S. Alle rettigheter er reservert. Dette dokumentet med sine underdokumenter har copyright. Les mer om hva du er tillatt å gjøre med våre oppskrifter nederst i alle våre oppskrifter på vår nettside. |
|


Med over 40 år i strikke- og heklebransjen, tilbyr DROPS Design en av de mest omfattende samlingene av gratis oppskrifter på internett - oversatt til 17 språk. Per i dag har vi 324 kataloger og 12290 oppskrifter på Norsk.
Vi jobber hardt for å tilby det beste innen strikking og hekling, inspirasjon og gode råd, men også kvalitetsgarn til fantastiske priser! Vil du bruke våre oppskrifter til annet enn personlig bruk? Du kan lese om hvilke regler som gjelder i teksten Copyright nederst på siden i alle våre oppskrifter. God fornøyelse!
Kommenter oppskrift DROPS Children 28-7
Vi vil gjerne høre din mening om denne modellen!
Hvis du ønsker å stille et spørsmål, husk å velge riktig kategori i menyen under - det vil sørge for at du får svar raskere. Obligatoriske felt er markert med *.