DROPS Safran uni colour 100% Cotton |
1.55 € /50g |
Order |
Clicking the ORDER button will redirect you to Trgovinca iNCA website
The yarn cost is calculated from the pattern’s smallest size and the yarn’s cheapest product type. Looking for an even better price? You might find it on the DROPS Deals!
-------------------------------------------------------
Alternative Yarn – See how to change yarns here
Yarn Groups A to F – Use the same pattern and change the yarn here
Yarn usage using an alternative yarn – Use our yarn converter here
-------------------------------------------------------
DROPS Safran uni colour 100% Cotton 1.55 € /50g Order |
Clicking the ORDER button will redirect you to Trgovinca iNCA website
The yarn cost is calculated from the pattern’s smallest size and the yarn’s cheapest product type. Looking for an even better price? You might find it on the DROPS Deals!
This pattern has been corrected. Click here to see the correction/s.
= knit from right side, purl from wrong side | |
= purl from right side, knit from wrong side | |
= between 2 stitches make 1 yarn over; on the next row purl the yarn over (hole) | |
= knit twisted from right side, purl twisted from wrong side | |
= knit 2 together | |
= slip 1 stitch as if to knit, knit 1 and pass the slipped stitch over the knitted stitch | |
= slip 1 stitch as if to knit, knit 2 together and pass the slipped stitch over the knitted-together stitches | |
= no stitch here as it was decreased earlier, go straight to next symbol in diagram |
Each of our patterns has specific tutorial videos to help you.
These step-by-step tutorials might also help you:
Why is the knitting/crochet tension so important?
Knitting tension is what determines the final measurements of your work, and is usually measured per 10 x 10 cm. It is provided like so: number of stitches in width x number of rows in height - eg: 19 stitches x 26 rows = 10 x 10 cm.
The knitting tension is very individual; some people knit/crochet loosely while others work tightly. You adjust the knitting tension with the needle size, which is why the suggested needle size is only meant as a guide! You need to adjust this (up or down) to ensure that YOUR knitting tension matches the knitting tension provided in the pattern. If you work with a different knitting tension than provided you will have a different yarn consumption, and your work will have different measurements than what the pattern suggests.
The knitting tension also determines which yarns can replace each other. As long as you achieve the same knitting tension you can replace one yarn with another.
See DROPS lesson: How to measure your tension/gauge
See DROPS video: How to make a gauge tension swatch
How do I know how many balls of yarn I need?
The required amount of yarn is provided in grams, eg: 450 g. To calculate how many balls you’ll need you first need to know how many grams are in 1 ball (25g, 50g or 100g). This information is available if you click on the individual yarn quality on our pages. Divide the amount required with the amount of each ball. For example, if each ball is 50g (the most common amount), the calculation will be as follows: 450 / 50 = 9 balls.
Can I use a different yarn than what the pattern suggests?
The important thing when changing from one yarn to another is that the knitting/crochet tension remains the same. This is so that the measurements of the finished piece will be the same as on the sketch provided. It is easier to achieve the same knitting tension using yarns from the same yarn group. It is also possible to work with multiple strands of a thinner yarn to achieve the knitting tension of a thicker one. Please try our yarn converter. We recommend you to always work a test swatch.
Please NOTE: when changing yarn the garment might have a different look and feel to the garment in the photo, due to individual properties and qualities of each yarn.
See DROPS lesson: Can I use a different yarn than the one mentioned in the pattern?
What are the yarn groups?
All our yarns are categorised into yarn groups (from A to F) according to thickness and knitting tension – group A contains the thinnest yarns and group F the thickest. This makes it easier for you to find alternative yarns to our patterns, should you wish to switch yarn. All yarns within the same group have a similar knitting tension and can easily replace each other. However, different yarn qualities have different structures and properties which will give the finished work a unique look and feel.
How do I use the yarn calculator?
At the top of all our patterns you’ll find a link to our yarn calculator, which is a helpful tool should you wish to use a different yarn than suggested. By filling in the yarn quality you wish to replace, the amount (in your size) and number of strands, the calculator will present good alternative yarns with the same knitting tension. Additionally it will tell you how much you’ll require in the new qualities and whether you’ll need to work with multiple strands. Most skeins are 50g (some are 25g or 100g).
If the pattern is worked with multiple colours, every colour will have to be calculated separately. Similarly, if the pattern is worked with several strands of different yarns (for example 1 strand Alpaca and 1 strand Kid-Silk) you will have to find alternatives for each, individually.
Why do you show discontinued yarns in the patterns?
Since different yarns have different qualities and textures we have chosen to keep the original yarn in our patterns. However, you can easily find options among our available qualities by using our yarn calculator, or simply pick a yarn from the same yarn group.
It is possible that some retailers still have discontinued yarns in stock, or that someone has a few skeins at home that they would like to find patterns for.
The yarn calculator will provide both alternative yarn as well as required amount in the new quality.
What size should I knit?
If you think it's hard to decide what size to make, it can be a good idea to measure a garment you own already and like the size of. Then you can pick the size by comparing those measures with the ones available in the pattern's size chart.
You'll find the size chart at the bottom of the pattern.
See DROPS lesson: How to read size chart
Why do I get the wrong knitting tension with the suggested needle size?
The needle size provided in the pattern serves only as a guide, the important thing is to follow the knitting tension. And since knitting tension is very individual, you will have to adjust the needle size to ensure that YOUR tension is the same as in the pattern – maybe you’ll have to adjust 1, or even 2 needle sizes, up or down to achieve the correct tension. For this, we recommend that you work test swatches.
Should you work with a different knitting tension than the one provided, the measurements of the finished garment might deviate from the measurement sketch.
See DROPS lesson: How to measure your tension/gauge
See DROPS video: How to make a tension/gauge swatch
Why is the pattern worked top-down?
Working a garment top-down provides more flexibility and room for personal adjustment. For example it is easier to try the garment on while working, as well as making adjustments to length of yoke and shoulder caps.
The instructions are carefully explaining every step, in the correct order. Diagrams are adjusted to the knitting direction and are worked as usual.
How do I work according to a knitting diagram?
The diagram depicts all rows/rounds, and every stitch seen from the right side. It is read from bottom to top, from right to left. 1 square = 1 stitch.
When working back and forth, every other row is worked from the right side and every other row is worked from the wrong side. When working from the wrong side, the diagram will have to be worked reversed: from left to right, knit stitches are purled, purl stitches are knit etc.
When working in the round every round is worked from the right side and the diagram are worked from right to left on all rounds.
See DROPS lesson: How to read knitting diagrams
How do I work according to a crochet diagram?
The diagram depicts all rows/rounds, and every stitch seen from the right side. It is worked from bottom to top, from right to left.
When working back and forth every other row is worked from the right side: from right to left and every other row is worked from the wrong side: from left to right.
When working in the round, every row in the diagram are worked from the right side, from right to left.
When working a circular diagram you start in the middle and work your way outwards, counter clockwise, row by row.
The rows usually start with a given number of chain stitches (equivalent to the height of the following stitch), this will either be depicted in the diagram or explained in the pattern.
See DROPS lesson: How to read crochet diagrams
How do I work several diagrams simultaneously on the same row/round?
Instructions for working several diagrams after each other on the same row/round, will often be written like so: “work A.1, A.2, A.3 a total of 0-0-2-3-4 times". This means you work A.1 once, then A.2 is worked once, and A.3 is repeated (in width) the number of times provided for your size – in this case like so: S = 0 times, M = 0 times, L=2 times, XL= 3 times and XXL = 4 times.
The diagrams are worked as usual: begin with the first row in A.1, then work the first row in A.2 etc.
See DROPS lesson: How to read knitting diagrams
See DROPS lesson: How to read crochet diagrams
Why are the sleeves shorter in larger sizes?
The total width of the garment (from wrist-to-wrist) will be larger in the larger sizes, despite the actual sleeves being shorter. The larger sizes have longer sleeve caps and wider shoulders, so there will be a good fit in all sizes.
Where on the garment is the length measured?
The measurement sketch/schematic drawing provides information regarding the full length of the garment. If it’s a jumper or a jacket the length is measured from the highest point on the shoulder closest to the neckline, and straight down to the bottom of the garment. It is NOT measured from the tip of shoulder. Similarly, the length of yoke is measured from the highest point on the shoulder and down to where yoke is split into body and sleeves.
On a jacket measures are never taken along bands, unless specifically stated. Always measure inside band stitches when measuring the length.
See DROPS lesson: How to read a schematic drawing
What is a repeat?
Diagrams are often repeated on the round or in height. 1 repeat is the diagram the way it appears in the pattern. If it says to work 5 repeats of A.1 in the round, then you work A.1 a total of 5 times after/next to each other in the round. If it says to work 2 repeats of A.1 vertically/in height you work the entire diagram once, then begin again at the start and work the entire diagram one more time.
Why does the piece start with more chain stitches than it’s worked with?
Chain stitches are slightly narrower than other stitches and to avoid working the cast-on edge too tight, we simply chain more stitches to begin with. The stitch count will be adjusted on the following row to fit the pattern and measurement sketch.
Why increase before the rib edge when the piece is worked top-down?
The rib edge is more elastic and will contract slightly compared to, for example, stocking stitch. By increasing before the rib edge, you avoid a visible difference in width between the rib edge and the rest of the body.
Why increase in the cast-off edge?
It’s very easy to cast off too tightly, and by making yarn overs while casting off (and simultaneously casting these off) you avoid a too tight cast off edge.
See DROPS video: How to bind off with yarn overs (yo)
How do I increase/decrease on every 3rd and 4th row/round alternately?
To achieve an even increase (or decrease) you can increase on, for example: every 3rd and 4th row alternately, like so: work 2 rows and increase on the 3rd row, work 3 rows and increase on the 4th. Repeat this until the increase is complete.
See DROPS lesson: Increase or decrease 1 st on every 3rd and 4th row alternately
How can I work a jacket in the round instead of back and forth?
Should you prefer to work in the round instead of back and forth, you may of course adjust the pattern. You’ll need to add steeks mid-front (usually 5 stitches), and follow the instructions. When you would normally turn and work from the wrong side, simply work across the steek and continue in the round. At the end you’ll cut the piece open, pick up stitches to work bands, and cover the cut edges.
See DROPS video: How to knit steeks and cut open
Can I work a jumper back and forth instead of in the round?
Should you prefer to work back and forth instead of in the round, you may of course adjust the pattern so you work the pieces separately and then assemble them at the end. Divide the stitches for the body in 2, add 1 edge stitch in each side (for sewing) and work the front and back pieces separately.
See DROPS lesson: Can I adapt a pattern for circular needles into straight needles?
Why is the pattern slightly different than what I see in the photo?
Pattern repeats can vary slightly in the different sizes, in order to get the correct proportions. If you’re not working the exact same size as the garment in the photo, yours might deviate slightly. This has been carefully developed and adjusted so that the complete impression of the garment is the same in all sizes.
Make sure to follow instructions and diagrams for your size!
How do I make a women’s size garment into a men’s size one?
If you have found a pattern you like which is available in women’s size it’s not very difficult to convert it to men’s size. The biggest difference will be the length of sleeves and body. Start working on the women size that you think would fit across the chest. The additional length will be worked right before you cast off for the armhole/sleeve cap. If the pattern is worked top-down you can add the length right after the armhole or before the first decrease on sleeve.
Regarding additional yarn amount, this will depend on how much length you add, but it is better with a skein too many than too few.
How do I prevent a hairy garment from shedding?
All yarns will have excess fibres (from production) that might come off as lint or shedding. Brushed yarns (ie hairier yarns) have more of these loose, excess fibres, causing more shedding.
Shedding also depends on what is worn under or over the garment, and whether this pulls at the yarn fibres. It’s therefore not possible to guarantee that there will be no shedding
Below are some tips on how to get the best result when working with hairier yarns:
1. When the garment is finished (before you wash it) shake it vigorously so the looser hairs come off. NOTE: do NOT use a lint roller, brush or any method that pulls at the yarn.
2. Place the garment in a plastic bag and put it in your freezer - the temperature will cause the fibres to become less attached to each other, and excess fibres will come off easier.
3. Leave in the freezer for a few hours before taking it out and shaking it again.
4. Wash the garment according to the instructions on the yarn label.
Why does my garment pill?
Pilling is a natural process that happens to even the most exclusive of fibers. It's a natural sign of wear and tear that is hard to avoid, and that is most visible in high friction areas of your garment like a sweater's arms and cuffs.
You can make your garment look as new by removing the pilling, using a fabric comb or a pill/lint remover.
Treasure Hunt Cardigan |
|||||||||||||||||||||||||
|
|
||||||||||||||||||||||||
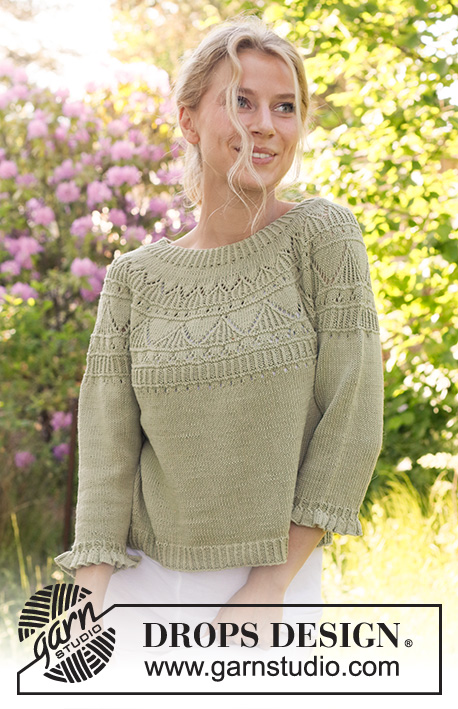
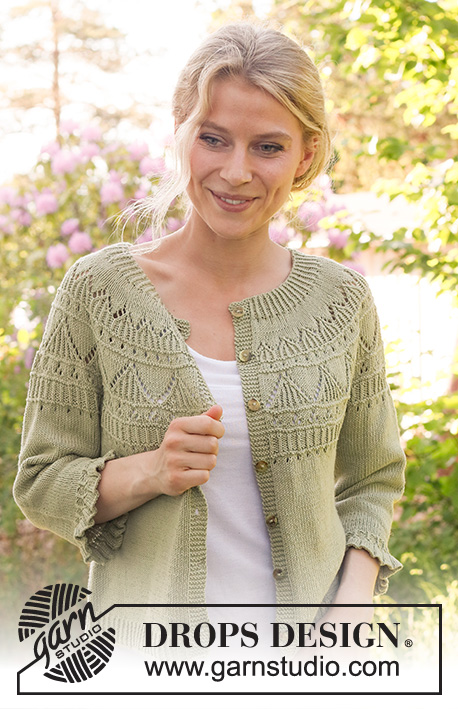
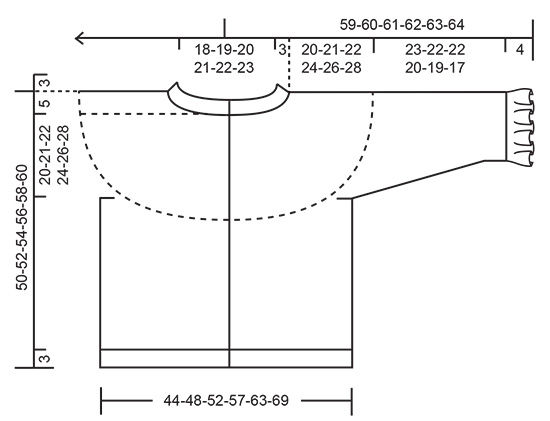
Knitted jacket in DROPS Safran. The piece is worked bottom up with round yoke, lace pattern and ¾-length sleeves with flounces. Sizes S - XXXL.
DROPS 230-22 |
|||||||||||||||||||||||||
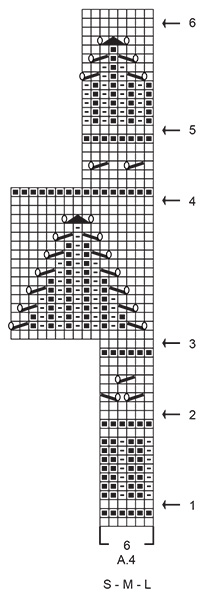
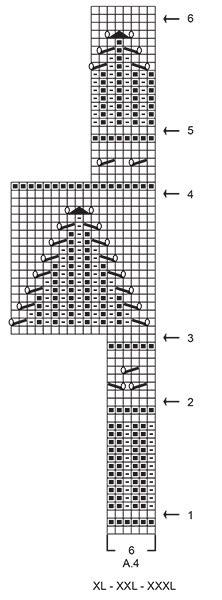
------------------------------------------------------- EXPLANATIONS FOR THE PATTERN: ------------------------------------------------------- RIDGE/GARTER STITCH (worked back and forth): Knit all rows. 1 ridge = knit 2 rows. PATTERN: See diagrams A.1 to A.5. Choose diagram for your size (applies to A.4). The diagrams show all rows in the pattern from the right side. DECREASE TIP (evenly spaced): To work out how to decrease evenly, count the total number of stitches on needle (e.g. 244 stitches) minus the bands (e.g. 12 stitches) and divide the remaining stitches by the number of decreases to be made (e.g. 23) = 10.1. In this example decrease by knitting together approx. each 9th and 10th stitch (do not decrease over the bands). INCREASE TIP (for sleeves): Work until there are 2 stitches left before the marker thread, 1 yarn over, knit 4 (marker thread sits between these 4 stitches), 1 yarn over. On the next round knit the yarn overs twisted to avoid holes. Then work the new stitches in stocking stitch. BUTTONHOLES: Work buttonholes on the right band. 1 BUTTONHOLE = Knit together the 3rd and 4th stitch from the edge, make 1 yarn over. On the next row, knit the yarn over to leave a hole. Work the buttonholes when the piece measures: S: 3, 10, 17, 24, 31, 38 and 45 cm M: 3, 10, 18, 25, 33, 40 and 47 cm L: 4, 11, 19, 26, 34, 41 and 49 cm XL: 4, 12, 20, 28, 36, 44 and 51 cm XXL: 3, 11, 19, 28, 36, 45 and 53 cm XXXL: 3, 12, 20, 29, 37, 46 and 55 cm ------------------------------------------------------- START THE PIECE HERE: ------------------------------------------------------- JACKET – SHORT OVERVIEW OF THE PIECE: The body is worked back and forth with circular needle, bottom up. The sleeves are worked in the round with double pointed needles/short circular needle, bottom up. The body and sleeves are worked together and the yoke finished back and forth. BODY: Cast on 244-268-286-316-343-379 stitches with circular needle size 2.5 mm and DROPS Safran. Purl 1 row from the wrong side. Work the next row from the right side as follows: 6 band stitches in GARTER STITCH – read description above, work A.1 until there are 7 stitches left, work the first stitch in A.1, so the pattern is symmetrical, and 6 band stitches in garter stitch. Continue this rib for 3 cm – remember the BUTTONHOLES on the right band – read description above. Knit 1 row from the right side where you decrease 23-25-25-29-30-36 stitches evenly spaced – read DECREASE TIP = 221-243-261-287-313-343 stitches. Purl 1 row from the wrong side (bands knitted). Change to circular needle size 3 mm. Continue with stocking stitch and 6 band stitches in garter stitch on each side. REMEMBER THE KNITTING TENSION! When the piece measures 25-26-27-27-27-27 cm, cast off for the armholes from the wrong side as follows: Work 55-60-64-70-76-83 stitches as before (front piece), cast off 6-8-8-10-10-12 stitches, work 99-107-117-127-141-153 stitches (back piece), cast off 6-8-8-10-10-12 stitches, work 55-60-64-70-76-83 stitches (front piece). Lay the piece to one side and work the sleeves. SLEEVES: Cast on 140-147-154-161-168-175 stitches on double pointed needles size 2.5 mm and DROPS Safran. Insert 1 marker thread at the beginning of the round. Allow the thread to follow your work onwards – it is used when increasing under the sleeve. Knit 1 round. Work A.2 a total of 20-21-22-23-24-25 times on the round. When A.2 has been completed in height there are 60-63-66-69-72-75 stitches and the sleeve measures approx. 4 cm. Change to double pointed needles size 3 cm and work stocking stitch. AT THE SAME TIME when the sleeve measures 6-6-7-7-6-4 cm from the cast-on edge, increase 2 stitches under the sleeve – read INCREASE TIP. Increase like this every 2½-2-1½-1-1-1 cm a total of 8-9-12-16-17-17 times = 76-81-90-101-106-109 stitches. When the sleeve measures 27-26-26-24-23-21 cm, work the next round as follows: Cast off 3-4-4-5-5-6 stitches for the armhole, knit 70-73-82-91-96-97, cast off 3-4-4-5-5-6 stitches for the armhole. Cut the strand and pull it through the last stitch. Work the other sleeve in the same way. YOKE: Place the sleeves on the same circular needle as the body, where stitches were cast off for the armholes (without working the stitches) = 349-373-409-449-485-513 stitches. Start from the right side and work 2-2-2-0-4-10 rows of stocking stitch with 6 band stitches in garter stitch on each side. Work the next row from the right side as follows: 6 band stitches in garter stitch, A.3 until there are 7 stitches left, work the first stitch in A.3 and 6 band stitches in garter stitch. When A.3 has been completed in height, work the next row as follows from the right side: 6 band stitches in garter stitch, A.4 until there are 7 stitches left, work the first stitch in A.4 and 6 band stitches in garter stitch. Continue this pattern. AT THE SAME TIME, on each row with an arrow in A.4, decrease as follows – remember DECREASE TIP: Arrow-1: Decrease 12-12-12-16-16-20 stitches evenly spaced = 337-361-397-433-469-493 stitches. Arrow-2: Decrease 24-24-36-42-54-54 stitches evenly spaced = 313-337-361-391-415-439 stitches. Arrow-3: Decrease 28-36-44-36-42-48 stitches evenly spaced = 285-301-317-355-373-391 stitches. Arrow-4: Decrease 40-40-48-62-72-74 stitches evenly spaced = 245-261-269-293-301-317 stitches. Arrow-5: Decrease 40-40-40-48-48-56 stitches evenly spaced = 205-221-229-245-253-261 stitches. Arrow-6: Decrease 42-52-56-64-68-68 stitches evenly spaced = 163-169-173-181-185-193 stitches. When A.4 has been completed, continue with stocking stitch and 6 band stitches in garter stitch on each side until the piece measures 20-21-22-24-26-28 cm from the bottom of the armholes (approx. 2-3-4-4-5-5 cm stocking stitch after A.4) – AT THE SAME TIME, on the last row from the right side, decrease 30-32-32-34-34-36 stitches evenly spaced = 133-137-141-147-151-157 stitches. Purl 1 row from the wrong side (bands knitted). NECK. Change to circular needle size 2.5 mm. Work the first row from the right side as follows: 6 band stitches in garter stitch, A.5 until there are 7 stitches left, work the first stitch in A.5 and 6 band stitches in garter stitch. Continue this rib for 3 cm. Cast off with knit from the right side. ASSEMBLY: Sew the openings under the sleeves. Sew the buttons onto the left band. |
|||||||||||||||||||||||||
Diagram explanations |
|||||||||||||||||||||||||
|
|||||||||||||||||||||||||
Have you made this or any other of our designs? Tag your pictures in social media with #dropsdesign so we can see them! Do you need help with this pattern?You'll find tutorial videos, a Comments/Questions area and more by visiting the pattern on garnstudio.com. © 1982-2024 DROPS Design A/S. We reserve all rights. This document, including all its sub-sections, has copyrights. Read more about what you can do with our patterns at the bottom of each pattern on our site. |
With over 40 years in knitting and crochet design, DROPS Design offers one of the most extensive collections of free patterns on the internet - translated to 17 languages. As of today we count 304 catalogues and 11428 patterns - 11428 of which are translated into English (UK/cm).
We work hard to bring you the best knitting and crochet have to offer, inspiration and advice as well as great quality yarns at incredible prices! Would you like to use our patterns for other than personal use? You can read what you are allowed to do in the Copyright text at the bottom of all our patterns. Happy crafting!
Comments / Questions (23)
Terttu wrote:
Paljon kiitoksia vastauksesta. Vaihdoin kaarrokkessa myös pienempään puikkoon. Toinen kysymys: Kuvasta saa käsityksen, että A. 4:n kolmionmuotoisten kuvioiden reunat ovat myös koholla. Ohjeessa on kuitenkin normaalit oikein silmukat kolmioiden molemissa reunoissa (esim. kaksi s oikein yhteen) ja nurin kerroksella neulotaan siis silmukat normaalisti nurin. Onko näin? Vastauksesta kiittäen.
07.06.2024 - 08:24DROPS Design answered:
Kolmioiden reunat kohenevat hieman, kun kolmion kummassakin reunassa kavennetaan. Neulo piirroksen mukaan, niin saat kuvan mukaiset kuviot.
10.06.2024 - 16:56Terttu wrote:
Hei! Teen kokoa L, jossa kaarrokkeeseen tulee yhteensä 409 s. Kaarrokkeeesta tulee valtavan leveä. Alaosa on oikeankokoinen. Missä vika?
02.06.2024 - 17:43DROPS Design answered:
Hei, kaarrokkeessa kavennetaan silmukoita piirroksen A.4 mukaisesti, joten se kapenee melko nopeasti.
06.06.2024 - 17:47Cinzia Accica wrote:
Salve, ho appena terminato la manica , cosa vuole dire tagliare il filo e farlo passare attraverso l'ultima maglia? Le devo passare tutte fino all' ultima? Grazie anticipatamente per la risposta. Sono una principiante.
23.05.2024 - 20:37DROPS Design answered:
Buonasera Cinzia, serve a chiudere il lavoro, passa il filo nell'ultima maglia e lo affranca. Buon lavoro!
28.05.2024 - 18:32Cinzia wrote:
Quando mettiamo le maniche sullo stesso ferro del corpo le maglie delle maniche non si devono lavorare mentre quelle del corpo SI???? Lavoriamo il ferro dal diritto?? Grazie
20.05.2024 - 20:58DROPS Design answered:
Buonasera Cinzia, deve mettere tutte le maglie sullo stesso ferro e poi iniziare a lavorare dal diritto del lavoro. Buon lavoro!
20.05.2024 - 23:18Marie France Binder wrote:
Pour l'encolure, ce sont le diminutions régulières qui la "font". il ne faut pas diminuer à partir du bord en "dégradé" ? Merci par avance Cordialement
20.05.2024 - 17:38DROPS Design answered:
Bonjour Mme Binder, pour ce modèle, l'encolure devant et l'encolure dos sont identiques, on ne rabat pas de mailles en plus, on va simplement tricoter le col sur les mailles restantes après l'empiècement. Bon tricot!
21.05.2024 - 13:51Carina wrote:
Hola. No digo en la fila de la flecha 5, sino a partir de esa fila, el punto central no debería ser un derecho retorcido en vez de uno revés? Gracias, yo lo he hecho así 🤷
01.04.2024 - 19:22DROPS Design answered:
Hola Carina, los puntos 1,3,5 y 7 son reveses, mientras que los puntos 2,4,6 y 8 son derechos retorcidos. Tiene que quedar un elástico en el que se alternen ambos, por lo que no puedes tener dos derechos retorcidos ni dos reveses seguidos. En la foto puedes ver que la punta del dibujo, donde tienes la disminución doble, está sobre el punto con menos relieve, que sería el punto de revés y no de derecho retorcido. En el dibujo anterior, puedes ver que se daba el caso contrario y por eso el punto central era el derecho retorcido. Por lo que el diagrama es correcto.
07.04.2024 - 23:02Carina wrote:
Hola No me habéis contestado a mí última pregunta, además el gráfico A4 a partir de la flecha 5 está equivocado, el punto central debería ser un punto derecho retorcido y no uno al revés, no creéis? Gracias
28.03.2024 - 17:50DROPS Design answered:
Hola Carina, no vemos ninguna pregunta previa tuya en este modelo. ¿Podrías indicarla de nuevo? En la flecha 5, en ambos diagramas A.4, se trabajan todos los puntos de derecho, junto a las disminuciones. No hay puntos de revés ni retorcidos.
31.03.2024 - 23:45Yolande Deckers wrote:
Geachte lezer, voor de zekerheid, het klopt dat ik na het breien van de boord vh lijf, steken moet MINDEREN? (Meestal moet je na een boord meerderen, toch?) Ik hoor het graag van u. Ik ben begonnen aan het vest in colour 59 van Drops Safran😊 Groetjes Yolande
09.03.2024 - 15:51DROPS Design answered:
Dag Yolanda,
Ja, dat klopt. Dit is om te voorkomen dat de boord het werk samentrekt.
10.03.2024 - 10:14HACQUARD wrote:
Bonjour. Je viens de m'apercevoir que les boutons 620 que j'ai commandé pour réaliser ce modèle ne passent pas dans les boutonnières. IL aurait peut etre fallu faire une boutonnière de deux mailles ? Maintenant je ne sais pas comment rectifier à part acheter des boutons plus petits. Cordialement
01.03.2023 - 10:30Pamela Coon wrote:
Hi. I don't understand "pearl one row from the wrong side". If I pearl the first row after cast on and consider that the "wrong side" (it would usually be the right side) my rib shows up on the "wrong side". I'm assuming that isn't correct? Thanks
17.10.2022 - 01:14DROPS Design answered:
Hi Pamela, The first row is the wrong side, so therefore the rib starts on the right side. Happy knitting!
17.10.2022 - 06:47