DROPS Nepal
DROPS Nepal
65% vlna, 35% alpaka
od 68.00 Kč /50g
Přízi na tento model můžete mít už za 408.00Kč.

Cenu za klubka počítáme podle spotřeby při výrobě modelu v nejmenší velikosti a nejlevnější variantě příze. Rádi byste ještě lepší cenu? Třeba ji najdete mezi DROPS Deals!

Fjord Mosaic Set

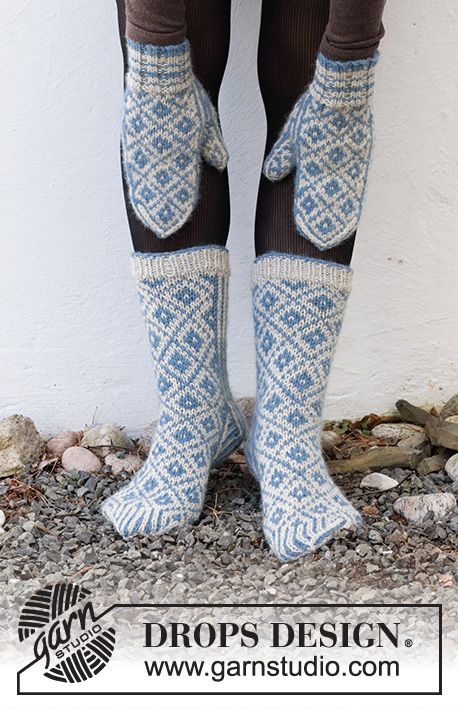
Rukavice palčáky a ponožky s norským vzorem pletené z příze DROPS Nepal. Velikost rukavic S/M – M/L. Velikost ponožek 35 – 43.

DROPS 214-54
DROPS Design: model č. ne-329
Skupina přízí C nebo A + A
-------------------------------------------------------

CELÁ SOUPRAVA:

VELIKOST:
Rukavice: S/M – M/L
Ponožky: 35/37 – 38/40 – 41/43

MATERIÁL:
DROPS NEPAL firmy Garnstudio (spadá do skupiny přízí C)
150-150-200 g, barva č. 0500, stříbrošedá
150-150-150 g, barva č. 8913, světlá modrá

RUKAVICE:

VELIKOST:
S/M – M/L
Rozměry: Obvod: asi 21-23 cm. Výška: asi 24-26 cm.

MATERIÁL:
DROPS NEPAL firmy Garnstudio (spadá do skupiny přízí C)
100-100 g, barva č. 0500, stříbrošedá
50-50 g, barva č. 8913, světlá modrá

ZKUŠEBNÍ VZOREK:
19 ok na šířku a 25 řad na výšku lícovým žerzejem norským vzorem = 10 x 10 cm.

JEHLICE:
DROPS PONOŽKOVÉ JEHLICE č. 4.
DROPS PONOŽKOVÉ JEHLICE č. 3,5 – na lemy.
Uvedená síla jehlic je pouze orientační. Máte-li ve svém zkušebním vzorku více ok na 10 cm, použijte jehlice silnější. Pokud máte naopak méně ok na 10 cm, použijte jehlice slabší.

PONOŽKY:

VELIKOST:
35/37 – 38/40 – 41/43
Délka chodidla: asi 22-24-27 cm.
Výška ponožky: asi 17-17-17 cm.

MATERIÁL:
DROPS NEPAL firmy Garnstudio (spadá do skupiny přízí C)
100-100-150 g, barva č. 0500, stříbrošedá
100-100-100 g, barva č. 8913, světlá modrá

ZKUŠEBNÍ VZOREK:
19 ok na šířku a 25 řad na výšku lícovým žerzejem norským vzorem = 10 x 10 cm.

JEHLICE:
DROPS PONOŽKOVÉ JEHLICE č. 4.
DROPS PONOŽKOVÉ JEHLICE č. 3,5 – na lemy.
Uvedená síla jehlic je pouze orientační. Máte-li ve svém zkušebním vzorku více ok na 10 cm, použijte jehlice silnější. Pokud máte naopak méně ok na 10 cm, použijte jehlice slabší.

-------------------------------------------------------

Náhradní příze – Podívejte se, jak změnit přízi
Skupina přízí A až F – Neměňte návod, změňte přízi
Spotřeba příze při použití náhradní příze – Využijte náš převodník

-------------------------------------------------------

DROPS Nepal
DROPS Nepal
65% vlna, 35% alpaka
od 68.00 Kč /50g
Přízi na tento model můžete mít už za 408.00Kč.

Cenu za klubka počítáme podle spotřeby při výrobě modelu v nejmenší velikosti a nejlevnější variantě příze. Rádi byste ještě lepší cenu? Třeba ji najdete mezi DROPS Deals!

DROPS Super Sale

SAVE 30% on 6 cotton favourites!
Platí do 12.04.2024

Návod

-------------------------------------------------------

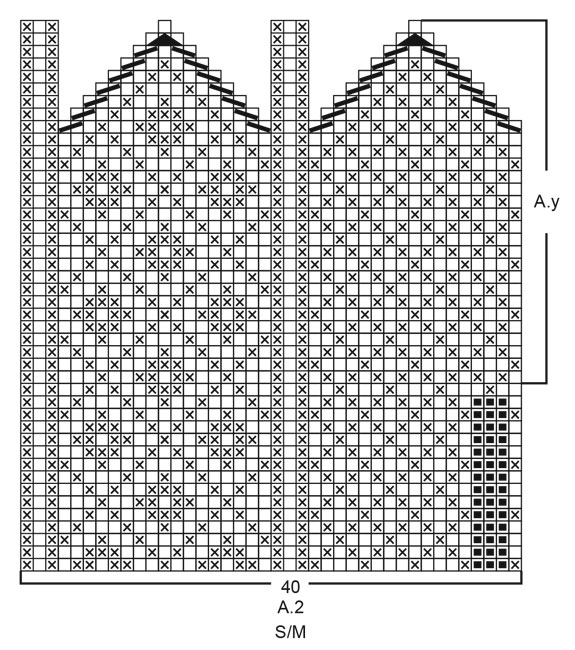
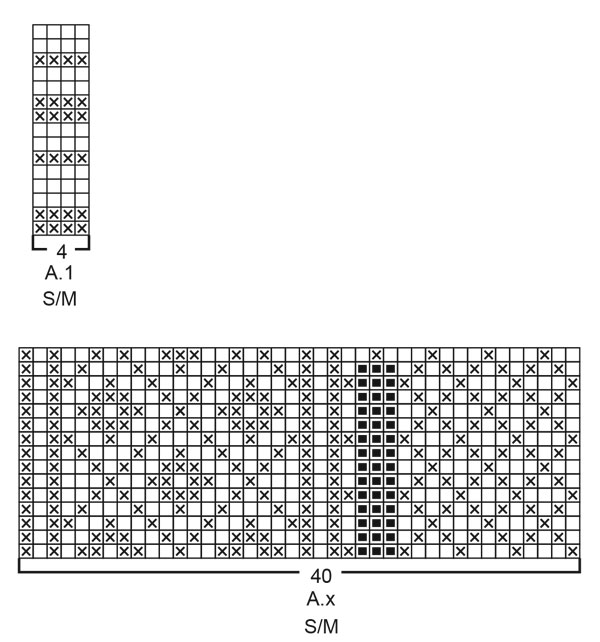
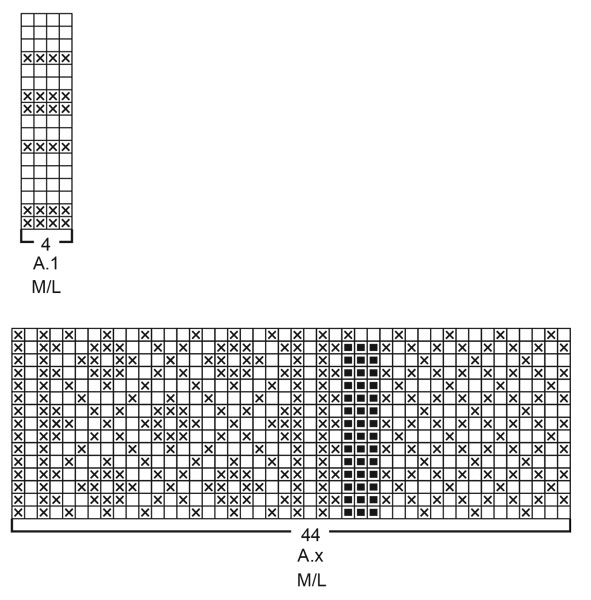
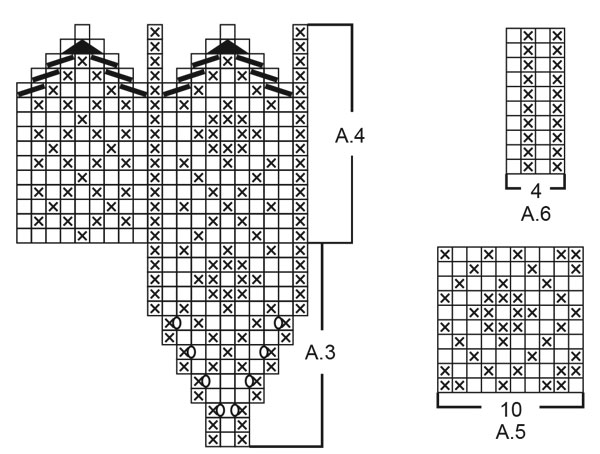
VYSVĚTLIVKY:

-------------------------------------------------------

VZOR:
Rukavice: Viz schémata A.1 až A.4. Zvolte si schéma pro vaši velikost (platí pro A.1, A.2, A.x and A.y)
Ponožky: Viz schémata A.5 a A.6.
Celý vzor pleteme lícovým žerzejem, s výjimkou vzoru A.1, který je pletený pružným vzorem.

TIP - PŘIDÁVÁNÍ/UJÍMÁNÍ:
Abychom vypočítali, v jakých rozestupech máme přidávat/ujímat, vydělíme celkový počet ok na jehlici (tj. 36 ok) počtem ok, která potřebujeme přidat/ujmout (např. 4), takže 36 : 4 = 9.
V tomto případě tedy 1x nahodíme za každým 9. okem. V následující kruhové řadě pleteme nahození za zadní nit, aby se v pletenině netvořily dírky.
Pokud ujímáme, pak spleteme hladce dohromady každé 8. a 9. oko.

TVAROVÁNÍ PATY:
1. ŘADA (= lícová): pleteme vzor A.6 až po posledních 4-5-5 ok, následující oko sejmeme hladce, 1 oko upleteme hladce a sejmuté přes ně přetáhneme, práci otočíme.
2. ŘADA (= rubová): pleteme vzor A.6 až po posledních 4-5-5 ok, následující oko sejmeme obrace, 1 oko upleteme obrace a sejmuté přes ně přetáhneme, práci otočíme.
3. ŘADA (= lícová): pleteme vzor A.6 až po poslední 3-4-4 oka, následující oko sejmeme hladce, 1 oko upleteme hladce a sejmuté přes ně přetáhneme, práci otočíme.
4. ŘADA (= rubová): pleteme vzor A.6 až po poslední 3-4-4 oka, následující oko sejmeme obrace, 1 oko upleteme obrace a sejmuté přes ně přetáhneme, práci otočíme.
Tímto způsobem pokračujeme v ujímání (vždy o 1 oko snížíme počet ok zbylých v řadě) dokud nám na jehlicích nezůstane 9-9-11 ok.

TIP - UJÍMÁNÍ (ponožky):
Začínáme 2 oka před značkou: 2 oka spleteme hladce jinou barvou, než má označené oko, označené oko pak upleteme jako dříve, následující 2 oka spleteme hladce za zadní nit jinou barvou, než má označené oko. Stejně postupujeme i u druhé značky (= v kruhové řadě ujmeme 4 oka).

-------------------------------------------------------

POPIS PRÁCE:

-------------------------------------------------------

RUKAVICE - JAK BUDEME POSTUPOVAT:
Pleteme v kruhových řadách na ponožkových jehlicích, zdola nahoru (tj. od lemu ke špičce), ve vyznačeném místě přidáme oka pro palec – tato oka pak odložíme na pomocnou jehlici a dopleteme tělo rukavice. Palec upleteme nakonec.

PRAVÁ RUKAVICE:
Na ponožkové jehlice č.3,5 nahodíme světle modrou přízí 36-40 ok a pleteme v kruhových řadách pružným vzorem 2/2, tj. střídáme 2 oka hladce, 2 obrace, barvy příze střídáme v pruzích dle schématu A.1.
Po dokončení celé sekvence vzoru A.1 upleteme 1 kruhovou řadu hladce stříbrošedou přízí a SOUČASNĚ přidáme rovnoměrně 4-4 oka – viz TIP -PŘIDÁVÁNÍ/UJÍMÁNÍ = 40-44 ok.
Pleteninu převedeme na ponožkové jehlice č.4 a rukavici dokončíme lícovým žerzejem.
Pleteme vzor podle schématu A.2.
SOUČASNĚ v 1. kruhové řadě pleteme nad 3 černými čtverečky ve vzoru A.2 vzor A.3. Pro vytvoření klínku pro palec přidáváme podle schématu A.3. Po dokončení celé sekvence vzoru A.3 (na výšku) máme ve vzoru A.3 přidaných 8 ok, takže celkem máme nyní 11 ok v klínku pro palec.
V následující kruhové řadě odložíme těchto 11 ok na pomocnou jehlici a za nimi nahodíme 3 oka nová (oka nahodíme barvou dle schématu) = 40-44 ok. Pokračujeme vzorem A.2 nad všemi oky.
Po dokončení celé sekvence vzoru A.2 zbývá na jehlicích 8 ok. Přízi odstřihneme, protáhneme zbylými oky, stáhneme a zapošijeme.

PALEC:
Odložených 11 ok palce vrátíme zpět na ponožkové jehlice č.4 a upleteme nad nimi prvních 11 ok první řady vzoru A.4 (= přední strana palce) - navíc k nim nabereme z okraje otvoru pro palec ještě 9 ok (tj. 2 oka na každé straně a 5 ok ze 3 nahozených ok); nad těmito 9 oky upleteme posledních 9 ok první řady vzoru A.4 (= zadní strana palce) = 20 ok. Pokračujeme v kruhových řadách vzorem A.4. Po dokončení celé sekvence vzoru A.4 zbývají v kruhové řadě 4 oka. Přízi odstřihneme, protáhneme zbylými oky, stáhneme a zapošijeme.

LEVÁ RUKAVICE:
Levou rukavici pleteme stejně jako pravou, jen zrcadlově převrácenou, tj. palec leží na opačné straně – viz schéma A.x, které zobrazuje umístění klínku ve vzoru. Po dokončení celé sekvence vzoru A.x (na výšku) pleteme až do ukončení práce vzor A.y.
Palec pak pleteme stejným způsobem, jako u pravé rukavice.
-------------------------------------------------------

PONOŽKY – JAK BUDEME POSTUPOVAT:
Pleteme v kruhových řadách na ponožkových jehlicích, shora dolů.

PONOŽKA:
Na ponožkové jehlice č.3,5 nahodíme světle modrou přízí 50-52-54 ok. Přízi změníme na stříbrošedou a pleteme v kruhových řadách pružným vzorem 1/1, tj. střídáme 1 oko hladce, 1 obrace, do výše 3 cm.
Pak upleteme 1 kruhovou řadu hladce stříbrošedou přízí a SOUČASNĚ ujmeme rovnoměrně 4 oka (platí pro všechny velikosti) – viz TIP – PŘIDÁVÁNÍ/UJÍMÁNÍ = 46-48-50 ok.
Pleteninu převedeme na ponožkové jehlice č.4 a následující kruhovou řadu pleteme takto: prvních 30 ok pleteme vzorem A.5 (= 3 sekvence po 10 okách), pak 1. oko vzoru A.5 (aby byl vzor symetrický; těchto 31 ok tvoří přední stranu ponožky), 14-16-18 ok vzorem A.6 a nakonec 1. oko vzoru A.6 (aby byl vzor symetrický; těchto 15-17-19 ok tvoří zadní stranu ponožky). V tomto rozvržení pokračujeme.
Po dokončení 3 celých sekvencí vzoru A.5 a A.6 (na výšku; platí pro všechny velikosti) odložíme 31 ok přední strany na pomocnou jehlici (tj. oka vzoru A.5; = nárt) = na jehlicích zbývá 15-17-19 ok paty.
Nad oky paty upleteme v řadách 5-5,5-6 cm výšky vzorem A.6. Doprostřed poslední řady vložíme značku – později od ní budeme měřit délku chodidla.
Teď TVARUJEME PATU – viz výše.

Po vytvarování paty pleteme následující kruhovou řadu takto: 9-9-11 ok paty pleteme dál vzorem A.6, podél strany paty nabereme 8-10-12 ok (barvami dle vzoru A.6), odložených 31 ok nártu z pomocné jehlice upleteme vzorem A.5 a nabereme 8-10-12 ok podél druhé strany paty (barvami dle vzoru A.6) = na jehlicích máme 56-60-66 ok.
31 ok nártu pleteme dál vzorem A.5, ostatní oka vzorem A.6.
SOUČASNĚ v 1. kruhové řadě začneme ujímat na každé straně 31 ok nártu – ujímáme vedle krajních ok vzoru A.6, takto:
první oko vzoru A.6 upleteme jako dříve (toto oko není součástí ujímání, ale pleteme je stále světle modrou přízí), 2 oka spleteme světle šedou přízí hladce za zadní nit, pak pleteme vzor A.6 až po poslední 3 oka před vzorem A.5, 2 oka spleteme hladce světle šedou přízí a upleteme poslední oko vzoru A.6 jako dříve (toto oko není součástí ujímání, ale pleteme je stále světle modrou přízí).
Takto ujímáme v každé 2. kruhové řadě, celkem 4-6-6x = 48-48-54 ok.
Dál pleteme vzory A.5 a A.6, až do výše 18-20-22 cm od značky na patě (= do výsledných rozměrů zbývá doplést asi 4-4-5 cm výšky – ponožku teď můžete vyzkoušet a míry upravit, ale dbejte na to, abyste končili po dopletení poloviny nebo celé sekvence vzoru A.5 (na výšku)).
Pokračujeme vzorem A.6 nad všemi oky, vzor přizpůsobíme tak, aby navazoval na vzor na chodidle.
SOUČASNĚ si ve 2. kruhové řadě označíme boky ponožky – mezi značkami leží 23-23-27 ok nártu a 23-23-25 ok chodidla.
Pleteme v kruhových řadách lícovým žerzejem a SOUČASNĚ tvarujeme špičku - ujímáme na obou stranách každého označeného oka – viz TIP - UJÍMÁNÍ = ujmeme 4 oka. Takto ujímáme v každé kruhové řadě, celkem 9-9-10x = 12-12-14 ok. V následující kruhové řadě spleteme každá 2 oka hladce = 6-6-7 ok. Přízi odstřihneme, protáhneme zbylými oky, stáhneme a zapošijeme.
Ponožka měří asi 22-24-27 cm (od značky na patě, měřeno na chodidle).
Stejným způsobem upleteme i druhou ponožku.

Schéma

symbols = stříbrošedá
symbols = světlá modrá
symbols = 1 oko sejmeme hladce, 1 oko upleteme hladce stříbrošedou přízí a sejmuté přes ně přetáhneme (= 1 oko ujmeme)
symbols = 2 oka spleteme hladce stříbrošedou přízí (= 1 oko ujmeme)
symbols = 1 oko sejmeme hladce, 2 oka spleteme hladce stříbrošedou přízí a sejmuté přes ně přetáhneme (= 2 oka ujmeme)
symbols = zde pleteme klínek pro palec, tj. vzor A.3
symbols = 1x nahodíme stříbrošedou přízí, v následující kruhové řadě pleteme nahození za zadní nit, aby se v pletenině netvořily dírky (= 1 oko přidáme)
diagram
diagram
diagram
diagram
diagram

Každý náš návod je doprovázen speciálními video-ukázkami, které vás navedou.

Chcete se na něco zeptat? Projděte si seznam nejčastějších otázek (FAQ).

Knitting tension is what determines the final measurements of your work, and is usually measured per 10 x 10 cm. It is provided like so: number of stitches in width x number of rows in height - eg: 19 stitches x 26 rows = 10 x 10 cm.

The knitting tension is very individual; some people knit/crochet loosely while others work tightly. You adjust the knitting tension with the needle size, which is why the suggested needle size is only meant as a guide! You need to adjust this (up or down) to ensure that YOUR knitting tension matches the knitting tension provided in the pattern. If you work with a different knitting tension than provided you will have a different yarn consumption, and your work will have different measurements than what the pattern suggests.

The knitting tension also determines which yarns can replace each other. As long as you achieve the same knitting tension you can replace one yarn with another.

See DROPS lesson: How to measure your tension/gauge

See DROPS video: How to make a gauge tension swatch

The required amount of yarn is provided in grams, eg: 450 g. To calculate how many balls you’ll need you first need to know how many grams are in 1 ball (25g, 50g or 100g). This information is available if you click on the individual yarn quality on our pages. Divide the amount required with the amount of each ball. For example, if each ball is 50g (the most common amount), the calculation will be as follows: 450 / 50 = 9 balls.

The important thing when changing from one yarn to another is that the knitting/crochet tension remains the same. This is so that the measurements of the finished piece will be the same as on the sketch provided. It is easier to achieve the same knitting tension using yarns from the same yarn group. It is also possible to work with multiple strands of a thinner yarn to achieve the knitting tension of a thicker one. Please try our yarn converter. We recommend you to always work a test swatch.

Please NOTE: when changing yarn the garment might have a different look and feel to the garment in the photo, due to individual properties and qualities of each yarn.

See DROPS lesson: Can I use a different yarn than the one mentioned in the pattern?

All our yarns are categorised into yarn groups (from A to F) according to thickness and knitting tension – group A contains the thinnest yarns and group F the thickest. This makes it easier for you to find alternative yarns to our patterns, should you wish to switch yarn. All yarns within the same group have a similar knitting tension and can easily replace each other. However, different yarn qualities have different structures and properties which will give the finished work a unique look and feel.

Click here for an overview of the yarns in each yarn group

At the top of all our patterns you’ll find a link to our yarn calculator, which is a helpful tool should you wish to use a different yarn than suggested. By filling in the yarn quality you wish to replace, the amount (in your size) and number of strands, the calculator will present good alternative yarns with the same knitting tension. Additionally it will tell you how much you’ll require in the new qualities and whether you’ll need to work with multiple strands. Most skeins are 50g (some are 25g or 100g).

If the pattern is worked with multiple colours, every colour will have to be calculated separately. Similarly, if the pattern is worked with several strands of different yarns (for example 1 strand Alpaca and 1 strand Kid-Silk) you will have to find alternatives for each, individually.

Click here to see our yarn calculator

Since different yarns have different qualities and textures we have chosen to keep the original yarn in our patterns. However, you can easily find options among our available qualities by using our yarn calculator, or simply pick a yarn from the same yarn group.

It is possible that some retailers still have discontinued yarns in stock, or that someone has a few skeins at home that they would like to find patterns for.

The yarn calculator will provide both alternative yarn as well as required amount in the new quality.

If you think it's hard to decide what size to make, it can be a good idea to measure a garment you own already and like the size of. Then you can pick the size by comparing those measures with the ones available in the pattern's size chart.

You'll find the size chart at the bottom of the pattern.

See DROPS lesson: How to read size chart

The needle size provided in the pattern serves only as a guide, the important thing is to follow the knitting tension. And since knitting tension is very individual, you will have to adjust the needle size to ensure that YOUR tension is the same as in the pattern – maybe you’ll have to adjust 1, or even 2 needle sizes, up or down to achieve the correct tension. For this, we recommend that you work test swatches.

Should you work with a different knitting tension than the one provided, the measurements of the finished garment might deviate from the measurement sketch.

See DROPS lesson: How to measure your tension/gauge

See DROPS video: How to make a tension/gauge swatch

Working a garment top-down provides more flexibility and room for personal adjustment. For example it is easier to try the garment on while working, as well as making adjustments to length of yoke and shoulder caps.

The instructions are carefully explaining every step, in the correct order. Diagrams are adjusted to the knitting direction and are worked as usual.

The diagram depicts all rows/rounds, and every stitch seen from the right side. It is read from bottom to top, from right to left. 1 square = 1 stitch.

When working back and forth, every other row is worked from the right side and every other row is worked from the wrong side. When working from the wrong side, the diagram will have to be worked reversed: from left to right, knit stitches are purled, purl stitches are knit etc.

When working in the round every round is worked from the right side and the diagram are worked from right to left on all rounds.

See DROPS lesson: How to read knitting diagrams

The diagram depicts all rows/rounds, and every stitch seen from the right side. It is worked from bottom to top, from right to left.

When working back and forth every other row is worked from the right side: from right to left and every other row is worked from the wrong side: from left to right.

When working in the round, every row in the diagram are worked from the right side, from right to left.

When working a circular diagram you start in the middle and work your way outwards, counter clockwise, row by row.

The rows usually start with a given number of chain stitches (equivalent to the height of the following stitch), this will either be depicted in the diagram or explained in the pattern.

See DROPS lesson: How to read crochet diagrams

Instructions for working several diagrams after each other on the same row/round, will often be written like so: “work A.1, A.2, A.3 a total of 0-0-2-3-4 times". This means you work A.1 once, then A.2 is worked once, and A.3 is repeated (in width) the number of times provided for your size – in this case like so: S = 0 times, M = 0 times, L=2 times, XL= 3 times and XXL = 4 times.

The diagrams are worked as usual: begin with the first row in A.1, then work the first row in A.2 etc.

See DROPS lesson: How to read knitting diagrams

See DROPS lesson: How to read crochet diagrams

The total width of the garment (from wrist-to-wrist) will be larger in the larger sizes, despite the actual sleeves being shorter. The larger sizes have longer sleeve caps and wider shoulders, so there will be a good fit in all sizes.

The measurement sketch/schematic drawing provides information regarding the full length of the garment. If it’s a jumper or a jacket the length is measured from the highest point on the shoulder closest to the neckline, and straight down to the bottom of the garment. It is NOT measured from the tip of shoulder. Similarly, the length of yoke is measured from the highest point on the shoulder and down to where yoke is split into body and sleeves.

On a jacket measures are never taken along bands, unless specifically stated. Always measure inside band stitches when measuring the length.

See DROPS lesson: How to read a schematic drawing

Diagrams are often repeated on the round or in height. 1 repeat is the diagram the way it appears in the pattern. If it says to work 5 repeats of A.1 in the round, then you work A.1 a total of 5 times after/next to each other in the round. If it says to work 2 repeats of A.1 vertically/in height you work the entire diagram once, then begin again at the start and work the entire diagram one more time.

Chain stitches are slightly narrower than other stitches and to avoid working the cast-on edge too tight, we simply chain more stitches to begin with. The stitch count will be adjusted on the following row to fit the pattern and measurement sketch.

The rib edge is more elastic and will contract slightly compared to, for example, stocking stitch. By increasing before the rib edge, you avoid a visible difference in width between the rib edge and the rest of the body.

It’s very easy to cast off too tightly, and by making yarn overs while casting off (and simultaneously casting these off) you avoid a too tight cast off edge.

See DROPS video: How to bind off with yarn overs (yo)

To achieve an even increase (or decrease) you can increase on, for example: every 3rd and 4th row alternately, like so: work 2 rows and increase on the 3rd row, work 3 rows and increase on the 4th. Repeat this until the increase is complete.

See DROPS lesson: Increase or decrease 1 st on every 3rd and 4th row alternately

Should you prefer to work in the round instead of back and forth, you may of course adjust the pattern. You’ll need to add steeks mid-front (usually 5 stitches), and follow the instructions. When you would normally turn and work from the wrong side, simply work across the steek and continue in the round. At the end you’ll cut the piece open, pick up stitches to work bands, and cover the cut edges.

See DROPS video: How to knit steeks and cut open

Should you prefer to work back and forth instead of in the round, you may of course adjust the pattern so you work the pieces separately and then assemble them at the end. Divide the stitches for the body in 2, add 1 edge stitch in each side (for sewing) and work the front and back pieces separately.

See DROPS lesson: Can I adapt a pattern for circular needles into straight needles?

Pattern repeats can vary slightly in the different sizes, in order to get the correct proportions. If you’re not working the exact same size as the garment in the photo, yours might deviate slightly. This has been carefully developed and adjusted so that the complete impression of the garment is the same in all sizes.

Make sure to follow instructions and diagrams for your size!

If you have found a pattern you like which is available in women’s size it’s not very difficult to convert it to men’s size. The biggest difference will be the length of sleeves and body. Start working on the women size that you think would fit across the chest. The additional length will be worked right before you cast off for the armhole/sleeve cap. If the pattern is worked top-down you can add the length right after the armhole or before the first decrease on sleeve.

Regarding additional yarn amount, this will depend on how much length you add, but it is better with a skein too many than too few.

All yarns will have excess fibres (from production) that might come off as lint or shedding. Brushed yarns (ie hairier yarns) have more of these loose, excess fibres, causing more shedding.

Shedding also depends on what is worn under or over the garment, and whether this pulls at the yarn fibres. It’s therefore not possible to guarantee that there will be no shedding

Below are some tips on how to get the best result when working with hairier yarns:

1. When the garment is finished (before you wash it) shake it vigorously so the looser hairs come off. NOTE: do NOT use a lint roller, brush or any method that pulls at the yarn.

2. Place the garment in a plastic bag and put it in your freezer - the temperature will cause the fibres to become less attached to each other, and excess fibres will come off easier.

3. Leave in the freezer for a few hours before taking it out and shaking it again.

4. Wash the garment according to the instructions on the yarn label.

Pilling is a natural process that happens to even the most exclusive of fibers. It's a natural sign of wear and tear that is hard to avoid, and that is most visible in high friction areas of your garment like a sweater's arms and cuffs.

You can make your garment look as new by removing the pilling, using a fabric comb or a pill/lint remover.

Pořád se nemůžete dobrat odpovědi, kterou hledáte? Pak posuňte stránku dolů a napište nám svůj dotaz, naši specialisté se vám pokusí poradit. Obvykle to zvládneme během 5 až 10 pracovních dnů..
Mezitím si můžete pročíst otázky a odpovědi, které k tomuto modelu položili ostatní, nebo navštívit skupinu DROPS Workshop na Facebooku, kde vám může poradit některá spřízněná duše!

Přidejte komentář k návodu DROPS 214-54

Rádi bychom věděli, co si o tomto modelu myslíte!

Pokud se chcete na něco zeptat, dbejte prosím na to, abyste ve formuláři níže vybrali správnou kategorii - díky tomu se dříve dozvíte, co potřebujete vědět. Povinná pole jsou označena *.

Komentáře / Otázky (14)

country flag Mette Marthinsen wrote:

Jeg strikket disse vottene i s/m og m/l, men hvorfor er det ikke to mønster til tommel? Votter i to str, men tommel i en str, det er merkelig. Jeg strikket tommel i m/l på pinne 4,5 for å få den større, men det burde være mønster i to str.

13.12.2023 - 06:38

country flag Hanne wrote:

Jeg synes, at der mangler forklaring/video til hvordan man stikker hælen med de lodrette striber, altså jeg ønsker tydeligere forklaring til denne til hælen i "fjord Mosaik"

20.02.2023 - 22:52

DROPS Design answered:

Hej Hanne, du finder forklaringen til hælindtagningen i starten af opskriften, ovenover vanterne :)

23.02.2023 - 15:43

country flag Bettina Moth Kej wrote:

Der er kun Indtagningssymboler på vanterne. Der må mangle udtagningssymbol/ forklaring til timmelfinger udtagning?!?!?!?\r\nHjælp!!!

06.02.2023 - 20:15

DROPS Design answered:

Hej Bettina, udtagningerne er omslagene du finder i diagram A.3 til tommelfingeren - symbolteksten er nu rettet, tak for info :)

08.02.2023 - 07:34

country flag Patricia wrote:

Hello! I am at the heel decrease for my first sock and a bit confused. When I get to 5 stitches remaining, slip one stitch, knit 1, then pass the slipped stitch back over, what do I do with the remaining 3 stitches? Also, how is this decreasing my stitches to 9 on the needle (I currently have 17)? Thanks for sharing so many beautiful, free patterns!

05.02.2022 - 03:02

DROPS Design answered:

Dear Patricia, you turn the work without working the remaining 3 stitches; these are called short rows. You decrease once in each row, but you also stop working 2 or 3 stitches on each row, because you turn before working them, so you will decrease up to 9 stitches faster. Happy knitting!

05.02.2022 - 19:33

country flag Helene Rasmussen wrote:

Der er billede af sokker men ingen opskrift, kun på vanter,men dem er der ikke billede af. Er det ikke en fejl?

11.09.2021 - 01:48

DROPS Design answered:

Hej Helene. Det är opskrift på både sokker och vanter. Först kommer vanter och sedan sokker. Mvh DROPS Design

16.09.2021 - 13:50

country flag Laura wrote:

Buongiorno, Non capisco cosa vuol dire: “ lavorare fino alla lunghezza desiderata, MA FINIRE DOPO MEZZA E UN’INTERA RIPETIZIONE DI A5 IN ALTEZZA”. Cosa vuol dire “mezza e un’intera ripetizione”? Grazie

03.09.2021 - 15:25

DROPS Design answered:

Buonasera Laura, abbiamo corretto il testo, deve lavorare una ripetizione intera del motivo o mezza. Buon lavoro!

04.09.2021 - 21:21

country flag Laura wrote:

Chiedo scusa, ma se lavoro 5 cm dopo aver messo in sospeso le maglie della calza davanti prima di fare le diminuzioni del tallone, poi come faccio a riprendere solo 8 maglie e chiudere il lavoro?

27.08.2021 - 18:36

DROPS Design answered:

Buonasera Laura, deve lavorare 5 cm sulle maglie del tallone, poi continuare A.6 sulle 9 maglie del tallone, riprendere 8 maglie ai due lati del tallone e continuare A.5 sulle 31 maglie in sospeso. Buon lavoro!

29.08.2021 - 22:26

country flag Kathrine wrote:

Jeg strikket vottene etter oppskrift M/L str Vottene passet til min sønn på 9 år! De passet overhodet ikke til meg😡 Mønsteret er helt nydelig, og jeg gledet med til å få meg nye votter

11.04.2021 - 22:18

country flag Friederike wrote:

Danke für die Antwort! Was ich nicht ganz verstehe... Wenn ich in der 1.Reihe das Muster Stricke und gleichzeitig den Raglan zunehme.Stricke ich diese Maschen dann laut Muster ab oder werden die vom Muster ausgenommen?

17.02.2021 - 17:06

DROPS Design answered:

Liebe Friederike, Sie meinen für den Pullover "Fjord Mosaic"? Bei der 1. Reihe bei der Passen stricken Sie die 1. Reihe von den Diagrammen und gleichzeitg nehmen Sie 1 Masche beidseitig von der M mit der Markierung, dh z. B. für die Ärmel in S: 1 Umschlag, 1. Reihe A.1, 1 Umschlag. Bei der 2. Runde stricken Sie diese 13 M wie im Diagram (= Umschläge werden mit perlgrau gestrickt). Bei der 3. Reihe stricken Sie: 1 Umschlag, 3. Reihe A.1, 1 Umschlag, bei der 4. Reihe stricken Sie diese 15 M wie im Diagram gezeigt. (A.2A und A.2C stricken Sie genauso wie bei A.1). Hilft es Ihnen weiter?

18.02.2021 - 08:39

country flag Eva Lodal wrote:

Ifølge forklaringen til diagrammet skal man tage ind på tommelen i stedet for ud ...

03.02.2021 - 16:48