
Popular categories
Looking for a yarn?


|
||||||||||||||||||||||
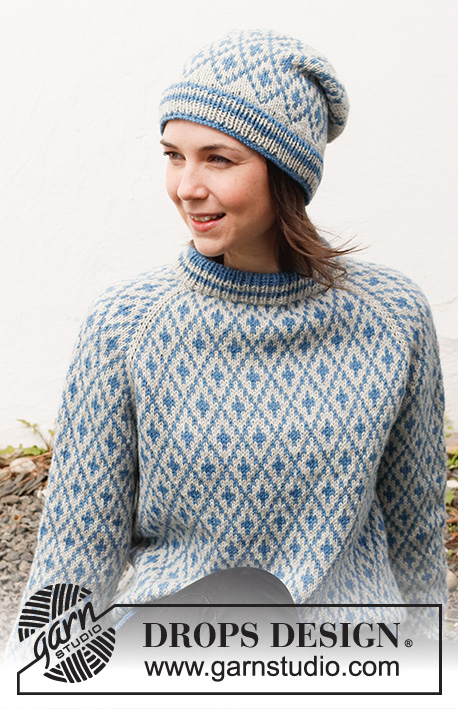
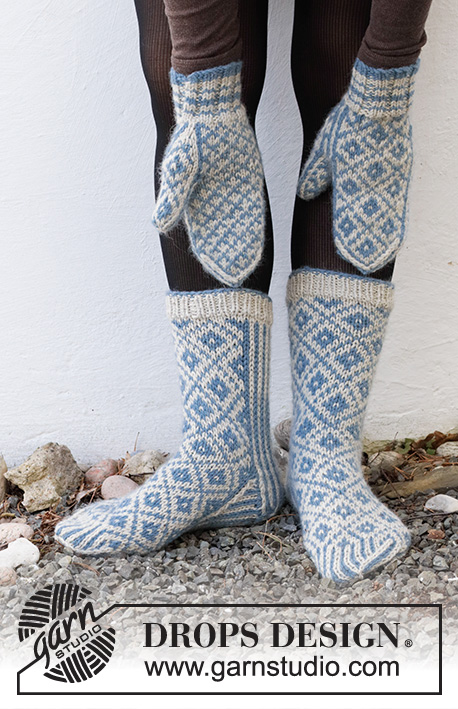
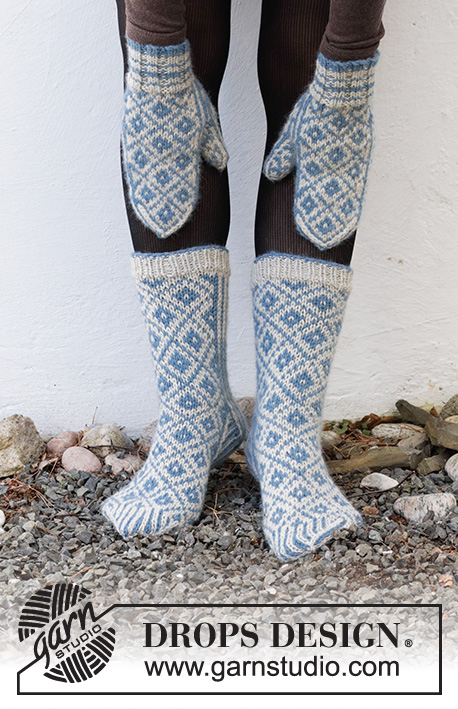
Fjord Mosaic Set |
||||||||||||||||||||||
 |
 |
|||||||||||||||||||||
Knitted mittens and socks with Nordic pattern in DROPS Nepal. Mitten sizes S/M – M/L. Sock sizes 35 – 43.
DROPS 214-54 |
||||||||||||||||||||||
|
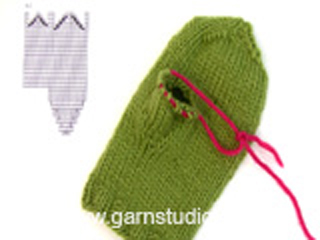
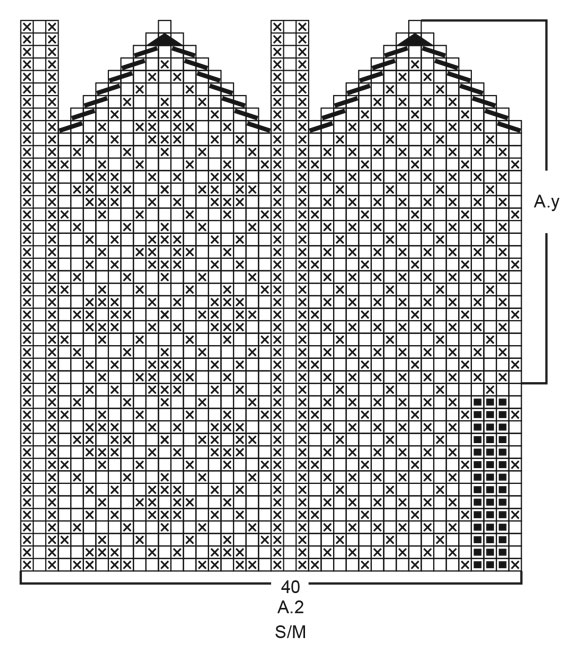
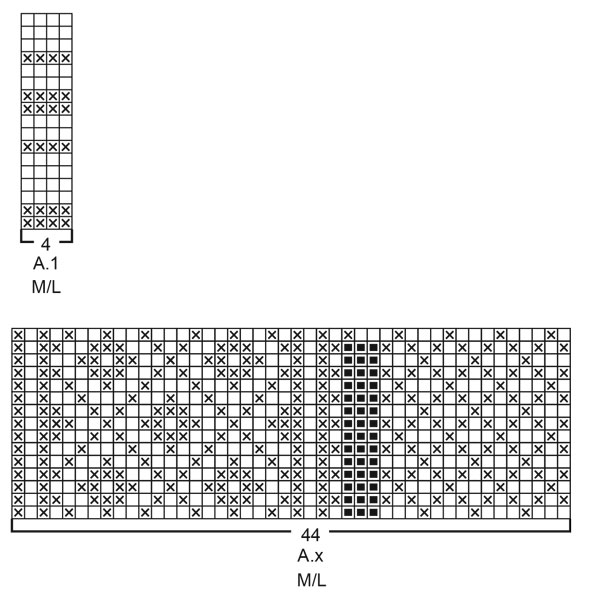
------------------------------------------------------- EXPLANATIONS FOR THE PATTERN: ------------------------------------------------------- PATTERN: Mittens: See diagrams A.1 to A.4. Chose diagram for your size (applies to A.1, A.2, A.x and A.y) Socks: See diagrams A.5 and A.6. The whole pattern is worked in stocking stitch, apart from A.1 which is worked in rib. INCREASE/DECREASE TIP (evenly spaced): To work out how to increase/decrease evenly, count the total number of stitches on needle (e.g. 36 stitches) and divide with number of increases/decreases to be made (e.g. 4) = 9. In this example, increase by making 1 yarn over after each 9th stitch. On the next round, knit the yarn overs twisted to avoid holes. When decreasing, knit together each 8th and 9th stitch. HEEL DECREASE: ROW 1 (= right side): Work A.6 until there are 4-5-5 stitches left, slip 1 stitch as if to knit, knit 1 and pass the slipped stitch over the knitted stitch, turn. ROW 2 (= wrong side): Work A.6 until there are 4-5-5 stitches left, slip 1 stitch as if to purl, purl 1 and pass the slipped stitch over the purled stitch, turn. ROW 3 (= right side): Work A.6 until there are 3-4-4 stitches left, slip 1 stitch as if to knit, knit 1 and pass the slipped stitch over the knitted stitch, turn. ROW 4 (= wrong side): Work A.6 until there are 3-4-4 stitches left, slip 1 stitch as if to purl, purl 1 and pass the slipped stitch over the purled stitch, turn. Continue to decrease like this, by working until there is one stitch less left before slipping a stitch, and until there are 9-9-11 stitches left on the needle. DECREASE TIP (for socks): Start 2 stitches before the marker-stitch, knit 2 together using the opposite colour to the marker-stitch, work the marker-stitch as before, knit 2 twisted together using the opposite colour to the marker-stitch. Decrease in the same way at the second marker (= 4 stitches decreased on the round). ------------------------------------------------------- START THE PIECE HERE: ------------------------------------------------------- MITTENS – SHORT OVERVIEW OF THE PIECE: The piece is worked bottom up. Increase for the thumb-gusset as shown in the diagram, then the thumb-stitches are placed on 1 thread before the hand is finished. Finally, the thumb is worked. RIGHT MITTEN: Cast on 36-40 stitches with double pointed needles size 3.5 mm and light blue. Work rib in the round (= knit 2, purl 2) with stripes as shown in A.1. When A.1 has been completed in height, knit 1 round with light grey where you increase 4-4 stitches evenly spaced – read INCREASE/DECREASE TIP = 40-44 stitches. Change to double pointed needles size 4 mm. The rest of the mitten is worked in stocking stitch. Work according to diagram A.2. REMEMBER THE KNITTING TENSION! AT THE SAME TIME on the first round work A.3 over the 3 black squares in A.2. Increase for the thumb-gusset as shown in A.3. When A.3 has been worked in height, 8 stitches have been increased in A.3, which now covers 11 stitches. On the next round place these 11 stitches on a thread and cast on 3 new stitches over the stitches on the thread (cast on with the colours shown in the diagram) = 40-44 stitches. Continue with A.2 over all stitches. When A.2 has been completed, there are 8 stitches left. Cut the strands and pull them through the remaining stitches, tighten and fasten well. THUMB: Place the 11 stitches from the thread on double pointed needles size 4 mm and work the first 11 stitches on the first row in A.4 over these 11 stitches (= front of thumb) – in addition knit up 9 stitches around the opening, i.e. 2 on each side and 5 stitches in the 3 cast-on stitches (work the last 9 stitches on the first row in A.4 over these 9 stitches = back of thumb) = 20 stitches. Continue A.4 in the round. When A.4 has been completed, there are 4 stitches left. Cut the strands and pull them through the remaining stitches, tighten and fasten well. LEFT MITTEN: Work the left mitten in the same way as the right mitten, but work the thumb gusset on the opposite side – see diagram A.x which shows where the thumb gusset is worked in the pattern. When A.x has been completed in height, work A.y to finished length. Work the thumb in the same way as on the right mitten. ------------------------------------------------------- SOCKS – SHORT OVERVIEW OF THE PIECE: The piece is worked in the round with double pointed needles, top down. SOCK: Cast on 50-52-54 stitches with double pointed needles size 3.5 mm and light blue. Change to light grey and work rib in the round (= knit 1, purl 1) for 3 cm. When the rib is finished, knit 1 round with light grey where you decrease 4 stitches evenly spaced in all sizes – read INCREASE/DECREASE TIP = 46-48-50 stitches. Change to double pointed needles size 4 mm and work the next round as follows: Work A.5 over the first 30 stitches (= 3 repeats of 10 stitches), then work the first stitch in A.5 so the pattern is symmetric (these 31 stitches are the front of the sock) work A.6 over the next 14-16-18 stitches and then the first stitch in A.6, so the pattern is symmetric (these 15-17-19 stitches are the back of the sock). Continue this pattern. When A.5 and A.6 have been worked 3 times in height in all sizes, place the 31 front stitches on a thread (i.e. the stitches in A.5) = 15-17-19 stitches left for the heel. Continue with A.6 back and forth over the heel stitches for 5-5½-6 cm. Insert 1 marker in the middle stitch on the last round – this will be used when measuring the foot-length. Work HEEL DECREASE – read description above. After the heel decrease, work the next round as follows: Continue A.6 over the 9-9-11 heel stitches, knit up 8-10-12 stitches along the side of the heel (with the colours in A.6), continue A.5 over the 31 stitches from the thread and knit up 8-10-12 stitches along the other side of the heel (with the colours in A.6) = 56-60-66 stitches on the needles. Continue with A.5 over the 31 stitches on the front of the sock and A.6 over the other stitches. AT THE SAME TIME, on the first round, decrease on each side of the 31 stitches – decrease inside the outermost stitches in A.6 as described below: Work the first stitch in A.6 as before (this stitch is not a part of the decrease, but is continued in light blue), knit 2 twisted together with light grey, work A.6 until there are 3 stitches left before A.5, knit 2 together with light grey and work the last stitch in A.6 as before (this stitch is not a part of the decrease, but is continued in light blue). Decrease like this every 2nd round a total of 4-6-6 times on each side = 48-48-54 stitches. Continue A.5 and A.6 until the piece measures 18-20-22 cm from the marker on the heel, measured under the foot. There is approx. 4-4-5 cm left to finished length; try the sock on and work to desired length, but finish after a half or whole repeat of A.5 in height. Continue with A.6 over all stitches, matching the pattern neatly over the stitches under the foot. AT THE SAME TIME on the 2nd round, insert 1 marker thread on each side so there are 23-23-27 stitches on top of the foot and 23-23-25 stitches underneath. On the next round decrease for the toe on each side of the stitches with marker threads – read DECREASE TIP = 4 stitches decreased. Decrease like this every round a total of 9-9-10 times = 12-12-14 stitches. On the next round knit all stitches together 2 and 2 = 6-6-7 stitches. Cut the strands and pull them through the remaining stitches, tighten and fasten well. The sock measures approx. 22-24-27 cm from the marker on the heel, measured under the foot. Work the other sock in the same way. |
||||||||||||||||||||||
Diagram explanations |
||||||||||||||||||||||
|
||||||||||||||||||||||
|
||||||||||||||||||||||

|
||||||||||||||||||||||

|
||||||||||||||||||||||
|
||||||||||||||||||||||

|
||||||||||||||||||||||
|
Have you made this or any other of our designs? Tag your pictures in social media with #dropsdesign so we can see them! Do you need help with this pattern?You'll find tutorial videos, a Comments/Questions area and more by visiting the pattern on garnstudio.com. © 1982-2024 DROPS Design A/S. We reserve all rights. This document, including all its sub-sections, has copyrights. Read more about what you can do with our patterns at the bottom of each pattern on our site. |
||||||||||||||||||||||


With over 40 years in knitting and crochet design, DROPS Design offers one of the most extensive collections of free patterns on the internet - translated to 17 languages. As of today we count 304 catalogues and 11422 patterns - 11422 of which are translated into English (UK/cm).
We work hard to bring you the best knitting and crochet have to offer, inspiration and advice as well as great quality yarns at incredible prices! Would you like to use our patterns for other than personal use? You can read what you are allowed to do in the Copyright text at the bottom of all our patterns. Happy crafting!
Comments / Questions (14)
Jeg strikket disse vottene i s/m og m/l, men hvorfor er det ikke to mønster til tommel? Votter i to str, men tommel i en str, det er merkelig. Jeg strikket tommel i m/l på pinne 4,5 for å få den større, men det burde være mønster i to str.
13.12.2023 - 06:38Jeg synes, at der mangler forklaring/video til hvordan man stikker hælen med de lodrette striber, altså jeg ønsker tydeligere forklaring til denne til hælen i "fjord Mosaik"
20.02.2023 - 22:52DROPS Design answered:
Hej Hanne, du finder forklaringen til hælindtagningen i starten af opskriften, ovenover vanterne :)
23.02.2023 - 15:43Der er kun Indtagningssymboler på vanterne. Der må mangle udtagningssymbol/ forklaring til timmelfinger udtagning?!?!?!?\r\nHjælp!!!
06.02.2023 - 20:15DROPS Design answered:
Hej Bettina, udtagningerne er omslagene du finder i diagram A.3 til tommelfingeren - symbolteksten er nu rettet, tak for info :)
08.02.2023 - 07:34Hello! I am at the heel decrease for my first sock and a bit confused. When I get to 5 stitches remaining, slip one stitch, knit 1, then pass the slipped stitch back over, what do I do with the remaining 3 stitches? Also, how is this decreasing my stitches to 9 on the needle (I currently have 17)? Thanks for sharing so many beautiful, free patterns!
05.02.2022 - 03:02DROPS Design answered:
Dear Patricia, you turn the work without working the remaining 3 stitches; these are called short rows. You decrease once in each row, but you also stop working 2 or 3 stitches on each row, because you turn before working them, so you will decrease up to 9 stitches faster. Happy knitting!
05.02.2022 - 19:33Der er billede af sokker men ingen opskrift, kun på vanter,men dem er der ikke billede af. Er det ikke en fejl?
11.09.2021 - 01:48DROPS Design answered:
Hej Helene. Det är opskrift på både sokker och vanter. Först kommer vanter och sedan sokker. Mvh DROPS Design
16.09.2021 - 13:50Buongiorno, Non capisco cosa vuol dire: “ lavorare fino alla lunghezza desiderata, MA FINIRE DOPO MEZZA E UN’INTERA RIPETIZIONE DI A5 IN ALTEZZA”. Cosa vuol dire “mezza e un’intera ripetizione”? Grazie
03.09.2021 - 15:25DROPS Design answered:
Buonasera Laura, abbiamo corretto il testo, deve lavorare una ripetizione intera del motivo o mezza. Buon lavoro!
04.09.2021 - 21:21Chiedo scusa, ma se lavoro 5 cm dopo aver messo in sospeso le maglie della calza davanti prima di fare le diminuzioni del tallone, poi come faccio a riprendere solo 8 maglie e chiudere il lavoro?
27.08.2021 - 18:36DROPS Design answered:
Buonasera Laura, deve lavorare 5 cm sulle maglie del tallone, poi continuare A.6 sulle 9 maglie del tallone, riprendere 8 maglie ai due lati del tallone e continuare A.5 sulle 31 maglie in sospeso. Buon lavoro!
29.08.2021 - 22:26Jeg strikket vottene etter oppskrift M/L str Vottene passet til min sønn på 9 år! De passet overhodet ikke til meg😡 Mønsteret er helt nydelig, og jeg gledet med til å få meg nye votter
11.04.2021 - 22:18Danke für die Antwort! Was ich nicht ganz verstehe... Wenn ich in der 1.Reihe das Muster Stricke und gleichzeitig den Raglan zunehme.Stricke ich diese Maschen dann laut Muster ab oder werden die vom Muster ausgenommen?
17.02.2021 - 17:06DROPS Design answered:
Liebe Friederike, Sie meinen für den Pullover "Fjord Mosaic"? Bei der 1. Reihe bei der Passen stricken Sie die 1. Reihe von den Diagrammen und gleichzeitg nehmen Sie 1 Masche beidseitig von der M mit der Markierung, dh z. B. für die Ärmel in S: 1 Umschlag, 1. Reihe A.1, 1 Umschlag. Bei der 2. Runde stricken Sie diese 13 M wie im Diagram (= Umschläge werden mit perlgrau gestrickt). Bei der 3. Reihe stricken Sie: 1 Umschlag, 3. Reihe A.1, 1 Umschlag, bei der 4. Reihe stricken Sie diese 15 M wie im Diagram gezeigt. (A.2A und A.2C stricken Sie genauso wie bei A.1). Hilft es Ihnen weiter?
18.02.2021 - 08:39Ifølge forklaringen til diagrammet skal man tage ind på tommelen i stedet for ud ...
03.02.2021 - 16:48