


Komentáře / Otázky (21)
![]() Sylvie napsala:
Sylvie napsala:
Bonjour, j’ai une laine dont l’échantillon donne 18 mailles, et donc il me faut augmenter de 10 mailles pour le corps. Normalement pour un small on dit d’augmenter 22 fois au total de chaque côté de A1 et si je le fais une fois de plus j’aurai 8 mailles de plus et je pourrais monter 7 mailles sous les bras au lieu de 6 ce qui me donnera mes 10 mailles . Est-ce que ça peut fonctionner avec le motif????
14.05.2024 - 20:45Odpověď DROPS Design :
Bonjour Sylvie, vérifiez votre échantillon (Indépendamment de ce qui est indiqué sur votre laine), vous devez avoir 16 brides x 8 rangs = 10 x 10 cm pour obtenir les mêmes mesures que celles du schéma pour chacune des tailles. Si vous n'avez pas cet échantillon, il vous faudra alors recalculer pour votre taille ou bien simplement trouver un modèle avec une tension correspondante. Bon tricot!
15.05.2024 - 07:32
![]() Sabine napsala:
Sabine napsala:
Guten Tag, ich bin am Anfang des Pullovers und habe an der Halsblende gleichmäßig verteilt Maschen zugenommen. In der nächsten Runde muss ich u.a. zwei Maschen rechts zusammen stricken. Können Sie mir sagen wie man das macht, wenn eine der beiden Maschen nur ein Umschlag ist? Bei meinem bisherigen Versuch ist ein Loch entstanden, das da sicher nicht sein soll. Vielen Dank und viele Grüße Sabine
05.05.2023 - 15:47Odpověď DROPS Design :
Liebe Sabine, so stricken Sie A.1A bei der 1. Runde: Umschlag, 1 M rechts, Umschlag, 2 M rechts, 1 M abheben, 1 M rechts, die abgehobene Masche über die gestrickte Masche ziehen; A.1B: 1 M links, 2 M re zs, 2 M re, Umschlag, 1 M re, Umschlag, 2 M re, 1 M abheben, 1 M rechts, die abgehobene Masche über die gestrickte Masche ziehen, A.1C: 1 M li, 2 M re zs, 2 M re, Umschlag, 1 M re, Umschlag. Bei der nächsten Runde stricken Sie alle Umschläge rechts, es sollen Löcher entstehen. Viel Spaß beim stricken!
05.05.2023 - 17:06
![]() Melanie napsala:
Melanie napsala:
Bonjour, j ai deux questions : la première on augmente bien de 8mailles (4 par manches) tous les 2 rangs ? La deuxième est sur le fait de faire 2 fois A1b après on doit faire A1a et a1c 1 fois du coup ?
19.09.2022 - 12:29Odpověď DROPS Design :
Bonjour Melanie, on augmente 8 mailles par tour: 1 maille de chaque côté des 2 mailles du raglan tricotées en jersey à la transition du dos/devant et des manches. Quand on a tricoté 20 rangs (et augmenté comme dans les diagrammes A et C), on a augmenté 10 mailles dans A et dans C = soit 1 motif de B en plus de chaque côté; tricotez A.1A au-dessus des 5 premières m de A.1A précédent et les 10 m suivantes en B, puis les 10 premières m du C précédent en B et les 6 dernières mailles en C. Bon tricot!
20.09.2022 - 09:37
![]() Diana napsala:
Diana napsala:
Siempre me respondieron las consultas, no se que pasa que con esta no tengo novedades. Me gustaría poder avanzar con el tejido, sigo esperando la respuesta a mi pregunta. Gracias!!!
22.07.2022 - 01:24
![]() Diana napsala:
Diana napsala:
Hola! Estoy tejiendo este patrón en talla XL. La indicación dice que al terminar 20 vueltas de A1 debería tener 186 puntos, pero sumando los aumentos de las mangas yo tengo 230 puntos. Los aumentos de las mangas van en todas las vueltas? Por otro lado, no me queda claro como comenzar la segunda repetición, ya que en lo que sería A1.A y A1. C ahora hay más puntos, no se como distribuírlos.
21.07.2022 - 01:21Odpověď DROPS Design :
Hola Diana, A.1A y A.1C se trabajan siempre en los extremos. Después de cada 20 filas trabajas 2 repeticiones más de A.1B entre A.1A y A.1C. Los aumentos para el cuerpo están en A.1A y A.1C. Los aumentos de la manga son aparte y se trabajan cada 2ª fila. Después de la 1ª fila con aumentos tienes 114 pts. En la siguiente fila no aumentas. En cada fila con aumentos (que es cada 2ª fila, es decir, una sí y en la siguiente no) aumentas 8 pts. En las 18 filas de A.1 restantes, aumentas 8 pts en cada fila y aumentas en filas alternas/ cada 2ª fila, así que has aumentado 72 pts más. En total, deberías tener 186 pts, incluyendo todo tipo de aumentos.
24.07.2022 - 19:13
![]() Diana napsala:
Diana napsala:
Buenos días! Estoy tejiendo este patrón en talla XL. La indicación dice que al terminar 20 vueltas de A1 debería tener 186 puntos, pero sumando los aumentos de las mangas yo tengo 230 puntos. Por otro lado, no me queda claro como comenzar la segunda repetición, ya que en lo que sería A1.A y A1. C ahora hay más puntos, no se como distribuírlos.
20.07.2022 - 15:28Odpověď DROPS Design :
Hola Diana, puedes ver la respuesta arriba.
24.07.2022 - 19:14
![]() Andrea Rademacher napsala:
Andrea Rademacher napsala:
Hallo! Nach welchen Schema wird das Vorder bzw. Rückenteil gestrickt? Bitte um Rückmeldung. Danke! Lg Andrea Rademacher
08.11.2021 - 17:20Odpověď DROPS Design :
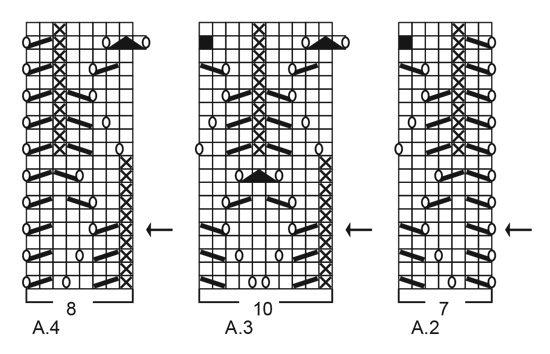
Liebe Frau Rademacher, meinen Sie Rumpfteil nach der Verteilung am Ende der Passe? Die werden mit A.2, A.3 und A.4 gestrickt mit jeweils glatt rechte Maschen an den Seiten. Viel Spaß beim stricken!
09.11.2021 - 12:47
![]() Alicja napsala:
Alicja napsala:
Dzień dobry, mam problem z liczbą oczek dla rozmiaru M w Karczku - po zsumowaniu wszystkich oczek wychodzi mi 90 - a w opisie podano 94 oczka. Dodatkowo napisano, że "dodano 8 oczek", a przecież są tylko 4 narzuty. Proszę o pomoc w zrozumieniu tego opisu..
08.11.2021 - 07:36Odpověď DROPS Design :
Witaj Alicjo, przed rozpoczęciem karczku w rozmiarze M masz 86 oczek. W 1-szym okrążeniu karczku wykonujesz 4 narzuty i dodatkowo będziesz miała 4 dodane oczka w schematach A.1A i A.1C. W sumie po przerobieniu 1-szego okrążenia karczku jest 94 oczka. Powodzenia i miłej pracy!
08.11.2021 - 07:57
![]() Martine MARCHERON napsala:
Martine MARCHERON napsala:
Bonjour Madame, Je vous serais reconnaissante de bien vouloir m'indiquer si je peux réaliser ce modèle avec Drops belle uni colour, ayant fait une erreur inexplicable lors de ma commande ; cela m'éviterait de retourner mes pelotes. Je vous remercie. Cordialement. Mme Marcheron
04.08.2021 - 22:48Odpověď DROPS Design :
Bonjour Mme Marcheron, ce pull se tricote en DROPS Big Merino, qui appartient au groupe C de nos fils alors que Belle appartient au groupe B et ne peut donc pas être utilisé ici, l'échantillon serait différent, vous trouverez ici tous les modèles de pulls femme en laine/fil du groupe B où vous pourrez utiliser Belle, vous trouverez peut-être un autre modèle qui vous conviendra? Utilisez le convertisseur pour obtenir la quantité nécessaire en Belle si besoin. Bon tricot!
05.08.2021 - 09:06
![]() MARCHERON Martinr napsala:
MARCHERON Martinr napsala:
Bonjour Madame, Dans empiècement, tricoter A.1A =5mailles, A.1B au dessus des 20 mailles suivantes. Au dessus ? Je ne comprends pas comment faire au dessus. Je vous remercie d'avance de me renseigner avant que j'effectue ma commande Cordialement Martine
13.05.2021 - 14:25Odpověď DROPS Design :
Bonjour Mme Marcheron. cela veut dire que vous devez tricoter 20 mailles suivantes ainsi: 2 x diagramme A.1B (1 rapport compte 10 mailles). Bon tricot!
13.05.2021 - 15:41
|
||||||||||||||||||||||||||||
Dripping Diamonds#drippingdiamondssweater |
||||||||||||||||||||||||||||
 |
 |
|||||||||||||||||||||||||||
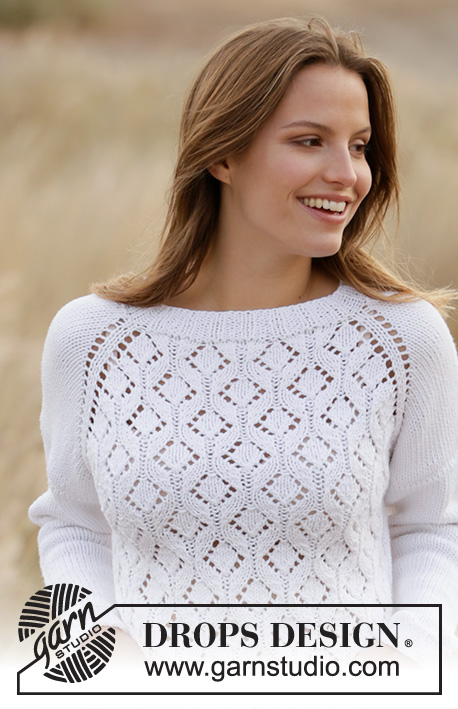
Raglánový pulovr pletený ažurovým vzorem shora dolů z příze DROPS Big Merino. Velikost: S - XXXL
DROPS 210-13 |
||||||||||||||||||||||||||||
|
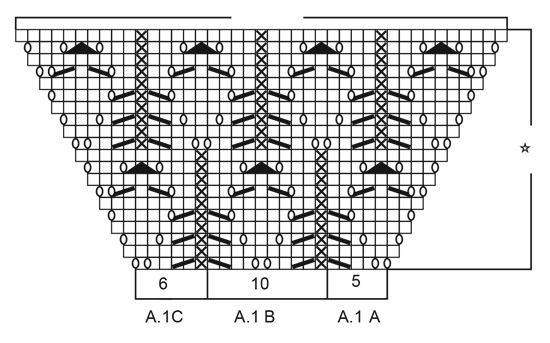
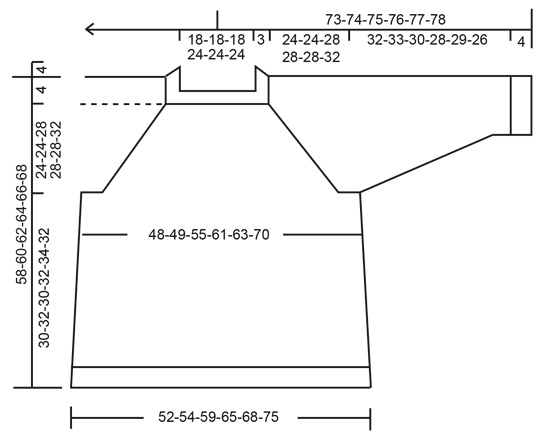
---------------------------------------------------------- VYSVĚTLIVKY: ---------------------------------------------------------- VROUBKOVÝ VZOR: 1 vroubek = 2 kruhové řady. Pleteme střídavě 1 kruhovou řadu hladce, 1 obrace. VZOR: Viz schémata A.1 až A.4. Zobrazeny jsou všechny řady vzoru nahlížené z lícové strany. TIP – PŘIDÁVÁNÍ 1: Abychom vypočítali, v jakých rozestupech máme přidávat, vydělíme celkový počet ok v řadě (např. 78 ok) počtem ok, která potřebujeme přidat (tj. 8), takže 78 : 8 = 9,75. V tomto případě tedy 1x nahodíme za každým zhruba 10. okem. V následující kruhové řadě pleteme nahození za zadní nit, aby se v pletenině netvořily dírky. TIP – PŘIDÁVÁNÍ 2 (boky trupu): Pleteme po poslední 2 oka před značkou, 1x nahodíme, 4 oka upleteme hladce (značka leží uprostřed těchto ok), 1x nahodíme. V následující kruhové řadě pleteme nahození hladce za zadní nit, aby se v pletenině netvořily dírky. Nová oka pak pleteme lícovým žerzejem. TIP – UJÍMÁNÍ (rukávy): Ujímáme 1 oko na každé straně značky, takto – začínáme 3 oka před značkou: 2 oka spleteme hladce, 2 oka upleteme hladce (značka leží mezi nimi), 1 oko sejmeme hladce, 1 upleteme hladce a sejmuté přes ně přetáhneme. ------------------------------------------------------- POPIS PRÁCE: ------------------------------------------------------- PULOVR - JAK BUDEME POSTUPOVAT: Lem průkrčníku a sedlo pleteme v kruhových řadách na kruhové jehlici, shora dolů, začínáme v místě, kde se stýká levý rukáv se zadním dílem. Pak pleteninu rozdělíme na trup a rukávy. Trup pleteme dál v kruhových řadách na kruhové jehlici. Rukávy pleteme v kruhových řadách na ponožkových jehlicích/krátké kruhové jehlici, také shora dolů. LEM PRŮKRČNÍKU: Na kruhovou jehlici č.4,5 nahodíme přízí Big Merino 78-78-78-88-88-88 ok a upleteme 1 kruhovou řadu hladce. Pak pleteme pružným vzorem 2/2 (= střídáme 2 oka hladce, 2 obrace). Ve výši 3 cm upleteme 1 vroubek VROUBKOVÝM VZOREM – viz výše. Pak pleteme 1 kruhovou řadu hladce a SOUČASNĚ přidáme rovnoměrně 8-8-8-18-18-18 ok - viz TIP – PŘIDÁVÁNÍ 1 = 86-86-86-106-106-106 ok. Pleteninu převedeme na kruhovou jehlici č.5. SEDLO: Pleteme v tomto rozvržení: vzor A.1 A (= 5 ok), 20-20-20-30-30-30 ok vzorem A.1 B ( = 2-2-2-3-3-3 sekvence vzoru po 10 okách), vzor A.1 C (= 6 ok), 2 oka lícovým žerzejem (= raglánový „šev“), 1x nahodíme, 8 ok lícovým žerzejem (= rukáv), 1x nahodíme, 2 oka lícovým žerzejem (= raglánový „šev“), vzor A.1 A, 20-20-20-30-30-30 ok vzorem A.1 B, vzor A.1 C, 2 oka lícovým žerzejem (= raglánový „šev“), 1x nahodíme, 8 ok lícovým žerzejem (= rukáv), 1x nahodíme, 2 oka lícovým žerzejem (= raglánový „šev“) = přidali jsme 8 ok. Na jehlici teď máme 94-94-94-114-114-114 ok. V tomto rozvržení vzorů pokračujeme. Na předním a na zadním dílu přidáváme na každé straně, jak je zobrazeno ve schématu A.1, na rukávech přidáváme nahozením na každé straně ok rukávu (raglánový „šev“ = zůstává po celou dobu tvořený 2 oky). Takto přidáváme v každé 2. kruhové řadě. V následující kruhové řadě pleteme nahození hladce – vzniknou dírky. Přidaná oka zapracujeme do lícového žerzeje na rukávu. Na předním a zadním dílu zapracujeme přidaná oka do vzoru A.1. Po dokončení 1 celé sekvence vzoru A.1 (na výšku) máme na jehlici 166-166-166-186-186-186 ok. V tomto rozvržení vzorů stále pokračujeme, tj. vzor opakujeme na výšku tak, jak je zobrazeno ve schématu A.1. Pokaždé, když upleteme 20 řad, můžeme na předním a zadním dílu plést v řadě o 2 sekvence vzoru A.1B více. Když na každé straně vzoru A.1 přidáme celkem 22-22-27-27-27-32x, máme v řadě 262-262-302-322-322-362 ok a díl měří asi 24-24-28-28-28-33 cm (od lemu průkrčníku). Následující kruhovou řadu pleteme takto: 75-75-85-95-95-105 ok upleteme jako dříve (= zadní díl), následujících 56-56-66-66-66-76 ok odložíme na pomocnou jehlici (= rukáv), nahodíme 6-8-8-8-12-14 nových ok (= podpaží), 75-75-85-95-95-105 ok upleteme jako dříve (= přední díl), dalších 56-56-66-66-66-76 ok odložíme na pomocnou jehlici (= rukáv), nahodíme 6-8-8-8-12-14 nových ok (= podpaží). Trup a rukávy dokončíme odděleně. NYNÍ MĚŘÍME DÍL OD TOHOTO MÍSTA! TRUP: = 162-166-186-206-214-238 ok. Na každou stranu trupu vložíme značku, vždy doprostřed 6-8-8-8-12-14 nových ok nahozených v podpaží. Značky během pletení snímáme vždy do aktuálně pletené kruhové řady; využijeme je při přidávání. První kruhovou řadu pleteme takto – začínáme 3-4-4-4-6-7 oka za značkou (začínáme kruhovou řadou, která je v každém schématu označena šipkou): vzor A.2 (= 7 ok), 60-60-70-80-80-90 ok vzorem A.3 (= 6-6-7-8-8-9 sekvencí po 10 okách), vzor A.4 (= 8 ok), 6-8-8-8-12-14 ok lícovým žerzejem (značka leží uprostřed těchto 6-8-8-8-12-14 ok), vzor A.2 (= 7 ok), 60-60-70-80-80-90 ok vzorem A.3 (= 6-6-7-8-8-9 sekvencí po 10 okách), vzor A.4 (= 8 ok), 6-8-8-8-12-14 ok lícovým žerzejem (značka leží uprostřed těchto 6-8-8-8-12-14 ok). V tomto rozvržení vzoru pokračujeme, sekvence vzorů A.2, A.3 a A.4 stále opakujeme (na výšku). Ve výši 5 cm od podpaží přidáme na obou stranách obou značek 1 oko – viz TIP – PŘIDÁVÁNÍ 2 = přidali jsme 4 oka. Takto přidáváme vždy po 7 cm výšky, celkem 4x = 178-182-202-222-230-254 ok. Pleteme až do výše asi 29-31-29-31-33-31 cm od podpaží. Pleteninu převedeme na kruhovou jehlici č.4,5 a upleteme 2 vroubky. Pak převedeme pleteninu zpět na kruhovou jehlici č.5 a všechna oka volně dle vzoru uzavřeme. Pulovr měří asi 58-60-62-64-66-68 cm (od ramene). RUKÁV: Odložených 56-56-66-66-66-76 ok jednoho rukávu vrátíme z pomocné jehlice zpět na krátkou kruhovou jehlici/ponožkové jehlice č.5 a navíc k nim nabereme po 1 oku z každého z 6-8-8-8-12-14 nově nahozených ok v podpaží = 62-64-74-74-78-90 ok. Doprostřed 6-8-8-8-12-14 nově nahozených ok v podpaží vložíme značku – značku během práce snímáme vždy do aktuálně pletené kruhové řady; využijeme ji při ujímání. Kruhová řada začíná u značky, pleteme lícovým žerzejem. Ve výši 3 cm od podpaží ujmeme na každé straně značky 1 oko - viz TIP - UJÍMÁNÍ. Takto ujímáme vždy po 2,5-2,5-2-1,5-1,5-1 cm výšky, celkem 12-12-16-16-17-22x = 38-40-42-42-44-46 ok. Pokračujeme až do výše asi 32-33-30-28-29-26 cm od podpaží. Pleteninu převedeme na ponožkové jehlice č.4,5 a pleteme 1 kruhovou řadu hladce; SOUČASNĚ upravíme celkový počet ok na výsledných 40-40-44-44-44-48. Upleteme 1 kruhovou řadu obrace. Pleteme v kruhových řadách lem pružným vzorem 2/2 (tj. střídáme 2 oka hladce, 2 obrace). Když je lem vysoký 4 cm, všechna oka volně hladce uzavřeme – dbáme na to, aby uzavřený okraj nebyl moc stažený. Rukáv měří asi 36-37-34-32-33-30 cm (od podpaží). Stejným způsobem upleteme i druhý rukáv. |
||||||||||||||||||||||||||||
Vysvětlivky ke schématu |
||||||||||||||||||||||||||||
|
||||||||||||||||||||||||||||
|
||||||||||||||||||||||||||||
|
||||||||||||||||||||||||||||
|
||||||||||||||||||||||||||||
Dokončili jste tento model?Pak označte své fotky tagem #dropspattern #drippingdiamondssweater nebo je pošlete do galerie #dropsfan. Potřebujete s tímto návodem poradit?Otevřete-li si návod na stránce garnstudio.com, najdete tam 25 výukových video-ukázek, Komentáře/Dotazy a další užitečné informace. © 1982-2025 DROPS Design A/S. Vyhrazujeme si veškerá práva. Tento dokument, včetně všech jeho dílčích částí, podléhá autorským právům. Podrobnější komentář k možnostem užití našich návodů najdete dole pod každým návodem na našich stránkách. |
||||||||||||||||||||||||||||


V oblasti pletené a háčkované módy působí DROPS Design více než 40 let. Díky tomu vám můžeme nabídnout jednu z nejrozsáhlejších kolekcí modelů s bezplatnými návody dostupnými na internetu - navíc v 17 jazycích. K dnešnímu dni máme na 314 katalogů a 11822 návodů celkem - z nich je už 7048 dostupných v [češtině].
Přidejte komentář k návodu DROPS 210-13
Rádi bychom věděli, co si o tomto modelu myslíte!
Pokud se chcete na něco zeptat, dbejte prosím na to, abyste ve formuláři níže vybrali správnou kategorii - díky tomu se dříve dozvíte, co potřebujete vědět. Povinná pole jsou označena *.