Komentáře / Otázky (80)
![]() Christina Swartz napsala:
Christina Swartz napsala:
I struggle with charts. Is there a written version?
06.05.2025 - 13:24Odpověď DROPS Design :
Dear Mrs Swartz, we only have diagrams to this pattern but this might help you understanding how to read diagrams. Happy knitting!
06.05.2025 - 13:49
![]() Ferenciné Kozma Szilvia napsala:
Ferenciné Kozma Szilvia napsala:
Kedves Drops Design, hibás a leírás. "NE FELEDKEZZÜNK MEG A MEGFELELŐ KÖTÉSPRÓBA BETARTÁSÁRÓL! Ezután a SZO felől a következő módon haladjunk: 3 szélszem lustakötéssel, az A.1 jelű minta a következő 152 szemen..." Szerintem itt az A.2 jelű mintával kell dolgozni. Üdvözlettel: Szilvia
05.05.2025 - 05:05
![]() Joke Hegener napsala:
Joke Hegener napsala:
Ik heb de babydeken gebreid en het patroon moeten aanpassen om het correct te krijgen de 7 meerderingen voor de overgang naar A3 zijn overbodig en maken het telpatroon onjuist door deze weg te laten is het patroon met 9 ipv 10 herhalingen kloppend
24.03.2025 - 22:31
![]() Ruth napsala:
Ruth napsala:
Ja, ich meine A3 und leider ist im Text eine Zunahme auf 166 beschrieben. Wird die Decke im oberen Bereich dann nicht sehr breit??? Ich kann natürlich auch 17 Maschen gleichmäßig verteilt zunehmen... könnte aber auch bei 159 Maschen aus A2 bleiben und den Rapport A3 nur 9 x wiederholen.
11.02.2025 - 22:55Odpověď DROPS Design :
Liebe Ruth, ja genau so stimmt es auch, es sind vor A.3 166 M auf der Nadel und diese 166 M stricken Sie so: 3 M krausrechts, die nächsten 160 M wie beim A.3 = 16 Maschen 10 Mal wiederholen und 3 M krausrechts stricken. Gleicheizeitig werden Sie 1 M in jedem A.3 bei er 5. Reihe zunehmen dann beim Wellenmuster wird es auch in der 2. Hälfte A.3 zugenommen. Viel Spaß beim Stricken!
12.02.2025 - 09:41
![]() Ruth napsala:
Ruth napsala:
Ich komme mit A2 nicht zurecht. Ab der 7. Reihe zähle ich 17 M pro Rapport. Im Text ist von 16 die Rede. Bei 16 würde die Maschenzahl passen (160:10) bei 17 ist dies ein Problem aber es muss eine ungerade Zahl sein, damit später die Mitte des Musters platziert werden kann... HILFE!
10.02.2025 - 21:22Odpověď DROPS Design :
Liebe Ruth, meinen Sie A.3? A.3 beginnt man über 16 Maschen aber bei der 5. Reihe strickt man 1 Umschlag am Anfang jedem A.3 so sind es 17 Maschen insgesamt. und so sind es insgesamt 176 M auf der Nadel. Nach Lochmuster wird man dann im Wellenmuster noch zunehmen. Viel Spaß beim Stricken!
11.02.2025 - 09:40
![]() Sophie napsala:
Sophie napsala:
Hungarian version incorrect, as usual. Says A1 pattern instead of A2 in the description where A2 is first introduced - or should have been.
18.08.2024 - 11:54
![]() Gigi napsala:
Gigi napsala:
Bonjour Jai 166 ml effectivement pour 3A mais j’arrive pas à terminé mon dessin pour la fin Bon dimanche
07.04.2024 - 12:41Odpověď DROPS Design :
Bonjour Gigi, tricotez ainsi: 3 m point mousse + 10 x les 16 mailles de A.3 (= répétez les 16 mailles du diagramme en commençant par le 1er rang en bas et lisez de droite à gauche sur l'endroit, de gauche à droite sur l'envers - mettez un marqueur entre chaque motif, ça pourra vous aider à bien vérifier votre nombre de mailles) et terminez par 3 mailles point mousse. Notez bien que vous allez augmenter 1 maile au 5ème rang, puis 2 mailles dans le point de vagues, les marqueurs pourront avoir ici leur importance pour pouvoir bien vérifier votre nombre de mailles. Bon tricot!
08.04.2024 - 08:15
![]() Julie napsala:
Julie napsala:
Baby 33-35 is it possible to see the complete blanket. I always like to compare with my work. Picture only shows top I would like to see the bottom Many thanks
26.03.2024 - 04:03Odpověď DROPS Design :
Dear Julie, unfortunately we don't have more pictures of the blanket, but both sides look similar, as the edging is the same feather and pan pettern at the beginning as well as at the end. Happy Knitting!
26.03.2024 - 22:09
![]() Sylvie Bouchard napsala:
Sylvie Bouchard napsala:
Le sixième rang de A1 est-il tricoté à l’endroit ou à l’envers ?
02.03.2024 - 16:49Odpověď DROPS Design :
Bonjour Mme Bouchard, le 1er rant de A.1 se fait sur l'endroit, ainsi tous les rangs impairs seront des rangs sur l'endroit et tous les rangs pairs (y compris le 6ème rang - le rang ajouré) sur l'envers. Bon tricot!
04.03.2024 - 08:14
![]() Susan napsala:
Susan napsala:
Ahh I understand now! Thank you so much for the help! I was reading the chart wrong!!!!!!! Thank you again for your help!
10.02.2023 - 14:58
Memory Maker#memorymakerblanket |
|||||||||||||||||||
 |
 |
||||||||||||||||||
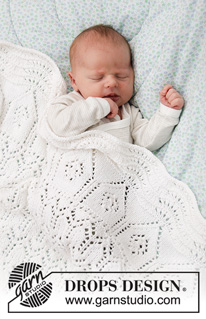
Dětská deka pletená z příze DROPS Cotton Merino. Motiv: Dětské deky.
DROPS Baby 33-35 |
|||||||||||||||||||
|
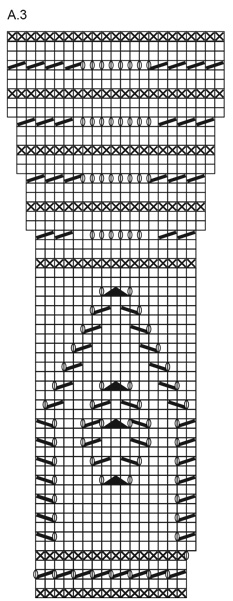
---------------------------------------------------------- VYSVĚTLIVKY: ---------------------------------------------------------- VZOR: Viz schémata A.1, A.2 a A.3. VROUBKOVÝ VZOR: Pleteme stále hladce, lícové i rubové řady. 1 vroubek = 2 řady hladce. TIP - PŘIDÁVÁNÍ: Přidáváme nahozením; v následující řadě pleteme nahození za zadní nit, aby se v pletenině netvořily dírky. Přidáváme takto: *upleteme 20 ok, 1x nahodíme*, *-* opakujeme celkem 7x, pak dopleteme zbytek řady. ---------------------------------------------------------- POPIS PRÁCE: ------------------------------------------------------- DEKA – JAK BUDEME POSTUPOVAT: Pleteme v řadách na kruhové jehlici, zdola nahoru. Na horním okraji deky upleteme krajkový lem A.3. DEKA: Na kruhovou jehlici č.3,5 nahodíme přízí Cotton Merino 159 ok a první řadu – lícovou – pleteme takto: 3 oka VROUBKOVÝM VZOREM – viz výše, 153 ok vzorem A.1 a končíme 3 oky vroubkovým vzorem. Takto pokračujeme. Po dokončení 1 celé sekvence vzoru A.1 (na výšku) pleteme následující lícovou řadu takto: 3 oka vroubkovým vzorem, 152 ok vzorem A.2 (= 19 sekvencí po 8 okách), 1 oko lícovým žerzejem a končíme 3 oky vroubkovým vzorem. Takto pokračujeme. Pleteme až do výše asi 63 cm, končíme před poslední řadou vzoru A.2. V následující řadě (= rubové a poslední řadě vzoru A.2) přidáme rovnoměrně 7 ok - viz TIP - PŘIDÁVÁNÍ = 166 ok. Pokračujeme lícovou řadou: 3 oka vroubkovým vzorem, 160 ok vzorem A.3 (= 10 sekvencí po 16 okách), končíme 3 oky vroubkovým vzorem. Po dokončení 1 celé sekvence vzoru A.3 (na výšku; na jehlici teď máme 236 ok) všechna oka volně hladce uzavřeme. Přízi odstřihneme a zapošijeme. |
|||||||||||||||||||
Vysvětlivky ke schématu |
|||||||||||||||||||
|
|||||||||||||||||||

|
|||||||||||||||||||

|
|||||||||||||||||||
Dokončili jste tento model?Pak označte své fotky tagem #dropspattern #memorymakerblanket nebo je pošlete do galerie #dropsfan. Potřebujete s tímto návodem poradit?Otevřete-li si návod na stránce garnstudio.com, najdete tam 17 výukových video-ukázek, Komentáře/Dotazy a další užitečné informace. © 1982-2025 DROPS Design A/S. Vyhrazujeme si veškerá práva. Tento dokument, včetně všech jeho dílčích částí, podléhá autorským právům. Podrobnější komentář k možnostem užití našich návodů najdete dole pod každým návodem na našich stránkách. |
|||||||||||||||||||


Přidejte komentář k návodu DROPS Baby 33-35
Rádi bychom věděli, co si o tomto modelu myslíte!
Pokud se chcete na něco zeptat, dbejte prosím na to, abyste ve formuláři níže vybrali správnou kategorii - díky tomu se dříve dozvíte, co potřebujete vědět. Povinná pole jsou označena *.