
Suositut kategoriat
Etsitkö tiettyä lankaa?


Kommentit / Kysymykset (80)
![]() Christina Swartz kirjoitti:
Christina Swartz kirjoitti:
I struggle with charts. Is there a written version?
06.05.2025 - 13:24DROPS Design vastasi:
Dear Mrs Swartz, we only have diagrams to this pattern but this might help you understanding how to read diagrams. Happy knitting!
06.05.2025 - 13:49
![]() Ferenciné Kozma Szilvia kirjoitti:
Ferenciné Kozma Szilvia kirjoitti:
Kedves Drops Design, hibás a leírás. "NE FELEDKEZZÜNK MEG A MEGFELELŐ KÖTÉSPRÓBA BETARTÁSÁRÓL! Ezután a SZO felől a következő módon haladjunk: 3 szélszem lustakötéssel, az A.1 jelű minta a következő 152 szemen..." Szerintem itt az A.2 jelű mintával kell dolgozni. Üdvözlettel: Szilvia
05.05.2025 - 05:05
![]() Joke Hegener kirjoitti:
Joke Hegener kirjoitti:
Ik heb de babydeken gebreid en het patroon moeten aanpassen om het correct te krijgen de 7 meerderingen voor de overgang naar A3 zijn overbodig en maken het telpatroon onjuist door deze weg te laten is het patroon met 9 ipv 10 herhalingen kloppend
24.03.2025 - 22:31
![]() Ruth kirjoitti:
Ruth kirjoitti:
Ja, ich meine A3 und leider ist im Text eine Zunahme auf 166 beschrieben. Wird die Decke im oberen Bereich dann nicht sehr breit??? Ich kann natürlich auch 17 Maschen gleichmäßig verteilt zunehmen... könnte aber auch bei 159 Maschen aus A2 bleiben und den Rapport A3 nur 9 x wiederholen.
11.02.2025 - 22:55DROPS Design vastasi:
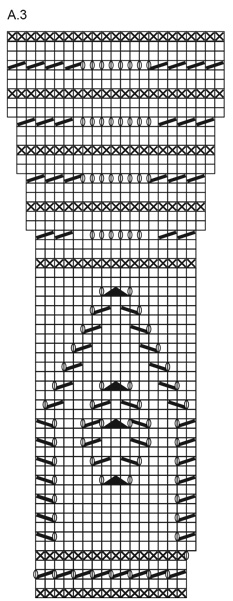
Liebe Ruth, ja genau so stimmt es auch, es sind vor A.3 166 M auf der Nadel und diese 166 M stricken Sie so: 3 M krausrechts, die nächsten 160 M wie beim A.3 = 16 Maschen 10 Mal wiederholen und 3 M krausrechts stricken. Gleicheizeitig werden Sie 1 M in jedem A.3 bei er 5. Reihe zunehmen dann beim Wellenmuster wird es auch in der 2. Hälfte A.3 zugenommen. Viel Spaß beim Stricken!
12.02.2025 - 09:41
![]() Ruth kirjoitti:
Ruth kirjoitti:
Ich komme mit A2 nicht zurecht. Ab der 7. Reihe zähle ich 17 M pro Rapport. Im Text ist von 16 die Rede. Bei 16 würde die Maschenzahl passen (160:10) bei 17 ist dies ein Problem aber es muss eine ungerade Zahl sein, damit später die Mitte des Musters platziert werden kann... HILFE!
10.02.2025 - 21:22DROPS Design vastasi:
Liebe Ruth, meinen Sie A.3? A.3 beginnt man über 16 Maschen aber bei der 5. Reihe strickt man 1 Umschlag am Anfang jedem A.3 so sind es 17 Maschen insgesamt. und so sind es insgesamt 176 M auf der Nadel. Nach Lochmuster wird man dann im Wellenmuster noch zunehmen. Viel Spaß beim Stricken!
11.02.2025 - 09:40
![]() Sophie kirjoitti:
Sophie kirjoitti:
Hungarian version incorrect, as usual. Says A1 pattern instead of A2 in the description where A2 is first introduced - or should have been.
18.08.2024 - 11:54
![]() Gigi kirjoitti:
Gigi kirjoitti:
Bonjour Jai 166 ml effectivement pour 3A mais j’arrive pas à terminé mon dessin pour la fin Bon dimanche
07.04.2024 - 12:41DROPS Design vastasi:
Bonjour Gigi, tricotez ainsi: 3 m point mousse + 10 x les 16 mailles de A.3 (= répétez les 16 mailles du diagramme en commençant par le 1er rang en bas et lisez de droite à gauche sur l'endroit, de gauche à droite sur l'envers - mettez un marqueur entre chaque motif, ça pourra vous aider à bien vérifier votre nombre de mailles) et terminez par 3 mailles point mousse. Notez bien que vous allez augmenter 1 maile au 5ème rang, puis 2 mailles dans le point de vagues, les marqueurs pourront avoir ici leur importance pour pouvoir bien vérifier votre nombre de mailles. Bon tricot!
08.04.2024 - 08:15
![]() Julie kirjoitti:
Julie kirjoitti:
Baby 33-35 is it possible to see the complete blanket. I always like to compare with my work. Picture only shows top I would like to see the bottom Many thanks
26.03.2024 - 04:03DROPS Design vastasi:
Dear Julie, unfortunately we don't have more pictures of the blanket, but both sides look similar, as the edging is the same feather and pan pettern at the beginning as well as at the end. Happy Knitting!
26.03.2024 - 22:09
![]() Sylvie Bouchard kirjoitti:
Sylvie Bouchard kirjoitti:
Le sixième rang de A1 est-il tricoté à l’endroit ou à l’envers ?
02.03.2024 - 16:49DROPS Design vastasi:
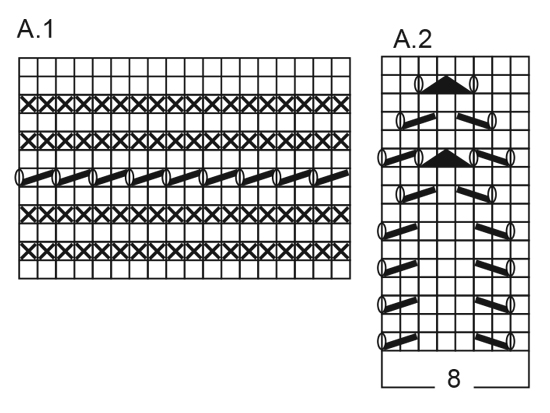
Bonjour Mme Bouchard, le 1er rant de A.1 se fait sur l'endroit, ainsi tous les rangs impairs seront des rangs sur l'endroit et tous les rangs pairs (y compris le 6ème rang - le rang ajouré) sur l'envers. Bon tricot!
04.03.2024 - 08:14
![]() Susan kirjoitti:
Susan kirjoitti:
Ahh I understand now! Thank you so much for the help! I was reading the chart wrong!!!!!!! Thank you again for your help!
10.02.2023 - 14:58
|
|||||||||||||||||||
Memory Maker#memorymakerblanket |
|||||||||||||||||||
 |
 |
||||||||||||||||||
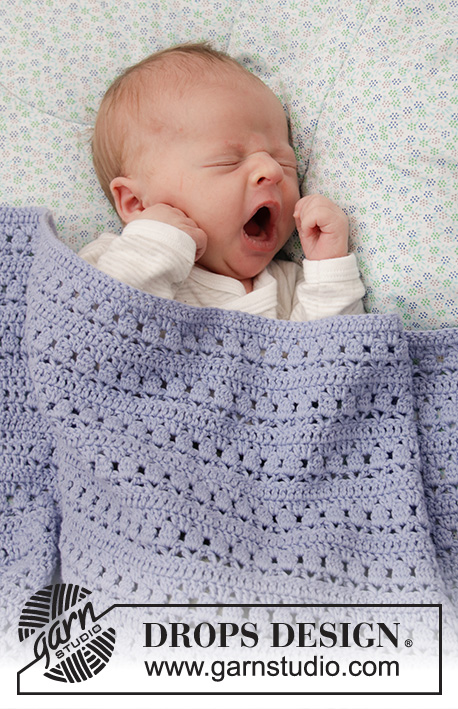
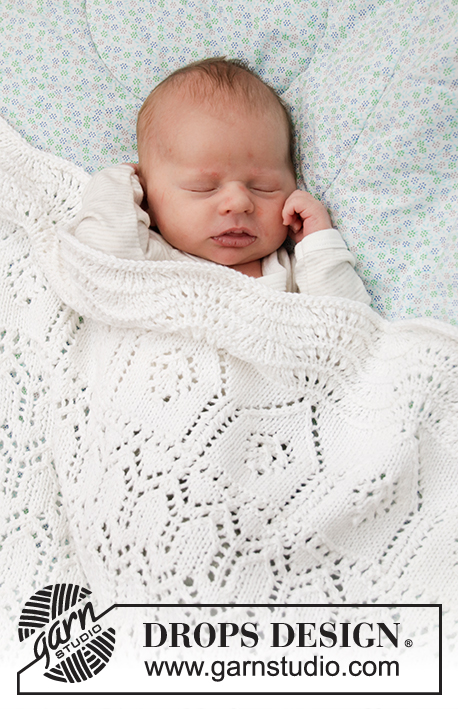
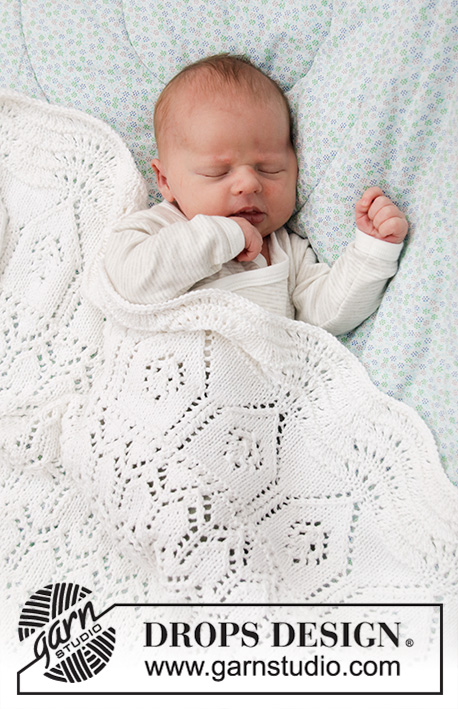
Vauvan neulottu peitto DROPS Cotton Merino -langasta. Teema: Vauvanpeitto
DROPS Baby 33-35 |
|||||||||||||||||||
|
OHJE: ------------------------------------------------------- MALLINEULE: Katso ruutupiirrokset A.1, A.2 ja A.3 AINAOIKEINNEULE tasona: Neulo kaikki kerrokset oikein. LISÄYSVINKKI: Lisää 1 silmukka tekemällä 1 langankierto puikolle. Seuraavalla kerroksella langankierto neulotaan kiertäen, jottei lisäyskohtaan muodostuisi reikää. Tee lisäykset seuraavasti: *Neulo 20 silmukkaa, 1 langankierto*, toista *-* 7 kertaa, neulo kerros loppuun. NEULOMISVINKKI A.1: Piirroksen A.1 6.kerros (kerros, jolla tehdään langankiertoja) neulotaan näin: 3 silmukkaa ainaoikeaa, neulo seuraavilla 152 silmukalla mallineuletta piirroksen A.1 mukaisesti, neulo 1 silmukka sileää neuletta, neulo lopuksi 3 silmukkaa ainaoikeaa. ------------------------------------------------------- ALOITA TYÖ TÄSTÄ: ------------------------------------------------------- VAUVAN PEITTO: LYHYT YLEISKATSAUS TYÖSTÄ: Työ neulotaan tasona pyöröpuikolla, alhaalta ylös. Peiton yläreunaan neulotaan pitsireunus piirroksen A.3 mukaisesti. PEITTO: Luo 159 silmukkaa pyöröpuikolle nro 3,5 Cotton Merino -langalla. Neulo seuraavasti (ensimmäinen kerros = oikea puoli): 3 silmukkaa AINAOIKEAA (lue selitys yllä), neulo seuraavilla 153 silmukalla mallineuletta piirroksen A.1 mukaisesti, neulo lopuksi 3 silmukkaa ainaoikeaa (katso NEULOMISVINKKI A.1). Jatka mallineuletta tähän tapaan, kunnes olet neulonut piirroksen A.1 loppuun. TARKISTA NEULETIHEYS! Jatka neulomalla seuraavasti (1.kerros = oikea puoli): 3 silmukkaa ainaoikeaa, neulo seuraavilla 152 silmukalla mallineuletta piirroksen A.2 mukaisesti (= 19 kpl 8 silmukan mallikertaa), neulo 1 silmukka sileää neuletta ja neulo lopuksi 3 silmukkaa ainaoikeaa. Jatka mallineuletta tähän tapaan. Neulo kunnes työn pituus on n. 63 cm ja seuraavaksi neulottava kerros on piirroksen A.2 mallikerran viimeinen kerros. Lisää tasavälein seuraavalla kerroksella (= nurja puoli ja piirroksen A.2 viimeinen kerros) 7 silmukkaa (lue LISÄYSVINKKI) = 166 silmukkaa. Jatka neulomalla seuraavasti (1.kerros = oikea puoli): 3 silmukkaa ainaoikeaa, neulo seuraavilla 160 silmukalla mallineuletta piirroksen A.3 mukaisesti (= 10 kpl 16 silmukan mallikertaa), neulo lopuksi 3 silmukkaa ainaoikeaa. Jatka mallineuletta tähän tapaan, kunnes olet neulonut piirroksen A.3 loppuun (työssä on nyt 236 silmukkaa). Päätä silmukat löyhästi oikein silmukoin. Katkaise lanka ja päättele langanpäät. |
|||||||||||||||||||
Ruutupiirroksen selitykset |
|||||||||||||||||||
|
|||||||||||||||||||
|
|||||||||||||||||||
|
|||||||||||||||||||
Oletko tehnyt tämän mallin?Tägää tällöin kuviasi #dropspattern #memorymakerblanket tai lähetä kuvat #dropsfan galleriaan. Tarvitsetko apua tämän ohjeen kanssa?Löydät 18 ohjevideota, kommentteja/kysymyksiä ja muuta osoitteessa www.garnstudio.com © 1982-2025 DROPS Design A/S. Pidätämme kaikki oikeudet. Tämä tiedosto ja kaikki sen alatiedostot on suojattu tekijänoikeuslailla. Lue lisää siitä, mitä voit tehdä ohjeillamme, verkkosivujemme jokaisen ohjeen alaosasta. |
|||||||||||||||||||


DROPS Design on toiminut neule- ja virkkausalalla yli 40 vuotta ja meillä on yksi kaikkein laajin valikoima ilmaisia ohjeita verkossa - käännettynä 17 kielelle. Tänään meiltä löytyy 314 lehteä ja 11822 ohjetta - joista 11209 ohjetta on käännetty suomeksi.
Työskentelemme ahkerasti, jotta voisimme antaa teille kaikkein parhaimpia neule- ja virkkausohjeita, inspiraatiota ja neuvoja sekä korkealaatuisia lankoja todella edulliseen hintaan! Haluaisitko käyttää ohjeitamme muuhun kuin henkilökohtaiseen käyttöön? Voit lukea säännöistä ohjeiden Tekijänoikeus -tekstissä, joka löytyy kaikkien ohjeidemme alapuolelta. Hauskoja hetkiä käsitöiden parissa!
Lisää kommentti ohjeeseen DROPS Baby 33-35
Haluamme mielellämme kuulla mielipiteesi tästä ohjeesta!
Mikäli haluat esittää kysymyksen, valitse oikea kategoria alla olevasta valikosta - tällä tavoin saat vastauksen nopeammin. Pakolliset kentät on merkitty tähdellä *.