
Popular categories
Looking for a yarn?


|
||||||||||||||||||||||||||||||||||||||||||||||
Bonita |
||||||||||||||||||||||||||||||||||||||||||||||
 |
 |
|||||||||||||||||||||||||||||||||||||||||||||
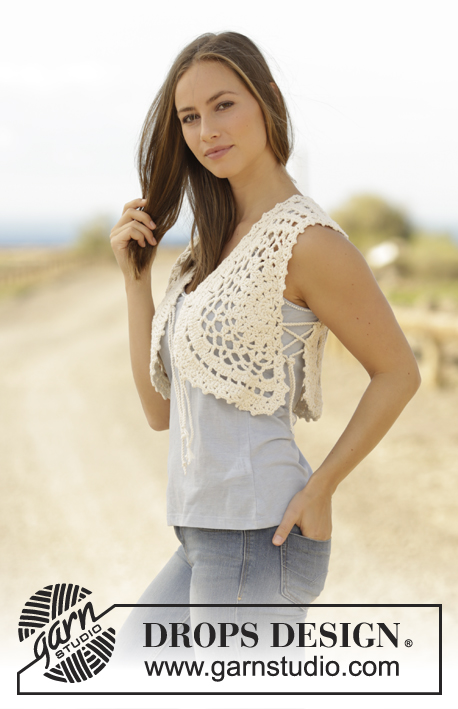
Crochet vest with crochet square and lace pattern in DROPS Paris. Size: S - XXXL
DROPS 175-24 |
||||||||||||||||||||||||||||||||||||||||||||||
|
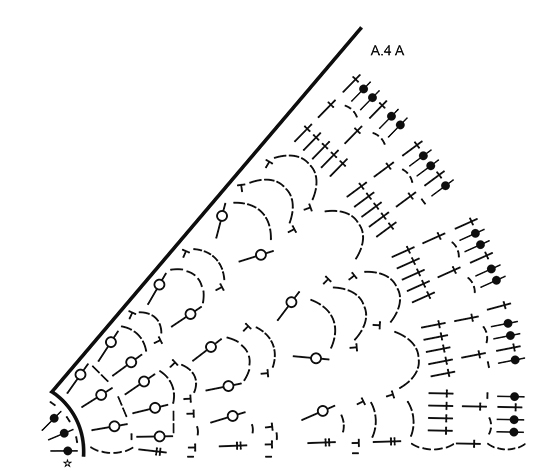
PATTERN: See diagrams A.1 to A.5. CROCHET INFO: At beginning of every round/row with double crochet replace first double crochet on round/row with 3 chain stitches. At beginning of every round/row with single crochet work 1 chain stitch (does not replace first single crochet). INCREASE TIP: Increase 1 double crochet by working 2 double crochet in same stitch. Increase 1 treble crochet by working 2 treble crochet in same stitch. ---------------------------------------------------------- VEST: The vest is worked in 3 parts. Work back piece as a square separately. Work front pieces as a half circle and continue up to shoulder. When front pieces and back piece are sewn together, work 1 round with picots along entire outer edge. BACK PIECE: Begin with crochet hook size 5 mm / H/8 and Paris and work pattern according to diagram A.2 4 times in total on round (A.1 shows how round begins and ends). REMEMBER THE CROCHET GAUGE! When A.2 has been worked, there are 35 double crochet along each side and 4 corners that consist of 2 double crochet, 3 chain stitches and 2 double crochet. The square for back piece is done for size S/M, fasten off. Crochet square measures approx. 28 x 28 cm / 11" x 11". Continue in the round in size L/XL and XXL/XXXL as follows: L/XL: Repeat the last 2 rounds. Increase 1 double crochet before and after each corner. There are now 2 double crochet more on each of the 4 sides = 39 double crochet along each side. Fasten off. Crochet square measures approx. 37 x 37 cm / 14½" x 14½". XXL/XXXL: Repeat the last 2 rounds. Increase 1 double crochet before and after each corner. There are now 2 double crochet more on each of the 4 sides = 43 double crochet along each side. Work slip stitches until chain space with 3 chain stitches in first corner. Then work from 2nd row in diagrams A.3A to A.3C back and forth along one side as follows: Work A.3A around this chain space (shows how row begins and ends) - READ CROCHET INFO. Work A.3B until 1 treble remains before chain space in next corner, work A.3C (= 1 chain stitch, skip 1 double crochet and work 1 double crochet around chain space in corner). Turn and work last row in diagrams. Fasten off. Work the same way along the side on opposite side of square. Fasten off. Crochet square measures approx. 47 x 37 cm / 18½" x 14½". RIGHT FRONT PIECE: Work 4 chain stitches on hook size 5 mm / H/8 with Paris and form a ring with 1 slip stitch in first chain stitch. Then work a half circle as follows: ROW 1: Work 4 chain stitches, * 1 double crochet around chain stitch ring, 1 chain stitch *, repeat from *-* 7 more times, finish with 1 double crochet around ring. Turn and work as follows from right side: Work A.4A, A.4B, A.4C. On last row in diagrams increase evenly as follows - READ INCREASE TIP: Increase 0-6-6 double crochet over A.4A (= 27-33-33 double crochet) and 0-9-9 treble crochet over A.4B (= 30-39-39 double double crochet). Increase 0-3-3 double crochet before corner in A.4C (= 6-9-9 double crochet ) and increase 0-3-3 double crochet after corner (= 13-16-16 double crochet). there are 76-97-97 stitches in total + corner (= 2 double crochet, 3 chain stitches, 2 double crochet) on last row. Size S/M is now done, fasten off. Work back and forth in the 2 next sizes as follows: L/XL- XXL/XXXL: Turn and work from wrong side. Work from row marked with arrow in diagrams as follows: Work A.5B over the first 15 double crochet, A.5A, 3 chain stitches, (2 double crochet, 3 chain stitches, 2 double crochet) around chain space in corner, 3 chain stitches, A.5B over the next 9 double crochet, A.5C over the next 39 treble crochet, A.5B over the next 32 double crochet, finish with A.5A in the last double crochet on row. Work last row in diagrams the same way. There are now 97 double crochet/treble crochet + 1 corner (= 2 double crochet, 3 chain stitches, 2 double crochet) on last row. Fasten off. SHOULDER: Now work back and forth over the first double crochet from right side in A.4 (in size S/M) and A.5 (in size L/XL and XXL/XXXL), begin from 2nd row in diagrams as follows: Work A.3A, A.3B 5-6-7 times in total in width. Turn and work last row. Repeat the 2 last rows in diagrams 3-3-4 more times. Fasten off. LEFT FRONT PIECE: Work as right front piece but reversed. ASSEMBLY: S/M and L/XL: Sew shoulder on to each side at the top edge on crochet square/back piece. Sew stitches together one by one. On back piece there are now 17-21 double crochet for neck between shoulder pieces. Cut the yarn and fasten off. XXL/XXXL: Sew shoulder on to each side at the top edge on crochet square/back piece. Sew the 6 outermost double crochet on shoulder to the side of the 2 outermost rows on back piece and sew the other stitches together one by one. On back piece there are now 25 double crochet for neck between shoulder pieces. Cut the yarn and fasten off. PICOT EDGE: Begin on top of one shoulder and work a picot edge as follows: Work * 1 double crochet in double crochet/around row, 3 chain stitches, 1 slip stitches in first of the 3 chain stitches, 2 double crochet in same double crochet/around row, skip approx. 2.5 cm / ⅞" *, repeat from *-* around the entire vest, i.e. around both armholes, along edge on front pieces, back of neck along bottom edge on back piece. Finish with a slip stitch in first double crochet on round. Fasten off. TWINED STRING: Cut 2 lengths of 1.5 metres each. Twine the strands tog until they resist, fold the string double so that it twines again. Make a knot at each end. Thread string through picot edge at the front on one front piece and tie a knot. Make another 3 strings the same way. Fasten one to the other front piece. Use the 2 other strands to keep front and back piece together in each side: Start approx. 21-23-25 cm / 8¼"-9"-9¾" from top of one of the front pieces and the back piece. Thread the string back and forth through holes in the picot edge, between the front and back piece in zig zags (like a shoe lace) and tie them together at the bottom - see picture. Adjust length on string so that distance between front piece and back piece is approx. 6-6-8 cm / 2½"-2½"-3". Repeat in the other side. |
||||||||||||||||||||||||||||||||||||||||||||||
Diagram explanations |
||||||||||||||||||||||||||||||||||||||||||||||
|
||||||||||||||||||||||||||||||||||||||||||||||

|
||||||||||||||||||||||||||||||||||||||||||||||
|
||||||||||||||||||||||||||||||||||||||||||||||

|
||||||||||||||||||||||||||||||||||||||||||||||

|
||||||||||||||||||||||||||||||||||||||||||||||

|
||||||||||||||||||||||||||||||||||||||||||||||
|
Have you made this or any other of our designs? Tag your pictures in social media with #dropsdesign so we can see them! Do you need help with this pattern?You'll find tutorial videos, a Comments/Questions area and more by visiting the pattern on garnstudio.com. © 1982-2024 DROPS Design A/S. We reserve all rights. This document, including all its sub-sections, has copyrights. Read more about what you can do with our patterns at the bottom of each pattern on our site. |
||||||||||||||||||||||||||||||||||||||||||||||


With over 40 years in knitting and crochet design, DROPS Design offers one of the most extensive collections of free patterns on the internet - translated to 17 languages. As of today we count 304 catalogs and 11422 patterns - 11417 of which are translated into English (US/in).
We work hard to bring you the best knitting and crochet have to offer, inspiration and advice as well as great quality yarns at incredible prices! Would you like to use our patterns for other than personal use? You can read what you are allowed to do in the Copyright text at the bottom of all our patterns. Happy crafting!
Comments / Questions (41)
A propos de ce modèle, vous parlez du diagramme A2 pour le dos et il est introuvable dans la liste des diagrammes ou alors il y a quelque chose que je n\'ai pas compris. Merci de me répondre sur mon nouvel email ci-dessous.
27.08.2019 - 12:45DROPS Design answered:
Bonjour Mme Renaut, le diagramme A.2 se trouve juste sous la légende des symboles des diagrammes. Bon crochet!
27.08.2019 - 15:57Ich bin ja soo froh endlich eine kompotente Anleitung gefunden zu haben, Bin richtig überwältigt lege gleich los...danke..danke. Mit freundlichen grüßen Ihre Manuela
24.06.2019 - 13:20Hi, I am stuck please help, I completed diagram A4A, but can’t see how to follow on with A4B and A4C , they all seem to be starting at the same point and no logical follow on? also at the end of A4A my treble count is 52 working size S/M and not 27 as per the pattern. Can’t figure this one out as I have a half circle . Please help.
19.05.2019 - 11:50DROPS Design answered:
Dear Elisabeth, when you work A.4 you are supposed to work seen from RS: A.4A, then A.4B and finish with A.4C - read more how to read several diagrams consecutively on the row here. Happy crocheting!
20.05.2019 - 14:10I love this vest. Is it possible to reduce the size to a girl's 12? So hard to find a good kids vest pattern but your adult ones are gorgeous!
14.01.2019 - 15:26DROPS Design answered:
Dear Mrs Gannon, we are unfortunately not able to adjust every pattern to each individual request. However you can check the measurement from chart and adjust following your tension to the desired measurements. Your DROPS store may assist you if required, even per mail or telephone. Happy crocheting!
14.01.2019 - 17:40Zur Anleitung Drops 175-24 habe ich folgende Frage. Beim Vorderteil steht, dass in der letzten Reihe der Diagramme Stäbchen zugenommen werden sollen. Wie ist das zu verstehen? Zum Beispiel in A.4A steht 0-6-6. Sind die wirklich alle in einer Reihe zu verteilen oder in 3 Reihen mit je 0, 6 und 6 Stäbchen. Und wenn alle in einer Reihe zugenommen werden, wie werden sie dann verteilt? Für eine kurzfristige Antwort wäre ich sehr dankbar, damit ich gleich weiter machen kann. Danke.
20.06.2018 - 21:28DROPS Design answered:
Liebe Astrid, alle diese Zunahmen sind bei der letzten Reihe (= alle in einer Reihe) regelmäßig verteilt zu häkeln - siehe 21.06.2018 - 08:08
Anleitung Bonita von Drops Design, 175-24\\\\\\\\\r\nHallo, wo muss ich bei der Schulter anfangen? Das müsste ja über die ersten Stäbchen sein bevor das Eck los geht. Mich verwirrt nur die Vorzeile (mit * markiert). Da wird nämlich eine Luftmasche angezeigt, es sind aber nur Stäbchen. Und zwar 13 Stück, lt. Muster von der Schulter werden es nur 11. Oder beginnt man da genau dazwischen, dass quasi die erste und letzte Masche ausgelassen werden? Vielen Dank
13.03.2018 - 22:16Anleitung Bonita von Drops Design, 175-24\\\\\\\\r\\\\\\\\n\\r\\nHallo, ich habe eine Frage zum Vorderteil. Werden da bei der dritt letzten Reihe vom Diagramm A.4A, A.4B und A.4C wirklich die Stäbchen in die Maschen gehäkelt nicht um den Maschenbogen? Es sind nämlich 5 Stäbchen (oder 5 Doppelstäbchen bei A.4B) für 6 Luftmaschen. Vielen Dank für Ihre Hilfe :-)
13.03.2018 - 22:13DROPS Design answered:
Liebe Frau Stockbauer, Ihren Hinweis wird unserer Designteam weiterleitet. Ich würde auch diese 5 Stäbchen um den Maschenbogen häkeln (dh wie beim 6. und 8. Reihe in A.2). Viel Spaß beim häkeln!
14.03.2018 - 09:21Anleitung Bonita von Drops Design, 175-24\\r\\nHallo, ich habe eine Frage zum Vorderteil. Werden da bei der dritt letzten Reihe vom Diagramm A.4A, A.4B und A.4C wirklich die Stäbchen in die Maschen gehäkelt nicht um den Maschenbogen? Es sind nämlich 5 Stäbchen (oder 5 Doppelstäbchen bei A.4B) für 6 Luftmaschen.wVielen Dank für Ihre Hilfe :-)
13.03.2018 - 22:10Thank you Deidre - I understand, but are you including the chain 3 as the 16th DC?
08.07.2017 - 14:38DROPS Design answered:
Hello again Gwyn, No, the 3 chain stitches are just the start and the finish of the round (A1), the 16 double crochets are A2, Deirdre
09.07.2017 - 12:49I am sorry - in my original message I am referring to chart A.1..thank you!
08.07.2017 - 02:16