DROPS Brushed Alpaca Silk uni colour 77% Alpaca, 23% Silk |
3.95 $ /25g |
Order |
Clicking the ORDER button will redirect you to Wool Warehouse Direct Ltd website
The yarn cost is calculated from the pattern’s smallest size and the yarn’s cheapest product type. Looking for an even better price? You might find it on the DROPS Deals!
-------------------------------------------------------
Alternative Yarn – See how to change yarns here
Yarn Groups A to F – Use the same pattern and change the yarn here
Yarn usage using an alternative yarn – Use our yarn converter here
-------------------------------------------------------
DROPS Brushed Alpaca Silk uni colour 77% Alpaca, 23% Silk 3.95 $ /25g Order |
Clicking the ORDER button will redirect you to Wool Warehouse Direct Ltd website
The yarn cost is calculated from the pattern’s smallest size and the yarn’s cheapest product type. Looking for an even better price? You might find it on the DROPS Deals!
All measurements in charts are in cm.
Each of our patterns has specific tutorial videos to help you.
These step-by-step tutorials might also help you:
Why is the knitting/crochet tension so important?
Knitting tension is what determines the final measurements of your work, and is usually measured per 10 x 10 cm. It is provided like so: number of stitches in width x number of rows in height - eg: 19 stitches x 26 rows = 10 x 10 cm.
The knitting tension is very individual; some people knit/crochet loosely while others work tightly. You adjust the knitting tension with the needle size, which is why the suggested needle size only serve as a guide! You need to adjust this (up or down) to ensure that YOUR knitting tension matches the knitting tension provided in the pattern. If you work with a different knitting tension than provided you will have a different yarn consumption, and your work will have different measurements than what the pattern suggests.
The knitting tension also determines which yarns can replace each other. As long as you achieve the same knitting tension you can replace one yarn with another.
See DROPS lesson: How to measure your tension/gauge
See DROPS video: How to make a gauge tension swatch
How do I know how many balls of yarn I need?
The required amount of yarn is provided in grams, eg: 450 g. To calculate how many balls you’ll need you first need to know how many grams are in 1 ball (25g, 50g or 100g). This information is available if you click on the individual yarn quality on our pages. Divide the amount required with the amount of each ball. For example, if each ball is 50g (the most common amount), the calculation will be as follows: 450 / 50 = 9 balls.
Can I use a different yarn than what the pattern suggests?
The important thing when changing from one yarn to another is that the knitting/crochet tension remains the same. This is so that the measurements of the finished piece will be the same as on the sketch provided. It is easier to achieve the same knitting tension using yarns from the same yarn group. It is also possible to work with multiple strands of a thinner yarn to achieve the knitting tension of a thicker one. Please try our yarn converter. We recommend you to always work a test swatch.
Please NOTE: when changing yarn the garment might have a different look and feel to the garment in the photo, due to individual properties and qualities of each yarn.
See DROPS lesson: Can I use a different yarn than the one mentioned in the pattern?
What are the yarn groups?
All our yarns are categorised into yarn groups (from A to F) according to thickness and knitting tension – group A contains the thinnest yarns and group F the thickest. This makes it easier for you to find alternative yarns to our patterns, should you wish to switch yarn. All yarns within the same group have a similar knitting tension and can easily replace each other. However, different yarn qualities have different structures and properties which will give the finished work a unique look and feel.
How do I use the yarn converter?
At the top of all our patterns you’ll find a link to our yarn converter, which is a helpful tool should you wish to use a different yarn than suggested. By filling in the yarn quality you wish to replace, the amount (in your size) and number of strands, the converter will present good alternative yarns with the same knitting tension. Additionally it will tell you how much you’ll require in the new qualities and whether you’ll need to work with multiple strands. Most skeins are 50g (some are 25g or 100g).
If the pattern is worked with multiple colours, every colour will have to be converted separately. Similarly, if the pattern is worked with several strands of different yarns (for example 1 strand Alpaca and 1 strand Kid-Silk) you will have to find alternatives for each, individually.
Why do you show discontinued yarns in the patterns?
Since different yarns have different qualities and textures we have chosen to keep the original yarn in our patterns. However, you can easily find options among our available qualities by using our yarn converter, or simply pick a yarn from the same yarn group.
It is possible that some retailers still have discontinued yarns in stock, or that someone has a few skeins at home that they would like to find patterns for.
The yarn converter will provide both alternative yarn as well as required amount in the new quality.
What size should I knit?
If you think it's hard to decide what size to make, it can be a good idea to measure a garment you own already and like the size of. Then you can pick the size by comparing those measures with the ones available in the pattern's size chart.
You'll find the size chart at the bottom of the pattern.
See DROPS lesson: How to read size chart
Why do I get the wrong knitting tension with the suggested needle size?
The needle size provided in the pattern serves only as a guide, the important thing is to follow the knitting tension. And since knitting tension is very individual, you will have to adjust the needle size to ensure that YOUR tension is the same as in the pattern – maybe you’ll have to adjust 1, or even 2 needle sizes, up or down to achieve the correct tension. For this, we recommend that you work test swatches.
Should you work with a different knitting tension than the one provided, the measurements of the finished garment might deviate from the measurement sketch.
See DROPS lesson: How to measure your tension/gauge
See DROPS video: How to make a gauge tension swatch
Why is the pattern worked top-down?
Working a garment top-down provides more flexibility and room for personal adjustment. For example it is easier to try the garment on while working, as well as making adjustments to length of yoke and shoulder caps.
The instructions are carefully explaining every step, in the correct order. Diagrams are adjusted to the knitting direction and are worked as usual.
How do I work according to a knitting diagram?
The diagram depicts all rows/rounds, and every stitch seen from the right side. It is read from bottom to top, from right to left. 1 square = 1 stitch.
When working back and forth, every other row is worked from the right side and every other row is worked from the wrong side. When working from the wrong side, the diagram will have to be worked reversed: from left to right, knit stitches are purled, purl stitches are knit etc.
When working in the round every round is worked from the right side and the diagram are worked from right to left on all rounds.
See DROPS lesson: How to read knitting diagrams
How do I work according to a crochet diagram?
The diagram depicts all rows/rounds, and every stitch seen from the right side. It is worked from bottom to top, from right to left.
When working back and forth every other row is worked from the right side: from right to left and every other row is worked from the wrong side: from left to right.
When working in the round, every row in the diagram are worked from the right side, from right to left.
When working a circular diagram you start in the middle and work your way outwards, counter clockwise, row by row.
The rows usually start with a given number of chain stitches (equivalent to the height of the following stitch), this will either be depicted in the diagram or explained in the pattern.
See DROPS lesson: How to read crochet diagrams
How do I work several diagrams simultaneously on the same row/round?
Instructions for working several diagrams after each other on the same row/round, will often be written like so: “work A.1, A.2, A.3 a total of 0-0-2-3-4 times". This means you work A.1 once, then A.2 is worked once, and A.3 is repeated (in width) the number of times provided for your size – in this case like so: S = 0 times, M = 0 times, L=2 times, XL= 3 times and XXL = 4 times.
The diagrams are worked as usual: begin with the first row in A.1, then work the first row in A.2 etc.
See DROPS lesson: How to read knitting diagrams
See DROPS lesson: How to read crochet diagrams
Why are the sleeves shorter in larger sizes?
The total width of the garment (from wrist-to-wrist) will be larger in the larger sizes, despite the actual sleeves being shorter. The larger sizes have longer sleeve caps and wider shoulders, so there will be a good fit in all sizes.
Where on the garment is the length measured?
The measurement sketch/schematic drawing provides information regarding the full length of the garment. If it’s a jumper or a jacket the length is measured from the highest point on the shoulder (usually closest to the neckline), and straight down to the bottom of the garment. It is NOT measured from the tip of shoulder. Similarly, the length of yoke is measured from the highest point on the shoulder and down to where yoke is split into body and sleeves.
See DROPS lesson: How to read a schematic drawing
What is a repeat?
Diagrams are often repeated on the round or in height. 1 repeat is the diagram the way it appears in the pattern. If it says to work 5 repeats of A.1 in the round, then you work A.1 a total of 5 times after/next to each other in the round. If it says to work 2 repeats of A.1 vertically/in height you work the entire diagram once, then begin again at the start and work the entire diagram one more time.
Why does the piece start with more chain stitches than it’s worked with?
Chain stitches are slightly narrower than other stitches and to avoid working the cast-on edge too tight, we simply chain more stitches to begin with. The stitch count will be adjusted on the following row to fit the pattern and measurement sketch.
Why increase before the rib edge when the piece is worked top-down?
The rib edge is more elastic and will contract slightly compared to, for example, stocking stitch. By increasing before the rib edge, you avoid a visible difference in width between the rib edge and the rest of the body.
Why increase in the cast-off edge?
It’s very easy to cast off too tightly, and by making yarn overs while casting off (and simultaneously casting these off) you avoid a too tight cast off edge.
See DROPS video: How to bind off with yarn overs (yo)
How do I increase/decrease on every 3rd and 4th row/round alternately?
To achieve an even increase (or decrease) you can increase on, for example: every 3rd and 4th row alternately, like so: work 2 rows and increase on the 3rd row, work 3 rows and increase on the 4th. Repeat this until the increase is complete.
See DROPS lesson: Increase or decrease 1 st on every 3rd and 4th row alternately
How can I work a jacket in the round instead of back and forth?
Should you prefer to work in the round instead of back and forth, you may of course adjust the pattern. You’ll need to add steeks mid-front (usually 5 stitches), and follow the instructions. When you would normally turn and work from the wrong side, simply work across the steek and continue in the round. At the end you’ll cut the piece open, pick up stitches to work bands, and cover the cut edges.
See DROPS video: How to knit steeks and cut open
Can I work a jumper back and forth instead of in the round?
Should you prefer to work back and forth instead of in the round, you may of course adjust the pattern so you work the pieces separately and then assemble them at the end. Divide the stitches for the body in 2, add 1 edge stitch in each side (for sewing) and work the front and back pieces separately.
See DROPS lesson: Can I adapt a pattern for circular needles into straight needles?
Why is the pattern slightly different than what I see in the photo?
Pattern repeats can vary slightly in the different sizes, in order to get the correct proportions. If you’re not working the exact same size as the garment in the photo, yours might deviate slightly. This has been carefully developed and adjusted so that the complete impression of the garment is the same in all sizes.
Make sure to follow instructions and diagrams for your size!
How do I make a women’s size garment into a men’s size one?
If you have found a pattern you like which is available in women’s size it’s not very difficult to convert it to men’s size. The biggest difference will be the length of sleeves and body. Start working on the women size that you think would fit across the chest. The additional length will be worked right before you cast off for the armhole/sleeve cap. If the pattern is worked top-down you can add the length right after the armhole or before the first decrease on sleeve.
Regarding additional yarn amount, this will depend on how much length you add, but it is better with a skein too many than too few.
How do I prevent a hairy garment from shedding?
All yarns will have excess fibres (from production) that might come off as lint or shedding. Brushed yarns (ie hairier yarns) have more of these loose, excess fibres, causing more shedding.
Shedding also depends on what is worn under or over the garment, and whether this pulls at the yarn fibres. It’s therefore not possible to guarantee that there will be no shedding
Below are some tips on how to get the best result when working with hairier yarns:
1. When the garment is finished (before you wash it) shake it vigorously so the looser hairs come off. NOTE: do NOT use a lint roller, brush or any method that pulls at the yarn.
2. Place the garment in a plastic bag and put it in your freezer - the temperature will cause the fibres to become less attached to each other, and excess fibres will come off easier.
3. Leave in the freezer for a few hours before taking it out and shaking it again.
4. Wash the garment according to the instructions on the yarn label.
Why does my garment pill?
Pilling is a natural process that happens to even the most exclusive of fibers. It's a natural sign of wear and tear that is hard to avoid, and that is most visible in high friction areas of your garment like a sweater's arms and cuffs.
You can make your garment look as new by removing the pilling, using a fabric comb or a pill/lint remover.
Clarice |
|
|
|
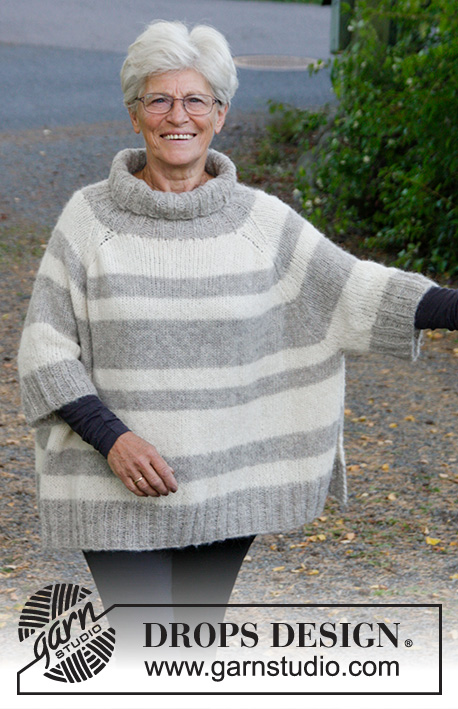
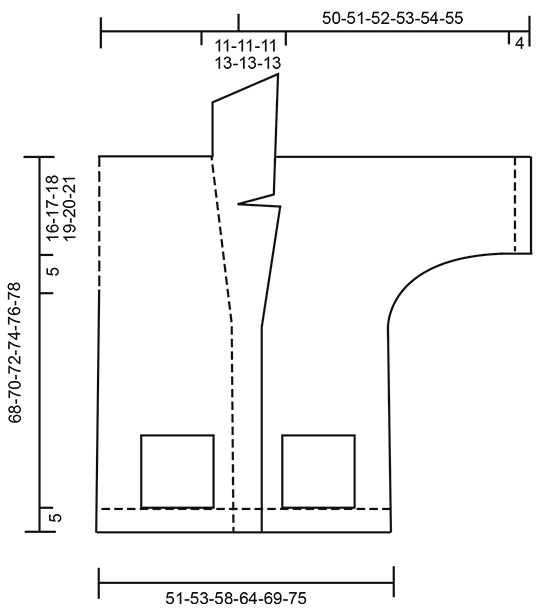
Knitted DROPS jacket with pockets and collar in "Alpaca Bouclé" and "Brushed Alpaca Silk". Size S-XXXL.
DROPS 173-30 |
|
GARTER ST (back and forth): K all rows. 1 ridge = K2 rows. SHORT ROWS: Work short rows over sts in band to avoid it contracting vertically. Work as follows from RS on every 10th row: K over all sts in band, turn, tighten yarn and K back, turn and work over all sts as before. NOTE! When working short ros on left band start from WS. DECREASE TIP: All dec are done from RS! Dec as follows on right front piece (i.e. after band sts): Slip 1 st as if to K, K 1, psso Dec as follows on left front piece (i.e. before band sts): Work until 2 sts remain before band, K 2 tog. INCREASE TIP: All inc are done from RS. Inc 1 st on right band as follows: Work until 1 st remains in band, 1 YO, work last sts in band. Inc 1 st on left band as follows: Work 1 st, 1 YO, work the remaining sts in band. On next row K YO twisted to avoid holes. BUTTONHOLES: Dec for buttonholes on right band. 1 buttonhole = K tog third and fourth st from edge and make 1 YO. Dec for buttonholes when piece measures: SIZE S: 28 and 36 cm SIZE M: 30 and 38 cm SIZE L: 32 and 40 cm SIZE XL: 34 and 42 cm SIZE XXL: 36 and 44 cm SIZE XXXL: 38 and 46 cm ---------------------------------------------------------- JACKET: Piece is worked back and forth in parts and sewn tog when finished. BACK PIECE: Cast on 58-60-66-72-78-84 sts (includes 1 edge st in each side) on circular needle size 8 mm / US 11 with 1 strand Alpaca Bouclé and 1 strand Brushed Alpaca Silk (= 2 strands). Work in GARTER ST - see explanation above - for 5 cm / 2''. On next row from RS work in stockinette st with 1 edge st in garter st in each side. REMEMBER THE KNITTING GAUGE When piece measures 47-48-49-50-51-52 cm / 18½''-19''-19¼''-19¾''-20''-20½'', cast on new sts at the end of every row for sleeves as follows: 3 sts 2 times, 4 sts 1 time and 16-16-14-12-10-9 st 1 time (= 26-26-24-22-20-19 sts inc for sleeve in each side) = 110-112-114-116-118-122 sts. Now continue in stockinette st with 4 sts in garter st in each side (= sleeve edge). When piece measures 66-68-70-72-74-76 cm / 26''-26¾''-27½''-28 3/8''-29 1/8''-30'', bind off the middle 10-10-10-12-12-12 sts for neck and finish each shoulder separately. Continue to bind off 1 st on next row from neck = 49-50-51-51-52-54 sts. When piece measures 68-70-72-74-76-78 cm / 26¾''-27½''-28 3/8''-29 1/8''-30''-30¾'', work on next row from RS 1 ridge over all sts. Bind off with K. Work the other shoulder the same way. RIGHT FRONT PIECE: Cast on 37-38-41-44-47-50 sts (includes 1 edge st in the side) on circular needle size 8 mm / US 11 with 1 strand Alpaca Bouclé and 1 strand Brushed Alpaca Silk (= 2 strands). Work in garter st - see explanation above - for 5 cm / 2''. On next row from RS work as follows: Work 8 band sts in garter st, stockinette st until 1 sts remain, 1 edge sts in garter st. Work SHORT ROWS - see explanation above - over all sts in band. REMEMBER BUTTONHOLES! When piece measures 36-38-40-42-44-46 cm / 14¼''-15''-15¾''-16½''-17¼''-18'', inc 1 st in band – see INCREASE TIP. Inc like this every other row (i.e. every row from RS) 8 times in total (= 16 sts in band), AT THE SAME TIME dec sts in stockinette st inside band st, cast on new sts for sleeve and bind off sts for vent in collar as follows: READ ALL OF THE FOLLOWING SECTION BEFORE CONTINUING! SLEEVE: When piece measures 47-48-49-50-51-52 cm / 18½''-19''-19¼''-19¾''-20''-20½'', cast on new sts for sleeve at the end of every row from RS as follows: 3 sts 2 times, 4 sts 1 time and 16-16-14-12-10-9 sts 1 time (= 26-26-24-22-20-19 sts inc for sleeve). Work the new sts in stockinette st with 4 sts in garter st at the edge (= sleeve edge). DECREASE TIP INSIDE BAND: When piece measures 47-48-49-50-51-52 cm / 18½''-19''-19¼''-19¾''-20''-20½'', dec 1 st in stockinette st inside band sts – see DECREASE TIP. Dec like this every 4th row (i.e. every other row from RS) 6-6-6-7-7-7 times in total. COLLAR: When piece measures 57-59-61-63-65-67 cm / 22½''-23¼''-24''-24¾''-25½''-26 3/8'', work as follows from RS: bind off the first 8 sts (= lapel), work the remaining sts. Turn and work back, at the end of row cast on 6 new sts (= 14 sts for collar). When all inc and dec are done, there are 63-64-65-65-66-68 sts on needle. Continue to work until piece measures 68-70-72-74-76-78 cm / 26¾''-27½''-28 3/8''-29 1/8''-30''-30¾''. Then work 1 ridge in garter st over all sts. On next row from RS work as follows: Work the first 14 sts, bind off the remaining 49-50-51-51-52-54 sts for shoulder/sleeve. Cut the yarn. Now work collar as follows: Beg from WS and work over all 14 sts, * turn and work 8 sts back, turn and work back, turn, work over all sts, turn and work over all sts *, repeat from *-* until collar measures 8-8-8-9-9-9 cm / 3"-3"-3"-3½"-3½"-3½'' on the shortest side. Bind off. LEFT FRONT PIECE: Cast on and work as right front piece. NOTE: Do not dec for buttonholes on left band. Cast on new sts for sleeve at the end of row from WS. When binding off sts for vent in collar, work as follows from WS: bind off the first 8 sts (= lapel), work the remaining sts. Turn and work back, at the end of row cast on 6 new sts (= 14 sts for collar). When piece measures 68-70-72-74-76-78 cm / 26¾''-27½''-28 3/8''-29 1/8''-30''-30¾'', work 1 ridge over all sts. Then work as follows from RS: bind off the first 49-50-51-51-52-54 sts, then work the remaining 14 sts in band. Turn and work short rows over band as follows: Beg from WS and work back over all 14 sts, turn and work over all sts, * turn and work 8 sts back, turn and work back, turn, work over all sts, turn and work over all sts *, repeat from *-* until collar measures 8-8-8-9-9-9 cm / 3"-3"-3"-3½"-3½"-3½'' on the shortest side. Bind off. ASSEMBLY: Sew the shoulder seams tog. Sew the collar tog mid back and sew it to neck edge. Sew underarm and side seams in one inside 1 edge st in garter st. Fasten off. POCKETS: Worked back and forth on needle. LOOSELY cast on 20 sts on circular needle size 8 mm / US 11 with 1 strand of each yarn (= 2 strands). Then work in garter st. When piece measures 20 cm / 8'', bind off. Place pocket on front piece so that there are 3 sts in stockinette st between pocket and band, and bottom of pocket goes all the way down to edge in garter st at the bottom of body. Sew pocket with 1 strand of each quality in one and one st so that pocket is flat on front piece. Repeat on the other front piece. Fasten off. |
|
Have you made this or any other of our designs? Tag your pictures in social media with #dropsdesign so we can see them! Do you need help with this pattern?You'll find tutorial videos, a Comments/Questions area and more by visiting the pattern on garnstudio.com. © 1982-2024 DROPS Design A/S. We reserve all rights. This document, including all its sub-sections, has copyrights. Read more about what you can do with our patterns at the bottom of each pattern on our site. |
With over 40 years in knitting and crochet design, DROPS Design offers one of the most extensive collections of free patterns on the internet - translated to 17 languages. As of today we count 304 catalogs and 11422 patterns - 11417 of which are translated into English (US/in).
We work hard to bring you the best knitting and crochet have to offer, inspiration and advice as well as great quality yarns at incredible prices! Would you like to use our patterns for other than personal use? You can read what you are allowed to do in the Copyright text at the bottom of all our patterns. Happy crafting!
Comments / Questions (38)
Mieke wrote:
Hallo, Graag zou ik dit vest met lange mouwen willen breien. Enig idee hoe ik dit zou moeten doen?
11.08.2018 - 21:44DROPS Design answered:
Dag Mieke, Dit zou je kunnen doen door de laatste keer dat je steken opzet voor de mouwen bij de panden, extra steken op te zetten. Dus de keer dat je 1 keer 16-16-14-12-10-9 steken opzet, zet je meer steken op. Aan de hand van de stekenverhouding en de tekening met de maten onderaan het patroon, kun je voor jezelf uitrekenen hoeveel steken extra je op moet zetten.
12.08.2018 - 17:32Valérie Huguenot wrote:
Bonjour, RANGS RACCOURCIS: (...) Tricoter ainsi sur l'endroit tous les 10 rangs: (...) Tous les 10 rangs = en comptant sur la bordure (incluant les rangs raccourcis ) ou sur le jersey ?
04.06.2018 - 09:19DROPS Design answered:
Bonjour Mme Huguenot, répétez les rangs raccourcis tous les 10 rangs jersey - ajustez si besoin en fonction de votre tension en y incluant les rangs point mousse pour que la hauteur du point mousse soit la même que celle du jersey. Bon tricot!
04.06.2018 - 09:45Elena wrote:
Leider entspricht das Bild nicht der Beschreibung. Die Knofleiste ist in der Beschreibung vor der Borte, auf dem Bild jedoch in die Borte integriert.
18.11.2017 - 07:36DROPS Design answered:
Liebe Elena, so werden die Knopflöcher gestrickt, dh wie beschrienben in den Blendenmaschen. Viel Spaß beim stricken!
20.11.2017 - 10:23Corbier wrote:
Ik maak het vest met maat XL nu zie dat met extra steken voor de mouwen voor deze maat minder steken worden opgezet dan voor de kleinere maten klopt dat?
15.08.2017 - 08:30Wendy Burfitt wrote:
But because you also decrease at the same time there will not be a gain of 8 stitches....
07.06.2017 - 23:16DROPS Design answered:
Dear Mrs Burfitt, in size M: you will inc 8 times 1 st on band and dec 6 times 1 st for neck, then cast off 8 sts and cast on 6 sts + inc a total of 26 sts for sleeve. Starting in size M with 38 sts + (8-6-8+6) + 26 = 38 + 0 + 26 = 64 sts. The first 8 sts are inc in the band and cast off later, then you cast on 6 sts for collar, and you dec 6 sts for neck (after band sts). The number of sts in pattern will dec and the number of sts of band will inc. Adding the number of sts for sleeve you will have the 64 sts in size M. Happy knitting!
08.06.2017 - 09:29Wendy Burfitt wrote:
Sorry to be so persistent but the 8 band stitches are included in the original cast on number and not additional as far as I can see in the pattern. if this is not correct - where are they cast on?
07.06.2017 - 12:42DROPS Design answered:
Dear Mrs Burfitt, you will inc 8 sts on band: " When piece measures 36-38-40-42-44-46 cm, inc 1 st in band – see INCREASE TIP. Inc like this every other row (i.e. every row from RS) 8 times in total (= 16 sts in band), AT THE SAME TIME dec sts in stocking st inside band st, cast on new sts for sleeve and cast off sts for vent in collar as follows: READ ALL OF THE FOLLOWING SECTION BEFORE CONTINUING!". Happy knitting!
07.06.2017 - 15:59Wendy Burfitt wrote:
But that will make the stitch count wrong - there will be only 54 stitches on at the end.....
06.06.2017 - 17:19DROPS Design answered:
Dear Mrs Burfitt, you should have the correct number of sts, let's take size M: 38 sts + 8 sts inc in band + 26 sts for sleeve - 6 sts dec for neck - 8 sts cast off for lapel + 6 sts cast on for collar = 38 + 8 + 26 - 6 - 8 + 6 = 64 sts. Happy knitting!
07.06.2017 - 08:54Wendy Burfitt wrote:
After the sleeve cast on the pattern says to decrease 1 st every 4th row inside the band for 6 times. There appear to be no compensating increasings at this point. if this is correct the stitch counts (63-64-65 etc.) later on are incorrect. do I need to do increasings as well as decreasings to make the stitch count correct or is that number wrong? thanks
06.06.2017 - 13:04DROPS Design answered:
Dear Mrs Burfitt, you will decrease for neckline (inside band) 1 st a total of 6 times and then cast off the first 8 sts from RS and cast on 6 new ssts at the end of next row from WS for lapel. So that you dec 6 sts for neckline, and cast off 8 sts then cast on 6 sts, there are 14 sts for collar. Happy knitting!
06.06.2017 - 15:09Maya wrote:
Verzoek om hulp: mijn proeflapje van 11 st. bij 15 toeren met naalden 8 wordt maar 7 cm. hoog. Ik brei niet vast.
12.04.2017 - 11:48DROPS Design answered:
Hoi Maya, Probeer eens een proeflapje te maken met kleinere naalden bv naald 6 of 7. Zelf heb ook dit 'probleem' ;) en gebruik altijd kleinere naalden. Als je een proeflapje maakt, zet dan wat meer steken op dan wordt aangegeven in de stekenverhouding, zodat je in het midden van het lapje kunt meten en de zijkanten wegvallen, want de kantsteken zijn vaak niet representatief voor de stekenverhouding. Succes!
12.04.2017 - 15:03Matei Loredana wrote:
Bonjour, vous dites que le devant gauche on le fait comme le devant droit, mais la bordure, si on est sur l'endroit, ce fait a la fin du rang, non, pas au debout de rang????
25.02.2017 - 09:28DROPS Design answered:
Bonjour Mme Matei, tout à fait, la bordure devant pour le devant gauche se fera en fin de rang sur l'endroit, on monte les mailles de la manche en fin de rang sur l'envers et ainsi de suite. Bon tricot!
27.02.2017 - 09:37