DROPS Lima
DROPS Lima
65% Wool, 35% Alpaca
from 2.60 € /50g
Get the yarn to make this pattern from 28.60€.

The yarn cost is calculated from the pattern’s smallest size and the yarn’s cheapest product type. Looking for an even better price? You might find it on the DROPS Deals!

DROPS Super Sale

Dinner Date

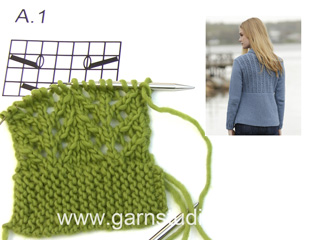
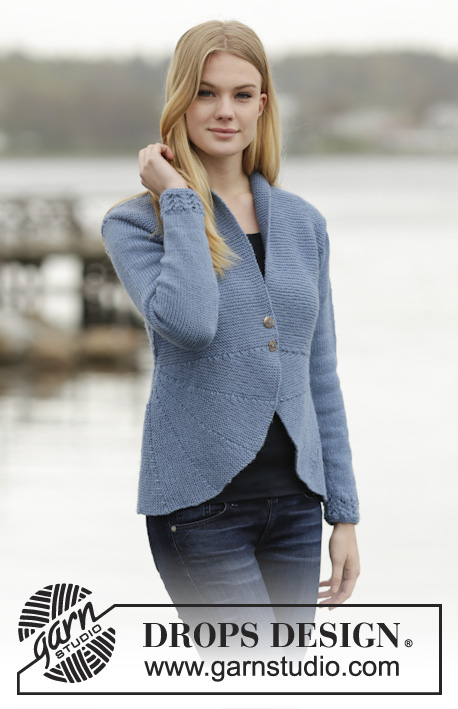
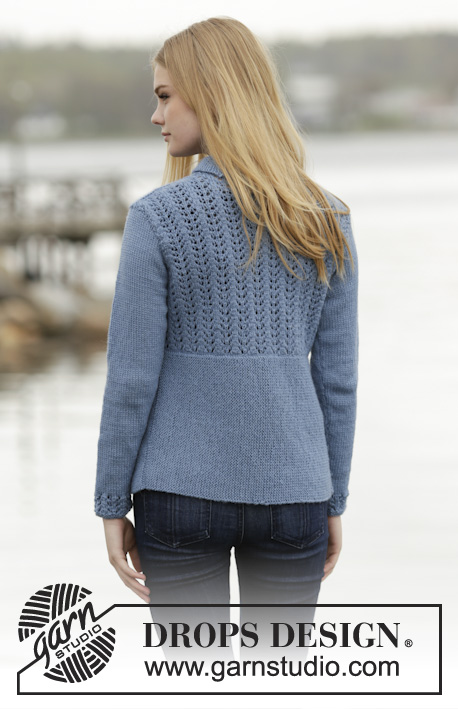
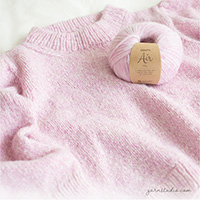
Knitted DROPS jacket with short rows, lace pattern and shawl collar in ”Lima”. Size: S - XXXL.

DROPS 165-24
DROPS design: Pattern no li-060
Yarn group B
----------------------------------------------------------
Size: S - M - L - XL - XXL - XXXL
Materials:
DROPS LIMA from Garnstudio
550-600-700-750-800-900 colour no 6235, grey blue

DROPS CIRCULAR NEEDLE (60 or 80 cm) SIZE 4 mm - or size needed to get 21 sts x 42 rows in garter st = 10 x 10 cm.
DROPS BUTTON ARCHED (white), NO 522: 2 pieces in all sizes

-------------------------------------------------------

Alternative Yarn – See how to change yarns here
Yarn Groups A to F – Use the same pattern and change the yarn here
Yarn usage using an alternative yarn – Use our yarn converter here

-------------------------------------------------------

DROPS Lima
DROPS Lima
65% Wool, 35% Alpaca
from 2.60 € /50g
Get the yarn to make this pattern from 28.60€.

The yarn cost is calculated from the pattern’s smallest size and the yarn’s cheapest product type. Looking for an even better price? You might find it on the DROPS Deals!

Pattern instructions

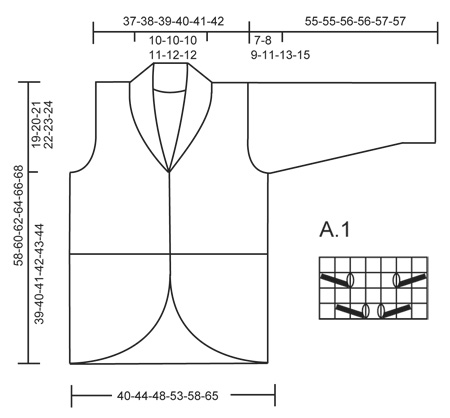
GARTER ST (back and forth):
K all rows. 1 ridge = 2 rows K.

PATTERN: See diagram A.1. Diagram shows all rows in pattern from RS.

SHORT ROWS:
Work short rows on front piece to get a rounded edge on the piece.
Work short rows as follows:
Row 1-2: Work 45-50-55-60-65-70 sts, turn piece and work back.
Row 3-4: Work 42-47-52-57-62-67 sts, turn piece and work back.
Row 5-6: Work 40-45-50-55-60-65 sts, turn piece and work back.
Row 7-8: Work 37-42-47-52-57-62 sts, turn piece and work back.
Row 9-10: Work 35-40-45-50-55-60 sts, turn piece and work back.
Continue like this by working alternately 2 and 3 sts less on every turn until:
SIZE S: Row 35-36: Work 2 sts, turn and work back.
Repeat from row 1.
Row 37-38: Work over all 47 sts, turn and work back.
SIZE M: Row 39-40: Work 2 sts, turn and work back.
Row 41-42: Work over all 52 sts, turn and work back.
Repeat from row 1.
SIZE L: Row 43-44: Work 2 sts, turn and work back.
Row 45-46: Work over all 57 sts, turn and work back.
Repeat from row 1.
SIZE XL: Row 47-48: Work 2 sts, turn and work back.
Row 49-50: Work over all 62 sts, turn and work back.
Repeat from row 1.
SIZE XXL: Row 51-52: Work 2 sts, turn and work back.
Row 53-54: Work over all 67 sts, turn and work back.
Repeat from row 1.
SIZE XXXL: Row 55-56: Work 2 sts, turn and work back.
Row 57-58: Work over all 72 sts, turn and work back.
Repeat from row 1.

BUTTONHOLES:
Dec for buttonholes on right band. 1 buttonhole = K tog 2nd and 3rd st from mid front, then make 1 YO. Dec for buttonholes when piece measures 1 and 5 cm in all sizes (after short rows are done).
----------------------------------------------------------

BACK PIECE:
Worked in 2 parts.

BOTTOM PART:
Cast on 47-52-57-62-67-72 sts on circular needle size 4 mm with Lima. Work ridges in GARTER ST – see explanation above – back and forth over all sts until piece measures 40-44-48-53-58-65 cm. REMEMBER THE KNITTING TENSION Cast off.

TOP PART:
Pick up 1 st in every ridge along on long side on bottom part. On next row (K from WS) adjust no of sts to 86-93-100-114-121-135. Continue to work as follows (from RS): 1 edge st in garter st, A.1 over the next 84-91-98-112-119-133 sts, 1 edge st in garter st. Work until piece measures 39-40-41-42-43-44 cm in total (measured in the side from bottom of jacket). Now cast off in each side for armholes. Cast off at beg of every row: 3 sts 1-1-1-2-2-2 times, 2 sts 0-1-2-3-4-6 times and 1 st 1-1-2-3-3-5 times = 78-81-82-84-87-89 sts. Continue to work until piece measures 56-58-60-62-64-66 cm. Now cast off the middle 18-19-20-20-21-23 sts for neck. On next row cast off 1 st towards the neck = 29-30-30-31-32-32 sts remain on each shoulder. Continue to work until piece measures 58-60-62-64-66-68 cm. Cast off.

RIGHT FRONT PIECE:
Worked back and forth on needle in garter st, i.e. K all rows. Cast on 47-52-57-62-67-72 sts on circular needle size 4 mm with Lima. Work SHORT ROWS - see explanation above (1st row = RS). Work Short rows (1st to 38th-42nd-46th-50th-54th-58th row) 5 times in total, the curved edge measures approx. 45-50-55-60-64-69 cm at the edge. Then work back and forth over all sts. Dec for BUTTONHOLES - see explanation above. Work until piece measures 39-40-41-42-43-44 cm (measured in the side from bottom of jacket). On next row from WS beg cast off for armhole in the side as on back piece = 43-46-48-47-50-49 sts. Continue to work until piece measures 58-60-62-64-66-68 cm. Now cast off the outermost 29-30-30-31-32-32 sts in the side for shoulder = 14-16-18-16-18-17 sts remain on needle for collar. Work rest of row. Then work short rows as follows (1st row = RS): * Work back and forth over all sts, work back and forth over 7-8-9-8-9-8 sts towards mid front *, repeat from *-* until collar measures approx. 7-7-7-8-8-9 cm (measured in the shorter side) from where shoulder was cast off. Cast off.

LEFT FRONT PIECE:
Cast on 47-52-57-62-67-72 sts on circular needle size 4 mm with Lima. K 1 row from RS. Then work as right front piece but reversed (1st row in short rows is from WS).

SLEEVE:
The sleeve is worked back and forth on circular needle. Cast on 44-44-51-51-58-58 sts (incl 1 edge st in each side) on circular needle size 4 mm with Lima. Work 2 ridges, then work as follows: 1 edge st in garter st, A.1 over the next 42-42-49-49-56-56 sts, finish with 1 edge st in garter st. Work A.1 3 times vertically, then work in stocking st with 1 st in garter st in each side. When piece measures 8 cm, inc 1 st in each side, repeat inc every 3-2½-2½-2-2-1½ cm 11-14-13-16-16-19 more times = 68-74-79-85-92-98 sts. When piece measures 48-47-47-46-46-44 cm (NOTE! Shorter measurements in the larger sizes because of longer sleeve cap and wider shoulders), cast off in each side for sleeve cap. Cast off at beg of every row as follows: 3 sts 1 time and 2 sts 4-4-5-5-6-6 times and 1 st 0-1-1-1-1-3 times. Then cast off 2 sts in each side until piece measures 54-54-55-55-56-56 cm, cast off 3 sts in each side 1 time. Cast off the remaining sts, piece measures approx. 55-55-56-56-57-57 cm. Make another sleeve.

ASSEMBLY:
Sew the shoulder seams. Sew in sleeves. Sew sleeve and side seams in one inside 1 edge st. Sew collar tog mid back and sew the neck dec on back piece. Sew the buttons on to left front piece.

Diagram

symbols = K from RS, P from WS
symbols = K 2 tog
symbols = slip 1 st as if to K, K 1, psso
symbols = 1 YO between 2 sts
diagram
Do you have a question? See a list of frequently asked questions (FAQ)

Knitting tension is what determines the final measurements of your work, and is usually measured per 10 x 10 cm. It is provided like so: number of stitches in width x number of rows in height - eg: 19 stitches x 26 rows = 10 x 10 cm.

The knitting tension is very individual; some people knit/crochet loosely while others work tightly. You adjust the knitting tension with the needle size, which is why the suggested needle size is only meant as a guide! You need to adjust this (up or down) to ensure that YOUR knitting tension matches the knitting tension provided in the pattern. If you work with a different knitting tension than provided you will have a different yarn consumption, and your work will have different measurements than what the pattern suggests.

The knitting tension also determines which yarns can replace each other. As long as you achieve the same knitting tension you can replace one yarn with another.

See DROPS lesson: How to measure your tension/gauge

See DROPS video: How to make a gauge tension swatch

The required amount of yarn is provided in grams, eg: 450 g. To calculate how many balls you’ll need you first need to know how many grams are in 1 ball (25g, 50g or 100g). This information is available if you click on the individual yarn quality on our pages. Divide the amount required with the amount of each ball. For example, if each ball is 50g (the most common amount), the calculation will be as follows: 450 / 50 = 9 balls.

The important thing when changing from one yarn to another is that the knitting/crochet tension remains the same. This is so that the measurements of the finished piece will be the same as on the sketch provided. It is easier to achieve the same knitting tension using yarns from the same yarn group. It is also possible to work with multiple strands of a thinner yarn to achieve the knitting tension of a thicker one. Please try our yarn converter. We recommend you to always work a test swatch.

Please NOTE: when changing yarn the garment might have a different look and feel to the garment in the photo, due to individual properties and qualities of each yarn.

See DROPS lesson: Can I use a different yarn than the one mentioned in the pattern?

All our yarns are categorised into yarn groups (from A to F) according to thickness and knitting tension – group A contains the thinnest yarns and group F the thickest. This makes it easier for you to find alternative yarns to our patterns, should you wish to switch yarn. All yarns within the same group have a similar knitting tension and can easily replace each other. However, different yarn qualities have different structures and properties which will give the finished work a unique look and feel.

Click here for an overview of the yarns in each yarn group

At the top of all our patterns you’ll find a link to our yarn calculator, which is a helpful tool should you wish to use a different yarn than suggested. By filling in the yarn quality you wish to replace, the amount (in your size) and number of strands, the calculator will present good alternative yarns with the same knitting tension. Additionally it will tell you how much you’ll require in the new qualities and whether you’ll need to work with multiple strands. Most skeins are 50g (some are 25g or 100g).

If the pattern is worked with multiple colours, every colour will have to be calculated separately. Similarly, if the pattern is worked with several strands of different yarns (for example 1 strand Alpaca and 1 strand Kid-Silk) you will have to find alternatives for each, individually.

Click here to see our yarn calculator

Since different yarns have different qualities and textures we have chosen to keep the original yarn in our patterns. However, you can easily find options among our available qualities by using our yarn calculator, or simply pick a yarn from the same yarn group.

It is possible that some retailers still have discontinued yarns in stock, or that someone has a few skeins at home that they would like to find patterns for.

The yarn calculator will provide both alternative yarn as well as required amount in the new quality.

If you think it's hard to decide what size to make, it can be a good idea to measure a garment you own already and like the size of. Then you can pick the size by comparing those measures with the ones available in the pattern's size chart.

You'll find the size chart at the bottom of the pattern.

See DROPS lesson: How to read size chart

The needle size provided in the pattern serves only as a guide, the important thing is to follow the knitting tension. And since knitting tension is very individual, you will have to adjust the needle size to ensure that YOUR tension is the same as in the pattern – maybe you’ll have to adjust 1, or even 2 needle sizes, up or down to achieve the correct tension. For this, we recommend that you work test swatches.

Should you work with a different knitting tension than the one provided, the measurements of the finished garment might deviate from the measurement sketch.

See DROPS lesson: How to measure your tension/gauge

See DROPS video: How to make a tension/gauge swatch

Working a garment top-down provides more flexibility and room for personal adjustment. For example it is easier to try the garment on while working, as well as making adjustments to length of yoke and shoulder caps.

The instructions are carefully explaining every step, in the correct order. Diagrams are adjusted to the knitting direction and are worked as usual.

The diagram depicts all rows/rounds, and every stitch seen from the right side. It is read from bottom to top, from right to left. 1 square = 1 stitch.

When working back and forth, every other row is worked from the right side and every other row is worked from the wrong side. When working from the wrong side, the diagram will have to be worked reversed: from left to right, knit stitches are purled, purl stitches are knit etc.

When working in the round every round is worked from the right side and the diagram are worked from right to left on all rounds.

See DROPS lesson: How to read knitting diagrams

The diagram depicts all rows/rounds, and every stitch seen from the right side. It is worked from bottom to top, from right to left.

When working back and forth every other row is worked from the right side: from right to left and every other row is worked from the wrong side: from left to right.

When working in the round, every row in the diagram are worked from the right side, from right to left.

When working a circular diagram you start in the middle and work your way outwards, counter clockwise, row by row.

The rows usually start with a given number of chain stitches (equivalent to the height of the following stitch), this will either be depicted in the diagram or explained in the pattern.

See DROPS lesson: How to read crochet diagrams

Instructions for working several diagrams after each other on the same row/round, will often be written like so: “work A.1, A.2, A.3 a total of 0-0-2-3-4 times". This means you work A.1 once, then A.2 is worked once, and A.3 is repeated (in width) the number of times provided for your size – in this case like so: S = 0 times, M = 0 times, L=2 times, XL= 3 times and XXL = 4 times.

The diagrams are worked as usual: begin with the first row in A.1, then work the first row in A.2 etc.

See DROPS lesson: How to read knitting diagrams

See DROPS lesson: How to read crochet diagrams

The total width of the garment (from wrist-to-wrist) will be larger in the larger sizes, despite the actual sleeves being shorter. The larger sizes have longer sleeve caps and wider shoulders, so there will be a good fit in all sizes.

The measurement sketch/schematic drawing provides information regarding the full length of the garment. If it’s a jumper or a jacket the length is measured from the highest point on the shoulder closest to the neckline, and straight down to the bottom of the garment. It is NOT measured from the tip of shoulder. Similarly, the length of yoke is measured from the highest point on the shoulder and down to where yoke is split into body and sleeves.

On a jacket measures are never taken along bands, unless specifically stated. Always measure inside band stitches when measuring the length.

See DROPS lesson: How to read a schematic drawing

Diagrams are often repeated on the round or in height. 1 repeat is the diagram the way it appears in the pattern. If it says to work 5 repeats of A.1 in the round, then you work A.1 a total of 5 times after/next to each other in the round. If it says to work 2 repeats of A.1 vertically/in height you work the entire diagram once, then begin again at the start and work the entire diagram one more time.

Chain stitches are slightly narrower than other stitches and to avoid working the cast-on edge too tight, we simply chain more stitches to begin with. The stitch count will be adjusted on the following row to fit the pattern and measurement sketch.

The rib edge is more elastic and will contract slightly compared to, for example, stocking stitch. By increasing before the rib edge, you avoid a visible difference in width between the rib edge and the rest of the body.

It’s very easy to cast off too tightly, and by making yarn overs while casting off (and simultaneously casting these off) you avoid a too tight cast off edge.

See DROPS video: How to bind off with yarn overs (yo)

To achieve an even increase (or decrease) you can increase on, for example: every 3rd and 4th row alternately, like so: work 2 rows and increase on the 3rd row, work 3 rows and increase on the 4th. Repeat this until the increase is complete.

See DROPS lesson: Increase or decrease 1 st on every 3rd and 4th row alternately

Should you prefer to work in the round instead of back and forth, you may of course adjust the pattern. You’ll need to add steeks mid-front (usually 5 stitches), and follow the instructions. When you would normally turn and work from the wrong side, simply work across the steek and continue in the round. At the end you’ll cut the piece open, pick up stitches to work bands, and cover the cut edges.

See DROPS video: How to knit steeks and cut open

Should you prefer to work back and forth instead of in the round, you may of course adjust the pattern so you work the pieces separately and then assemble them at the end. Divide the stitches for the body in 2, add 1 edge stitch in each side (for sewing) and work the front and back pieces separately.

See DROPS lesson: Can I adapt a pattern for circular needles into straight needles?

Pattern repeats can vary slightly in the different sizes, in order to get the correct proportions. If you’re not working the exact same size as the garment in the photo, yours might deviate slightly. This has been carefully developed and adjusted so that the complete impression of the garment is the same in all sizes.

Make sure to follow instructions and diagrams for your size!

If you have found a pattern you like which is available in women’s size it’s not very difficult to convert it to men’s size. The biggest difference will be the length of sleeves and body. Start working on the women size that you think would fit across the chest. The additional length will be worked right before you cast off for the armhole/sleeve cap. If the pattern is worked top-down you can add the length right after the armhole or before the first decrease on sleeve.

Regarding additional yarn amount, this will depend on how much length you add, but it is better with a skein too many than too few.

All yarns will have excess fibres (from production) that might come off as lint or shedding. Brushed yarns (ie hairier yarns) have more of these loose, excess fibres, causing more shedding.

Shedding also depends on what is worn under or over the garment, and whether this pulls at the yarn fibres. It’s therefore not possible to guarantee that there will be no shedding

Below are some tips on how to get the best result when working with hairier yarns:

1. When the garment is finished (before you wash it) shake it vigorously so the looser hairs come off. NOTE: do NOT use a lint roller, brush or any method that pulls at the yarn.

2. Place the garment in a plastic bag and put it in your freezer - the temperature will cause the fibres to become less attached to each other, and excess fibres will come off easier.

3. Leave in the freezer for a few hours before taking it out and shaking it again.

4. Wash the garment according to the instructions on the yarn label.

Pilling is a natural process that happens to even the most exclusive of fibers. It's a natural sign of wear and tear that is hard to avoid, and that is most visible in high friction areas of your garment like a sweater's arms and cuffs.

You can make your garment look as new by removing the pilling, using a fabric comb or a pill/lint remover.

Still can't find the answer you need? Then scroll down and leave your question so one of our experts can try to help you. This will be done normally within 5 to 10 working days.
In the meantime, you can read the questions and answers that others have left to this pattern or join the DROPS Workshop on Facebook to get help from fellow knitters/crocheters!

You might also like...

Post a comment to pattern DROPS 165-24

We would love to hear what you have to say about this pattern!

If you want to leave a question, please make sure you select the correct category in the form below, to speed up the answering process. Required fields are marked *.

Comments / Questions (55)

country flag Karin wrote:

Eine einmalige Jacke! Ein wahres Schmuckstück! Passt perfekt. Danke für die genaue Anleitung. Lima ist ein herrliches Garn! Ich habe noch ein drittes Knopfloch eingearbeitet. Das sieht noch schöner aus.

31.05.2016 - 10:03

country flag Vini Beyer wrote:

Jeg har styr på vendepinden, men kan ikke få den fremtrædende linje og maske på venstre forstykke som på højre. Jeg har og andre har prøvet på mange måder. Kan der være en fejl i opskriften??? Håber snart på en løsning. Vh. Vini

25.02.2016 - 11:08

DROPS Design answered:

Hej, Hvis du på venstre forstykke starter vendingerne i modsat side, så vil du få buen i den anden side og altså mod midt foran. Selve overgangen til buerne vil ikke se nøjagtig ligedan ud da den ene strikkes fra vrangen, men da alt strikkes i retstrik er forskellen ikke større end det man kan se på billedet. God fornøjelse!

25.02.2016 - 15:29

country flag Vini Beyer wrote:

Nu prøver jeg igen. Vil det ikke være en ide at I laver en vidio som viser hvordan begge forstykker strikkes så de bliver som på billedet???? Kan lære at vi er flere der har samme problem. Hilsen Vini. Su gerne hurtigt.

20.02.2016 - 19:58

DROPS Design answered:

Hej Vini, Er det vendepindene du ikke forstår, her ser du en video med dem:

DROPS Knitting Tutorial: How to knit short rows in garter st - basic from Garnstudio Drops design on Vimeo.

24.02.2016 - 15:42

country flag Uta Becker wrote:

Beim rechten Vorderteil sieht die verkürzte Reihe anders aus als beim linken Vorderteil. Was mache ich falsch?

17.01.2016 - 17:46

DROPS Design answered:

Liebe Uta, haben Sie sich alle unsere Videos zum Thema Verkürzte Reihen angeschaut? Mit diesem Wissen sollten Sie dann die verkürzten Reihen ausführen können.

02.03.2016 - 09:36

country flag Vini Beyer wrote:

Hjælp, jeg kan ikke få venstre forstykke rigtigt ,stribeeffekten kommer på vrangsiden? Hilsen Vini

17.01.2016 - 11:15

DROPS Design answered:

Hej Vini, Jo du lader samme side være ret fra retsiden som højre forstykke, men du strikker selve vendingerne i den anden side af arbejdet. God fornøjelse!

27.01.2016 - 11:39

country flag Truus wrote:

Ik weet inmiddels dat het vest ook op gewone naalden gebreid kan worden.

02.01.2016 - 09:49

country flag Peggy Tetzner wrote:

Ich bin jetzt am Rückenteil, wo die Abnahmen für die Ärmel gemacht werden sollen. Wenn ich die Abnahmen mache und dann weiter im Muster A.1 stricke verschiebt sich das Muster. Wie muss ich nach den Abnahmen weiterstricken in A.1, damit sich das Muster nicht versetzt? Vielen Dank Peggy

23.11.2015 - 12:53

DROPS Design answered:

Sie müssen darauf achten, dass Sie bei den M, die nicht durch die Armausschnitte abgekettet werden, auf jeden Fall im Muster bleiben. Die M, die durch das Abketten nicht mehr im Muster aufgehen, stricken Sie einfach glatt re. Orientieren Sie sich also am begonnen Muster und achten Sie darauf, dass die Mustersätze weiterhin übereinander zu liegen kommen. Sie können sich zur besseren Orientierung die ersten Mustersätze der R jeweils mit Fäden markieren, dann sehen Sie direkt, wo ein Mustersatz beginnt.

30.11.2015 - 12:42

Sihem wrote:

Bonsoir; Merci pour ce joli modèle, je voudrais savoir s'il y a un moyen pour avoir ce gilet avec une longueur superieure (si c'est faisable). Merci

15.11.2015 - 20:45

DROPS Design answered:

Bonjour Sihem, vous pouvez probablement ajuster à votre convenance, demandez conseil à votre magasin DROPS il pourra vous aider. Bon tricot!

16.11.2015 - 09:48

country flag Jennifer wrote:

I am knitting the pattern in size XXL. Currently doing the decreases for the armholes on the back of the body. The stitch count at the beginning is 121sts, and it should be 87sts when the armhole decreases are complete. If I bind off as instructed at the beginning of every row, there are only 17 decreases, leaving 104 stitches. Did I miss something?

06.11.2015 - 22:14

DROPS Design answered:

Dear Jenniver, bind off for armhole have to be done on each side (= at the beg of every row both from RS and from WS): 3 sts 2 times x 2 sides, 2 sts 4 times x 2 sides and 1 st 3 timesx 2 sides = 17 sts x 2 sides= 34 sts bound off for armhole in total. 121 -34= 87 sts. Happy knitting!

09.11.2015 - 09:38

country flag Denise Church wrote:

Can you please help me with the back of the neck of this pattern, i;m not sure how the back neck should be stitched. The pattern says " sew the neck on dec on back piece" but i;m not sure what this means. Can you help please? Thank you

30.10.2015 - 16:36

DROPS Design answered:

Dear Mrs Church, the collar will be sewn tog (from both front pieces), then sew along the neckline on back piece (sts cast off and dec) - see also video below (different collar - without short rows - but same technique).

31.10.2015 - 17:33