
Popular categories
Looking for a yarn?


Comments / Questions (22)
![]() Emilie Ida Gustafsson wrote:
Emilie Ida Gustafsson wrote:
Hej. Jeg har strikket ca 40 cm nu og brugt 2 nøgler garn allerede. Jeg bruger et substitut til dét i opskriften men garnet er samme tykkelse og endda flere meter end det originale i opskriften, men af hvad jeg kan regne ud, skal jeg bruge omkring 10 nøgler i alt? Min strikkefadthed passer, min bredde stemmer overens med de 48 cm i opskriften, så jeg forstår ikke hvad der går galt?
04.04.2024 - 19:59
![]() Patty wrote:
Patty wrote:
Knitted DROPS stole with lace pattern, I am confused with the diagram instructions. I do not understand what it means saying K from RS, P from WS with a plain square Then K from WS with a coloured in square. Do you just mean K with the plain square and P with the coloured square?
10.11.2022 - 23:01DROPS Design answered:
Hi Patty, You are working back and forth. The first row is from the right side and you read the diagram from bottom right to left, where the open squares are knitted. Then you work back from the wrong side, reading from left to right, where the open squares will now be purled stitches. Hope this helps and happy crafting!
11.11.2022 - 06:51
![]() Andrea Blümel wrote:
Andrea Blümel wrote:
Liebes Drops Team, kann man den Schal auch in einem Stück stricken? Oder muss er unbedingt in zwei Teilen gefertigt werden. Danke für die Antwort
20.10.2022 - 08:04DROPS Design answered:
Liebe Frau Blümel, damit beide Ende gleich sind, sollen beide Hälfte genauso anfangen und dann in der Mitte zusammengenäht werden. Viel Spaß beim stricken!
20.10.2022 - 10:07
![]() Angi wrote:
Angi wrote:
I can’t see how many balls of yarn I will need.
30.08.2021 - 16:27DROPS Design answered:
Hi Angi, you will need 5 balls of DROPS Brushed AlpacaSilk (each ball is 25g). Happy knitting!
30.08.2021 - 16:40
![]() Goris Nadine wrote:
Goris Nadine wrote:
Kan ik de sjaal ook in 1 stuk breien in plaats van 2
20.04.2021 - 14:06DROPS Design answered:
Dag Nadine,
De reden dat de sjaal in 2 delen wordt gebreid is omdat het er dan hetzelfde uitziet aan beide kanten wanneer je de sjaal draagt. Je zou ook gewoon door kunnen breien en dan aan het einde weer meerderen van 87 naar 99 steken om tot slot af te kanten.
21.04.2021 - 13:01
![]() Ula K wrote:
Ula K wrote:
Ok. Rozumiem, że mogę użyć pod warunkiem, że będę robić z włóczek Drops. Nasza grupa na fb to Świry Rękodzieła Inspirują. Fan page to Świry Rękodzieła. Pozdrawiam i dziękuję za odpowiedź.
01.09.2020 - 18:15DROPS Design answered:
Dokładnie tak jest. Pozdrawiamy!
01.09.2020 - 18:40
![]() Ula K wrote:
Ula K wrote:
Dzień dobry! Czy mogę wzór wykorzystać, aby przeprowadzić bezpłatny live/bezpłatne szkolenie jak wykonać taki szalik na facebooku na naszej grupie? Wszystkie warsztaty/szkolenia na tej grupie są bezpłatne. Naszym sponsorem są kokonki.pl, które są dystrybutorem marki Drops. Prowadzimy też bloga z rękodziełem.
31.08.2020 - 14:27DROPS Design answered:
Witaj Ulu! Nasze wzory mogą być wykorzystywane pod 2 warunkami: 1. musi być wyraźnie zaznaczone, że to wzór DROPS. 2. Celem takiego wykorzystania nie może być sprzedaż produktów innych marek. Możesz podać mi nazwę waszej grupy/bloga? Pozdrawiamy i dziękujemy za zainteresowanie naszymi wzorami :)
01.09.2020 - 07:49
![]() Agi wrote:
Agi wrote:
Dears, how much if at all I need to stretch my swatch to check gauge? I made swatches with needles 4, 4.5 and 5 and without stretching even with n5 it was smaller than 10 cm. I'm a bit nervous that with needles 2 sizes up than the suggested ones my yarn won't be enough. :P Also, note on pattern: in Hungarian it says for the decrease in first row: "repeat from *-* two more times = 87 sts" instead of the English "repeat from *-* until 2 sts remain" Thank you!
13.05.2020 - 12:14DROPS Design answered:
Dear Agi, you can block your swatch to check your tension, getting the recommended tension will ensure you to get correct measurements - thanks for your feedback, Hungarian pattern will be edited. Happy knitting!
13.05.2020 - 12:25
![]() Kay wrote:
Kay wrote:
Bonjour, Pourquoi tricoter l'étole en deux parties ? Est-il possible de la faire en une seule partie ou y a-t-il une raison technique, autre que la longueur de l'ouvrage :-) ? Merci et Bonne et heureuse année 2018
13.01.2018 - 12:24DROPS Design answered:
Bonjour Kay, on la tricote en 2 parties pour que les 2 extrémités soient identiques. Bon tricot!
15.01.2018 - 08:49
![]() Irene wrote:
Irene wrote:
Salve, vorrei sapere se a lavoro ultimato è consigliabile o no bloccare tutto. In caso come è meglio procedere? Il filato si rovina? Grazie
21.10.2017 - 18:32DROPS Design answered:
Buonasera Irene. Con questo tipo di filato non è necessario procedere con il bloccaggio. Buon lavoro!
21.10.2017 - 19:49
|
|||||||||||||||||||
Sweet Carolina#sweetcarolinascarf |
|||||||||||||||||||
|
|
|||||||||||||||||||
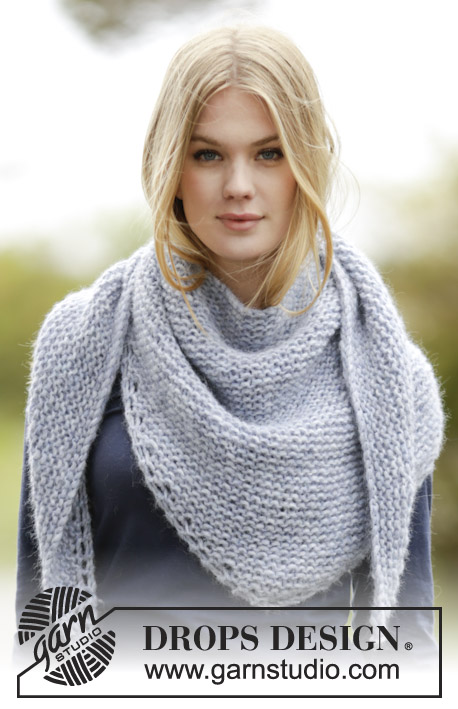
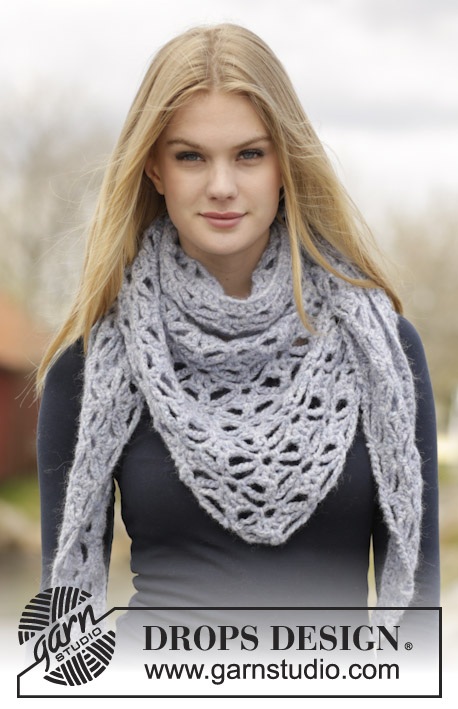
Knitted DROPS stole with lace pattern in ”Brushed Alpaca Silk”.
DROPS 166-19 |
|||||||||||||||||||
|
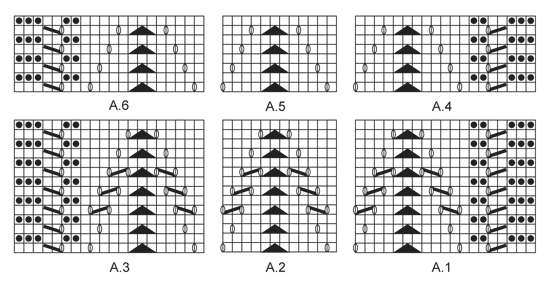
PATTERN: See diagrams A.1 to A.6. The diagrams show all rows in pattern seen from RS. ---------------------------------------------------------- STOLE: Piece is worked back and forth on needle in 2 equal parts and sewn tog when finished. Loosely cast on 99 sts on needle size 4 mm with Brushed Alpaca Silk. Work first row as follows from RS: K 13, * slip 1 st as if to K, K 2 tog, psso, K 11 *, repeat from *-* until 2 sts remain, K these sts = 87 sts on needle. K 3 rows. Continue with A.1-A.3 as follows: Work A.1 over the first 19 sts, repeat A.2 4 times in width and then A.3 over the last 20 sts. When A.1-A.3 has been worked 3 times in total vertically, continue with A.4 over A.1, A.5 over A.2 and A.6 over A.3. REMEMBER THE KNITTING TENSION Repeat A.4-A.6 vertically until piece measures approx. 85 cm - adjust to finish piece after last row in diagram. Slip sts on a stitch holder and knit another part the same way. ASSEMBLY: Sew the 2 parts tog with grafting/kitchener stitches to make the seam invisible. |
|||||||||||||||||||
Diagram explanations |
|||||||||||||||||||
|
|||||||||||||||||||
|
|||||||||||||||||||
Have you finished this pattern?Tag your pictures with #dropspattern #sweetcarolinascarf or submit them to the #dropsfan gallery. Do you need help with this pattern?You'll find 13 tutorial videos, a Comments/Questions area and more by visiting the pattern on garnstudio.com. © 1982-2025 DROPS Design A/S. We reserve all rights. This document, including all its sub-sections, has copyrights. Read more about what you can do with our patterns at the bottom of each pattern on our site. |
|||||||||||||||||||


With over 40 years in knitting and crochet design, DROPS Design offers one of the most extensive collections of free patterns on the internet - translated to 17 languages. As of today we count 314 catalogues and 11822 patterns translated into English (UK/cm).
We work hard to bring you the best knitting and crochet have to offer, inspiration and advice as well as great quality yarns at incredible prices! Would you like to use our patterns for other than personal use? You can read what you are allowed to do in the Copyright text at the bottom of all our patterns. Happy crafting!
Post a comment to pattern DROPS 166-19
We would love to hear what you have to say about this pattern!
If you want to leave a question, please make sure you select the correct category in the form below, to speed up the answering process. Required fields are marked *.