
Popular categories
Looking for a yarn?


|
|||||||||||||||||||||||||||||||
Water Pearl |
|||||||||||||||||||||||||||||||
 |
 |
||||||||||||||||||||||||||||||
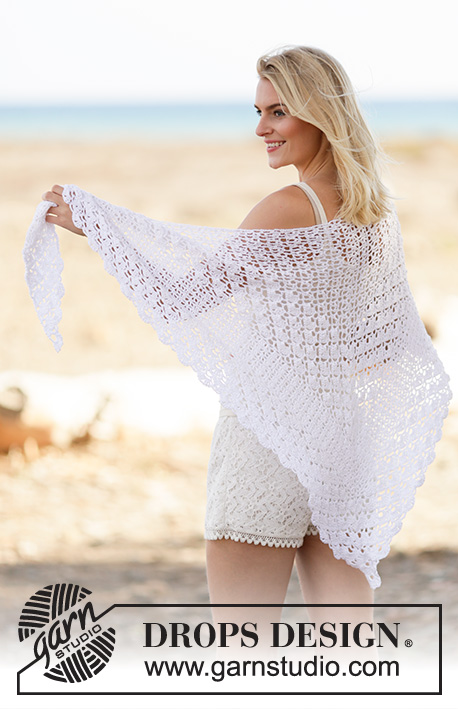
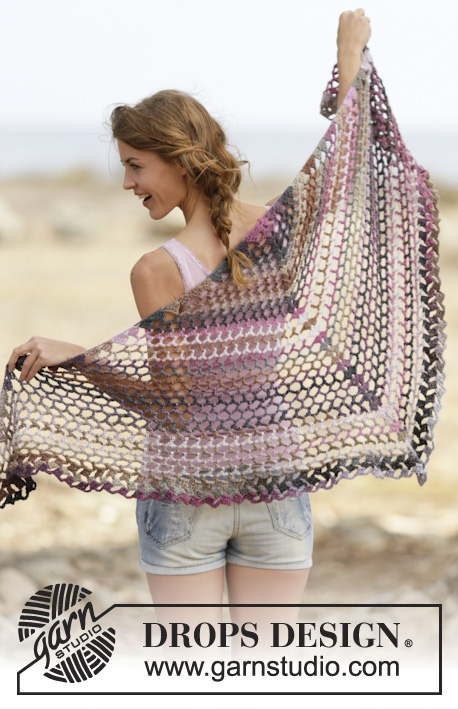
Crochet DROPS shawl with lace pattern in ”Alpaca”.
DROPS 162-23 |
|||||||||||||||||||||||||||||||
|
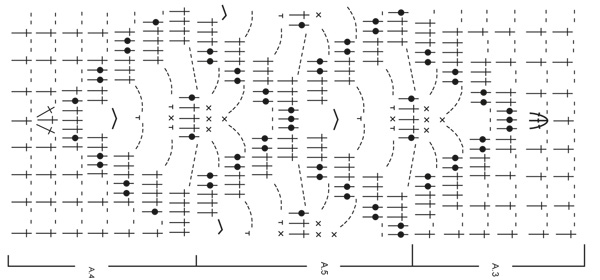
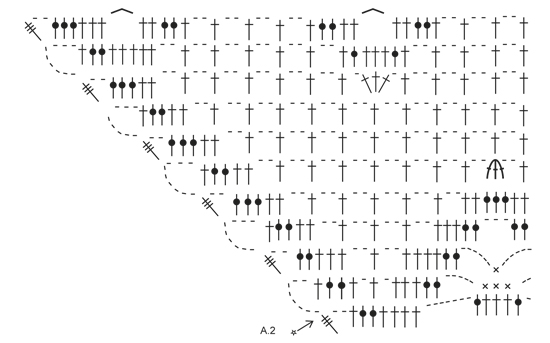
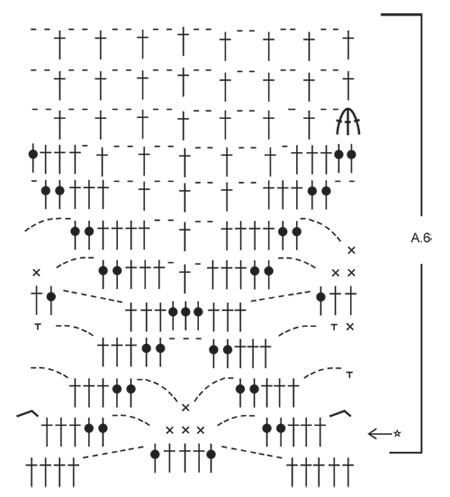
PATTERN: See diagrams A.1 to A.6. ---------------------------------------------------------- SHAWL: Worked back and forth from bottom of tip and upwards. Work pattern according to diagram A.1 with Alpaca on hook size 3 mm. REMEMBER THE CROCHET TENSION! When entire A.1 has been worked vertically, continue with A.3 over each of the squares in pattern, AT THE SAME TIME continue inc in each side as shown in A.2. NOTE: Work inc in A.2 reversed in the other side (only left side is shown in diagram). When A.3 has been worked vertically, continue with A.4. NOTE: Square pattern will displace as shown in A.2, i.e. ½ repetition towards the side, so that mesh pattern between square form a zig-zag line. Continue inc in each side as shown in A.1. When A.4 has been worked vertically, continue with A.5 2 times vertically. Then work A.3, AT THE SAME TIME continue inc in each side as shown in A.2. There are now 3 pattern squares at the most vertically. When A.3 has been worked vertically, continue with A.4. NOTE: Square pattern will displace as shown in A.2 and as before in piece. Continue inc in each side as shown in A.1. When A.4 has been worked vertically, continue with A.6 1 time vertically (1½ pattern square vertically). Now work an edge at the top as follows: Work 1 dc in every tr until mesh pattern beg, * 3 ch, 1 dc in next tr *, repeat from *-* along the entire edge at the top until only tr remain on row below, work 1 dc in every tr. Cut and fasten the yarn. |
|||||||||||||||||||||||||||||||
Diagram explanations |
|||||||||||||||||||||||||||||||
|
|||||||||||||||||||||||||||||||

|
|||||||||||||||||||||||||||||||
|
|||||||||||||||||||||||||||||||
|
|||||||||||||||||||||||||||||||
|
|||||||||||||||||||||||||||||||
|
Have you made this or any other of our designs? Tag your pictures in social media with #dropsdesign so we can see them! Do you need help with this pattern?You'll find tutorial videos, a Comments/Questions area and more by visiting the pattern on garnstudio.com. © 1982-2024 DROPS Design A/S. We reserve all rights. This document, including all its sub-sections, has copyrights. Read more about what you can do with our patterns at the bottom of each pattern on our site. |
|||||||||||||||||||||||||||||||


With over 40 years in knitting and crochet design, DROPS Design offers one of the most extensive collections of free patterns on the internet - translated to 17 languages. As of today we count 304 catalogues and 11422 patterns - 11422 of which are translated into English (UK/cm).
We work hard to bring you the best knitting and crochet have to offer, inspiration and advice as well as great quality yarns at incredible prices! Would you like to use our patterns for other than personal use? You can read what you are allowed to do in the Copyright text at the bottom of all our patterns. Happy crafting!
Comments / Questions (43)
The tutorial video was required for me to start as the A1 chart was not clearly drawn with the start of chain 14 stitches etc. Thank you for the video, the Q&A with the earlier users( I read these and was very helpful) and a beautiful shawl pattern. My shawl is working beautifully.
30.04.2019 - 11:01Ciao, bellissimo lavoro complimenti. solo una domanda,con quante catenelle devo iniziare? grazie Susanna
25.05.2018 - 11:58DROPS Design answered:
Buongiorno Susanna. Deve iniziare con 13 catenelle. Buon lavoro!
25.05.2018 - 12:17Vraag; heb A2 klaar en kom daarna niet verder met de zijkanten. Eindig met 6 stokjes, 2 lossen en driedubbel stokje. Waar kan ik vinden wat ik daarna moet? Bij A1 zie je nergens 6 stokjes, 2 lossen enz
17.11.2016 - 11:19DROPS Design answered:
Hoi Veronie. Je meerdert aan de zijkanten volgens A.2, dus je krijgt steeds nieuwe steken bij die gaandeweg meegaat in het patroon (A.3). Je gaat dus door met de meerderingen zoals beschreven in A.2 met de nieuwe st en de patronen.
17.11.2016 - 14:25Eseguito, molto bello! Grazie per il modello
28.05.2016 - 10:37Kedves Drops! Kérnék egy kis segítséget, mert elakadtam a 4-es diagram szaporításánál. A leírás szerint a 2 -es diagram után az 1-es szerint kell szaporítani, de míg a 2-esben 6 erp, 2 lsz, 1 hrp szerepel a sor végén, addig az 1-esben 4 erp, 2 lsz, 1hrp van. Hogy lesz a 6 erp-ből 4? Köszönöm előre is választ. Agnes
12.04.2016 - 15:36DROPS Design answered:
Kedves Ágnes! A szaporítással a minta fél mintaegységgel elmozdul.
06.11.2016 - 16:15Buongiorno , ho lavorato senza problemi il diagramma A1 e il diagramma A3 (con diagramma A2 per aumenti ). Ora ho difficoltà con il motivo A4 non mi è chiaro se una parte degli aumenti di questo diagramma è A2 e poi A1 o se gli aumenti sono solo in A1 e da che riga. Inoltre non mi è chiaro cosa si intende che il motivo si sposta di 1/2 ripetizione. Grazie.
29.02.2016 - 13:07DROPS Design answered:
Buongiorno Antonella. Quando lavora A.4 gli aumenti da seguire sono quelli del diagramma A.1, a partire dalla riga 7. Deve inoltre incolonnare correttamente il motivo, come indicato nel diagramma A.2: verifichi esattamente la posizione delle 3 m.a lavorate nella stessa m rispetto alla 3 m.a lavorate insieme. Con il lavoro sotto e guardando la fotografia, dovrebbe risultarle più chiaro. Buon lavoro!
01.03.2016 - 10:22Buongiorno, potresti confermarmi che nel diagramma di aumenti A2 ci sono due inizi ( il primo e il quarto ) con 8 catenelle invece di 9 ? grazie
25.02.2016 - 09:44DROPS Design answered:
Buongiorno Antonella, non ci sono errori nel diagramma A.2. Buon lavoro!
25.02.2016 - 09:59Goedenavond. Bedankt voor het prachtige patroon. Helaas loop ik vast en zou graag wat hulp willen. Ik heb A3 in de hoogte gehaakt en hierbij A2 gebruikt voor de zijkanten. Nu moet ik bij A4 voor de zijkanten A1 weer gebruiken maar bij de laatste ronde van A2 eindig ik met 6 dst, 2 l, 1 driedb st. Zoek ik deze zelfde ronde op in A1 dan eindig ik met 4 dst, 2l, 1driedb st. Ik zou dus graag weten hoe ik de ronde begin na de laatste toer van A2. Alvast bedankt. Mvg Leonie
10.02.2016 - 20:14Mariana wrote:
Wuauuuu los felicito estos proyectos me han ayudado mucho me gusta tejer
16.01.2016 - 01:05Bonsoir, Je suis débutante et je viens de commencer ce châle, comme beaucoup de monde je bloque à partir du diagramme A4, pourriez vous svp expliquer ce que vous entendez par "NOTE: les motifs se décalent comme on le voit dans A.2, c'est-à-dire ½ motif sur le côté pour que le point de filet entre les motifs forme un zigzag. Augmenter de chaque côté comme dans A.1. " ? Combien de fois exactement doit on répéter le diagramme A4? Cordialement, Audrey
04.08.2015 - 23:32DROPS Design answered:
Bonjour Audrey, tout en suivant A.2 (début et fin de rang), on crochète d'abord 1 fois A.3 en hauteur, puis 1 fois A.4 en hauteur à la place de A.3. Quand A.2 est terminé, continuez A.4 tout en augmentant de chaque côté comme dans A.1. Les motifs vont se mettre en place d'eux-mêmes. Bon crochet!
05.08.2015 - 09:29