DROPS Karisma
DROPS Karisma
100% Wool
from 2.30 £ /50g
Get the yarn to make this pattern from 34.50£.

The yarn cost is calculated from the pattern’s smallest size and the yarn’s cheapest product type. Looking for an even better price? You might find it on the DROPS Deals!

DROPS SS24

Lavender Mist

Crochet DROPS jacket with fan pattern, raglan and shawl collar in ”Karisma”. Size: S - XXXL.

DROPS 149-7
DROPS design: Pattern no u-712
Yarn group B
-----------------------------------------------------------
Size: S - M - L - XL - XXL - XXXL
Materials:
DROPS KARISMA from Garnstudio
750-850-950-1050-1150-1250 g colour no 64, grey purple

DROPS CROCHET HOOK SIZE 4 mm – or size needed to get 17 tr x 10 rows = 10 x 10 cm.
DROPS MOTHER-OF-PEARL BUTTON NO 522: 2 pieces for all sizes

-------------------------------------------------------

Alternative Yarn – See how to change yarns here
Yarn Groups A to F – Use the same pattern and change the yarn here
Yarn usage using an alternative yarn – Use our yarn converter here

-------------------------------------------------------

DROPS Karisma
DROPS Karisma
100% Wool
from 2.30 £ /50g
Get the yarn to make this pattern from 34.50£.

The yarn cost is calculated from the pattern’s smallest size and the yarn’s cheapest product type. Looking for an even better price? You might find it on the DROPS Deals!

Pattern instructions

NOTE: This pattern is written in British English. All measurements in charts are in cm. For conversion from cm to inches - click here. There are different terms for crocheting in British and American English. If this pattern includes crochet, click for "crochet terms" here. For this pattern in American English, please click here.
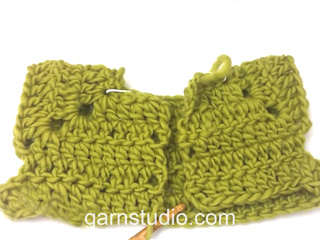
CROCHET INFO:
Replace first tr on every round/row with 3 ch.
Finish every round with 1 sl st in 3rd ch from beg of round. Finish every row with 1 tr in first tr from beg of previous row.

DECREASE TIP:
Work 1 tr but wait with last pull through (= 2 sts on hook), then work next tr but on last pull through, pull yarn through all sts on hook = 1 st dec.

INCREASE TIP:
Inc 1 dtr by working 2 dtr in one of the middle dtr from previous row = 4 dtr between every fan on round.

CROCHET TIP:
After first inc to 4 dtr, continue to inc 1 dtr between every section with fan pattern when piece measures 14-14-15-15-16-16 cm, 21-21-21-22-23-23 cm and 28-28-28-28-28-28 cm = 7 dtr between every fan when all inc are done.
----------------------------------------------------------

JACKET:
The piece is worked top down.
Work 92-92-100-100-107-108 ch on hook size 4 mm with Karisma. Work 1 tr in 4th ch from hook, then work 1 tr in every ch the entire row = 89-89-97-97-104-105 tr.
Continue to work as follows: 1 tr in each of the first 18-18-20-20-22-22 tr, 1 ch (= front piece), work 1 tr in each of the next 14 tr (= sleeve), 1 ch, work 1 tr in each of the next 25-25-29-29-32-33 tr, 1 ch (= back piece), work 1 tr in each of the next 14 tr (= sleeve), 1 ch, work 1 tr in each of the last 18-18-20-20-22-22 tr = 89-89-97-97-104-105 tr on row and 1 ch for each raglan line (= 4 ch)
READ ALL OF THE FOLLOWING SECTION BEFORE CONTINUING:
Work next row as follows: Work 1 tr in every tr but in every ch work 2 tr + 2 ch + 2 tr = 105-105-113-113-120-121 tr on row and 2 ch in every raglan line (= 8 ch).
Continue inc for raglan on every row as follows: Work 1 tr + 2 ch + 1 tr in each ch-space in every raglan line (= 8 tr inc on row)
NOTE! In size XXXL inc 1 st extra each side of front and back piece on the first 9 rows, i.e work 2 tr next to 2 ch on the side towards front and back pieces in every ch-space (= 12 inc in total on each of these rows), then continue as explained above with 8 inc per row.
Repeat inc for raglan on every row 18-19-20-21-22-23 more times (= 19-20-21-22-23-24 times in total) = 257-265-281-289-304-349 tr. REMEMBER THE CROCHET TENSION!
Work next row as follows: Work 1 tr in each of the first 39-40-43-44-47-57 tr (= front piece), skip the next 56-58-60-62-64-66 tr (= sleeve), work 8 ch, work 1 tr in each of the next 67-69-75-77-82-103 tr (= back piece), skip the next 56-58-60-62-64-66 tr (= sleeve), work 8 ch and work 1 tr in each of the last 39-40-43-44-47-57 tr.

Then finish body and sleeves separately.

BODY:
NOW MEASURE PIECE FROM HERE!
Work first row as follows: Work 1 tr in each of the 39-40-43-44-47-57 tr on front piece, 1 tr in every ch (= 8 tr), 1 tr in each of the 67-69-75-77-82-103 tr on back piece, 1 tr in every ch (= 8 tr) and 1 tr in each of the 39-40-43-44-47-57 tr on front piece = 161-165-177-181-192-233 tr on row. Insert 1 marker 43-44-47-48-51-61 sts in from each side (= 75-77-83-85-90-111 sts on back piece). Continue back and forth with 1 tr in every tr.
When piece measures 3 cm, dec 1-1-1-0-0-1 tr on each side of both markers – READ DECREASE TIP (= 4-4-4-0-0-4 tr dec). Repeat dec on the next 2-2-1-0-0-1 row (= 12-12-8-0-0-8 tr dec in total). When piece measures 6-7-8-9-10-11 cm, inc 0-0-0-4-1-0 tr and dec 4-0-0-0-0-0 tr evenly = 145-153-169-185-193-225 tr on round. When piece measures 7-8-9-10-11-12 cm, work fan pattern back and forth from mid front as follows:
ROW 1: 1 tr in each of the first 6 tr (= band), 1 dc in next tr, * 2 ch, skip 1 tr, 1 dc in next tr, 2 ch, skip 1 tr, 1 dc in next tr, 1 tr in each of the next 3 tr, 1 dc in next tr *, repeat from *-* 15-16-18-20-21-25 more times (= 16-17-19-21-22-26 times in total), ch 2, skip 1 tr, 1 dc in next tr, ch 2, skip 1 tr, 1 dc in next tr, and finish with 1 tr in each of the next 6 tr (= band). Turn piece. There are now 34-36-40-44-46-54 ch-spaces with 6 tr in each side for band.
ROW 2:
1 dtr in each of the first 6 tr, * 4 tr in ch-space below, 2 ch, 4 tr in next ch-space, 1 dtr in each of the next 3 tr *, repeat from *-* until 2 ch-spaces remain, work 4 tr in ch-space below, 2 ch, 4 tr in next ch-space, finish with 1 dtr in each of the next 6 tr below. Turn piece.
ROW 3:
1 dtr in each of the first 6 dtr, * 4 tr + 2 ch + 4 tr in ch-space below, 1 dtr in each of the 3 dtr from previous row *, repeat from *-* until 1 ch-space remains, 4 tr + 2 ch + 4 tr in ch-space, finish with 1 dtr in each of the 6 dtr on band, turn piece.
ROW 4:
1 dtr in each of the first 6 dtr, * 4 tr + 2 ch + 4 tr in ch-space below, 1 dtr in each of the three dtr from previous row AT THE SAME TIME inc 1 dtr – Read INCREASE TIP *, repeat from *-* until 1 ch-space remains, 4 tr + 2 ch + 4 tr in this ch-space, finish with 1 dtr in each of the 6 dtr on band, turn piece.
Then continue the same way with fan pattern and 6 dtr in each side for band, AT THE SAME TIME inc 1 dtr between every fan 3 more times - Read CROCHET TIP.
Continue to work until piece measures 45-47-49-51-53-55 cm. Piece measures approx. 70-73-76-79-82-85 cm from shoulder. Fasten off.

SLEEVE:
= 56-58-60-62-64-66 sts. Insert 1 marker here – NOW MEASURE PIECE FROM HERE.
Sleeve is worked in the round, top down. Beg by working mid under sleeve as follows: Work 1 dc in 5th ch of the 8 ch worked in armhole on body. Ch 3 (= 1 tr) and work 1 tr in each of the next 3 ch. Then work 1 tr in every tr over sleeve, before working 1 tr in each of the remaining 4 ch under sleeve = 64-66-68-70-72-74 tr. Insert 1 marker mid under sleeve.
When sleeve measures 3 cm, dec 1 st on each side of marker - READ DECREASE TIP. Repeat dec every 3-2½-2½-3-2½-2 cm 11-12-13-11-12-13 more times (= 12-13-14-12-13-14 dec in total) = 40-40-40-46-46-46 tr remain.
Continue until sleeve measures 39-39-39-39-38-38 cm, AT THE SAME TIME on last row dec 0-0-0-1-1-1 tr mid under sleeve = 40-40-40-45-45-45 tr remain.

Then work an edge as follows: - Remember CROCHET INFO!
ROUND 1:
1 dc in first tr, * 2 ch, skip 1 tr, 1 dc in next tr, 2 ch, skip 1 tr, 1 dc in next tr, 1 tr in each of the next 3-3-3-4-4-4 tr, 1 dc in next tr *, repeat from *-* 3 more times (= 4 times in total), 2 ch, skip 1 tr, 1 dc in next tr, 2 ch, skip 1 tr, 1 dc in next tr, 1 tr in each of the next 3-3-3-4-4-4 tr.
ROUND 2:
1 dc in first tr, * 4 tr in ch-space below, 2 ch, 4 tr in next ch-space, 1 dtr in each of the next 3-3-3-4-4-4 tr below *, repeat from *-* the entire way, finish with 1 sl st in first dc and 3 ch.
ROUND 3:
Work sl sts until the middle of first ch-space, * 4 tr + 2 ch + 4 tr in ch-space below, 1 dtr in each of the 3-3-3-4-4-4 tr from previous row *, repeat from *-* the entire round 4 more times (= 5 times in total).
Repeat 3rd ROUND 1 more time but finish with 1 sl st in first tr on round. Fasten off.

SHAWL COLLAR:
Work shawl collar with short rows over the 18-18-20-20-22-22 tr on right front piece as follows:
ROW 1 (= from mid front): 1 tr in every tr = 18-18-20-20-22-22 tr.
ROW 2 (= from shoulder): 6-6-6-6-6-6 dc, 2-2-2-2-3-3 htr, 3-3-4-4-4-4 tr and 7-7-8-8-9-9 dtr.
Repeat 1st and 2nd row until piece measures approx. 16-16-17-17-18-18 cm on the shortest. Work on left front piece as right front piece but mirrored. NOTE: Make sure that one side is finished with 1st row and the other side is finished with 2nd row.

ASSEMBLY:
Sew collar tog mid back and sew collar to neckline at the back of neck.
Sew buttons on to left band 2-2-2-2-2-2 cm and 7-7-8-8-9-9 cm over fan pattern. Button between tr on band.

Diagram

diagram measurements
Do you have a question? See a list of frequently asked questions (FAQ)

Knitting tension is what determines the final measurements of your work, and is usually measured per 10 x 10 cm. It is provided like so: number of stitches in width x number of rows in height - eg: 19 stitches x 26 rows = 10 x 10 cm.

The knitting tension is very individual; some people knit/crochet loosely while others work tightly. You adjust the knitting tension with the needle size, which is why the suggested needle size is only meant as a guide! You need to adjust this (up or down) to ensure that YOUR knitting tension matches the knitting tension provided in the pattern. If you work with a different knitting tension than provided you will have a different yarn consumption, and your work will have different measurements than what the pattern suggests.

The knitting tension also determines which yarns can replace each other. As long as you achieve the same knitting tension you can replace one yarn with another.

See DROPS lesson: How to measure your tension/gauge

See DROPS video: How to make a gauge tension swatch

The required amount of yarn is provided in grams, eg: 450 g. To calculate how many balls you’ll need you first need to know how many grams are in 1 ball (25g, 50g or 100g). This information is available if you click on the individual yarn quality on our pages. Divide the amount required with the amount of each ball. For example, if each ball is 50g (the most common amount), the calculation will be as follows: 450 / 50 = 9 balls.

The important thing when changing from one yarn to another is that the knitting/crochet tension remains the same. This is so that the measurements of the finished piece will be the same as on the sketch provided. It is easier to achieve the same knitting tension using yarns from the same yarn group. It is also possible to work with multiple strands of a thinner yarn to achieve the knitting tension of a thicker one. Please try our yarn converter. We recommend you to always work a test swatch.

Please NOTE: when changing yarn the garment might have a different look and feel to the garment in the photo, due to individual properties and qualities of each yarn.

See DROPS lesson: Can I use a different yarn than the one mentioned in the pattern?

All our yarns are categorised into yarn groups (from A to F) according to thickness and knitting tension – group A contains the thinnest yarns and group F the thickest. This makes it easier for you to find alternative yarns to our patterns, should you wish to switch yarn. All yarns within the same group have a similar knitting tension and can easily replace each other. However, different yarn qualities have different structures and properties which will give the finished work a unique look and feel.

Click here for an overview of the yarns in each yarn group

At the top of all our patterns you’ll find a link to our yarn calculator, which is a helpful tool should you wish to use a different yarn than suggested. By filling in the yarn quality you wish to replace, the amount (in your size) and number of strands, the calculator will present good alternative yarns with the same knitting tension. Additionally it will tell you how much you’ll require in the new qualities and whether you’ll need to work with multiple strands. Most skeins are 50g (some are 25g or 100g).

If the pattern is worked with multiple colours, every colour will have to be calculated separately. Similarly, if the pattern is worked with several strands of different yarns (for example 1 strand Alpaca and 1 strand Kid-Silk) you will have to find alternatives for each, individually.

Click here to see our yarn calculator

Since different yarns have different qualities and textures we have chosen to keep the original yarn in our patterns. However, you can easily find options among our available qualities by using our yarn calculator, or simply pick a yarn from the same yarn group.

It is possible that some retailers still have discontinued yarns in stock, or that someone has a few skeins at home that they would like to find patterns for.

The yarn calculator will provide both alternative yarn as well as required amount in the new quality.

If you think it's hard to decide what size to make, it can be a good idea to measure a garment you own already and like the size of. Then you can pick the size by comparing those measures with the ones available in the pattern's size chart.

You'll find the size chart at the bottom of the pattern.

See DROPS lesson: How to read size chart

The needle size provided in the pattern serves only as a guide, the important thing is to follow the knitting tension. And since knitting tension is very individual, you will have to adjust the needle size to ensure that YOUR tension is the same as in the pattern – maybe you’ll have to adjust 1, or even 2 needle sizes, up or down to achieve the correct tension. For this, we recommend that you work test swatches.

Should you work with a different knitting tension than the one provided, the measurements of the finished garment might deviate from the measurement sketch.

See DROPS lesson: How to measure your tension/gauge

See DROPS video: How to make a tension/gauge swatch

Working a garment top-down provides more flexibility and room for personal adjustment. For example it is easier to try the garment on while working, as well as making adjustments to length of yoke and shoulder caps.

The instructions are carefully explaining every step, in the correct order. Diagrams are adjusted to the knitting direction and are worked as usual.

The diagram depicts all rows/rounds, and every stitch seen from the right side. It is read from bottom to top, from right to left. 1 square = 1 stitch.

When working back and forth, every other row is worked from the right side and every other row is worked from the wrong side. When working from the wrong side, the diagram will have to be worked reversed: from left to right, knit stitches are purled, purl stitches are knit etc.

When working in the round every round is worked from the right side and the diagram are worked from right to left on all rounds.

See DROPS lesson: How to read knitting diagrams

The diagram depicts all rows/rounds, and every stitch seen from the right side. It is worked from bottom to top, from right to left.

When working back and forth every other row is worked from the right side: from right to left and every other row is worked from the wrong side: from left to right.

When working in the round, every row in the diagram are worked from the right side, from right to left.

When working a circular diagram you start in the middle and work your way outwards, counter clockwise, row by row.

The rows usually start with a given number of chain stitches (equivalent to the height of the following stitch), this will either be depicted in the diagram or explained in the pattern.

See DROPS lesson: How to read crochet diagrams

Instructions for working several diagrams after each other on the same row/round, will often be written like so: “work A.1, A.2, A.3 a total of 0-0-2-3-4 times". This means you work A.1 once, then A.2 is worked once, and A.3 is repeated (in width) the number of times provided for your size – in this case like so: S = 0 times, M = 0 times, L=2 times, XL= 3 times and XXL = 4 times.

The diagrams are worked as usual: begin with the first row in A.1, then work the first row in A.2 etc.

See DROPS lesson: How to read knitting diagrams

See DROPS lesson: How to read crochet diagrams

The total width of the garment (from wrist-to-wrist) will be larger in the larger sizes, despite the actual sleeves being shorter. The larger sizes have longer sleeve caps and wider shoulders, so there will be a good fit in all sizes.

The measurement sketch/schematic drawing provides information regarding the full length of the garment. If it’s a jumper or a jacket the length is measured from the highest point on the shoulder closest to the neckline, and straight down to the bottom of the garment. It is NOT measured from the tip of shoulder. Similarly, the length of yoke is measured from the highest point on the shoulder and down to where yoke is split into body and sleeves.

On a jacket measures are never taken along bands, unless specifically stated. Always measure inside band stitches when measuring the length.

See DROPS lesson: How to read a schematic drawing

Diagrams are often repeated on the round or in height. 1 repeat is the diagram the way it appears in the pattern. If it says to work 5 repeats of A.1 in the round, then you work A.1 a total of 5 times after/next to each other in the round. If it says to work 2 repeats of A.1 vertically/in height you work the entire diagram once, then begin again at the start and work the entire diagram one more time.

Chain stitches are slightly narrower than other stitches and to avoid working the cast-on edge too tight, we simply chain more stitches to begin with. The stitch count will be adjusted on the following row to fit the pattern and measurement sketch.

The rib edge is more elastic and will contract slightly compared to, for example, stocking stitch. By increasing before the rib edge, you avoid a visible difference in width between the rib edge and the rest of the body.

It’s very easy to cast off too tightly, and by making yarn overs while casting off (and simultaneously casting these off) you avoid a too tight cast off edge.

See DROPS video: How to bind off with yarn overs (yo)

To achieve an even increase (or decrease) you can increase on, for example: every 3rd and 4th row alternately, like so: work 2 rows and increase on the 3rd row, work 3 rows and increase on the 4th. Repeat this until the increase is complete.

See DROPS lesson: Increase or decrease 1 st on every 3rd and 4th row alternately

Should you prefer to work in the round instead of back and forth, you may of course adjust the pattern. You’ll need to add steeks mid-front (usually 5 stitches), and follow the instructions. When you would normally turn and work from the wrong side, simply work across the steek and continue in the round. At the end you’ll cut the piece open, pick up stitches to work bands, and cover the cut edges.

See DROPS video: How to knit steeks and cut open

Should you prefer to work back and forth instead of in the round, you may of course adjust the pattern so you work the pieces separately and then assemble them at the end. Divide the stitches for the body in 2, add 1 edge stitch in each side (for sewing) and work the front and back pieces separately.

See DROPS lesson: Can I adapt a pattern for circular needles into straight needles?

Pattern repeats can vary slightly in the different sizes, in order to get the correct proportions. If you’re not working the exact same size as the garment in the photo, yours might deviate slightly. This has been carefully developed and adjusted so that the complete impression of the garment is the same in all sizes.

Make sure to follow instructions and diagrams for your size!

If you have found a pattern you like which is available in women’s size it’s not very difficult to convert it to men’s size. The biggest difference will be the length of sleeves and body. Start working on the women size that you think would fit across the chest. The additional length will be worked right before you cast off for the armhole/sleeve cap. If the pattern is worked top-down you can add the length right after the armhole or before the first decrease on sleeve.

Regarding additional yarn amount, this will depend on how much length you add, but it is better with a skein too many than too few.

All yarns will have excess fibres (from production) that might come off as lint or shedding. Brushed yarns (ie hairier yarns) have more of these loose, excess fibres, causing more shedding.

Shedding also depends on what is worn under or over the garment, and whether this pulls at the yarn fibres. It’s therefore not possible to guarantee that there will be no shedding

Below are some tips on how to get the best result when working with hairier yarns:

1. When the garment is finished (before you wash it) shake it vigorously so the looser hairs come off. NOTE: do NOT use a lint roller, brush or any method that pulls at the yarn.

2. Place the garment in a plastic bag and put it in your freezer - the temperature will cause the fibres to become less attached to each other, and excess fibres will come off easier.

3. Leave in the freezer for a few hours before taking it out and shaking it again.

4. Wash the garment according to the instructions on the yarn label.

Pilling is a natural process that happens to even the most exclusive of fibers. It's a natural sign of wear and tear that is hard to avoid, and that is most visible in high friction areas of your garment like a sweater's arms and cuffs.

You can make your garment look as new by removing the pilling, using a fabric comb or a pill/lint remover.

Still can't find the answer you need? Then scroll down and leave your question so one of our experts can try to help you. This will be done normally within 5 to 10 working days.
In the meantime, you can read the questions and answers that others have left to this pattern or join the DROPS Workshop on Facebook to get help from fellow knitters/crocheters!

You might also like...

Post a comment to pattern DROPS 149-7

We would love to hear what you have to say about this pattern!

If you want to leave a question, please make sure you select the correct category in the form below, to speed up the answering process. Required fields are marked *.

Comments / Questions (65)

country flag Deli wrote:

سلام خسته نباشید\r\nبرای بافت یقه روی ۱۸ پایه اول بافت انجام میشه؟\r\nپایه های سرشانه و پایه های پشت لباس چی میشه؟چطور یقه شکل میگیره؟\r\nممنون از راهنماییتون

21.07.2018 - 18:12

country flag Wilma wrote:

Hallo, ik kom echt niet uit de sjaalkraag. Op het patroon staat dat je twee verkorte toeren haakt welke je herhaald. Moet je dan na de 20 stokjes afhechten weer aanhechten en weer beginnen bij het eerste stokje? En over welke steken haak me? Als ik middenachter uit wil komen heb ik namelijk wel meer steken nodig dan de in totaal 40 steken en ska ik eerste tien steken op het voorpand over?

12.06.2018 - 08:17

DROPS Design answered:

Dag Wilma, Je begint op middenvoor met de eerste toer en dan haak je richting het schouder. Dan keer je het werk en haak je weer terug naar midden voor volgens instructies. Je slaat geen steken over. In de tweede toer haak je vasten, halve stokjes en dubbele stokjes, waardoor die toer aan de schouderkant minder breed wordt, maar het totaal aantal steken zijn hetzelfde op beide toeren.

12.06.2018 - 09:34

country flag Wilma wrote:

Please advise on collar. I don\'t understand where to start. Work shawl collar with short rows over the 20 dc

11.06.2018 - 15:24

DROPS Design answered:

Dear Wilma, collar is worked bottom up, working first row in the first 20 dc on front pieces = start first row on collar on right front piece over the first 20 chains from beginning of piece (from RS), and work the first row on collar on left front piece from WS over the first 20 chains on left front piece. Happy crocheting!

11.06.2018 - 16:19

SHARON wrote:

Can I use double knitting wool for this pattern (Charity type) and how many balls (100gms) will I need

12.04.2018 - 11:40

DROPS Design answered:

Dear Sharon, We are able to provide free patterns thanks to our yarns sold throughout the world. You will therefore understand that we can only recomand you to contact your DROPS Store for any further help & assistance. Thank you for your comprehension.

12.04.2018 - 13:26

Monica wrote:

It seems mine is coming too \"wavy\" and too \"perforated\". Is it right as I am doing it? s7.postimg.org/9mrtq5suj/20180405_132539.jpg Thank you

05.04.2018 - 13:30

DROPS Design answered:

Hi Monica! It looks lovely! You can shape it after the garment is finished, by making it damp and shaping to measurements and let it try. Happy crocheting!

05.04.2018 - 15:00

Maria wrote:

Please can you let me know if I can crochet more rounds to make the coat long enough to reach the ankles, using the same pattern?? Thank you

22.03.2018 - 03:20

DROPS Design answered:

Dear Maria, yes, you can, but you have to take into account that, as it gets longer, the inferior part widens.

29.03.2018 - 19:46

country flag Jacqueline wrote:

Klopt het dat ik voor maat XXL geen 304 steken heb, maar 312? Ik heb het patroon al verschillende keren uitgehaals en opnieuw gehaakt, masr ik blijf op 312 uitkomen.

09.02.2018 - 20:34

DROPS Design answered:

Hoi Jaqueline, Als ik het helemaal nareken kom ik toch 312 steken. Omdat het verschil 8 steken is vermoed ik dat je 1 toer met meerderingen over hebt geslagen. Je herhaalt het meerderen van 8 steken 22 keer (dus in totaal 23 keer met de eerste keer erbij gerekend).

19.02.2018 - 22:23

country flag Diana wrote:

So I started with 92 ch, then dc in 4th ch from the hook, then I dc in each of the remaining chains. If I count the first three ch as a double crochet there will be 90 double crochet in total?

10.01.2018 - 01:15

DROPS Design answered:

Dear Diana, do not count the first 3 ch from 1st row as first tr, so that there will be 89 tr, then continue in rows with 3 ch to replace 1st tr at the beg of every row. Happy crocheting!

10.01.2018 - 09:04

country flag Patricia Parmentier Endres wrote:

Bonjour, je suis complètement perdue pour faire le col de ce gilet! Je n'y comprends rien du tout! Pouvez vous m'aider? Merci !

12.11.2017 - 17:53

DROPS Design answered:

Bonjour Mme Parmentier, on va crocheter le col de bas en haut, à partir des 18-22 premières brides des devants. Par ex pour le devant droit, en commençant sur l'endroit, crochetez 1 bride dans chaque maille, tournez. Au rang suivant, crochetez 6 ms, 2-3 dB, 3-4 brides et 7-8-9 doubles brides. Tournez et reprenez au rang 1. Ainsi, le côté extérieur du col sera plus haut et formera un col châle qui pourra joliment se retourner sur l'endroit. Bon crochet!

13.11.2017 - 10:03

country flag Angelika wrote:

Hallo, können Sie mir erklären wie der Schalkragen gemacht wird oder ein Bild schicken? Ich verstehe es nicht🤔 Danke

02.10.2017 - 20:49

DROPS Design answered:

Liebe Angelika, der Schalkragen wird über die am Anfang für das Vorderteil angeschlagene Luftmaschen gehäkelt, dh von oben nach unten in den ersten 18-20-22 ersten Lm vom rechten Vorderteil (Hinreihe werden von der vorderen Mitte aus gestrickt): 1 Stb in jeder M. Dann von der Rückseite werden Sie die Rückreihe mit fM, H-Stb, Stb und D-Stb häkeln damit der Kragen höher gegen der Mitte als gegen Schulter sein wird. Viel Spaß beim häkeln!

03.10.2017 - 09:04