DROPS Snow
DROPS Snow
100% Wool
from 2.65 $ /50g
Get the yarn to make this pattern from 26.50$.

The yarn cost is calculated from the pattern’s smallest size and the yarn’s cheapest product type. Looking for an even better price? You might find it on the DROPS Deals!

DROPS SS24

Pistachio

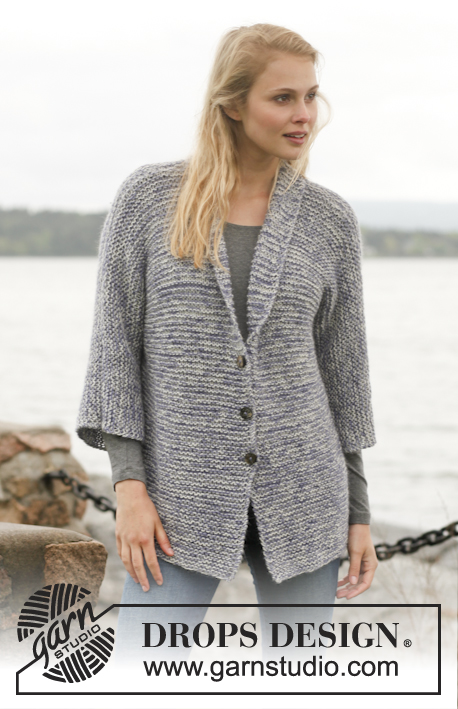
Knitted DROPS jacket with raglan and shawl collar in ”Snow”. Size: S - XXXL.

DROPS 149-33
DROPS design: Pattern no ee-460
Yarn group E
-----------------------------------------------------------
Size: S - M - L - XL - XXL - XXXL
Finished measurements:
Bust: 88-96-106-116-128-138 cm / 34½"-37¾"-41¾"-45¾"-50½"-54¼"
Full length: 58-60-62-64-66-68 cm / 22¾"-23⅝"-24⅜"-25¼"-26"-26¾"

Materials:
DROPS SNOW from Garnstudio
500-550-600-650-750-800 g color no 35, lime

DROPS CIRCULAR NEEDLE (60 and 80 cm / 24" and 32") SIZE 10 mm / US 15 - or size needed to get 9 sts x 12 rows in stockinette st = 10 x 10 cm / 4" x 4".

DROPS ANGULAR BUFFELHORN BUTTON NO 538: 4 pieces

-------------------------------------------------------

Alternative Yarn – See how to change yarns here
Yarn Groups A to F – Use the same pattern and change the yarn here
Yarn usage using an alternative yarn – Use our yarn converter here

-------------------------------------------------------

DROPS Snow
DROPS Snow
100% Wool
from 2.65 $ /50g
Get the yarn to make this pattern from 26.50$.

The yarn cost is calculated from the pattern’s smallest size and the yarn’s cheapest product type. Looking for an even better price? You might find it on the DROPS Deals!

Pattern instructions

NOTE: This pattern is written in American English. All measurements in charts are in cm. For conversion from inches to cm - click here. There are different terms for crocheting in American and British English. If this pattern includes crochet, click for "crochet terms" here. For this pattern in British English, please click here.
SEED ST:
Row 1: * K 1, P 1 *, repeat from *-*.
Row 2: K over P and P over K. Repeat 2nd row.

BUTTONHOLES:
Dec for buttonholes on right band from RS. 1 buttonhole = K tog third and fourth st from mid front and make 1 YO. Dec for buttonholes when piece measures:
SIZE S: 12, 20, 28 and 36 cm /
4¾", 8", 11" and 14¼".
SIZE M: 13, 21, 29 and 37 cm /
5⅛", 8¼", 11⅜" and 14½".
SIZE L: 14, 22, 30 and 38 cm /
5½", 8¾", 11¾" and 15".
SIZE XL: 15, 23, 31 and 39 cm /
6", 9", 12¼" and 15¼".
SIZE XXL: 16, 24, 32 and 40 cm /
6¼", 9½", 12½" and 15¾".
SIZE XXXL: 17, 25, 33 and 41 cm /
6¾", 9¾", 13" and 16⅛"

DECREASE TIP (raglan):
Dec as follows from RS:
Before marker:
Beg 3 sts before marker: K 2 tog, K 1 (marker is after this st).
After marker:
K 1 (marker is before this st), slip 1 st as if to K, K 1, psso.

Dec as follows from WS:
Before marker:
P 2 twisted tog, P 1 (marker is after this st).
After marker:
P 1 (marker is before this st), P 2 tog.
----------------------------------------------------------

BODY:
Worked back and forth on circular needle from mid front. Cast on 92-100-108-116-128-136 sts (includes 6 band sts in each side towards mid front) on circular needle size 10 mm / US 15 with Snow. P 1 row from WS, then work as follows from RS: 6 sts in SEED ST (= band), rib K 1/P 1 until 6 sts remain, work 6 sts in seed st (= band). Work 1 row from WS the same way. Continue in stockinette st with 6 sts in seed st in each side. REMEMBER THE KNITTING GAUGE. Remember to dec for BUTTONHOLES on right band - see explanation above. When piece measures 28-29-30-31-32-33 cm / 11"-11⅜"-11¾"-12¼"-12½"-13", work next row from WS as follows: Work 22-24-26-28-31-33 sts (= left front piece), bind off 8 sts, work 32-36-40-44-50-54 sts (= back piece), bind off 8 sts and work the remaining 22-24-26-28-31-33 sts (= right front piece). Put piece aside and knit the sleeves.

SLEEVE:
Worked in the round. Loosely cast on 56-58-60-62-64-66 sts on circular needle size 10 mm / US 15 with Snow. Work 4 rounds in seed st, then work in stockinette st. When piece measures 7 cm / 2¾", bind off 8 sts at beg of round = 48-50-52-54-56-58 sts. Put piece aside and Make another sleeve.

YOKE:
Slip sleeves on to same circular needle as body where armholes were bound off = 172-184-196-208-224-236 sts. Insert 1 marker in all transitions between sleeves and body = 4 markers. READ ALL OF THE FOLLOWING SECTION BEFORE CONTINUING!
Continue in stockinette st with 6 sts in seed st in each side. Now beg dec for raglan - READ DECREASE TIP: Dec is different on sleeves and body - like this:
ON SLEEVE: Dec on every other row 17-17-17-17-18-18 times, then on every row 3-4-5-6-6-7 times (= 8 sts remain on sleeve).
ON BODY: Dec on every 6th row 2-1-0-0-0-0 times, then every 4th row 7-9-8-8-6-4 times, then on every other row 0-0-4-5-10-14 times (= 13-14-14-15-15-15 sts remain on each front piece and 14-16-16-18-18-18 sts remain on back piece).

AT THE SAME TIME when piece measures 36-37-38-39-40-41 cm / 14¼"-14½"-15"-14¼"-15¾"-16⅛", work 1 st of stockinette st into band, i.e. no of sts in seed st inc and no of sts in stockinette st on front piece dec (total no of sts is the same), repeat every 9-6-7-5-5-6 cm / 3½"-2½"-2¾"-2"-2"-2½" 3-4-4-5-5-5 times in total (= 9-10-10-11-11-11 sts in seed st on band).

After all dec are done, 56-60-60-64-64-64 sts remain on needle. Work 1 row from RS while dec 8-8-8-10-10-10 sts evenly (do not dec over bands) = 48-52-52-54-54-54 sts. After last row with dec, work 1 row from WS while at the same time slipping the first 9-10-10-11-11-11 sts on row on 1 stitch holder (work them first), bind off the next 30-32-32-32-32-32 sts and keep the last 9-10-10-11-11-11 sts on needle, turn piece. Then work short rows for collar over sts on needle as follows (continue with seed st): * work 2 rows over the first 5-5-5-6-6-6 sts towards mid front, work 2 rows over all sts *, repeat from *-* until collar measures 17-18-18-18-18-18 cm / 6¾"-7"-7"-7"-7"-7" from beg of short rows (measure on the inside towards neck on the shortest), bind off. Slip sts from stitch holder in the other side back on needle, work 1 row from RS, then work short rows the same way.

ASSEMBLY:
Sew the openings under the sleeves. Sew collar tog mid back (sew edge to edge) and sew it to the neckline at the back of neck with neat, little stitches. Sew on buttons.

Diagram

All measurements in charts are in cm.

diagram measurements
Do you have a question? See a list of frequently asked questions (FAQ)

Knitting tension is what determines the final measurements of your work, and is usually measured per 10 x 10 cm. It is provided like so: number of stitches in width x number of rows in height - eg: 19 stitches x 26 rows = 10 x 10 cm.

The knitting tension is very individual; some people knit/crochet loosely while others work tightly. You adjust the knitting tension with the needle size, which is why the suggested needle size only serve as a guide! You need to adjust this (up or down) to ensure that YOUR knitting tension matches the knitting tension provided in the pattern. If you work with a different knitting tension than provided you will have a different yarn consumption, and your work will have different measurements than what the pattern suggests.

The knitting tension also determines which yarns can replace each other. As long as you achieve the same knitting tension you can replace one yarn with another.

See DROPS lesson: How to measure your tension/gauge

See DROPS video: How to make a gauge tension swatch

The required amount of yarn is provided in grams, eg: 450 g. To calculate how many balls you’ll need you first need to know how many grams are in 1 ball (25g, 50g or 100g). This information is available if you click on the individual yarn quality on our pages. Divide the amount required with the amount of each ball. For example, if each ball is 50g (the most common amount), the calculation will be as follows: 450 / 50 = 9 balls.

The important thing when changing from one yarn to another is that the knitting/crochet tension remains the same. This is so that the measurements of the finished piece will be the same as on the sketch provided. It is easier to achieve the same knitting tension using yarns from the same yarn group. It is also possible to work with multiple strands of a thinner yarn to achieve the knitting tension of a thicker one. Please try our yarn converter. We recommend you to always work a test swatch.

Please NOTE: when changing yarn the garment might have a different look and feel to the garment in the photo, due to individual properties and qualities of each yarn.

See DROPS lesson: Can I use a different yarn than the one mentioned in the pattern?

All our yarns are categorised into yarn groups (from A to F) according to thickness and knitting tension – group A contains the thinnest yarns and group F the thickest. This makes it easier for you to find alternative yarns to our patterns, should you wish to switch yarn. All yarns within the same group have a similar knitting tension and can easily replace each other. However, different yarn qualities have different structures and properties which will give the finished work a unique look and feel.

Click here for an overview of the yarns in each yarn group

At the top of all our patterns you’ll find a link to our yarn converter, which is a helpful tool should you wish to use a different yarn than suggested. By filling in the yarn quality you wish to replace, the amount (in your size) and number of strands, the converter will present good alternative yarns with the same knitting tension. Additionally it will tell you how much you’ll require in the new qualities and whether you’ll need to work with multiple strands. Most skeins are 50g (some are 25g or 100g).

If the pattern is worked with multiple colours, every colour will have to be converted separately. Similarly, if the pattern is worked with several strands of different yarns (for example 1 strand Alpaca and 1 strand Kid-Silk) you will have to find alternatives for each, individually.

Click here to see our yarn converter

Since different yarns have different qualities and textures we have chosen to keep the original yarn in our patterns. However, you can easily find options among our available qualities by using our yarn converter, or simply pick a yarn from the same yarn group.

It is possible that some retailers still have discontinued yarns in stock, or that someone has a few skeins at home that they would like to find patterns for.

The yarn converter will provide both alternative yarn as well as required amount in the new quality.

If you think it's hard to decide what size to make, it can be a good idea to measure a garment you own already and like the size of. Then you can pick the size by comparing those measures with the ones available in the pattern's size chart.

You'll find the size chart at the bottom of the pattern.

See DROPS lesson: How to read size chart

The needle size provided in the pattern serves only as a guide, the important thing is to follow the knitting tension. And since knitting tension is very individual, you will have to adjust the needle size to ensure that YOUR tension is the same as in the pattern – maybe you’ll have to adjust 1, or even 2 needle sizes, up or down to achieve the correct tension. For this, we recommend that you work test swatches.

Should you work with a different knitting tension than the one provided, the measurements of the finished garment might deviate from the measurement sketch.

See DROPS lesson: How to measure your tension/gauge

See DROPS video: How to make a gauge tension swatch

Working a garment top-down provides more flexibility and room for personal adjustment. For example it is easier to try the garment on while working, as well as making adjustments to length of yoke and shoulder caps.

The instructions are carefully explaining every step, in the correct order. Diagrams are adjusted to the knitting direction and are worked as usual.

The diagram depicts all rows/rounds, and every stitch seen from the right side. It is read from bottom to top, from right to left. 1 square = 1 stitch.

When working back and forth, every other row is worked from the right side and every other row is worked from the wrong side. When working from the wrong side, the diagram will have to be worked reversed: from left to right, knit stitches are purled, purl stitches are knit etc.

When working in the round every round is worked from the right side and the diagram are worked from right to left on all rounds.

See DROPS lesson: How to read knitting diagrams

The diagram depicts all rows/rounds, and every stitch seen from the right side. It is worked from bottom to top, from right to left.

When working back and forth every other row is worked from the right side: from right to left and every other row is worked from the wrong side: from left to right.

When working in the round, every row in the diagram are worked from the right side, from right to left.

When working a circular diagram you start in the middle and work your way outwards, counter clockwise, row by row.

The rows usually start with a given number of chain stitches (equivalent to the height of the following stitch), this will either be depicted in the diagram or explained in the pattern.

See DROPS lesson: How to read crochet diagrams

Instructions for working several diagrams after each other on the same row/round, will often be written like so: “work A.1, A.2, A.3 a total of 0-0-2-3-4 times". This means you work A.1 once, then A.2 is worked once, and A.3 is repeated (in width) the number of times provided for your size – in this case like so: S = 0 times, M = 0 times, L=2 times, XL= 3 times and XXL = 4 times.

The diagrams are worked as usual: begin with the first row in A.1, then work the first row in A.2 etc.

See DROPS lesson: How to read knitting diagrams

See DROPS lesson: How to read crochet diagrams

The total width of the garment (from wrist-to-wrist) will be larger in the larger sizes, despite the actual sleeves being shorter. The larger sizes have longer sleeve caps and wider shoulders, so there will be a good fit in all sizes.

The measurement sketch/schematic drawing provides information regarding the full length of the garment. If it’s a jumper or a jacket the length is measured from the highest point on the shoulder (usually closest to the neckline), and straight down to the bottom of the garment. It is NOT measured from the tip of shoulder. Similarly, the length of yoke is measured from the highest point on the shoulder and down to where yoke is split into body and sleeves.

See DROPS lesson: How to read a schematic drawing

Diagrams are often repeated on the round or in height. 1 repeat is the diagram the way it appears in the pattern. If it says to work 5 repeats of A.1 in the round, then you work A.1 a total of 5 times after/next to each other in the round. If it says to work 2 repeats of A.1 vertically/in height you work the entire diagram once, then begin again at the start and work the entire diagram one more time.

Chain stitches are slightly narrower than other stitches and to avoid working the cast-on edge too tight, we simply chain more stitches to begin with. The stitch count will be adjusted on the following row to fit the pattern and measurement sketch.

The rib edge is more elastic and will contract slightly compared to, for example, stocking stitch. By increasing before the rib edge, you avoid a visible difference in width between the rib edge and the rest of the body.

It’s very easy to cast off too tightly, and by making yarn overs while casting off (and simultaneously casting these off) you avoid a too tight cast off edge.

See DROPS video: How to bind off with yarn overs (yo)

To achieve an even increase (or decrease) you can increase on, for example: every 3rd and 4th row alternately, like so: work 2 rows and increase on the 3rd row, work 3 rows and increase on the 4th. Repeat this until the increase is complete.

See DROPS lesson: Increase or decrease 1 st on every 3rd and 4th row alternately

Should you prefer to work in the round instead of back and forth, you may of course adjust the pattern. You’ll need to add steeks mid-front (usually 5 stitches), and follow the instructions. When you would normally turn and work from the wrong side, simply work across the steek and continue in the round. At the end you’ll cut the piece open, pick up stitches to work bands, and cover the cut edges.

See DROPS video: How to knit steeks and cut open

Should you prefer to work back and forth instead of in the round, you may of course adjust the pattern so you work the pieces separately and then assemble them at the end. Divide the stitches for the body in 2, add 1 edge stitch in each side (for sewing) and work the front and back pieces separately.

See DROPS lesson: Can I adapt a pattern for circular needles into straight needles?

Pattern repeats can vary slightly in the different sizes, in order to get the correct proportions. If you’re not working the exact same size as the garment in the photo, yours might deviate slightly. This has been carefully developed and adjusted so that the complete impression of the garment is the same in all sizes.

Make sure to follow instructions and diagrams for your size!

If you have found a pattern you like which is available in women’s size it’s not very difficult to convert it to men’s size. The biggest difference will be the length of sleeves and body. Start working on the women size that you think would fit across the chest. The additional length will be worked right before you cast off for the armhole/sleeve cap. If the pattern is worked top-down you can add the length right after the armhole or before the first decrease on sleeve.

Regarding additional yarn amount, this will depend on how much length you add, but it is better with a skein too many than too few.

All yarns will have excess fibres (from production) that might come off as lint or shedding. Brushed yarns (ie hairier yarns) have more of these loose, excess fibres, causing more shedding.

Shedding also depends on what is worn under or over the garment, and whether this pulls at the yarn fibres. It’s therefore not possible to guarantee that there will be no shedding

Below are some tips on how to get the best result when working with hairier yarns:

1. When the garment is finished (before you wash it) shake it vigorously so the looser hairs come off. NOTE: do NOT use a lint roller, brush or any method that pulls at the yarn.

2. Place the garment in a plastic bag and put it in your freezer - the temperature will cause the fibres to become less attached to each other, and excess fibres will come off easier.

3. Leave in the freezer for a few hours before taking it out and shaking it again.

4. Wash the garment according to the instructions on the yarn label.

Pilling is a natural process that happens to even the most exclusive of fibers. It's a natural sign of wear and tear that is hard to avoid, and that is most visible in high friction areas of your garment like a sweater's arms and cuffs.

You can make your garment look as new by removing the pilling, using a fabric comb or a pill/lint remover.

Still can't find the answer you need? Then scroll down and leave your question so one of our experts can try to help you. This will be done normally within 5 to 10 working days.
In the meantime, you can read the questions and answers that others have left to this pattern or join the DROPS Workshop on Facebook to get help from fellow knitters/crocheters!

You might also like...

Post a comment to pattern DROPS 149-33

We would love to hear what you have to say about this pattern!

If you want to leave a question, please make sure you select the correct category in the form below, to speed up the answering process. Required fields are marked *.

Comments / Questions (43)

country flag Svenja wrote:

Was heißt denn möglicherweise? Wenn man nur 2 M pro Ärmel abnimmt ist es a: kein Raglan und b: bleiben 96 M über, das sind dann 36 M zu viel. Langsam hab ich schon keine Lust mehr auf die Jacke! Keine Ahnung was ich mit der Wolle machen soll. Man kann auch eingestehen wenn man einen Fehler macht. Oder stricken Sie doch einfach mal die Jacke nach der Anleitung. Am besten mit Video dann gestehe ich ja vielleicht einen Fehler ein.

19.08.2013 - 10:24

DROPS Design answered:

Liebe Svenja, "möglicherweise" heisst, das wir nicht ganz sicher sind, welche Stelle Sie missverstanden haben. Jedenfalls werden nach Anleitung nur 2 M pro Ärmel abgenommen: eine an der vorderen Raglankante und eine an der hinteren. Die andere Abnahme gehört zum Rumpfteil.

20.08.2013 - 09:41

country flag Svenja wrote:

OK, Gr. L: Pro Ärmel sind es 4 abnahmen (Raglan vorne/hinten) 4 + 4 = 8 M das ganze 17 X. 8 x 17 = 136 M. Noch Ärmel 5 x 8 = 40 M. 136 M (Ärmel) + 40 M (Ärmel) + 8 M (Rumpf) + 4 M (Rumpf) = 188 M gesamt

15.08.2013 - 08:45

DROPS Design answered:

Liebe Svenja, möglicherweise ist das der Überlegungsfehler: pro Ärmel sind es 2 Abnahmen, nicht 4.

19.08.2013 - 09:46

Ester wrote:

Svenja= Melanie???

14.08.2013 - 21:40

country flag Svenja wrote:

Das kann trotzdem nicht sein. Wenn ich mit 196 M starte und alle abnahmen zusammen rechne dann sind das 188 M. 196 M - 188 M = 8 M bleiben über nach allen abnahmen da fehlen 52 M. Bitte sagt mir was ich falsch mache?

14.08.2013 - 19:47

DROPS Design answered:

Liebe Svenja, schreiben Sie uns bitte kurz, wie Sie die Abnahmen zusammengerechnet haben, dann können wir es kontrollieren.

15.08.2013 - 07:40

country flag Svenja wrote:

Ok, habe die 8M je Ärmel vergessen. Aber 60M nach allen abn. geht nicht auf. Wenn es 14M je Vorderteil & 16M Rumpf seinen sollen dann müssen es 28M je Ärmel sein und nicht 8M. Es geht sonst einfach nicht auf. Was bedeutet das man 100M nach allen abn. hat. Das die Angaben zum Kragen gar nicht mehr passen. Ich komme auf (Gr.L) je Ärmel in jeder 2.R.10x abnehmen, dann in jeder R.2x abnehmen. Beim Rumpf gar keine Abnahme sind dann schon 16M. Wenn das so richtig ist wie stricke ich dann den Kragen?

14.08.2013 - 12:39

DROPS Design answered:

Siehe Antwort zu Ihrer ersten Frage: 16+14+14+8+8=60.

14.08.2013 - 18:26

country flag Svenja wrote:

Hallo, so hatte mir jetzt Nadeln gekauft. Aber die angaben der abnahmen können nicht stimmen. Auch die angaben zu den verbleibenden M stimmt nicht. Bei Größe L sollen nach allen abnahmen 44 M übrig bleiben. Dann steht weiter unten das es nach allen abnahmen 60 M sind. Ich bin gerade mal bei 8 M pro Blende bin aber nur noch eine M von der Raglanschrägung entfernt. Bitte schnell korrigieren! Da ich jetzt ja von vorne anfangen muss.

14.08.2013 - 08:31

DROPS Design answered:

Liebe Svenja, für Grösse L haben Sie 14+14 (Vorderteile)+16 (Rückenteil)+8+8 (beide Ärmel) = 60 M. Die Anleitung ist also korrekt. Die 44 M sind nur beim Rückenteil (aber bei Grösse XL nicht L!) vor den Raglanabnahmen.

14.08.2013 - 18:23

country flag Svenja wrote:

Hallo, diese tolle Jacke (die Wolle dafür bekomme ich Morgen) soll mit Nadel/-spiel Nr. 10 gestrickt werden. Ihr selber bietet aber gar kein Nadelspiel in Nr.10 an. Ich würde sie auch lieber mit Nr.8 Stricken, denn da hab ich ein Nadelspiel und Nadeln. Was sollte ich beachten wenn ich zwei Nr. kleiner Stricke (wenn das mit der Nr.10 in der Anleitung überhaupt stimmt)?

09.08.2013 - 11:33

DROPS Design answered:

Liebe Svenja, Sie haben Recht, das Nadelspiel ist momentan nicht im Sortiment, aber Sie können das Ärmelteil auch mit der Rundnadel stricken. Sie sollten die Jacke nicht einfach 2 Nadelstärken kleiner stricken. Es ist wichtig, dass die Maschenprobe stimmt.

10.08.2013 - 13:57

country flag Annie wrote:

Really nice, I want this!

26.06.2013 - 13:22

country flag BEDIER Marie wrote:

Un petit haut délicieux et joyeux. Très jolie forme. Bravo

21.06.2013 - 13:27

country flag Barbro wrote:

Måste sticka den här modellen. Mönster snabbt, tack!

19.06.2013 - 10:25