
Popular categories
Looking for a yarn?


|
|
DROPS Extra 0-898 |
|
 |
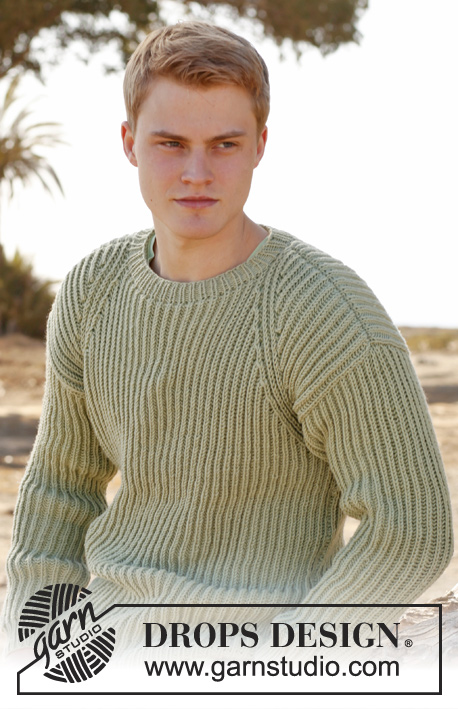 |
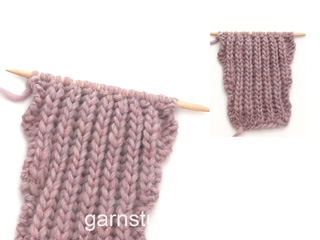
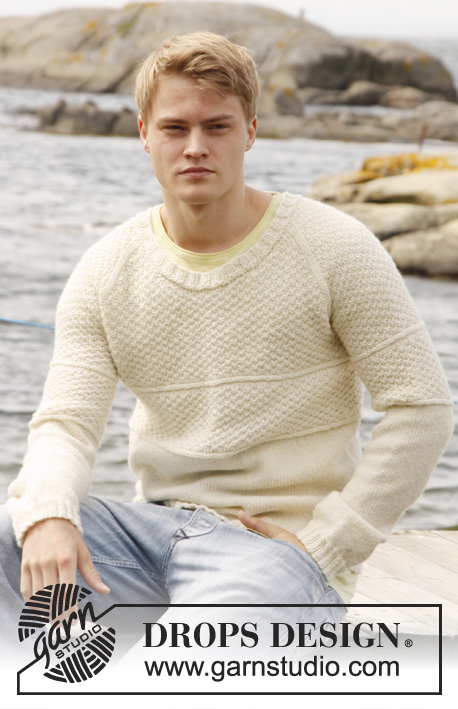
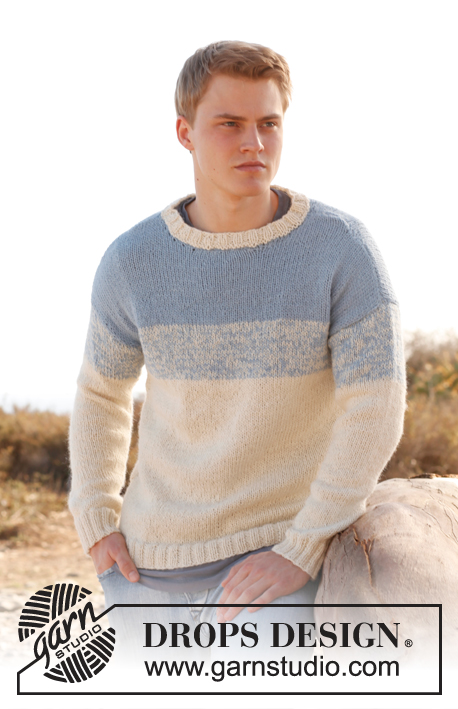
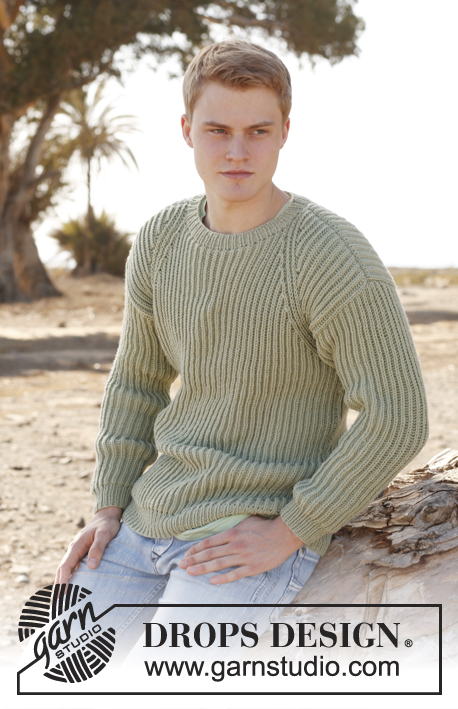
Men's knitted jumper with English rib, in DROPS Karisma. Size: S - XXXL.
DROPS Extra 0-898 |
|
|
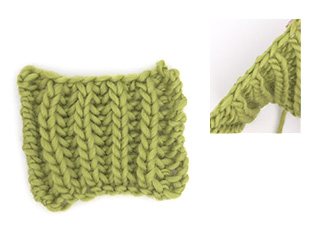
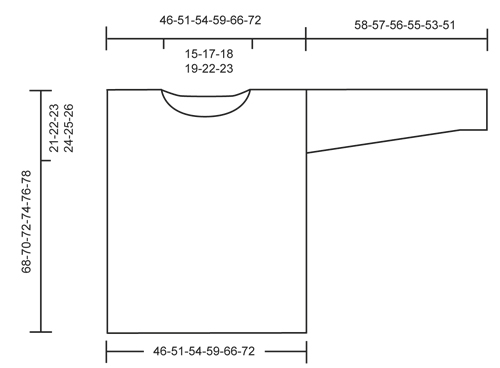
MEASURING TIP: Because of the weight of the yarn all measurements must be done when the piece is held up. GARTER ST (back and forth on needle): K all rows. 1 ridge = 2 rows K. ENGLISH RIB (back and forth on needle): Row 1 (from WS): 1 st in garter st, * 1 YO, slip 1 st as if to P, K 1 *, repeat from *-* until 2 sts remain, 1 YO, slip 1 st as if to P, 1 st in garter st. Row 2 (= from RS): 1 st in garter st, * K tog YO and slipped st, 1 YO, slip 1 st as if to P *, repeat from *-* until 2 sts remain, K tog YO and slipped st, 1 st in garter st. Row 3 (= from WS): 1 st in garter st, * 1 YO, slip 1 st as if to P, K tog YO and slipped st *, repeat from *-* until 2 sts remain, finish with 1 YO, slip 1 st as if to P, 1 st in garter st. Repeat 2nd and 3rd row upwards. ENGLISH RIB ST: When counting the sts, the YOs are not counted as sts. INCREASE TIP (applies to sleeve): Inc 1 st inside 1 edge st in each side of piece. Inc 1 st by making 1 YO, on next row work YO twisted i.e. work in back loop of st instead front. NOTE: Work the inc sts in English rib. CAST-OFF TIP: When casting off, work YO and slipped st K tog (= K 1). ---------------------------------------------------------- BACK PIECE: Worked back and forth on circular needle to make room for all the sts. Cast on 82-90-96-106-118-128 sts on circular needle size 4.5 mm with Karisma. Work as follows – from RS: 1 edge st, * K 1, P 1 *, repeat from *-* and finish with 1 edge st. Work edge st in GARTER ST until finished measurements - see explanation above. Work rib like this for 6 cm – READ MEASURING TIP. Inc 1 st at the end of last row in rib (last row = from RS) = 83-91-97-107-119-129 sts. Continue to work in ENGLISH RIB with 1 edge st in each side - see explanation above. When piece measures 47-47-47-46-45-43 cm, work a false raglan – 4 sts in English rib in each side should be displaced towards the neck. In the right side (from RS) inc 2 sts before 4 sts in English rib and dec 2 sts after 4 sts in English rib. In the left side dec 2 sts before 4 sts in English rib and inc 2 sts after 4 sts in English rib. No of sts should always be the same. Work the 2 inc sts in English rib. Work as follows from RS: 1 edge st in garter st, 2 YOs, insert 1 marker in piece, work 4 sts in English rib as before (YOs are not counted as sts - READ ENGLISH RIB ST), insert 1 marker in piece, pass next YO over st (so that it is behind this st), slip this st to the right needle as if to K, K the next 2 sts tog, psso, continue in English rib until 7 sts in English rib + 1 edge st remain, K the next 3 sts tog, insert 1 marker in piece, work 4 sts in English rib as before, insert 1 marker in piece, 2 YOs, finish with 1 edge st in garter st. On next row work the new YOs as follows: At beg of row (seen from WS): 1 edge st, P in back loop of first YO, 1 YO, K in back loop of second YO, continue in English rib as before. At end of row (seen from WS): K 1 in back loop of first YO, P 1 in back loop of second YO, 1 YO, 1 edge st in garter st. Work 4 rows in English rib over all sts. On next row work in English rib AT THE SAME TIME inc before first marker, dec after second marker, dec before third marker and inc after fourth marker as explained above. Inc and dec on every 6th row 11-12-13-15-17-19 times in total. Work in English rib for 2 cm after last dec/inc. Now cast off the middle 27-31-33-35-39-41 sts - READ CAST-OFF TIP = 28-30-32-36-40-44 sts remain on each shoulder. Finish each shoulder separately. Work in English rib for 2 cm, cast off. The whole piece measures approx. 68-70-72-74-76-78 cm. Insert 1 marker in each side of back piece, 21-22-23-24-25-26 cm down from shoulder. Markers show where sleeve is sewn in. FRONT PIECE: Cast on and work as on back piece until piece measures 58-60-62-64-66-68 cm. Continue inc and dec on every 6th row AT THE SAME TIME cast off for neck as follows: Slip the middle 17-21-23-25-29-31 sts on a stitch holder for neck and finish each shoulder separately. Continue pattern and displacement as before AT THE SAME TIME cast off for neck on every row from mid front as follows: 2 sts 2 times and 1 st 1 time = 28-30-32-36-40-44 sts remain on shoulder. Cast off when piece measures 68-70-72-74-76-78 cm. Insert 1 marker in each side of piece, 21-22-23-24-25-26 cm down from shoulder. Markers show where sleeve is sewn in. SLEEVE: Worked back and forth on circular needle. Loosely cast on 44-46-48-50-52-54 sts with Karisma on circular needle size 4.5 mm. Work as follows – from RS: 1 edge st, * K 1, P 1 *, repeat from *-* and finish with 1 edge st. Work edge sts in garter st until finished measurements. Work rib for 6 cm – READ MEASURING TIP. Inc 1 st at the end of last row in rib (last row = from RS) = 45-47-49-51-53-55 sts. Then work in English rib with 1 edge st in garter st in each side. When piece measures 8 cm, inc 1 st in each side - READ INCREASE TIP above! Repeat inc every 3-2½-2½-2½-2-2 cm 15-16-16-17-18-18 more times (16-17-17-18-19-19 inc in total) = 77-81-83-87-91-93 sts. When piece measures 58-57-56-55-53-51 cm (NOTE! Shorter measurements in the larger sizes because of wider shoulders), cast off. ASSEMBLY: Sew underarm seams inside 1 edge st. Sew in sleeves, down to markers on body. Sew side seams inside one edge st. NECK EDGE: Pick up approx. 84-88-92-96-100-104 sts (incl sts on stitch holder) around the neck on a short circular needle size 4.5 mm. Work rib = K 1/P 1 for 3 cm, then cast off with K over K and P over P. |
|
|
|
|
Have you made this or any other of our designs? Tag your pictures in social media with #dropsdesign so we can see them! Do you need help with this pattern?You'll find tutorial videos, a Comments/Questions area and more by visiting the pattern on garnstudio.com. © 1982-2024 DROPS Design A/S. We reserve all rights. This document, including all its sub-sections, has copyrights. Read more about what you can do with our patterns at the bottom of each pattern on our site. |
|


With over 40 years in knitting and crochet design, DROPS Design offers one of the most extensive collections of free patterns on the internet - translated to 17 languages. As of today we count 304 catalogues and 11422 patterns - 11422 of which are translated into English (UK/cm).
We work hard to bring you the best knitting and crochet have to offer, inspiration and advice as well as great quality yarns at incredible prices! Would you like to use our patterns for other than personal use? You can read what you are allowed to do in the Copyright text at the bottom of all our patterns. Happy crafting!
Comments / Questions (51)
Bei der Ferigstellung fehlt, wann die Seitennähte geschlossen werden sollen. Ich kann doch nicht als letztes die Schulternaht schließen? Das muß doch vor dem Einsetzen der Ärmel passieren? Bitte um Hilfe zur richtigen Reihenfolge der Fertigstellung.
14.03.2015 - 13:46DROPS Design answered:
Sie haben Recht, das fehlt. Die Schulternähte schließen Sie zuerst, bevor Sie die Ärmel einnähen. Sie schließen also jeweils die Naht unter den Ärmeln und die Schulternähte (dabei ist die Reihenfolge ja egal), dann setzen Sie die Ärmel ein und zuletzt schließen Sie die Seitennähte ab dem Ärmel nach unten.
14.03.2015 - 18:33Tak for videoen :-). Hvordan syr man ærmerne pænt sammen. Har prøver med madrassting. Er pænt hvor der ikke er udtagninger , men ellers hm ? Måske dumt spørgsmål men vil gerne have en god finish :-)
05.02.2015 - 12:20DROPS Design answered:
Hej Dorrit, Vi har flere gode videoer med montering, det er en smags sag så find den som passer dig bedst. God fornøjelse!
05.02.2015 - 14:18Hej Dorrit Hansen. Der er ikke fejl i opskriften og vi har nu lavet en video med falsk raglan. Se videoen her. Haaber den kan hjaelpe dig videre.
02.02.2015 - 11:48DROPS Design wrote:
Please find below a video showing how to work the false raglan. Happy knitting! Voici ci-dessous une vidéo montrant comment réaliser le faux raglan. Bon tricot!
30.01.2015 - 11:20Merci beaucoup pour votre reponse rapide, Je suis contente de voir que je ne suis pas la seule a avoir de la difficulte avec le raglan, J'ai imprime votre patron en francais . Pourriez vous re-ecrire les instructions en Francais afin que nous soyons tous sur le meme pied . Merci de faire un video, J'ai hate de voir. Pour me pratiquer, j'ai monte un tricot sur 21 mailles car je ne voulais pas tout defaire ce que j'avais fait. Merci encore
28.01.2015 - 03:30DROPS Design answered:
Bonjour Mme Benoist, une vidéo sera bientôt ajoutée pour montrer comment faire ce faux raglan. Au 1er marqueur, on augm. 2 m avant les 4 m (du raglan) et on dim. 2 m après ces 4 mêmes mailles, on diminue ensuite 2 m avant les 4 m en fin de rang et on augmente 2 m après ces 4 m. Pour augm, faites 2 jetés, au rang suivant, vous tricotez ces jetés en côtes anglaises (cf au début/fin de rang sur l'envers) - pour dim en début de rang, on glisse la 1ère m à l'end en retirant le jeté de l'aiguille (celui de la m côte anglaise), 2 m ens à l'end et on passe la m glissée par-dessus la m tricotée. En fin de rang, on tricote 3 m ens à l'end. Bon tricot!
28.01.2015 - 11:11Andrea Gunner wrote:
I'm also having trouble with the instructions for the false raglan. I have used the clarification from earlier posts without much success. Can you please post reworded instructions or provide instructions for this sweater with a proper raglan?
27.01.2015 - 07:22DROPS Design answered:
Dear Mrs Gunner, we are currently working on a video showing how to work the false raglan. Thank you very much in advance for your patience. Happy knitting!
27.01.2015 - 13:30I am having difficulty with the pattern instructions for the raglan. The first part and last part of increase/decrease. I was wondering if you could show a little video on how to proceed. The knit and pattern are beautiful and I was hoping to get one done for my son but unable to achieve a good result without your help. Thank you so much for your attention and hope to see a video. I am homebound and cannot get out of the house for now
25.01.2015 - 23:11DROPS Design answered:
Dear Mrs Benoist, a video will be done to show how to work the false raglan. You inc with 2 YOs (and work the YOs following the English rib on next row: at beg of row from WS P in back loop of first YO, 1 YO, K in back loop of second YO and at the end of row from WS K 1 in back loop of first YO, P 1 in back loop of second YO, 1 YO. The increase are done with sl 1 as if to K (but drop YO over the st before slipping it), then K the next 2 sts tog and psso - 2nd dec (from RS) is worked by K3 sts tog. Happy knitting!
26.01.2015 - 10:48Kan se at der også er andre der har opgivet. Har været i flere "stores" og ingen fatter noget. En meget strikkekyndig - strikker til forretninger - siger, at der er fejl i opskriften !!
15.01.2015 - 18:44Hi, I have been struggling with the pattern. The part where the false raglan is described with stitches in English does not work. No matter what myself or other try the stitches slant to the outside and not the neck. It appears that there are at least two others who say they gave up on the pattern. But I would really like to solve it. Can you please review the pattern and see if what I am describing is because of a pattern error? Thank you.
10.01.2015 - 19:59DROPS Design answered:
Dear Mrs Larkin, to work the false raglan keeping the pattern at the same time, you will inc 2 sts (2 yos) before the 1st marker, work 4 sts in English Rib, dec 2 sts after 2nd marker, work until 3rd marker, dec 2 sts before 3rd marker, work 4 sts in English rib, and inc 2 sts (2 yos) before 4th marker. Work then next row after inc/dec from WS as explained, work 4 rows English rib over all sts and repeat dec/inc row to shift the 4 sts in English rib at beg of row and the 4 sts in English rib (= the 4 sts between markers) towards inside. Happy knitting!
14.01.2015 - 10:33Hejsa. Er det ikke muligt, at I kunne give en tidshorisont,da den egentlig skulle have været færdig til jul :-( og kan ikke Google det !!,Ingen kender den betegnelse
16.12.2014 - 16:48DROPS Design answered:
Hej Dorrit. Det kan jeg desvaerre. Og ifm med travlhed omkring den nye kollektion naar vi det ikke inden jul.
17.12.2014 - 17:44