
Popular categories
Looking for a yarn?


|
||||||||||||||||
Leona |
||||||||||||||||
 |
 |
|||||||||||||||
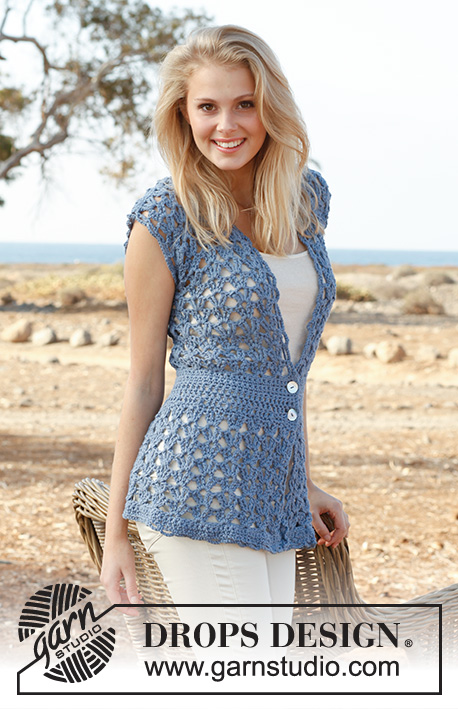
Crochet DROPS vest with fan pattern in ”Paris”. Size S-XXXL.
DROPS 145-4 |
||||||||||||||||
|
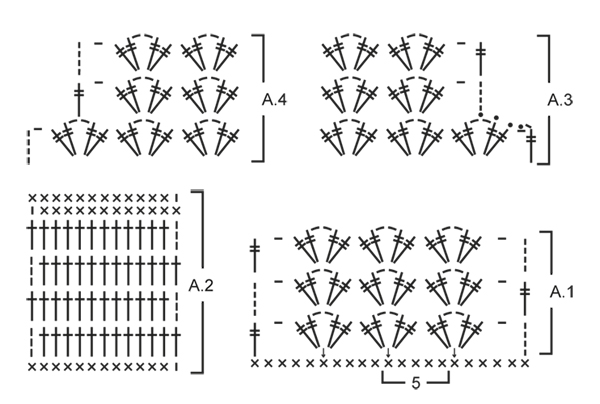
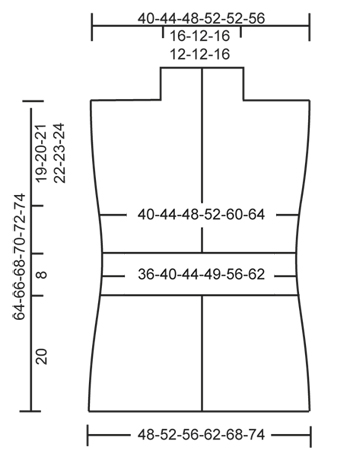
PATTERN: See diagrams A.1 and A.2 (diagrams A.3 and A.4 show dec for armhole in size XXL + XXXL). INCREASE TIP: Inc 1 sc by working 2 sc in same st. DECREASE TIP (dec 1 sc): Work 1 sc but wait with last pull through (= 2 sts on hook), then work next sc but on last pull through, pull yarn through all sts on hook = 1 sc dec. ---------------------------------------------------------- VEST: Read US/UK above! Worked back and forth from mid front. With Paris ch 189-204-219-242-264-287 on hook size 6 mm / J/10, turn. ROW 1: 1 sc in 2nd ch from hook, * skip ch 1, 1 sc in each of the next 2 ch *, repeat from *-* until 4-4-4-3-4-3 ch remain, skip next ch and finish with 1 sc in each of the last 3-3-3-2-3-2 ch = 126-136-146-161-176-191 sc on row, turn piece. ROW 2: ch 1, then work 1 sc in every sc from previous row = 126-136-146-161-176-191 sc, turn piece. ROW 3: Work as 2nd row. ROW 4: Then work pattern according to diagram A.1, i.e. ch 5 (= 1 tr + 1 ch), * skip 4 sc, in next sc work 2 tr + ch 2 + 2 tr *, repeat from *-* until 5 sc remain, skip 4 sc and finish with ch 1 and 1 tr in last sc = 24-26-28-31-34-37 tr-groups, turn piece. ROW 5: ch 5, in ch-space in every tr-group work 2 tr + ch 2 + 2 tr, finish row with 1 ch and 1 tr in 4th ch on beg of previous row = 24-26-28-31-34-37 tr-groups, turn piece. Repeat 5th row until piece measures approx. 16 cm / 6¼". Work next row as follows: ch 4 (= 1 tr), in ch-space in the middle of every tr-group work 2 tr + ch 1 (instead of 2 ch) + 2 tr, finish row with 1 tr in 4th ch from beg of previous row = 24-26-28-31-34-37 tr-groups, turn piece. Ch 1, 1 sc in same st, then work 1 sc in every tr the entire row, finish with 1 sc in 4th ch from beg of previous row, turn piece = 98-106-114-126-138-150 sc. Continue to work as follows: ROW 1: Work pattern according to diagram A.2, i.e. work ch 1, then work 1 sc in every sc the entire row AT THE SAME TIME dec 18-18-18-18-14-14 sc evenly – READ DECREASE TIP = 80-88-96-108-124-136 sc, turn piece. ROW 2: 3 ch (= 1 dc), then work 1 dc in every sc the entire row = 80-88-96-108-124-136 dc on row. ROW 3-5: Work as 2nd row = 80-88-96-108-124-136 dc. ROW 6: Work 1 sc in every dc AT THE SAME TIME adjust no of sts as follows: Size S + M + L + XL + XXL: Inc 5-9-5-5-5 sc evenly – READ INCREASE TIP. Size XXXL: Dec 3 sts evenly – READ DECREASE TIP = 85-97-101-113-129-133 sc, turn piece. ROW 7: ch 1, 1 sc in same st, then work 1 sc in every sc from previous row = 85-97-101-113-129-133 sc, turn piece. ROW 8: ch 5, * skip 3 sc, in next sc work 2 tr + ch 2 + 2 tr *, repeat from *-* until 4 sc remain on row, skip 3 sc and finish with 1 ch and 1 tr in last sc on row = 20-23-24-27-31-32 tr-groups on row, turn piece. ROW 9: Then work pattern according to diagram A.1 again, i.e. ch 5, in ch-space in the middle of every tr-group work 2 tr + ch 2 + 2 tr, finish row with ch 1 and 1 tr in 4th ch on beg of previous row = 20-23-24-27-31-32 tr-group. Repeat 9th row upwards. AT THE SAME TIME when piece measures 45-46-47-48-49-50 cm / 17¾"-18"-18½"-19"-19¼"-19¾", divide for markers as follows: Insert 1 marker after 5-6-6-7-8-8 tr-groups in from each side (= 10-11-12-13-15-16 tr-groups between markers on back piece). Finish each part separately. BACK PIECE: = 10-11-12-13-15-16 tr-groups. Continue back and forth with tr-groups as shown in A.1. AT THE SAME TIME on 1st row dec for armholes in each side in size XXL + XXXL as follows: Dec 1 tr-group on beg of row as shown in A.3, work as before until 1 tr-group remains on row, finish row as shown in A.4 (do not dec in the other sizes) = 10-11-12-13-13-14 tr-groups remain on row. Continue pattern back and forth until 1 row remains before piece measures 64-66-68-70-72-74 cm / 25¼"-26"-26¾"-27½"-28⅜"-29⅛". Now work 1 row with tr-groups only over the outermost 3-4-4-5-5-5 tr-groups in the one side of piece: ch 5, * in ch-space in the middle of next tr-group work 2 tr + ch 2 + 2 tr *, repeat from *-* 3-4-4-5-5-5 times in total, finish with 1 tr in last tr in same tr-group, turn piece. Now work 1 row sc as follows: ch 1, 1 sc in same st, * 1 sc in each of the first 2 tr, 1 sc in ch-space in the middle of tr-group, 1 sc in each of the next 2 tr *, repeat from *-* 3-4-4-5-5-5 times in total, finish with 1 sc in last ch and 1 sc in 4th ch from beg of previous row = 18-23-23-28-28-28 sc on row. Fasten off. Repeat on the other shoulder (i.e. do not work over the middle 4-3-4-3-3-4 tr-groups = neck.) RIGHT FRONT PIECE: = 5-6-6-7-8-8 tr-groups. Continue back and forth with tr-groups as on back piece. AT THE SAME TIME on 1st row dec for armhole in the side in size XXL + XXXL as shown in A.4 (do not dec in the other sizes) = 5-6-6-7-7-7 tr-groups. Continue pattern back and forth until piece measures approx. 64-66-68-70-72-74 cm / 25¼"-26"-26¾"-27½"-28⅜"-29⅛" - make sure that same no of rows with tr-groups has been worked as on back piece. Now work 1 row sc as on back piece only over the outermost 3-4-4-5-5-5 tr-groups on shoulder (i.e. do not work over the 2 tr-groups towards the neck = collar) = 18-23-23-28-28-28 sc. Fasten off. Insert 1 marker on the shoulder. Now work tr-groups back and forth over collar as follows: ch 5, in ch-space in first tr-group work 2 tr + ch 2 + 2 tr, in ch-space in next tr-group work 2 tr + ch 2 + 2 tr, ch 1 and finish with 1 tr in last tr in same tr-group. Continue back and forth like this until collar measures approx. 10-8-10-8-8-10 cm / 4"-3⅛"-4"-3⅛"-3⅛"-4" from marker on shoulder. Then work 1 row sc as follows: ch 1, 1 sc in same st, 1 sc in next ch, 1 sc in each of the first 2 tr, 1 sc in ch-space in the middle of tr-group, 1 sc in each of the next 2 tr *, repeat from *-* 2 times in total, finish with 1 sc in last ch and 1 sc in 4th ch from beg of previous row = 14 sc, cut the yarn. LEFT FRONT PIECE: Work as right front piece but reversed. When dec for armhole in size XXL + XXXL, dec 1 tr-group as shown in A.3. ASSEMBLY: Sew shoulder seams edge to edge to avoid a chunky seam. Sew collar tog mid back (sew edge to edge) and sew it on to neck line at the back of neck. Sew on buttons on right front piece – see picture. Button through the crochet edge explained below. CROCHET EDGE: Work a finishing edge around the entire opening on vest and around both armholes as follows: 1 sc in first st, * ch 5, skip approx. 2½ cm / ⅞", 1 sc in next st/ch-space *, repeat from *-* the entire round and finish with ch 5 and 1 sl st in sc from beg of round. |
||||||||||||||||
Diagram explanations |
||||||||||||||||
|
||||||||||||||||
|
||||||||||||||||
|
||||||||||||||||
|
Have you made this or any other of our designs? Tag your pictures in social media with #dropsdesign so we can see them! Do you need help with this pattern?You'll find tutorial videos, a Comments/Questions area and more by visiting the pattern on garnstudio.com. © 1982-2024 DROPS Design A/S. We reserve all rights. This document, including all its sub-sections, has copyrights. Read more about what you can do with our patterns at the bottom of each pattern on our site. |
||||||||||||||||


With over 40 years in knitting and crochet design, DROPS Design offers one of the most extensive collections of free patterns on the internet - translated to 17 languages. As of today we count 304 catalogs and 11422 patterns - 11417 of which are translated into English (US/in).
We work hard to bring you the best knitting and crochet have to offer, inspiration and advice as well as great quality yarns at incredible prices! Would you like to use our patterns for other than personal use? You can read what you are allowed to do in the Copyright text at the bottom of all our patterns. Happy crafting!
Comments / Questions (189)
Is dit patroon ook verkrijgbaar in maat xs of xxs? Ik ben nl begonnen met maat s, maar m'n werk is zo'n 16 cm te lang(rond mijn taille). Ik zou hem heel graag willen maken, want ik vind het patroon erg leuk. Groetjes!
01.11.2014 - 10:54DROPS Design answered:
Hoi Barbara. Nee, helaas niet. Je kan proberen het patroon aan te passen met hulp van de stekenverhouding.
03.11.2014 - 17:04Dit gilet ben ik aan het haken in maat M. In het 2de stukje "Herhaal 5e toer to het werk 16 vm meet ......" Staat bij toer 1 dat je van 106 naar 88 steken moet minderen, echter ik kom iedere keer niet uit ! Om de hoeveel steken moet ik nu minderen. Ik hoor graag van jullie
29.07.2014 - 13:03DROPS Design answered:
U kunt dit berekenen door het aantal steken dat u hebt te delen door het aantal steken dat u moet minderen. U weet dan ongeveer om de hoeveel steken u een steek moet samenhaken. U kunt ook een markeerder plaatsen in het midden, u mindert dan 9 st voor het midden en 9 erna, dat is een handig hulpmiddel.
29.07.2014 - 14:25Bonjour! J'avais vérifié mon échantillon et je n'arrivais pas à avoir 11MS = 10cm et 2,5 groupe de DB = 10 cm... Je me suis donc basée sur les MS mais en fait il en faut 13MS pour 2,5 groupe. 11 ça fait seulement 2 groupe...
24.07.2014 - 10:08DROPS Design answered:
Bonjour Virginie, n'hésitez pas à changer de crochet si nécessaire entre les différentes motifs, vous arriverez probablement ainsi à la bonne largeur et ms/B ou en groupes de DB. Bon crochet!
24.07.2014 - 11:56Bonjour, J'ai commencé à crocheter ce joli gilet, j'ai donc fait un échantillon. Ensuite j'ai monté les 189 mailles pour une taille S et à faire quelques rangs mais je m'appercois que c'est très très grand !! J'ai donc fait le calcul, les 126 mailles que l'on a après le rang 1 donnent 114 cm!! On est long des 96 indiqués sur le patron... Pouvez vous me dire où est l'erreur s'il vous plait? Merci d'avance
23.07.2014 - 17:43DROPS Design answered:
Bonjour Virginie, Avez-vous vérifié votre échantillon ? vous devez avoir 2.5 groupes de DB du diagramme A.1 = 10 cm de large, ainsi les 24 groupes de DB en A.1 = 96 cm. Bon crochet!
24.07.2014 - 08:52Morillo Bersa wrote:
Te felicito me encanto espero hacerlo pronto
15.07.2014 - 03:00Beste, ik snap de kraag niet. als ik het werk nu open voor me neerleg, moeten dan die extra lapjes van de kraag aan de buitenkant komen, of aan de kant van het achterpand. Verder snap ik niet hoe die stukjes, waar ook bevestigd, aan elkaar moeten komen. Aangezien het achterpand geen verlenging voor de kraag heeft. (als ik het achterpand goed begrepen heb, heeft deze alleen 2x3dstk groepen meer aan de kant van het rechter/linker pand)
13.07.2014 - 12:39DROPS Design answered:
Hoi Lianne. De uiteinden van de kraagdelen (de bovenkant) worden aan elkaar genaaid en vervolgens naai je de kraag vast aan de halskant van het achterpand.
14.07.2014 - 16:51Hej! Jag såg frågan var ställd. Jag förstår inte riktigt fortfarande. Kragen och monteringen av den i slutet. Hur fungerar det? Finns det en bild man kan se hur den färdiga kragen ska se ut? Jag fattar det som att den sys mot axelsömmen mot ärmen.
03.07.2014 - 16:09DROPS Design answered:
Hej Marie. Du lukker først kragedelene (de to yderste ender - sidste omg) af dem sammen. Derefter lægger du kragen til halsen på rygstykket og syer den fast her
21.07.2014 - 17:15Bonjour il me manque 3 pelotes pour finir mon ouvrage ou dois je faire ma demande pour en recommander car sur la commande pour les frais de port il est marqué de demander d abord merci
13.06.2014 - 12:46DROPS Design answered:
Bonjour Mme Specq, avez-vous bien vérifié votre échantillon ? Pour toute commande supplémentaire de fils, merci de bien vouloir contacter le magasin où vous avez effectué votre 1ère commande. Bon crochet !
13.06.2014 - 13:43Bonjour est ce que le crochet drops 6 et de la meme taille qu'un crochet normal? car j'ai acheter la laine sur le site et quand je crochete en XXL mon bas fait 2 fois la largeur qu'il faudrait merci j'ai au moins 30cm de plus!!!
02.06.2014 - 18:02DROPS Design answered:
Bonjour Mme Specq, avez-vous fait votre échantillon ? vous devez avoir 2.5 groupes de DB du diagramme A.1 = 10 cm de large et 11 ms/B = 10 cm de large pour obtenir les mesures indiquées dans le schéma en bas de page. Bon crochet!
03.06.2014 - 10:22Combien de pelotes faut-il prévoir pour le gilet complet? Merci
01.05.2014 - 08:07DROPS Design answered:
Bonjour Ludivine, les fournitures pour chaque taille sont indiquées sous l'onglet "Fournitures" à droite de la photo, par ex en taille S il faut 350 g DROPS Paris à 50 g la pelote soit 7 pelotes. Bon crochet!
02.05.2014 - 10:08