
Popular categories
Looking for a yarn?


|
||||||||||||||||
Leona |
||||||||||||||||
 |
 |
|||||||||||||||
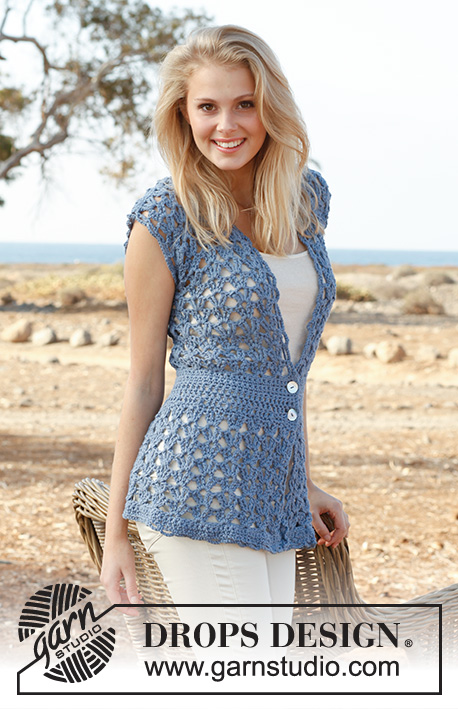
Crochet DROPS vest with fan pattern in ”Paris”. Size S-XXXL.
DROPS 145-4 |
||||||||||||||||
|
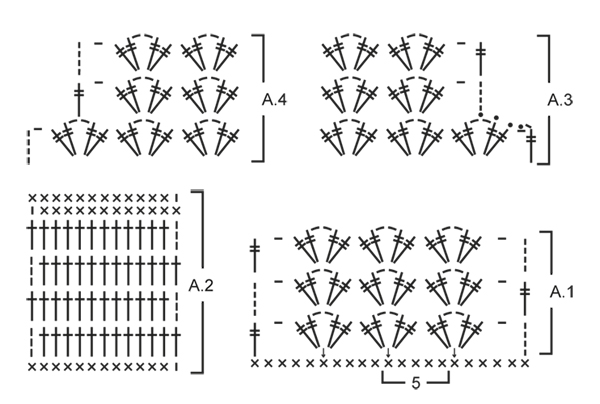
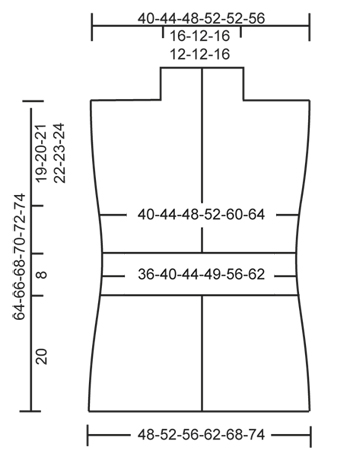
PATTERN: See diagrams A.1 and A.2 (diagrams A.3 and A.4 show dec for armhole in size XXL + XXXL). INCREASE TIP: Inc 1 sc by working 2 sc in same st. DECREASE TIP (dec 1 sc): Work 1 sc but wait with last pull through (= 2 sts on hook), then work next sc but on last pull through, pull yarn through all sts on hook = 1 sc dec. ---------------------------------------------------------- VEST: Read US/UK above! Worked back and forth from mid front. With Paris ch 189-204-219-242-264-287 on hook size 6 mm / J/10, turn. ROW 1: 1 sc in 2nd ch from hook, * skip ch 1, 1 sc in each of the next 2 ch *, repeat from *-* until 4-4-4-3-4-3 ch remain, skip next ch and finish with 1 sc in each of the last 3-3-3-2-3-2 ch = 126-136-146-161-176-191 sc on row, turn piece. ROW 2: ch 1, then work 1 sc in every sc from previous row = 126-136-146-161-176-191 sc, turn piece. ROW 3: Work as 2nd row. ROW 4: Then work pattern according to diagram A.1, i.e. ch 5 (= 1 tr + 1 ch), * skip 4 sc, in next sc work 2 tr + ch 2 + 2 tr *, repeat from *-* until 5 sc remain, skip 4 sc and finish with ch 1 and 1 tr in last sc = 24-26-28-31-34-37 tr-groups, turn piece. ROW 5: ch 5, in ch-space in every tr-group work 2 tr + ch 2 + 2 tr, finish row with 1 ch and 1 tr in 4th ch on beg of previous row = 24-26-28-31-34-37 tr-groups, turn piece. Repeat 5th row until piece measures approx. 16 cm / 6 1/4''. Work next row as follows: ch 4 (= 1 tr), in ch-space in the middle of every tr-group work 2 tr + ch 1 (instead of 2 ch) + 2 tr, finish row with 1 tr in 4th ch from beg of previous row = 24-26-28-31-34-37 tr-groups, turn piece. Ch 1, 1 sc in same st, then work 1 sc in every tr the entire row, finish with 1 sc in 4th ch from beg of previous row, turn piece = 98-106-114-126-138-150 sc. Continue to work as follows: ROW 1: Work pattern according to diagram A.2, i.e. work ch 1, then work 1 sc in every sc the entire row AT THE SAME TIME dec 18-18-18-18-14-14 sc evenly – READ DECREASE TIP = 80-88-96-108-124-136 sc, turn piece. ROW 2: 3 ch (= 1 dc), then work 1 dc in every sc the entire row = 80-88-96-108-124-136 dc on row. ROW 3-5: Work as 2nd row = 80-88-96-108-124-136 dc. ROW 6: Work 1 sc in every dc AT THE SAME TIME adjust no of sts as follows: Size S + M + L + XL + XXL: Inc 5-9-5-5-5 sc evenly – READ INCREASE TIP. Size XXXL: Dec 3 sts evenly – READ DECREASE TIP = 85-97-101-113-129-133 sc, turn piece. ROW 7: ch 1, 1 sc in same st, then work 1 sc in every sc from previous row = 85-97-101-113-129-133 sc, turn piece. ROW 8: ch 5, * skip 3 sc, in next sc work 2 tr + ch 2 + 2 tr *, repeat from *-* until 4 sc remain on row, skip 3 sc and finish with 1 ch and 1 tr in last sc on row = 20-23-24-27-31-32 tr-groups on row, turn piece. ROW 9: Then work pattern according to diagram A.1 again, i.e. ch 5, in ch-space in the middle of every tr-group work 2 tr + ch 2 + 2 tr, finish row with ch 1 and 1 tr in 4th ch on beg of previous row = 20-23-24-27-31-32 tr-group. Repeat 9th row upwards. AT THE SAME TIME when piece measures 45-46-47-48-49-50 cm / 17¾''-18''-18½''-19''-19¼''-19¾'', divide for markers as follows: Insert 1 marker after 5-6-6-7-8-8 tr-groups in from each side (= 10-11-12-13-15-16 tr-groups between markers on back piece). Finish each part separately. BACK PIECE: = 10-11-12-13-15-16 tr-groups. Continue back and forth with tr-groups as shown in A.1. AT THE SAME TIME on 1st row dec for armholes in each side in size XXL + XXXL as follows: Dec 1 tr-group on beg of row as shown in A.3, work as before until 1 tr-group remains on row, finish row as shown in A.4 (do not dec in the other sizes) = 10-11-12-13-13-14 tr-groups remain on row. Continue pattern back and forth until 1 row remains before piece measures 64-66-68-70-72-74 cm / 25¼''-26''-26¾''-27½''-28 3/8''-29 1/8''. Now work 1 row with tr-groups only over the outermost 3-4-4-5-5-5 tr-groups in the one side of piece: ch 5, * in ch-space in the middle of next tr-group work 2 tr + ch 2 + 2 tr *, repeat from *-* 3-4-4-5-5-5 times in total, finish with 1 tr in last tr in same tr-group, turn piece. Now work 1 row sc as follows: ch 1, 1 sc in same st, * 1 sc in each of the first 2 tr, 1 sc in ch-space in the middle of tr-group, 1 sc in each of the next 2 tr *, repeat from *-* 3-4-4-5-5-5 times in total, finish with 1 sc in last ch and 1 sc in 4th ch from beg of previous row = 18-23-23-28-28-28 sc on row. Fasten off. Repeat on the other shoulder (i.e. do not work over the middle 4-3-4-3-3-4 tr-groups = neck.) RIGHT FRONT PIECE: = 5-6-6-7-8-8 tr-groups. Continue back and forth with tr-groups as on back piece. AT THE SAME TIME on 1st row dec for armhole in the side in size XXL + XXXL as shown in A.4 (do not dec in the other sizes) = 5-6-6-7-7-7 tr-groups. Continue pattern back and forth until piece measures approx. 64-66-68-70-72-74 cm / 25¼''-26''-26¾''-27½''-28 3/8''-29 1/8'' - make sure that same no of rows with tr-groups has been worked as on back piece. Now work 1 row sc as on back piece only over the outermost 3-4-4-5-5-5 tr-groups on shoulder (i.e. do not work over the 2 tr-groups towards the neck = collar) = 18-23-23-28-28-28 sc. Fasten off. Insert 1 marker on the shoulder. Now work tr-groups back and forth over collar as follows: ch 5, in ch-space in first tr-group work 2 tr + ch 2 + 2 tr, in ch-space in next tr-group work 2 tr + ch 2 + 2 tr, ch 1 and finish with 1 tr in last tr in same tr-group. Continue back and forth like this until collar measures approx. 10-8-10-8-8-10 cm / 4"-3 1/8"-4"-3 1/8"-3 1/8"-4" from marker on shoulder. Then work 1 row sc as follows: ch 1, 1 sc in same st, 1 sc in next ch, 1 sc in each of the first 2 tr, 1 sc in ch-space in the middle of tr-group, 1 sc in each of the next 2 tr *, repeat from *-* 2 times in total, finish with 1 sc in last ch and 1 sc in 4th ch from beg of previous row = 14 sc, cut the yarn. LEFT FRONT PIECE: Work as right front piece but reversed. When dec for armhole in size XXL + XXXL, dec 1 tr-group as shown in A.3. ASSEMBLY: Sew shoulder seams edge to edge to avoid a chunky seam. Sew collar tog mid back (sew edge to edge) and sew it on to neck line at the back of neck. Sew on buttons on right front piece – see picture. Button through the crochet edge explained below. CROCHET EDGE: Work a finishing edge around the entire opening on vest and around both armholes as follows: 1 sc in first st, * ch 5, skip approx. 2½ cm / 7/8'', 1 sc in next st/ch-space *, repeat from *-* the entire round and finish with ch 5 and 1 sl st in sc from beg of round. |
||||||||||||||||
Diagram explanations |
||||||||||||||||
|
||||||||||||||||
|
||||||||||||||||
|
||||||||||||||||
|
Have you made this or any other of our designs? Tag your pictures in social media with #dropsdesign so we can see them! Do you need help with this pattern?You'll find tutorial videos, a Comments/Questions area and more by visiting the pattern on garnstudio.com. © 1982-2024 DROPS Design A/S. We reserve all rights. This document, including all its sub-sections, has copyrights. Read more about what you can do with our patterns at the bottom of each pattern on our site. |
||||||||||||||||


With over 40 years in knitting and crochet design, DROPS Design offers one of the most extensive collections of free patterns on the internet - translated to 17 languages. As of today we count 304 catalogs and 11422 patterns - 11417 of which are translated into English (US/in).
We work hard to bring you the best knitting and crochet have to offer, inspiration and advice as well as great quality yarns at incredible prices! Would you like to use our patterns for other than personal use? You can read what you are allowed to do in the Copyright text at the bottom of all our patterns. Happy crafting!
Comments / Questions (189)
Redouane wrote:
Franchement parler tous ces modeles sont magnifiques
11.12.2012 - 08:41Very flattering!
11.12.2012 - 07:16Sehr schönes Muster!
10.12.2012 - 21:32Super leuk!
10.12.2012 - 20:43Vil være sød til sommer
10.12.2012 - 20:35Den er rigtig flot og kan anvendes af både gamle og unge
10.12.2012 - 19:34Den er så fin, den MÅ jeg bare eje!
10.12.2012 - 16:47Maggie wrote:
Beautiful pattern, perfect fit!
10.12.2012 - 16:18Beautiful!
10.12.2012 - 13:20