
Popular categories
Looking for a yarn?


|
||||||||||||||||
Leona |
||||||||||||||||
 |
 |
|||||||||||||||
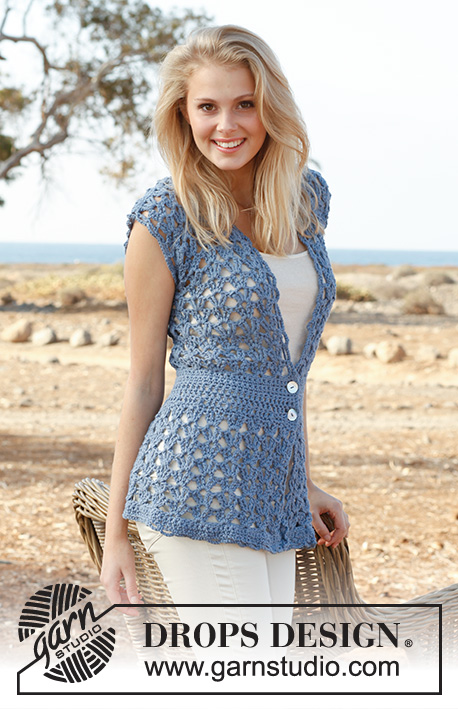
Crochet DROPS vest with fan pattern in ”Paris”. Size S-XXXL.
DROPS 145-4 |
||||||||||||||||
|
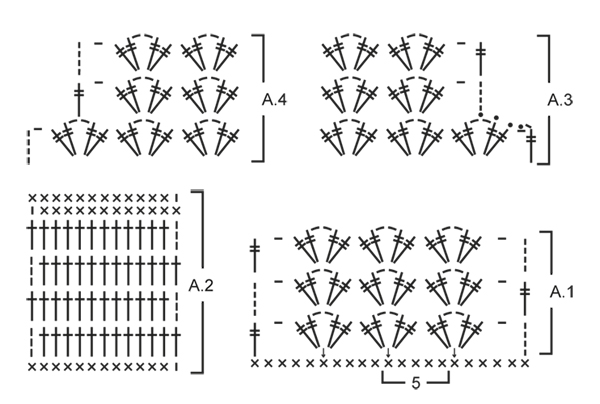
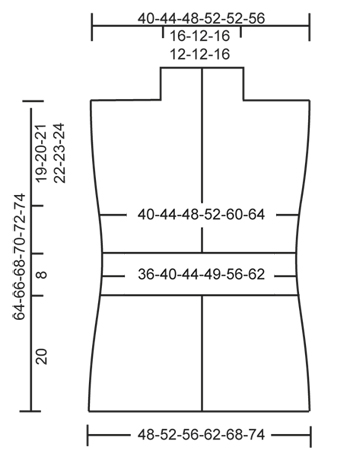
PATTERN: See diagrams A.1 and A.2 (diagrams A.3 and A.4 show dec for armhole in size XXL + XXXL). INCREASE TIP: Inc 1 sc by working 2 sc in same st. DECREASE TIP (dec 1 sc): Work 1 sc but wait with last pull through (= 2 sts on hook), then work next sc but on last pull through, pull yarn through all sts on hook = 1 sc dec. ---------------------------------------------------------- VEST: Read US/UK above! Worked back and forth from mid front. With Paris ch 189-204-219-242-264-287 on hook size 6 mm / J/10, turn. ROW 1: 1 sc in 2nd ch from hook, * skip ch 1, 1 sc in each of the next 2 ch *, repeat from *-* until 4-4-4-3-4-3 ch remain, skip next ch and finish with 1 sc in each of the last 3-3-3-2-3-2 ch = 126-136-146-161-176-191 sc on row, turn piece. ROW 2: ch 1, then work 1 sc in every sc from previous row = 126-136-146-161-176-191 sc, turn piece. ROW 3: Work as 2nd row. ROW 4: Then work pattern according to diagram A.1, i.e. ch 5 (= 1 tr + 1 ch), * skip 4 sc, in next sc work 2 tr + ch 2 + 2 tr *, repeat from *-* until 5 sc remain, skip 4 sc and finish with ch 1 and 1 tr in last sc = 24-26-28-31-34-37 tr-groups, turn piece. ROW 5: ch 5, in ch-space in every tr-group work 2 tr + ch 2 + 2 tr, finish row with 1 ch and 1 tr in 4th ch on beg of previous row = 24-26-28-31-34-37 tr-groups, turn piece. Repeat 5th row until piece measures approx. 16 cm / 6¼". Work next row as follows: ch 4 (= 1 tr), in ch-space in the middle of every tr-group work 2 tr + ch 1 (instead of 2 ch) + 2 tr, finish row with 1 tr in 4th ch from beg of previous row = 24-26-28-31-34-37 tr-groups, turn piece. Ch 1, 1 sc in same st, then work 1 sc in every tr the entire row, finish with 1 sc in 4th ch from beg of previous row, turn piece = 98-106-114-126-138-150 sc. Continue to work as follows: ROW 1: Work pattern according to diagram A.2, i.e. work ch 1, then work 1 sc in every sc the entire row AT THE SAME TIME dec 18-18-18-18-14-14 sc evenly – READ DECREASE TIP = 80-88-96-108-124-136 sc, turn piece. ROW 2: 3 ch (= 1 dc), then work 1 dc in every sc the entire row = 80-88-96-108-124-136 dc on row. ROW 3-5: Work as 2nd row = 80-88-96-108-124-136 dc. ROW 6: Work 1 sc in every dc AT THE SAME TIME adjust no of sts as follows: Size S + M + L + XL + XXL: Inc 5-9-5-5-5 sc evenly – READ INCREASE TIP. Size XXXL: Dec 3 sts evenly – READ DECREASE TIP = 85-97-101-113-129-133 sc, turn piece. ROW 7: ch 1, 1 sc in same st, then work 1 sc in every sc from previous row = 85-97-101-113-129-133 sc, turn piece. ROW 8: ch 5, * skip 3 sc, in next sc work 2 tr + ch 2 + 2 tr *, repeat from *-* until 4 sc remain on row, skip 3 sc and finish with 1 ch and 1 tr in last sc on row = 20-23-24-27-31-32 tr-groups on row, turn piece. ROW 9: Then work pattern according to diagram A.1 again, i.e. ch 5, in ch-space in the middle of every tr-group work 2 tr + ch 2 + 2 tr, finish row with ch 1 and 1 tr in 4th ch on beg of previous row = 20-23-24-27-31-32 tr-group. Repeat 9th row upwards. AT THE SAME TIME when piece measures 45-46-47-48-49-50 cm / 17¾"-18"-18½"-19"-19¼"-19¾", divide for markers as follows: Insert 1 marker after 5-6-6-7-8-8 tr-groups in from each side (= 10-11-12-13-15-16 tr-groups between markers on back piece). Finish each part separately. BACK PIECE: = 10-11-12-13-15-16 tr-groups. Continue back and forth with tr-groups as shown in A.1. AT THE SAME TIME on 1st row dec for armholes in each side in size XXL + XXXL as follows: Dec 1 tr-group on beg of row as shown in A.3, work as before until 1 tr-group remains on row, finish row as shown in A.4 (do not dec in the other sizes) = 10-11-12-13-13-14 tr-groups remain on row. Continue pattern back and forth until 1 row remains before piece measures 64-66-68-70-72-74 cm / 25¼"-26"-26¾"-27½"-28⅜"-29⅛". Now work 1 row with tr-groups only over the outermost 3-4-4-5-5-5 tr-groups in the one side of piece: ch 5, * in ch-space in the middle of next tr-group work 2 tr + ch 2 + 2 tr *, repeat from *-* 3-4-4-5-5-5 times in total, finish with 1 tr in last tr in same tr-group, turn piece. Now work 1 row sc as follows: ch 1, 1 sc in same st, * 1 sc in each of the first 2 tr, 1 sc in ch-space in the middle of tr-group, 1 sc in each of the next 2 tr *, repeat from *-* 3-4-4-5-5-5 times in total, finish with 1 sc in last ch and 1 sc in 4th ch from beg of previous row = 18-23-23-28-28-28 sc on row. Fasten off. Repeat on the other shoulder (i.e. do not work over the middle 4-3-4-3-3-4 tr-groups = neck.) RIGHT FRONT PIECE: = 5-6-6-7-8-8 tr-groups. Continue back and forth with tr-groups as on back piece. AT THE SAME TIME on 1st row dec for armhole in the side in size XXL + XXXL as shown in A.4 (do not dec in the other sizes) = 5-6-6-7-7-7 tr-groups. Continue pattern back and forth until piece measures approx. 64-66-68-70-72-74 cm / 25¼"-26"-26¾"-27½"-28⅜"-29⅛" - make sure that same no of rows with tr-groups has been worked as on back piece. Now work 1 row sc as on back piece only over the outermost 3-4-4-5-5-5 tr-groups on shoulder (i.e. do not work over the 2 tr-groups towards the neck = collar) = 18-23-23-28-28-28 sc. Fasten off. Insert 1 marker on the shoulder. Now work tr-groups back and forth over collar as follows: ch 5, in ch-space in first tr-group work 2 tr + ch 2 + 2 tr, in ch-space in next tr-group work 2 tr + ch 2 + 2 tr, ch 1 and finish with 1 tr in last tr in same tr-group. Continue back and forth like this until collar measures approx. 10-8-10-8-8-10 cm / 4"-3⅛"-4"-3⅛"-3⅛"-4" from marker on shoulder. Then work 1 row sc as follows: ch 1, 1 sc in same st, 1 sc in next ch, 1 sc in each of the first 2 tr, 1 sc in ch-space in the middle of tr-group, 1 sc in each of the next 2 tr *, repeat from *-* 2 times in total, finish with 1 sc in last ch and 1 sc in 4th ch from beg of previous row = 14 sc, cut the yarn. LEFT FRONT PIECE: Work as right front piece but reversed. When dec for armhole in size XXL + XXXL, dec 1 tr-group as shown in A.3. ASSEMBLY: Sew shoulder seams edge to edge to avoid a chunky seam. Sew collar tog mid back (sew edge to edge) and sew it on to neck line at the back of neck. Sew on buttons on right front piece – see picture. Button through the crochet edge explained below. CROCHET EDGE: Work a finishing edge around the entire opening on vest and around both armholes as follows: 1 sc in first st, * ch 5, skip approx. 2½ cm / ⅞", 1 sc in next st/ch-space *, repeat from *-* the entire round and finish with ch 5 and 1 sl st in sc from beg of round. |
||||||||||||||||
Diagram explanations |
||||||||||||||||
|
||||||||||||||||
|
||||||||||||||||
|
||||||||||||||||
|
Have you made this or any other of our designs? Tag your pictures in social media with #dropsdesign so we can see them! Do you need help with this pattern?You'll find tutorial videos, a Comments/Questions area and more by visiting the pattern on garnstudio.com. © 1982-2024 DROPS Design A/S. We reserve all rights. This document, including all its sub-sections, has copyrights. Read more about what you can do with our patterns at the bottom of each pattern on our site. |
||||||||||||||||


With over 40 years in knitting and crochet design, DROPS Design offers one of the most extensive collections of free patterns on the internet - translated to 17 languages. As of today we count 304 catalogs and 11422 patterns - 11417 of which are translated into English (US/in).
We work hard to bring you the best knitting and crochet have to offer, inspiration and advice as well as great quality yarns at incredible prices! Would you like to use our patterns for other than personal use? You can read what you are allowed to do in the Copyright text at the bottom of all our patterns. Happy crafting!
Comments / Questions (189)
Ja, es ist viel mehr! Ich habe nochmal Größe s versucht aber selbst da ist es nach der zweiten Reihe insgesamt 131 cm breit!
19.07.2013 - 09:47DROPS Design answered:
Liebe Neli, bitte überprüfen Sie noch, ob die Maschenzahl stimmt. Es wird nicht in jede Lm des Anschlags gehäkelt. Haben Sie das beachtet?
19.07.2013 - 12:05Ich verstehe es nicht, ich habe Maschenprobe gemacht und die stimmte. Nun habe ich die ersten fünf Reihen gehäkelt und das Teil ist ultrabreit, ist das normal?
18.07.2013 - 21:35DROPS Design answered:
Liebe Neli, haben Sie die angegebene Anzahl Fächer? Und haben Sie Ihr Mass mit den Angaben in der Schnittzeichnung verglichen? Ist es mehr als dort angegeben?
19.07.2013 - 08:24Eine wirklich wunderschönes Teil... Ich habe mich mit dieser Weste zum ersten Mal an ein Kleidungsstück gewagt, und bin wirklich sehr gut mit der Anleitung zurecht gekommen... Nur beim Zusammennähen bin ich teilweise verzweifelt... Ansonsten ist die Weste auch super für Nicht-Häkelprofis geeignet... Ich werde das Teil gleich heut Abend beim Grillabend Probe tragen... :)
18.07.2013 - 07:56Confused when working the tr-group work on the outermost 4 tr-groups on the back. States to start with a chain 5 and the 4 tr-groups, but how do I transition to the next row? Also, not clear on the collar instructions. Usually, I can figure it out looking at the vest, but the model's beautiful covers it up!!:) Any help would be greatly appreciated. Thanks.
10.07.2013 - 23:07DROPS Design answered:
Dear Mrs Underkofler, after the 4 tr-group on shoulder, you work 1 tr in last tr in same tr-group then work 1 row sc as stated : ch 1, 1 sc in same st, * 1 sc in each of the first 2 tr, 1 sc in ch-space in the middle of tr-group, 1 sc in each of the next 2 tr *, repeat from *-* 3-4-4-5-5-5 times in total, finish with 1 sc in last ch and 1 sc in 4th ch from beg of previous row = 18-23-23-28-28-28 sc on row. Happy crocheting!
11.07.2013 - 09:23Jag har stora problem med kragen på denna modell. Jag förstår inte alls hur den ska sys ihop när det endast sitter en kragbit på båda framstyckena. Om man ska kunna "sy ihop kragen mitt bak" som det står i beskrivningen som måste det väl rimligen finnas en kragdel på bakstycket också? Eller har jag helt missuppfattat detta?
19.06.2013 - 14:46DROPS Design answered:
Der er ingen kragdel paa bakstycket. Du har haeklet kragen i et stykke op fra forstykket (8 til 10 cm fra merket paa skulderen). Du syer disse to kragdele sammen og derefter syr du dette stykke fast paa bakstycket. Haaber du kan komme videre saadan.
20.06.2013 - 11:52'Ga verder in patroon heen en weer tot er 1 toer overblijft voor werk 64-66-68-70-72-74 cm meet.' Wordt hier bedoeld dat de zijpanden 1 cm langer worden dan het rugpand?
14.06.2013 - 21:41DROPS Design answered:
Nee, de voorpanden worden net zo lang als het achterpand. Je plaatst bij 64-66-68-70-72-74 cm 1 markeerder op de schouder. En haakt vanaf hier door over de de 2 dstk-groepen richting hals voor de kraag.
19.06.2013 - 13:39Bij het apart verder haken van de delen eindig je aan beide zijden met een groep om de l tussen de volgende groep. 1 l en 1dbst dan tussen de 2 groepen bij begin en keren?
13.06.2013 - 20:06DROPS Design answered:
Uw vraag is ons helaas niet duidelijk. U haakt verder met dstk-groepen en u begint in patroon A.1 elke toer met l om te keren, bedoelt u dat?
21.10.2013 - 08:42Im almost finished with this ..which is so beautiful btw...Im having trouble with the construction of the arms..it says to count 8 tr groups in..but im not sure if thats counting down or across...
30.05.2013 - 08:01DROPS Design answered:
Dear Jessica, you will count the 8 tr group from beg / end of row (= each side), and place a marker, so that you will have 15-16 (see size) tr groups between both markers for back piece. Happy crocheting!
30.05.2013 - 09:14Dag, Ik heb net als Xenia de vraag over de armstukjes (kraag?). Volgens het patroon moet ik 'omhoog' haken met 2 dubbelstokjes groepen totdat het ongeveer 10 cm is boven de markeerders. Uiteindelijk moet dit vastgemaakt worden, maar klopt het dan dat aan de achterkant van de mouwtjes het waaier patroon andersom kom te zitten? Ik hoor het graag! Groetjes Angenita
15.05.2013 - 19:31DROPS Design answered:
Hoi Angenita. Dit was de reactie voor Xenia: Zie maattekening onderaan, de kraag wordt doorgehaakt nadat de voorpanden klaar zijn over de eerste st middenvoor ongeveer 10 cm tot deze st aan elkaar kunnen komen middenachter. Je sluit dan deze kraagdelen aan elkaar middenachter en naait de kraag vast aan de halslijn. Het is voor mij niet duidelijk wat je bedoelt precies met armstukjes en mouwtjes?
16.05.2013 - 13:35Xenia wrote:
I'm very excited about almost finishing this amazing vest! I'm only having a difficulty understanding the assembly of the collar pieces and it can't be seen in the photo either! So the question is how do I sew those extra 10cm in the middle back and the two fronts? Thank you!
10.05.2013 - 09:08DROPS Design answered:
Dear Xenia, look at the measurement chart below, the collar continues after the front pieces, on the first sts worked towards mid front during 10 cm until this part reach mid neck from back piece. You will then sew last rows of both collars together then sew side (= end/beg of rows) to the neckline on back piece. Happy crocheting !
10.05.2013 - 09:49