
Popular categories
Looking for a yarn?


|
||||||||||||||||||||||
Spearmint |
||||||||||||||||||||||
 |
 |
|||||||||||||||||||||
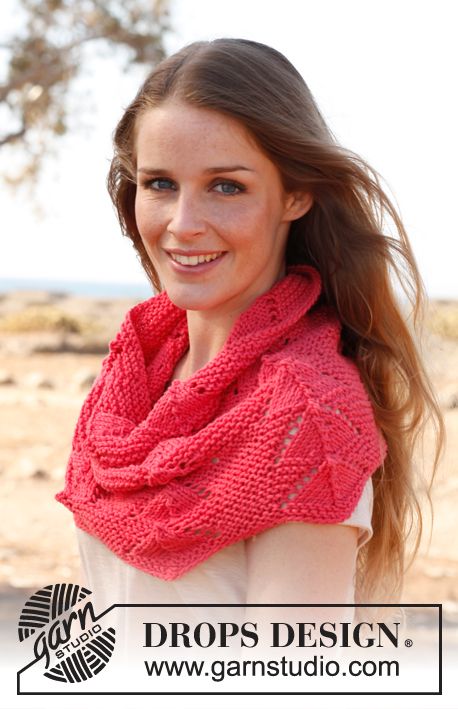
Crochet DROPS poncho in ”Muskat”. Size: S - XXXL.
DROPS 147-35 |
||||||||||||||||||||||
|
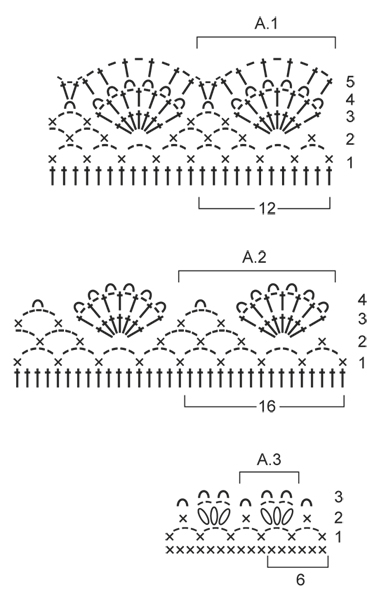
PATTERN: See diagrams A.1 to A.3 and read explanation below. INCREASE TIP 1 (applies ROW 2): Inc 1 tr by working 2 tr in same dc. INCREASE TIP 2: All inc are done on rows/rounds with only tr (i.e. not on rows/rounds with holes). Inc 1 tr by working 1 tr in next tr, 2 tr in next ch-loop. PATTERN A.1: ROUND 1: 1 ch, 1 dc in 3rd ch from previous round, * 3 ch, skip 2 tr, 1 dc in next tr *, repeat from *-*, finish with 3 ch and 1 sl st in 1st dc from beg of round = 56-60-64-68-72-76 ch-loops. Sl sts until 1st ch-loop. ROUND 2: Work 1 ch, 1 dc in same loop, ** 7 tr in next ch-loop, * 1 dc in next ch-loop, 3 ch *, repeat from *-* 1 more time, 1 dc in next ch-loop **, repeat from **-** the entire round (14-15-16-17-18-19 times in total) - but when repeating the last time, repeat *-* 2 times, then finish round with 1 sl st in 1st dc from beg of round. Sl sts until 1st tr. ROUND 3: * Work 1 tr in each of the next 7 tr with 1 ch between every tr (NOTE: Replace 1st tr on round with 3 ch) = 7 tr and 6 ch-loops, 1 dc in next ch-loop, 3 ch, 1 dc in next ch-loop *, repeat from *-* the entire round, finish with 1 sl st in 3rd ch from beg of round. Sl sts until 1st ch-loop. ROUND 4: Work 1 PICOT - read explanation below - in every ch-loop the entire round (= 7 picots over every repetition), finish with 1 sl st in 1st dc from beg of round. Sl sts until ch-loop on 1st picot. ROUND 5: ** In ch-loop on each of the next 6 picots work * 1 tr in ch-loop, 1 ch *, repeat from *-* 2 times in ch-loop on next picot ** = 8 tr and 8 ch-loops over every repetition, repeat from **-** the entire round, finish with 1 sl st in 3rd ch from beg of round. ROUND 6 (not shown in diagram): 3 ch (counted as 1st tr), 1 tr in 1st ch-loop, work 2 tr in every ch-loop the entire round = 16 tr over every repetition, finish with 1 sl st in 3rd ch from beg of round = 224-240-256-272-288-304 tr. Do not cut the thread. PICOT: 1 picot = 1 dc, 3 ch, 1 dc in same ch-loop/dc. PATTERN A.2: ROUND 1: 1 ch, 1 dc in 3rd ch from previous round, * 4 ch, skip 3 tr, 1 dc in next tr *, repeat from *-*, finish with 4 ch and 1 sl st in 1st dc from beg of round = 56-60-64-68-72-76 ch-loops. Sl sts until 1st ch-loop. ROUND 2: Work 1 ch, 1 dc in same loop, ** 7 tr in next ch-loop, * 1 dc in next ch-loop, 5 ch *, repeat from *-* 1 more time, 1 dc in next ch-loop **, repeat from **-** the entire round (15 times in total) - but when repeating the last time, repeat *-* 2 times, then finish round with 1 sl st in 1st dc from beg of round. Sl sts until 1st tr. ROUND 3: Work 1 tr in each of the next 7 tr with 1 ch between every tr = 7 tr and 6 ch-loops, 1 dc in next ch-loop, 5 ch, 1 dc in next ch-loop *, repeat from *-* the entire round, finish with 1 sl st in 3rd ch from beg of round. Sl sts until 1st ch-loop. ROUND 4: Work 1 picot in every ch-loop the entire round and finish with 1 sl st in 1st dc from beg of round. PATTERN A.3 (neck edge): ROW 1: 1 ch, 1 dc in 1st dc, * 3 ch, skip 2 dc, 1 dc in next dc *, repeat from *-* until 2 dc remain, finish with 3 ch and 1 dc in last dc = 32-34-36-38-40-42 dc and 31-33-35-37-39-41 ch-loops, turn. ROW 2: Sl sts until 1st ch-loop, 1 ch, 1 dc in same loop, * in next ch-loop work 3 bobbles - read explanation below - with 2 ch between every bobble, 1 dc in next ch-loop *, repeat from *-* the entire row (finish with 1 dc in last ch-loop), turn. ROW 3: Work 1 picot in every ch-loop and 1 picot in every dc. BOBBLE: 1 bobble = work 2 tr in same ch-loop - but wait with last pull through on both sts, pull thread through all 3 sts on hook. ---------------------------------------------------------- PONCHO: Worked from neck and down with vent mid back. The piece is first worked back and forth and then in the round. ROW 1: With Muskat and hook size 4.5 mm, work 95-101-107-113-119-125 ch, turn and work 1 dc in 2nd ch from hook, then 1 dc in every ch = 94-100-106-112-118-124 dc (divisible by 3 + 1 dc), turn. ROW 2: Work 3 ch (counted as 1st tr), then work tr in every dc - AT THE SAME TIME inc 31-31-31-33-33-33 tr - READ INCREASE TIP 1 - evenly on row = 125-131-137-145-151-157 tr, turn. ROW 3 (with holes): 4 ch (counted as 1st tr + 1 ch), * skip 1 tr, 1 tr in next tr, 1 ch *, repeat from *-*, finish with 1 tr in 3rd ch from beg of previous row = 63-66-69-73-76-79 tr with 1 ch between every tr, turn. ROW 4 (with tr): Work 3 ch (counted as 1st tr), 1 tr in 1st ch-loop, work 2 tr in every ch-loop on row - AT THE SAME TIME inc 16-16-16-18-18-18 tr - READ INCREASE TIP 2 - evenly on row, NOTE! Work 1 tr in last ch-loop on row, finish with 1 tr in 3rd ch from beg of previous row = 141-147-153-163-169-175 tr, turn. ROW 5: Work as ROW 3 = 71-74-77-82-85-88 tr with 1 ch between every tr, turn. ROW 6: 3 ch, 1 tr in 1st ch-loop, work 2 tr in every ch-loop on row - AT THE SAME TIME inc 3-5-7-5-7-9 tr evenly on row, finish with 1 tr in 3rd ch from beg of previous row = 144-152-160-168-176-184 tr. REMEMBER THE CROCHET TENSION! Continue to work in the round as follows: ROUND 1 (with holes): 4 ch (counted as 1st tr + 1 ch), * skip 1 tr, 1 tr in next tr, 1 ch *, repeat from *-*, finish with 1 sl st in 3rd ch from beg of round = 72-76-80-84-88-92 tr with 1 ch between every tr. ROUND 2 (with tr): 3 ch (counted as 1st tr), 1 tr in 1st ch-loop, work 2 tr in every ch-loop the entire round - AT THE SAME TIME inc 4 tr evenly on round, finish with 1 sl st in 3rd ch from beg of round = 148-156-164-172-180-188 tr. Repeat 1st and 2nd ROUND 5-6-7-8-9-10 more times (i.e. inc with 4 tr evenly every other round a total of 6-7-8-9-10-11 times) = 168-180-192-204-216-228 tr on round. Then work 1st and 2nd ROUND alternately WITHOUT inc until piece measures approx. 26-29-31-34-36-39 cm (finish with 1 round with only tr = ROUND 2). Then work diagram A.1 - see diagram and explanation above. When A.1 has been worked 1 time vertically, there are 224-240-256-272-288-304 tr on round. Then work diagram A.2 - see diagram and read explanation above - 1 time vertically, cut and fasten the thread. NECK EDGE: Worked back and forth. Work from RS diagram A.3 - see diagram and read explanation above - around the entire neck edge (start mid back), do not cut the thread. Then work ch for 24 cm, turn and work sl sts in every ch on return = 1 tie, cut and fasten the thread. Work another tie the same way in the corner on the other side of vent. |
||||||||||||||||||||||
Diagram explanations |
||||||||||||||||||||||
|
||||||||||||||||||||||

|
||||||||||||||||||||||
|
||||||||||||||||||||||
|
Have you made this or any other of our designs? Tag your pictures in social media with #dropsdesign so we can see them! Do you need help with this pattern?You'll find tutorial videos, a Comments/Questions area and more by visiting the pattern on garnstudio.com. © 1982-2024 DROPS Design A/S. We reserve all rights. This document, including all its sub-sections, has copyrights. Read more about what you can do with our patterns at the bottom of each pattern on our site. |
||||||||||||||||||||||


With over 40 years in knitting and crochet design, DROPS Design offers one of the most extensive collections of free patterns on the internet - translated to 17 languages. As of today we count 304 catalogues and 11422 patterns - 11422 of which are translated into English (UK/cm).
We work hard to bring you the best knitting and crochet have to offer, inspiration and advice as well as great quality yarns at incredible prices! Would you like to use our patterns for other than personal use? You can read what you are allowed to do in the Copyright text at the bottom of all our patterns. Happy crafting!
Comments / Questions (47)
Salve, io ho bisogno di aiuto. Sono arrivata alla riga 4 per la lavorazione del poncho: devo aumentare 16 m.a ma non ho capito come perché seguendo i suggerimento 2 mi risultano 187 maglie invece di 141. Potrei avere una spiegazione dettagliata su come aumentare e ogni quante maglie aumentare? Grazie
01.02.2018 - 11:10DROPS Design answered:
Buongiorno Sasi. Deve distribuire i 16 aumenti a distanza regolare l'uno dall'altro. Quindi circa ogni quattro maglie del giro precedente. Lavora il giro 4 come indicato e solo quando aumenta segue le indicazioni riportate nel suggerimento 2. Buon lavoro!
01.02.2018 - 11:29Hi, I have one further question: will the seam at the back be straight down from the vent or on an angle? Thank you again for your help!
21.03.2017 - 05:27DROPS Design answered:
Dear Mercedes, there will be no seam, after row 6 (= 144-184 sts, see your size), you will continue in the round to the end. You will then work 2 ties on the top of each side of the vent on mid back. Happy crocheting!
21.03.2017 - 09:41Hello. What does the instruction, which appears at the end of row 3 and some subsequent rows, "finish with 1dc in 3rd ch from beg previous row" mean? I am not sure where to place this double crochet... the best interpretation I can make of this is that I need to add a double crochet to a chain a few spaces behind it, on an angle, which forms a sort of reinforced edge. Is this corrrect?
18.03.2017 - 20:47DROPS Design answered:
Dear Mrs Pisano, when working in rows, you will replace 1st dc at beg of row with 3 ch and work the last dc on round in the 3rd chain from beg of previous row - see also video below, how to crochet dc back and forth. Happy crocheting!
20.03.2017 - 09:31Beverley wrote:
Hello, with regards to PONCHO: "Worked from neck and down with vent mid back. The piece is first worked back and forth and then in the round" how do I work begin to work in the round is it by slip stitching last stitch at the end of row 6 ?
14.05.2016 - 01:22DROPS Design answered:
Dear Beverly, you will join in the round with a sl st in 1st st at beg of round at the end of a row from RS. Happy crocheting!
17.05.2016 - 09:02Hallo, ich bin dabei den Poncho für meine Mutter 89 jährig und mit Konfektionsgröße 42-44 65 kg zu häkel.n Dafür habe ich Größe L genommen. Wird das reichen. Danke für eine Antwort vlG Tina :-)
02.08.2015 - 08:50DROPS Design answered:
Am besten schauen Sie sich die Maße in der Maßskizze an, dann wissen Sie, welche Größe am besten passt. Idealerweise nehmen Sie einfach Maß an Ihrer Mutter.
07.08.2015 - 09:22At ROW 4, inc 16-16-16-18-18-18 dc - READ INCREASE TIP 2 - evenly on row, NOTE! Work 1 dc in last ch-space on row, finish with 1 dc in 3rd ch from beg of previous row = 141-147-153-163-169-175 dc, turn. ****************************************************************** Here, I think the # of dc should be 146 (M size), not 147 at the end. here's why. 16 dc from the increase, 130 dc (65 wholes from 66 dc x2 ) 16+130=146 can you please double check this? thank you.
22.10.2014 - 19:59DROPS Design answered:
Dear Sunny, at the end of 4th row, you crochet 1 more dc in last ch-space, ie 65 ch-sp x 2 dc = 130 + 16 inc + 1 more dc in last ch-space = 147 dc. Happy crocheting!
23.10.2014 - 09:49Hi, in Pattern A.1, ROUND 1, finish with ch 3 and 1 sl st in 1st sc from beg of round = 56-60-64-68-72-76 ch-spaces. Sl sts until 1st ch-space, the row just before this is dc. does it mean to reverse (go backwards) to do sl st in the very last sc? if so, then the ch-spaces would be 59 (for M size), not 60. please help
20.10.2014 - 18:05DROPS Design answered:
Dear Sunny, at the end of row 1, after the sl st in 1st sc from beg of round, work sl st un the 1st ch-loop from beg of round 1 to crochet 1st sc round 2 in the 1st ch-loop from round 1 (this sc should be in the middle of ch-loop, sl st helps to go there). Happy crocheting!
21.10.2014 - 09:53Mooi patroon,mooie garenkwaliteit. Ben het wel met eerdere opmerkingen eens dat de benodigde hoeveelheid garen krap berekend is. Ik heb voor het maken van de maat xl 400gram garen nodig gehad, terwijl in de beschrijving voor mat xl en xxl 350 gram geadviseerd wordt. Ik koop gelukkig altijd ruim mijn garen in, maar wellicht toch een aanpassing in het patroon waard om teleurstellingen te voorkomen.
05.05.2014 - 23:48Ik heb de poncho gehaakt is heel mooi maar helaas ik kom voor de laatste halstour garen te kort erg jammer !!! Voor medium 6 bollen zelfs voor large 6 bollen dit klopt niet !!!!finlandia benadert of zij 1 bol exclusief verzendkosten kunnen verzenden dat doen zij niet !!!en verwijzen mij naar uw bedrijf is dit door U op te lossen ik vind het erg kinderachtig . Vr. Gr
27.03.2014 - 12:43DROPS Design answered:
beste Tonny. De benodigde hoeveelheid garen is wat wij nodig hadden om dit voorbeeld te maken, maar iedereen breit anders, dus het is altijd handig een extra bol te bestellen voor de zekerheid. Wij noteren je opmerking en als er meerdere reacties komen betreffend de hoeveelheid garen voor dit patroon, dan zullen wij uiteraard het patroon nader bekijken en aanpassen. Wij ontwerpen de patronen, we bepalen niet de voorwaarden van de verkooppunten.
27.03.2014 - 15:50Poncho is prachtig mooi garen er word 300gram aangegeven voor medium maar kom net iets te kort om de hals af te werken heel jammer voor large word ook 300 gram aangegeven dat klopt niet nogmaals heel jammer
18.03.2014 - 21:03