
Popular categories
Looking for a yarn?


Comments / Questions (16)
![]() KatriinaS wrote:
KatriinaS wrote:
Ehkä aavistuksen on tiuhempi minulla. Mutta ohjeessa ei ole sanottu korkeuden tiheyttä. Tämä on vain harmillista koska monien vuosien jälkeen innostuin neulotaan. Aina ennen on jäänyt jopa liikaakin lankaa yli. Täytyy seuraavaan ohjeeseen etsiä lanka lähempää jotta pääsen helposti asioimaan liikkeessä.
10.10.2024 - 07:50
![]() Katriina Saarinen wrote:
Katriina Saarinen wrote:
Aloin neuvomaan Kate mallin pipoa ja kauluria. Pipo valmis vaan ei pitänyt langan ilmoitettu menekki paikkaansa. Nyt kauluri menossa ja tulen luultavasti tarvitsemaan kaksi kerää lisää lankaa. Harmi vaan kun maksan sitten toisetkin toimituskulut vielä. Ohje sinänsä ihana.
06.10.2024 - 15:44DROPS Design answered:
Hei, oletko tarkistanut, että neuletiheytesi on sama kuin ohjeessa annettu tiheys?
09.10.2024 - 19:23
![]() Malin K wrote:
Malin K wrote:
Hej, jag undrar hur man ska minska ner till kragen? Jag förstår inte vad "avpassa så att nästa v stickas från rätsidan - byt till st 7 och fortsätt med resår = 1 rm, 1 am med 4 rätst m i varje sida. (på 1 v stickas omslaget som rm tills med den lösa maskan)" betyder. Sedan tänkte jag tipsa er att ha en översättningsfunktion här i frågefältet (om det går) så man kan se om någon annan har frågat samma sak tidigare :)
20.01.2024 - 12:09DROPS Design answered:
Hei Malin. Jo, når arbeidet ditt måler 22-23 cm er du ferdig med å strikke patent og nå skal det strikkes vrangbord med 1 rett og 1 vrang (lik som patent men ikke med kast). Når du starter med vrangborden skal det gjøres fra retten. Måler arbeidet ditt 22-23 cm og du er på vrangen, må du strikke 1 pinne til, slik at du kommer til retten. På 1. pine med vanlig vrangbord strikkes kastet du hadde fra patentstrikkingen sammen med den løse masken, så på 2. pinne med vrangbord har du bare rett og vrangmasker. Og takk for tipset :) mvh DROPS Design
29.01.2024 - 09:48
![]() Katalin wrote:
Katalin wrote:
Liebe Drops Design, Ich finde mit diesem Muster /Halswärmer / etwas stimmt nicht. Muss man wirklich nur mit max. 63 Maschen anfangen?! Das ist viel zu klein, man kann dann die Knöpfe auch nicht schliessen. Richtung Hals sollte man die Maschen nicht abnehmen, sonst bei der Krage wird dann zu gross?! Komische Anleitung auf jeden Fall.
10.02.2019 - 16:59DROPS Design answered:
Liebe Katalin, stimmt Ihre Maschenprobe? Der Halswärmer wird mit Bündchen (und 4 M kraus rechts beidseitig) gestrickt und soll dann elastisch genug sein. Viel Spaß beim stricken!
11.02.2019 - 10:41
![]() Kristina Andersson wrote:
Kristina Andersson wrote:
Skall det vara så långt till knapphålet som det står i mönstret för halsvärmaren?
23.11.2018 - 21:20DROPS Design answered:
Jo, det stämmer som det står i mönstret.
28.11.2018 - 17:43
![]() Alexandra wrote:
Alexandra wrote:
Est il possible de connaître les dimensions exacte du tour de cou, je souhaiterais faire ce modele des aiguilles 5 et j ai du mal a trouver mon nombre de mailles, j aurai dis 210 mailles mais sans certitudes. Merci
01.12.2013 - 14:50DROPS Design answered:
Bonjour Alexandra, vous pouvez vous baser sur l'échantillon donné en côtes anglaises et sur le votre pour recalculer le nombre de mailles nécessaire. Ou bien choisir un modèle correspondant au groupe de qualités souhaité. Bon tricot!
02.12.2013 - 13:50
![]() Alexandra wrote:
Alexandra wrote:
Est il possible de connaître les dimensions exacte du tour de cou, je souhaiterais faire ce modele des aiguilles 5 et j ai du mal a trouver mon nombre de mailles, j aurai dis 210 mailles mais sans certitudes. Merci
01.12.2013 - 14:46
![]() LENOIR wrote:
LENOIR wrote:
Ce modèle est ravissant j'ai réussi à le faire selon la méthode française des côtes anglaises qui n'ont rien à voir avec le point du modèle qui ne donne absolument rien de bien dommage que vos modèles ne soient pas mieux expliqués car moi je tricote depuis 40 ans donc je me débrouille mais pour les débutantes je pense que la traduction n'est pas au TOP
18.06.2013 - 20:31DROPS Design answered:
Bonjour Mme Lenoir, il existe effectivement plusieurs façons de faire les côtes anglaises pour un résultat analogue. Pour réaliser celles de ce modèle, je vous recommande la vidéo ci-dessous. Bon tricot!
18.06.2013 - 23:07
![]() LENOIR wrote:
LENOIR wrote:
Je suis désolée mais des côtes anglaises sont plus simples que votre point à vous et de ce fait j'avoue que je n'arrive pas à obtenir des côtes
12.06.2013 - 16:57DROPS Design answered:
Bonjour Mme Lenoir, il existe effectivement différentes façons de tricoter les côtes anglaises, pour réussir celles-ci, je vous recommande la vidéo ci-dessous ou bien de consulter le forum DROPS pour un pas à pas. Bon tricot!
12.06.2013 - 19:04
![]() Annelie wrote:
Annelie wrote:
Hej! Jag håller på att sticka den här mössan och ganska snart upptäckte jag att det måste vara något fel någonstans för det blev inte patentstickning. Det ska väl vara så att på det aviga varvet ska de två maskorna stickas samman avigt och inte rätt? I mönstret står det räta maskor på båda aviga och räta varvet vilket gör att mönstret ser likadant ut på båda sidor och det blir ingen resår. Mvh Annelie
22.10.2012 - 19:09
|
|
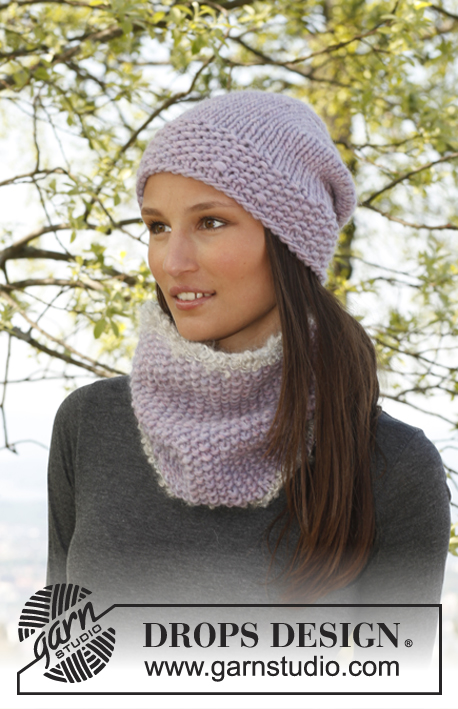
Kate#kateset |
|
|
|
|
Knitted DROPS hat and neck warmer in English rib with buttons in ”Snow”.
DROPS 141-34 |
|
|
GARTER ST (back and forth on needle): K all rows. 1 ridge = 2 rows K. ENGLISH RIB (back and forth on needle): ROW 1 (= RS): * K 1, 1 YO, slip 1 st as if to P *, repeat from *-* and finish with K 1. ROW 2 (= WS): * 1 YO, slip 1 st as if to P, K YO and slipped st tog *, repeat from *-*, finish with 1 YO, slip 1 st as if to P. ROW 3 (= RS): * K tog YO and slipped st, 1 YO, slip 1 st as if to P *, repeat from *-*, finish with K tog YO and slipped st. Repeat 2nd and 3rd row upwards. ---------------------------------------------------------- HAT: Worked back and forth on needle and sewn tog mid back when finished. Cast on 53-57 sts on needle size 7 mm with Snow. Work as follows (1st row = RS): 1 st in GARTER ST - see explanation above, * K 1, P 1 *, repeat from *-*, finish with K 1 and 1 st in garter st. Work a total of 6 rows rib. Switch to needle size 9 mm and continue with ENGLISH RIB - see explanation above, with 1 st in garter st in each side. REMEMBER THE KNITTING TENSION! When piece measures approx. 20-21 cm – adjust so that next row is worked from RS - continue with 2 rows rib = K 1/P 1 with 1 st in garter st in each side (on 1st row K yo's and slipped sts tog). On next round K all sts tog 2 by 2 (except last st) = 27-29 sts. P 1 row, then work 1 row where all sts are K tog 2 by 2 one more time = 14-15 sts. Cut the thread, pull it through the remaining sts, tighten tog and sew hat tog edge to edge in the back in sts in garter st. Hat measures approx. 23-24 cm. ---------------------------------------------------------- NECK WARMER: Worked back and forth on needle. LOOSELY cast on 63-69 sts with Snow on needle size 9 mm. Work ENGLISH RIB – see explanation above, with 4 sts in GARTER ST – see explanation above, in each side. REMEMBER THE KNITTING TENSION! When piece measures 16-18 cm, cast off for 1 buttonhole at beg of row from RS as follows: K 1, K 2 tog, 1 YO, work as before the rest of row. Repeat cast off for buttonhole every 6 cm 2 more times. AT THE SAME TIME when piece measures approx. 22-23 cm – adjust so that next row is worked from RS - change to 7 mm needles and continue with rib = K 1/P 1 with 4 sts in garter st in each side (on 1st row K yo's and slipped sts tog). When neck warmer measures 30-32 cm, cast off with K over K and P over P. Sew on buttons to match the buttonholes. |
|
Have you finished this pattern?Tag your pictures with #dropspattern #kateset or submit them to the #dropsfan gallery. Do you need help with this pattern?You'll find 7 tutorial videos, a Comments/Questions area and more by visiting the pattern on garnstudio.com. © 1982-2025 DROPS Design A/S. We reserve all rights. This document, including all its sub-sections, has copyrights. Read more about what you can do with our patterns at the bottom of each pattern on our site. |


With over 40 years in knitting and crochet design, DROPS Design offers one of the most extensive collections of free patterns on the internet - translated to 17 languages. As of today we count 314 catalogues and 11821 patterns translated into English (UK/cm).
We work hard to bring you the best knitting and crochet have to offer, inspiration and advice as well as great quality yarns at incredible prices! Would you like to use our patterns for other than personal use? You can read what you are allowed to do in the Copyright text at the bottom of all our patterns. Happy crafting!
Post a comment to pattern DROPS 141-34
We would love to hear what you have to say about this pattern!
If you want to leave a question, please make sure you select the correct category in the form below, to speed up the answering process. Required fields are marked *.