Chili by DROPS Design

Kotníkové ponožky s copánkem pletené z příze DROPS Alaska. Velikost: 35-43.

DROPS 131-43
DROPS design: model č. NE-060
Skupina přízí: C
-----------------------------------------------------------

Velikost: 35/37-38/40-41/43
Délka chodidla: 22 - 24 - 27 cm
Výška ponožky: 4 – 4 - 4 cm

Materiál:
DROPS ALASKA firmy Garnstudio (spadá do skupiny přízí C)
100-100-100 g, barva č. 10, červená

DROPS PONOŽKOVÉ JEHLICE č. 4,5 – nebo velikosti potřebné k upletení zkušebního vzorku o rozměrech 18 ok a 23 řad lícovým žerzejem = 10 cm na šířku a 10 cm na výšku.
----------------------------------------------------------

-------------------------------------------------------

Zkušební vzorek – Podívejte se, jak ho měřit a proč
Náhradní příze – Podívejte se, jak změnit přízi
Skupina přízí A až F – Neměňte návod, změňte přízi
Spotřeba příze při použití náhradní příze – Využijte náš převodník

-------------------------------------------------------


100% vlna
od 42.00 Kč /50g
DROPS Alaska uni colour DROPS Alaska uni colour 42.00 Kč /50g
Ganella
Objednat
DROPS Alaska mix DROPS Alaska mix 42.00 Kč /50g
Ganella
Objednat
needles Jehlice a háčky Objednat
Přízi na tento model můžete mít už za 84Kč. Více zde.

Návod

TVAROVÁNÍ PATY (pleteme lícovým žerzejem):
1. řada (= lícová): pleteme po posledních 6-7-7 ok v řadě, 1 oko sejmeme hladce, 1 oko upleteme hladce a sejmuté přes ně přetáhneme, práci otočíme.
2. řada (= rubová): pleteme po posledních 6-7-7 ok v řadě, 1 oko sejmeme obrace, 1 oko upleteme obrace a sejmuté přes ně přetáhneme, práci otočíme.
3. řada (= lícová): pleteme po posledních 5-6-6 ok v řadě, 1 oko sejmeme hladce, 1 oko upleteme hladce a sejmuté přes ně přetáhneme, práci otočíme.
4. řada (= rubová): pleteme po posledních 5-6-6 ok v řadě, 1 oko sejmeme obrace, 1 oko upleteme obrace a sejmuté přes ně přetáhneme, práci otočíme.
Tímto způsobem pokračujeme v ujímání (vždy o 1 oko snížíme počet ok zbylých v řadě), až nám v řadě zůstane 9-11-11 ok.
--------------------------------------------------------

PONOŽKA:
Pleteme v kruhových řadách na ponožkových jehlicích.
Na ponožkové jehlice č. 4,5 nahodíme přízí Alaska 42-48-48 ok. Upleteme 2 kruhové řady hladce a pokračujeme 5 kruhovými řadami pružným vzorem 1/1 (tj. střídáme 1 oko hladce, 1 obrace). Následující kruhovou řadu pleteme takto: prvních 27-33-33 ok pleteme dál pružným vzorem 1/1, pak vzor M.1 (= 15 ok). Takto pokračujeme do výše 4-4-4 cm.
Nyní práci rozdělíme – následující oka odložíme na pomocnou jehlici (= nárt): 1 oko hladce, 1 obrace, 1 hladce, vzor M.1, 1 oko hladce, 1 obrace, 1 hladce = 21-21-21 ok, zbylých 21-27-27 ok ponecháme na jehlici (= pata).
Nad oky paty pokračujeme v řadách pružným vzorem - upleteme 5-5,5-6 cm výšky. POZOR! V poslední rubové řadě ujmeme rovnoměrně potřebný počet ok na výsledných 19-23-23 ok; ujímáme spletením 2 ok hladce. Označíme si střed paty – NYNÍ MĚŘÍME DÍL OD TOHOTO MÍSTA.
TVARUJEME PATU – viz výše! Po dokončení tvarování nabereme po obou stranách paty 9-10-12 ok a odložených 21-21-21 ok vrátíme z pomocné jehlice zpět na jehlici = 48-52-56 ok.
Označíme si obě strany nártu – značky umístíme po stranách 21-23-25 ok nártu (= za 3-4-5 oka pletená pružným vzorem na každé straně vzoru M.1).
Pokračujeme lícovým žerzejem (= chodidlo a klíny paty) a vzorem M.1 s pružným vzorem po stranách - SOUČASNĚ ujímáme na obou stranách takto:

poslední 2 oka před značkou na nártu spleteme hladce za zadní nit, první 2 oka za značkou na nártu spleteme hladce. Ujímání opakujeme v každé 2. kruhové řadě, celkem 6-7-7x = 36-38-42 ok.
Pleteme dále až do výše 16-18-21 cm od značky na patě – končíme dopletením 1 celé sekvence vzoru M.1 = do požadovaných rozměrů chybí uplést asi 6-6-6 cm výšky. Označíme si obě boční strany ponožky – chodidlo tvoří 19-19-21 ok, nárt 17-19-21 ok (= 1-2-3 oka po obou stranách vzoru M.1).
Začneme tvarovat špičku - NEJPRVE SI PŘEČTĚTE CELÝ NÁSLEDUJÍCÍ POPIS!
POZN.: Na chodidle a na nártu ujímáme různě, ale ve stejných kruhových řadách.
Na chodidle ujímáme takto (mezi značkami): za značkou spleteme 2 oka hladce za zadní nit, před značkou spleteme 2 oka hladce. Ujímání opakujeme v každé 2. kruhové řadě, celkem 4-4-4x, pak v každé kruhové řadě, celkem 3-3-4x.
SOUČASNĚ ujímáme na nártu, takto: nad vzorem M.1 pleteme nyní vzor M.2 (1-2-3 oka na každé straně vzoru M.1 pleteme pružným vzorem jako dosud).
Po dokončení tvarování špičky zbývá na jehlici 10-12-14 ok. Přízi odstřihneme, protáhneme zbylými oky, stáhneme a zapošijeme.

Schéma

symbols = hladce
symbols = obrace
symbols = 2 oka spleteme obrace
symbols = 1 oko sejmeme hladce, 1 upleteme hladce a sejmuté přes ně přetáhneme
symbols = 2 oka spleteme hladce
symbols = 3 oka odložíme na pomocnou jehlici ZA práci, 3 oka hladce, 3 oka z pom.jehlice hladce
symbols = 3 oka odložíme na pomocnou jehlici PŘED práci, 3 oka hladce, 3 oka z pom.jehlice hladce
symbols = 1 oko sejmeme hladce, 2 oka spleteme hladce a sejmuté přes ně přetáhneme
diagram

Potřebujete poradit s tímto návodem?

Děkujeme, že jste si vybrali návod DROPS Design. Zakládáme si na tom, že dáváme k dispozici návody ověřené a snadno srozumitelné. Všechny návody jsou přeložené z norského originálu a tak si můžete kdykoli srovnat rozměry a počty s původním návodem (DROPS 131-43) .

Máte s návodem potíže? Níže najdete seznam odkazů, které vám pomohou dokončit vaše dílo co nejdříve - nebo se třeba přiučit něco nového.

signature-image signature

Máte s návodem potíže? Níže najdete seznam odkazů, které vám pomohou dokončit vaše dílo co nejdříve - nebo se třeba přiučit něco nového.

Každý náš návod je doprovázen speciálními video-ukázkami, které vás navedou.

Máme takopodrobné rozpisy různých technik a postupů krok za krokem - najdete je zde.

1) Why is the knitting/crochet tension so important?

Knitting tension is what determines the final measurements of your work, and is usually measured per 10 x 10 cm. It is provided like so: number of stitches in width x number of rows in height - eg: 19 stitches x 26 rows = 10 x 10 cm.

The knitting tension is very individual; some people knit/crochet loosely while others work tightly. You adjust the knitting tension with the needle size, which is why the suggested needle size only serve as a guide! You need to adjust this (up or down) to ensure that YOUR knitting tension matches the knitting tension provided in the pattern. If you work with a different knitting tension than provided you will have a different yarn consumption, and your work will have different measurements than what the pattern suggests.

The knitting tension also determines which yarns can replace each other. As long as you achieve the same knitting tension you can replace one yarn with another.

See DROPS lesson: How to measure your tension/gauge

See DROPS video: How to make a gauge tension swatch

nahoru

2) What are the yarn groups?

All our yarns are categorised into yarn groups (from A to F) according to thickness and knitting tension – group A contains the thinnest yarns and group F the thickest. This makes it easier for you to find alternative yarns to our patterns, should you wish to switch yarn. All yarns within the same group have a similar knitting tension and can easily replace each other. However, different yarn qualities have different structures and properties which will give the finished work a unique look and feel.

Click here for an overview of the yarns in each yarn group

nahoru

3) Can I use a different yarn than what the pattern suggests?

The important thing when changing from one yarn to another is that the knitting/crochet tension remains the same. This is so that the measurements of the finished piece will be the same as on the sketch provided. It is easier to achieve the same knitting tension using yarns from the same yarn group. It is also possible to work with multiple strands of a thinner yarn to achieve the knitting tension of a thicker one. Please try our yarn converter. We recommend you to always work a test swatch.

Please NOTE: when changing yarn the garment might have a different look and feel to the garment in the photo, due to individual properties and qualities of each yarn.

See DROPS lesson: Can I use a different yarn than the one mentioned in the pattern?

nahoru

4) How do I use the yarn converter?

At the top of all our patterns you’ll find a link to our yarn converter, which is a helpful tool should you wish to use a different yarn than suggested. By filling in the yarn quality you wish to replace, the amount (in your size) and number of strands, the converter will present good alternative yarns with the same knitting tension. Additionally it will tell you how much you’ll require in the new qualities and whether you’ll need to work with multiple strands. Most skeins are 50g (some are 25g or 100g).

If the pattern is worked with multiple colours, every colour will have to be converted separately. Similarly, if the pattern is worked with several strands of different yarns (for example 1 strand Alpaca and 1 strand Kid-Silk) you will have to find alternatives for each, individually.

Click here to see our yarn converter

nahoru

5) Why do I get the wrong knitting tension with the suggested needle size?

The needle size provided in the pattern serves only as a guide, the important thing is to follow the knitting tension. And since knitting tension is very individual, you will have to adjust the needle size to ensure that YOUR tension is the same as in the pattern – maybe you’ll have to adjust 1, or even 2 needle sizes, up or down to achieve the correct tension. For this, we recommend that you work test swatches.

Should you work with a different knitting tension than the one provided, the measurements of the finished garment might deviate from the measurement sketch.

See DROPS lesson: How to measure your tension/gauge

See DROPS video: How to make a gauge tension swatch

nahoru

6) Why is the pattern worked top-down?

Working a garment top-down provides more flexibility and room for personal adjustment. For example it is easier to try the garment on while working, as well as making adjustments to length of yoke and shoulder caps.

The instructions are carefully explaining every step, in the correct order. Diagrams are adjusted to the knitting direction and are worked as usual.

nahoru

7) Why are the sleeves shorter in larger sizes?

The total width of the garment (from wrist-to-wrist) will be larger in the larger sizes, despite the actual sleeves being shorter. The larger sizes have longer sleeve caps and wider shoulders, so there will be a good fit in all sizes.

nahoru

8) What is a repeat?

Diagrams are often repeated on the round or in height. 1 repeat is the diagram the way it appears in the pattern. If it says to work 5 repeats of A.1 in the round, then you work A.1 a total of 5 times after/next to each other in the round. If it says to work 2 repeats of A.1 vertically/in height you work the entire diagram once, then begin again at the start and work the entire diagram one more time.

nahoru

9) How do I work according to a knitting diagram?

The diagram depicts all rows/rounds, and every stitch seen from the right side. It is read from bottom to top, from right to left. 1 square = 1 stitch.

When working back and forth, every other row is worked from the right side and every other row is worked from the wrong side. When working from the wrong side, the diagram will have to be worked reversed: from left to right, knit stitches are purled, purl stitches are knit etc.

When working in the round every round is worked from the right side and the diagram are worked from right to left on all rounds.

See DROPS lesson: How to read knitting diagrams

nahoru

10) How do I work according to a crochet diagram?

The diagram depicts all rows/rounds, and every stitch seen from the right side. It is worked from bottom to top, from right to left.

When working back and forth every other row is worked from the right side: from right to left and every other row is worked from the wrong side: from left to right.

When working in the round, every row in the diagram are worked from the right side, from right to left.

When working a circular diagram you start in the middle and work your way outwards, counter clockwise, row by row.

The rows usually start with a given number of chain stitches (equivalent to the height of the following stitch), this will either be depicted in the diagram or explained in the pattern.

See DROPS lesson: How to read crochet diagrams

nahoru

11) How do I work several diagrams simultaneously on the same row/round?

Instructions for working several diagrams after each other on the same row/round, will often be written like so: “work A.1, A.2, A.3 a total of 0-0-2-3-4 times". This means you work A.1 once, then A.2 is worked once, and A.3 is repeated (in width) the number of times provided for your size – in this case like so: S = 0 times, M = 0 times, L=2 times, XL= 3 times and XXL = 4 times.

The diagrams are worked as usual: begin with the first row in A.1, then work the first row in A.2 etc.

See DROPS lesson: How to read knitting diagrams

See DROPS lesson: How to read crochet diagrams

nahoru

12) Why does the piece start with more chain stitches than it’s worked with?

Chain stitches are slightly narrower than other stitches and to avoid working the cast-on edge too tight, we simply chain more stitches to begin with. The stitch count will be adjusted on the following row to fit the pattern and measurement sketch.

nahoru

13) Why increase before the rib edge when the piece is worked top-down?

The rib edge is more elastic and will contract slightly compared to, for example, stocking stitch. By increasing before the rib edge, you avoid a visible difference in width between the rib edge and the rest of the body.

nahoru

14) Why increase in the cast-off edge?

It’s very easy to cast off too tightly, and by making yarn overs while casting off (and simultaneously casting these off) you avoid a too tight cast off edge.

See DROPS video: How to bind off with yarn overs (yo)

nahoru

15) How do I increase/decrease on every 3rd and 4th row/round alternately?

To achieve an even increase (or decrease) you can increase on, for example: every 3rd and 4th row alternately, like so: work 2 rows and increase on the 3rd row, work 3 rows and increase on the 4th. Repeat this until the increase is complete.

See DROPS lesson: Increase or decrease 1 st on every 3rd and 4th row alternately

nahoru

16) Why is the pattern slightly different than what I see in the photo?

Pattern repeats can vary slightly in the different sizes, in order to get the correct proportions. If you’re not working the exact same size as the garment in the photo, yours might deviate slightly. This has been carefully developed and adjusted so that the complete impression of the garment is the same in all sizes.

Make sure to follow instructions and diagrams for your size!

nahoru

17) How can I work a jacket in the round instead of back and forth?

Should you prefer to work in the round instead of back and forth, you may of course adjust the pattern. You’ll need to add steeks mid-front (usually 5 stitches), and follow the instructions. When you would normally turn and work from the wrong side, simply work across the steek and continue in the round. At the end you’ll cut the piece open, pick up stitches to work bands, and cover the cut edges.

See DROPS video: How to knit steeks and cut open

nahoru

18) Can I work a jumper back and forth instead of in the round?

Should you prefer to work back and forth instead of in the round, you may of course adjust the pattern so you work the pieces separately and then assemble them at the end. Divide the stitches for the body in 2, add 1 edge stitch in each side (for sewing) and work the front and back pieces separately.

See DROPS lesson: Can I adapt a pattern for circular needles into straight needles?

nahoru

19) Why do you show discontinued yarns in the patterns?

Since different yarns have different qualities and textures we have chosen to keep the original yarn in our patterns. However, you can easily find options among our available qualities by using our yarn converter, or simply pick a yarn from the same yarn group.

It is possible that some retailers still have discontinued yarns in stock, or that someone has a few skeins at home that they would like to find patterns for.

The yarn converter will provide both alternative yarn as well as required amount in the new quality.

nahoru

20) How do I make a women’s size garment into a men’s size one?

If you have found a pattern you like which is available in women’s size it’s not very difficult to convert it to men’s size. The biggest difference will be the length of sleeves and body. Start working on the women size that you think would fit across the chest. The additional length will be worked right before you cast off for the armhole/sleeve cap. If the pattern is worked top-down you can add the length right after the armhole or before the first decrease on sleeve.

Regarding additional yarn amount, this will depend on how much length you add, but it is better with a skein too many than too few.

nahoru

21) How do I prevent a hairy garment from shedding?

All yarns will have excess fibres (from production) that might come off as lint or shedding. Brushed yarns (ie hairier yarns) have more of these loose, excess fibres, causing more shedding.

Shedding also depends on what is worn under or over the garment, and whether this pulls at the yarn fibres. It’s therefore not possible to guarantee that there will be no shedding

Below are some tips on how to get the best result when working with hairier yarns:

1. When the garment is finished (before you wash it) shake it vigorously so the looser hairs come off. NOTE: do NOT use a lint roller, brush or any method that pulls at the yarn.

2. Place the garment in a plastic bag and put it in your freezer - the temperature will cause the fibres to become less attached to each other, and excess fibres will come off easier.

3. Leave in the freezer for a few hours before taking it out and shaking it again.

4. Wash the garment according to the instructions on the yarn label.

nahoru

22) Where on the garment is the length measured?

The measurement sketch/schematic drawing provides information regarding the full length of the garment. If it’s a jumper or a jacket the length is measured from the highest point on the shoulder closest to the neckline, and straight down to the bottom of the garment. It is NOT measured from the tip of shoulder. Similarly, the length of yoke is measured from the highest point on the shoulder and down to where yoke is split into body and sleeves.

On a jacket measures are never taken along bands, unless specifically stated. Always measure inside band stitches when measuring the length.

See DROPS lesson: How to read a schematic drawing

nahoru

23) How do I know how many balls of yarn I need?

The required amount of yarn is provided in grams, eg: 450 g. To calculate how many balls you’ll need you first need to know how many grams are in 1 ball (25g, 50g or 100g). This information is available if you click on the individual yarn quality on our pages. Divide the amount required with the amount of each ball. For example, if each ball is 50g (the most common amount), the calculation will be as follows: 450 / 50 = 9 balls.

nahoru

Pořídili jste si přízi DROPS na tento model? Pak máte taky právo žádat po svém prodejci, u něhož jste nakoupili, pomoc a rady. Seznam DROPS obchodů najdete tady!
Pořád se nemůžete dobrat odpovědi, kterou hledáte? Pak posuňte stránku dolů a napište nám svůj dotaz, naši specialisté se vám pokusí poradit. Obvykle to zvládneme během 5 až 10 pracovních dnů.. Mezitím si můžete pročíst otázky a odpovědi, které k tomuto modelu položili ostatní, nebo navštívit skupinu DROPS Workshop na Facebooku, kde vám může poradit některá spřízněná duše!

Komentáře / Otázky (51)

country flag Gaetane wrote:

Bonjour, je comprends votre patron, mais ma question est : Vous dites se tricote en rond, sur aiguilles circulaires ou 4 aiguilles double pointés ? Et si oui on répartit les mailles de combien sur aiguilles? Merci

08.02.2023 - 12:36

DROPS Design answered:

Bonjour Gaetane, on utilise ici des aiguilles doubles pointes, mais vous pouvez aussi utiliser une aiguille circulaire et la technique du magic loop - divisez le nombre de mailles à monter par le nombre d'aiguilles et ajustez si besoin avec 1 maille en plus sur 1 ou 2 aiguilles en fonction. Bon tricot!

08.02.2023 kl. 16:40

country flag Gaetane wrote:

Bonjour ! Combien de mailles pour une enfant de 8 ans ? Merci ! Félicitation pour vos patrons c est si explicite 👍👍👏👏😄😄 merci 🙏

24.01.2023 - 12:30

DROPS Design answered:

Bonjour Gaetane et merci. Ce modèle n'est disponible qu'à partir du 35/37 - retrouvez tous les chaussons enfant ici - n'hésitez pas à filtrer en choisissant la pointure de l'enfant. Bon tricot!

24.01.2023 kl. 16:33

country flag Sue wrote:

Do I finish M.1 on WS? Then it looks like I set aside the M.1 section along with 3 stitches on either side, is this correct? To work rib back and forth over heel sts, wouldn't I need to cut the yarn first from M.1 and reapply it to heel section?

10.11.2021 - 02:40

DROPS Design answered:

Hi Sue, You place the stitches on the thread without working them, then you do not need to cut the strand. Happy knitting!

10.11.2021 kl. 06:55

country flag Dusica wrote:

I finished heel decrease but really have problem understanding the part afterwards.on the needle with 11 heel sts(size 38)I picked up 10 sts and now have 21 sts on that needle.Do I add sts from holder and than 10 sts from the other side to this 1 needle or? After that,stockinette st on heel is clear but on each side of heel and M1 diagram with rib? Please explain this part a bit more detailed .Thank you.

14.03.2019 - 10:18

DROPS Design answered:

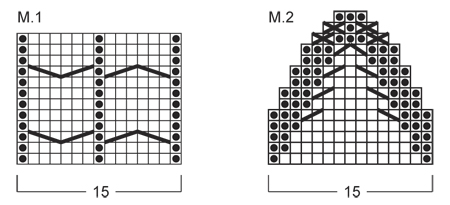
Dear Dusica, after heel decreases have been worked, pick up 10 sts along left side of heel, slip the 21 sts from upper foot back on needle and pick up 10 sts along right side of heel. Insert a marker inside 1 st of the picked up sts on left and right side of heel and work these sts purled, so that you will have: marker, P1 (new st), K1, P1, K1, (= 4 sts in rib before M.1) M1 (= 15 sts), K1,P1,K1 (sts from st holder), P1 (= 4 sts in rib after M.1). Happy knitting!

14.03.2019 kl. 10:32

country flag Dusica wrote:

At the beginning, where it says now devide the sts as follows : slip sts on holder for mid on top of foot K1,P1,K1,M1 diagram, K1,P1,K1=21 sts....do I work these sts or simply place them on holder?

10.03.2019 - 20:02

DROPS Design answered:

Hi Dusica, simply place these sts on holder, without working them. Happy knitting!

10.03.2019 kl. 20:21

country flag Lora Huey wrote:

Just finished a pair, love, love, love them ! The pattern is not hard if you pay close attention to it and follow it to the letter . Know I will be making many more of these socks.

08.01.2019 - 14:55

country flag Katty.c wrote:

Très joli modèle qui réclame de l'attention mais avec un peu de concentration, on y arrive !

21.12.2018 - 00:40

country flag Guilbert wrote:

J’ai bien réalisé ce modèle. Mais je crois que j’ai fait la pointe un peu plus longue et la tige aussi. Mais je suis ravie du résultat. Sauf que je n’ai pas suivi votre méthode du rétrécis, car pour moi il était carré alors j’ai démonté et fais autrement. Peut on vous envoyer une photo. Merci de vos modèles je me régale à les réaliser. Cordialement Gisele de l’Aveyron

16.01.2018 - 06:44

country flag Mia wrote:

A bit confused: "Continue in rib K 1/P 1 over the first 27-33-33 sts, diagram M.1 (= 15 sts). REMEMBER THE KNITTING TENSION! Continue like this until piece measures 4-4-4 cm" 1) is the diagram (chart) RS rows only or all rows? If RS only how should I work WS? 2) for the first 27-33-33 sts, I assume it'll be rib on both RS and WS rows? Please confirm Thanks

21.09.2017 - 16:03

DROPS Design answered:

Dear Mia, diagram is showing all rows (1 square = 1 st x 1 row). Socks are worked in the round, so that you will knit rib in the round, then rib over the first 27-33-33 sts as before, and work M.1 over the last sts on round. Happy knitting!

21.09.2017 kl. 16:45

country flag Marie wrote:

Bonjour, Peut-on remplacer Drops Alaska par Drops Big Merino pour réaliser ces chaussons car Drops Big Merino est traitée superwash, ce qui est pratique pour des chaussons ? Merci

28.06.2017 - 15:26

DROPS Design answered:

Bonjour Marie, tout à fait, retrouvez ici comment calculer la quantité. Vous pouvez également utiliser 2 fils Fabel pour plus de solidité (explications sur la même page). Bon tricot!

28.06.2017 kl. 18:04

Přidejte komentář k návodu DROPS 131-43

Rádi bychom věděli, co si o tomto modelu myslíte!

Pokud se chcete na něco zeptat, dbejte prosím na to, abyste ve formuláři níže vybrali správnou kategorii - díky tomu se dříve dozvíte, co potřebujete vědět. Povinná pole jsou označena *.

Z galerie #dropsfan

131-43 Chili

Carina, Norway

Cold Feet?

yarnsmithery, United Kingdom