
Popular categories
Looking for a yarn?


|
|||||||
Silver Star |
|||||||
 |
 |
||||||
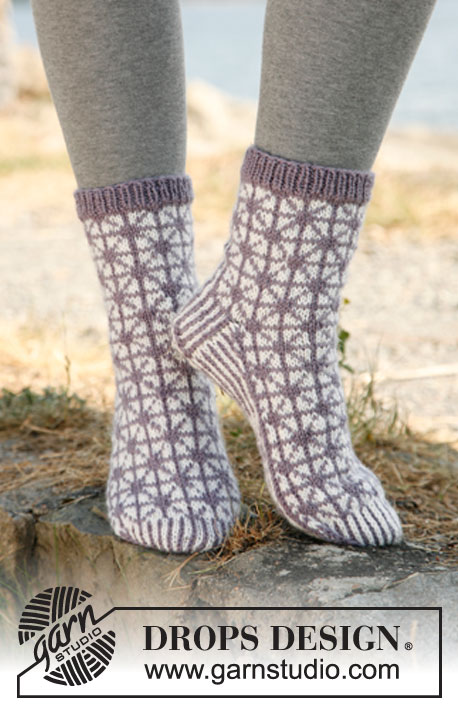
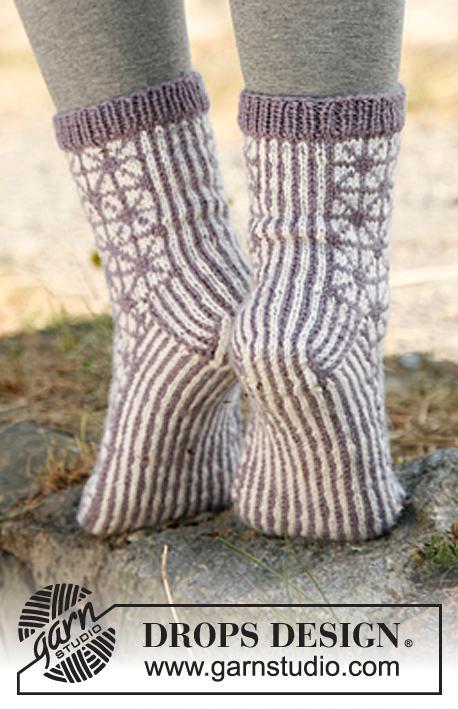
Knitted DROPS socks with pattern in ”Karisma”.
DROPS 132-7 |
|||||||
|
PATTERN: Diagrams M.1 and M.2. The diagrams show the pattern from RS. Work entire pattern in stockinette st. HEEL DECREASE: Worked in diagram M.2. Row 1 (= RS): Work until 7-8-8 sts remain, slip 1 st as if to K, K 1, psso, turn piece. Row 2 (= WS): Work until 7-8-8 sts remain, slip 1 st as if to P, P 1, psso, turn piece. Row 3 (= RS): Work until 6-7-7 sts remain, slip 1 st as if to K, K 1, psso, turn piece. Row 4 (= WS): Work until 6-7-7 sts remain, slip 1 st as if to P, P 1, psso, turn piece. Continue dec like this with 1 less st before each dec until there are 9-11-11 sts on needle. -------------------------------------------------------- SOCK: Worked in the round on double pointed needles. Cast on 60-60-70 sts on double pointed needles size 3 mm / US 2or3 with graypurple. Work 2 cm / ¾" in rib: K 1/P 1. Switch to double pointed needles 3.5mm/ US 4 and K 1 round with graypurple while at the same time dec 4-0-10 sts evenly = 56-60-60 sts. Work next round as follows: 51-51-51 sts in diagram M.1 (on top of foot), work the remaining 5-9-9 sts in diagram M.2 (= mid back). Work diagram M.1 a total of 3 times vertically, then slip the mid 35 sts on top of foot on a stitch holder = 21-25-25 sts for heel. Work diagram M.2 back and forth over these sts in heel for 5-5.5-6 cm / 2"-2¼"-2⅜", insert a marker on last row, now dec for heel – see explanation above. After heel dec, knit up 12-14-14 sts on each side of heel and slip the 35 sts from stitch holder back on needle = 68-74-74 sts. Continue the 35 sts on top of foot according to diagram M.1, and work sts under foot in diagram M.2, AT THE SAME TIME dec on each side of sts on top of foot inside outermost st in diagram M.2 as follows: Work 1 st in diagram M.2 (this st is not in dec but stays the same color the entire dec) - K the next 2 sts tog, work diagram M.2 until 3 sts remain - K the next to last 2 sts in diagram M.2 twisted tog (i.e. work in back loop of st instead of front) and work the last st in diagram M.2 (- this st is not in dec but stays the same color the entire dec). Repeat on every other row a total of 5 times = 58-64-64 sts. Continue with pattern according to diagram M.1 and M.2. Continue until piece measures 17-18-21 cm / 6¾"-7"-8¼" from marker on heel (adjust after one whole or half repetition of diagram M.1 - approx. 5-6-6 cm / 2"-2⅜"-2⅜" remain). Now work diagram M.2 over all sts while AT THE SAME TIME dec for toes on each side of mid st in each side: Dec as follows before mid st: K the last 2 sts tog and dec as follows after mid st: Slip first st as if to K, K 1, psso – Repeat dec on every round a total of 9-10-10 times = 22-24-24 sts remain. K2 tog around, cut the yarn and pull it through the remaining sts. |
|||||||
Diagram explanations |
|||||||
|
|||||||

|
|||||||
|
Have you made this or any other of our designs? Tag your pictures in social media with #dropsdesign so we can see them! Do you need help with this pattern?You'll find tutorial videos, a Comments/Questions area and more by visiting the pattern on garnstudio.com. © 1982-2024 DROPS Design A/S. We reserve all rights. This document, including all its sub-sections, has copyrights. Read more about what you can do with our patterns at the bottom of each pattern on our site. |
|||||||


With over 40 years in knitting and crochet design, DROPS Design offers one of the most extensive collections of free patterns on the internet - translated to 17 languages. As of today we count 304 catalogs and 11422 patterns - 11417 of which are translated into English (US/in).
We work hard to bring you the best knitting and crochet have to offer, inspiration and advice as well as great quality yarns at incredible prices! Would you like to use our patterns for other than personal use? You can read what you are allowed to do in the Copyright text at the bottom of all our patterns. Happy crafting!
Comments / Questions (34)
Hei. Har begynt å strikke disse sokkene, men skjønner ikke: Hvordan skal jeg stikke for å få med den hvite tråden når jeg har strikket den grå pinnen og skal strikke M2 på sålen? Kan jo ikke klippe tråden for hver gang. hadde vært kjekt med en vide på det. Hilsen May
08.11.2018 - 10:29DROPS Design answered:
Hei May. Du kan tvinne den hvite tråden med deg bortover på baksiden av arbeidet. Da slipper du å klippe tråden for hver gang. Tvinn den ca hver 3 maske avhengig av hvor lange tråder du er komfortabel med å ha på baksiden. Her er en video som viser hvordan å tvinne tråden (ca 05.10) God fornøyelse.
20.11.2018 - 14:00Jeg prøver å strikke denne i str. 35/37. Jeg bruker riktig garn og pinner, og har riktig antall masker der jeg er komt (58) men den virker gigantisk!! Såååå stor og bred over foten... Jeg skjønner ikke hvordan dette skal se bra ut til slutt liksom. Tips?
07.11.2018 - 23:17DROPS Design answered:
Hei Alette, Med riktig strikkefasthet får du 22 masker på 10 cm i bredden. Så 58 masker er ca. 25cm, som er ikke for stor for omkretsen . Kanskje du skal sjekke strikkefastheten din på en prøvelapp før du fortsetter? God fornøyelse!
08.11.2018 - 08:19Hur minskar jag vid tårna för att få det snyggt? Efter/före kantmaska är det två olika färger som skall stickas ihop till en maska. Vilken färg bör jag använda för att få bästa resultatet?
12.09.2018 - 16:21DROPS Design answered:
Hej Tove, sticka ihop med den färgen som stämmer med mönstret, lycka till :)
19.09.2018 - 14:03Det må være feil i oppskriften. Når man har strikket M1 de antall ganger dere sier, vil det være 10 masker igjen til M2, ikke 9. Hva skal man gjøre?
05.05.2018 - 23:22DROPS Design answered:
Hei Kathrine. Etter vrangborden felles det 4-0-10 m jevnt fordelt = 56-60-60 m. Videre står det at du skal strikke M.1 over de neste 51 m – 5 hele rapporter, pluss den første masken en ekstra gang (så arbeidet blir likt i begge sider). Da sitter du igjen med 5-9-9 masker. God fornøyelse
07.05.2018 - 13:59Klar! Ist ja einfach! Wie dumm von mir, daran habe ich nicht gedacht! Haben Sie vielen Dank für Ihre schnelle, ausführliche und hilfreiche Antwort. Ich wünsche Ihnen ein schönes Wochenende!
08.05.2015 - 17:26Guten Morgen. Ich habe bis und mit Ferse gestrickt. Die 6te Runde von M1ist eine grau-lila Runde über M1 nicht aber über M2 das ja im Streifenmuster weiterläuft. Wie stricken Sie das? Nehmen Sie mehrere WollKneuel? Vielen Dank für Ihre Antwort und wünsche Ihnen einen schönen Tag.
08.05.2015 - 07:29DROPS Design answered:
Ich würde den naturfarbenen Faden einfach über den ganzen grau-lila Teil von M.1 mitlaufen lassen und ihn nach ca. jeder 5. M mit dem graulilafarbenen Faden verkreuzen, damit er befestigt wird und hinten nicht lose herumhängt. Auf diese Weise kommen Sie dann bei M.2 mit dem hellen Faden immer wieder an der richtigen Stelle an, und einen Mitlauffaden haben Sie ja im restlichen Muster von M1. sowieso.
08.05.2015 - 11:50Ja wirklich, "Liebe auf den ersten Blick"! Tolle Socken! Werde ich nachstricken, wie schon so viele von Ihnen! Gute Ideen, schöne Garne und Design! Ich sende Ihnen ein herzliches Dankeschön.
05.05.2015 - 09:13Bas 132-7 Comment on peut appliquer le diagramme 2 (10 mailles) sur 51 mailles. La dernière maille est-elle tricotée comme la première du diagramme?
04.12.2014 - 02:55DROPS Design answered:
Bonjour Mme Samuel, c'est tout à fait exact, vous répétez 5 fois les 10 m de M1 puis tricotez la 1ère m de M1. Bon tricot!
04.12.2014 - 11:09När M1 varv 1 och 6 stickas är de helt lila, utom de på M2 där ska man växla färg. Finns det något bra sätt att slippa släpa med det vita hela varvet runt? Samma sak när foten ska stickas.
16.10.2014 - 22:20DROPS Design answered:
Hej, Kan du inte bara lämna den vita tills du kommer till nästa varv och då ta med den igen. Lycka till!
23.10.2014 - 11:18Ik ben deze sok aan het breien in maat 38/40 en ben nu bij de teen aangekomen. Er staat dat je voor de teen 10x in elke naald moet minderen. Dan zou de teen dus na 10 naalden (is dus 3 centimeter) klaar zijn. Maar dan komt het totaal van de voetlengte op 18+3=21 cm ipv 18+6=24 cm. Moet het minderen misschien 10x "om de naald" ipv "elke naald"? Dan zou het precies uitkomen op 6 cm!
14.11.2013 - 17:03