
Oblíbené kategorie
Hledáte přízi?


|
|
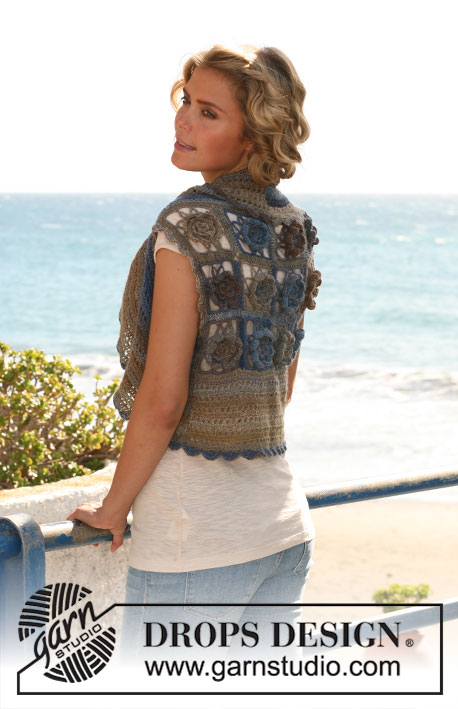
Rosevest |
|
 |
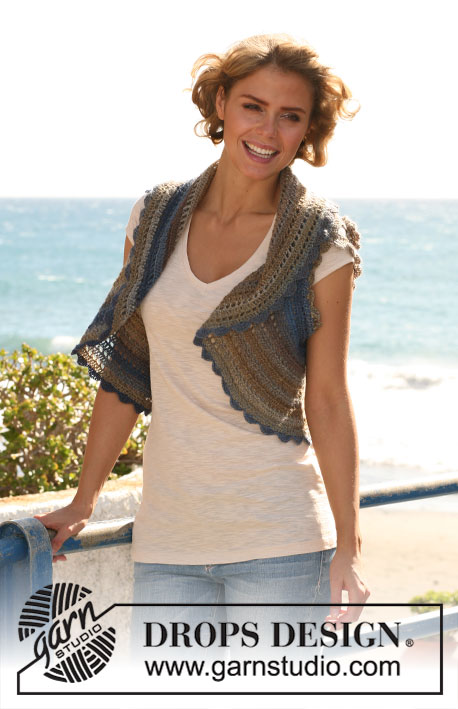 |
Háčkované DROPS bolero s květinami na zadním díle z příze „ Delight „. Velikost XS – XXL.
DROPS 129-10 |
|
|
TIP NA HÁČKOVÁNÍ: DS na začátku každé řady/kruhové řady nahrazujeme 3 řetízkovými oky. Každou kruhovou řadu končíme pevným okem do třetího řo ze začátku řady. TIP NA PRIDÁVÁNÍ: 1 DS přidáváme tak, že do jednoho DS háčkujeme 2 DS. ČTVEREC S KVĚTINOU: Háčkem č. 3,5 háčkujeme 4 řo a spojíme pevným okem do kruhu. 1. kruhová řada: * KS do kruhu, 3 řo*, mezi *-* opakujeme celkem 3 krát a kruhovou řadu končíme pevným okem do prvního KS ze začátku řady = 3 smyčky. 2.kr.ř.: Do každé smyčky háčkujeme: KS, 3 DS a KS, řadu končíme pevným okem do prvního KS = 3 lístečky. Práci otočíme – další řadu háčkujeme z rubové strany květiny. 3.kr.ř.: řo, KS do prvního KS z první řady, 4 řo, KS vpíchnutý do dolní části druhého DS prvního lístečku druhé řady, 4 řo, KS do druhého KS z první řady, 4 řo, KS vpíchnutý do dolní části druhého DS druhého lístečku druhé řady, 4 řo, KS do třetího KS z první řady, 4 řo, KS vpíchnutý do dolní části druhého DS třetího lístečku druhé řady, 4 řo, pevné oko do prvního řo ze začátku řady = 6 smyček. Práci otočíme – následující řadu háčkujeme z lícové strany květiny. 4. kr. ř.: Do každé smyčky háčkujeme: KS, 5 DS a KS, kruhovou řadu končíme pevným okem do prvního KS ze začátku řady = 6 lístečků. Práci otočíme – další řadu háčkujeme z rubové strany květiny. 5.kr.ř.: řo, KS do prvního KS ze třetí řady, 5 řo, KS vpíchnutý do spodní části čtvrtého DS prvního lístečku ze čtvrté řady, 5 řo, KS vpíchnutý do spodní části třetího DS druhého lístečku ze čtvrté řady, 5 řo, KS vpíchnutý do spodní části druhého DS třetího lístečku ze čtvrté řady, 5 řo, KS mezi třetí a čtvrtý lísteček ze čtvrté řady, 5 řo, KS vpíchnutý do spodní části čtvrtého DS čtvrtého lístečku ze čtvrté řady, 5 řo, KS vpíchnutý do spodní části třetího DS pátého lístečku ze čtvrté řady, 5 řo, KS vpíchnutý do spodní části druhého DS šestého lístečku ze čtvrté řady, 5 řo, pevné oko do prvního řo ze začátku řady = 8 smyček. Práci otočíme – další řadu háčkujeme z lícové strany květiny. 6.kr.ř.: do každé smyčky háčkujeme: KS, DS, 4 2x nahozené DS, DS a KS, kruhovou řadu končíme pevným okem do prvního KS ze začátku řady = 8 lístečků. Práci otočíme – další řadu háčkujeme z rubové strany květiny. 7. kr. ř.: řo, KS do prvního KS z páté řady, * 10 řo, KS do následujícího KS z páté řady*, mezi *-* opakujeme celkem 7 krát, řadu končíme 10 řo a pevným okem do prvního řo ze začátku řady = 8 smyček. Práci otočíme, čtverec dokončíme z lícové strany. 8. kr. ř.: pevnými oky se přesuneme do středu první smyčky, * 12 řo, KS do následující smyčky, 5řo, KS do následující smyčky*, mezi *-* opakujeme celkem 3 krát, 12 řo, KS do další smyčky, 5 řo, pevné oko do pevného oka ve vrcholu první smyčky předchozí řady. 9. kr. ř.: Do každé velké smyčky háčkujeme: 5 KS, 2 řo a 5 KS a do každé malé smyčky háčkujeme 5 KS. Řadu končíme pevným okem do prvního KS ze začátku řady. ---------------------------------------------------------------------- ZADNÍ DÍL: Háčkujeme 9-12-16 ČTVERCŮ - viz popis výše. Sestavíme 3-4-4 čtverce na šířku a 3-3-4 čtverce na výšku. Čtverce spojujeme dohromady – nejprve ve svislém, potom ve vodorovném směru. 2 čtverce položíme rubovými stranami k sobě a spojujeme k sobě z lícové strany: KS do rohu prvního čtverce, řo, KS do rohu druhého čtverce, řo, KS do následujícího oka prvního čtverce, řo, KS do následujícího oka druhého čtverce, řo, KS do dalšího oka prvního čtverce, řo, KS do dalšího oka druhého čtverce…, řadu končíme uháčkováním KS do rohů obou čtverců, přízi ustřihneme a zapošijeme. POZN: Průběžně si čtverce pokládáme a přesvědčujeme se, že přechody mezi čtverci jsou správně. Následuje kruhová řada DS kolem celého zadního dílu (začínáme v pravém horním rohu): Začínáme KS do rohu čtverce, 3 řo (= 1 DS), 75-83-91 DS podél horního okraje, 56-56-74 DS podél strany dílu (ujistíme se, že rohy jsme uháčkovali dostatečně volně), následuje 72-78-86 DS podél spodního okraje a 56-56-74 DS podél druhé strany dílu. Řadu končíme pevným okem do třetího řo ze začátku řady. Přízi ustřihneme a zapošijeme. LEM BOČNÍHO DÍLU: Začínáme ve středu zadního průkrčníku. Do každého z 38-42-46 DS podél zadního dílu háčkujeme DS, následuje 45-49-53 řo (= průramky). Práci otočíme. Do čtvrtého řo od háčku háčkujeme DS, do každého řo pak háčkujeme DS a DS háčkujeme až do středu zadního průkrčníku = 81-89-97 DS. Pokračujeme v rubových a lícových řadách: 1. řada: 3 řo (=1 DS), * řo, vynechat DS, do následujícího DS háčkujeme DS*, mezi *-* opakujeme. 2. řada: do každého DS a každého řo háčkujeme DS. Tyto dvě řady opakujeme – SOUČASNĚ, když lem měří asi 4 cm (poslední řadu uháčkujeme pouze z DS), rovnoměrně přidáme 16 DS – viz TIP NA PŘIDÁVÁNÍ – přidávání opakujeme ve výšce 8, 12 a 16 cm = 145-153-161 DS. VELIKOST XL/XXL: Přidávání opakujeme ještě ve výšce 20 cm = 177 DS. Háčkujeme až do výšky lemu asi 18-20-22 cm – přidáme 1 řadu z DS. Přízi ustřihneme a zapošijeme. Druhou stranu háčkujeme stejně. LEM ZADNÍHO DÍLU: Začínáme ve spodním rohu KS. Háčkujeme 3 řo (= 1 DS), do každého ze 71-77-85 DS háčkujeme DS = 72-78-86 DS. Podle výše zmíněného popisu háčkujeme 1 a 2. řadu z lícové a rubové strany do výšky asi 13-17-13 cm měřeno od čtverců – na závěr uháčkujeme jednu řadu z DS. Přízi ustřihneme a zapošijeme. DOKONČENÍ: Matracovým stehem sešijeme zadní průkrčník. Boční lem přišijeme k zadnímu lemu, začneme na vnější straně lemu směrem dovnitř. Stejným způsobem dokončíme i druhou stranu. OZDOBNÝ LEM: Háčkujeme háčkem č. 3,5 podél celého vnějšího okraje. Začínáme ve středu zadního dílu: KS, * vynecháme 2 oka, do následujícího oka háčkujeme 3 DS, řo, do stejného oka háčkujeme DS, řo, do stejného oka háčkujeme 3 DS, vynecháme 2 oka, do následujícího oka háčkujeme KS*, mezi *-* opakujeme podél celého obvodu lemu a řadu končíme pevným okem do KS ze začátku řady. Stejně obháčkujeme průramky. |
|

|
|
|
Vyrobili jste si tento nebo nějaký jiný z našich modelů? Přidejte ke svým fotkám na sociálních sítích tag #dropsdesign - díky tomu je uvidíme i my! Potřebujete s tímto návodem poradit?Otevřete-li si návod na stránce garnstudio.com, najdete tam výukových video-ukázek, Komentáře/Dotazy a další užitečné informace. © 1982-2024 DROPS Design A/S. Vyhrazujeme si veškerá práva. Tento dokument, včetně všech jeho dílčích částí, podléhá autorským právům. Podrobnější komentář k možnostem užití našich návodů najdete dole pod každým návodem na našich stránkách. |
|


V oblasti pletené a háčkované módy působí DROPS Design více než 40 let. Díky tomu vám můžeme nabídnout jednu z nejrozsáhlejších kolekcí modelů s bezplatnými návody dostupnými na internetu - navíc v 17 jazycích. K dnešnímu dni máme na 304 katalogů a 11422 návodů celkem - z nich je už 6304 dostupných v češtině.
We work hard to bring you the best knitting and crochet have to offer, inspiration and advice as well as great quality yarns at incredible prices! Would you like to use our patterns for other than personal use? You can read what you are allowed to do in the Copyright text at the bottom of all our patterns. Happy crafting!
Komentáře / Otázky (37)
Love this pattern but I am confused with round 5 on the flower motif. I have 7 petals when it states I should have 8. What am I doing wrong? Have pulled out so many times. Is it a printing error?
23.10.2016 - 12:32DROPS Design answered:
Dear Mrs Latham, make sure you are crocheting a total of 8 times "5 ch, 1 dc" as written under this round. Happy crocheting!
24.10.2016 - 14:36Vid kantstycket i sidan, vart ska man mäta "kanten"? I mitten vid nacken eller ute vid ärmhålan?
22.07.2016 - 18:43DROPS Design answered:
Hej Petea. Det er vel lige meget da jeg vil mene du haekler det samme over alle maskerne? Ellers maal paa det breddeste stykke.
26.07.2016 - 16:45I love the pattern, but it is confusing because the printed directions are different than the directions online. I am working on the flowers, and I worked the initial flowers while sitting in front of the computer. I then printed the directions so that I could crochet on the go, only to find that there are many differences
25.09.2015 - 02:55DROPS Design answered:
Dear Mrs Miller, crochet terminology is different in UK-English and in US-English, check you print the US-English pattern. Happy crocheting!
25.09.2015 - 09:51Bonjour Si les carrés mesurent 8 cm, la e dos mesure donc en taille xl : 4 x 8 = 32 cm. Cela me paraît petit. N'y a t'il pas une erreur sur l'echantillon ? Il me faut au moins 50 cm pour le dos. Je vous remercie pour votre réponse.
17.08.2015 - 07:10DROPS Design answered:
Bonjour Mme Lecoq, chaque carré doit bien mesurer 8 cm de côté, l'assemblage se fait avec 1 ms dans 1 carré, 1 ml, 1 ms dans l'autre carré et ajoutera de la largeur et de la longueur. Le tour de brides crocheté ensuite tout autour du dos donnera les mesures finales du schéma. Bon crochet!
17.08.2015 - 09:58Drops. 129-10 xxl size not write not enough loops at sides for extra lenth please correct good pattern just needs adjusting
19.04.2015 - 01:28DROPS Design answered:
Dear Mrs Davidson, pattern is correct: the edge on the side is worked on each side starting from mid top of back + 53 ch, inc 16 tr evenly when piece measures 4, 8, 12, 16 and 20 cm = 177 tr. Piece is then sewn to edge piece mid back then remaining sts are sew to the back piece (= armhole). Happy crocheting!
20.04.2015 - 13:51Das verstehe ich leider überhaupt nicht. 4 cm ab wo? Ab der 1. genau erklärten Reihe oder erst ab sozusagen 3.? Und in welcher Reihe soll ich nun die Stäbchen gleichmäßig aufnehmen, in einer 1. oder 2. ?
15.10.2013 - 21:10DROPS Design answered:
Liebe Jani, es sind 4 cm Gesamthöhe des Seitenteils gemeint (also ab dem neuen Lm-Anschlag gemessen) und es wird in einer Stb-Reihe zugenommen.
16.10.2013 - 07:46Plz reply iwant to ask about increasing dc :where i start inceasing? in the biginning of the row??
30.09.2013 - 18:15Batoul Fawaz wrote:
I want to ask about increasing dc i don't know where starting in the begining of the row??
30.09.2013 - 18:07DROPS Design answered:
Deear Mrs Fawaz, Increase have to be done evenly on the row, ie work approx same number of sts on the row between each inc. Happy crocheting!
01.10.2013 - 08:39Valeria wrote:
Lo terminé y quedó muy lindo, las explicaciones son claras y se puede hacer con facilidad. La lana se apelmaza demasiado para mi gusto, aunque los colores son muy lindos.
11.12.2012 - 20:54Lara wrote:
This is a great piece, casual with a twist... I love it! Would very much appreciate diagrams for flower grannies; like so many others I prefer working from a diagram rather then from a written sequence.
09.08.2012 - 18:07