


Komentáře / Otázky (30)
![]() Cent napsala:
Cent napsala:
Kan er bij de patronen ook een tekening worden geplaatst met de maten en afmetingen, zoals dat voorheen ook werd gedaan?
01.03.2025 - 12:49Odpověď DROPS Design :
Dag Cent,
Helaas is dit wat een ouder patroon, waar geen maattekening voor is. Bij de nieuwere patronen staat wel een maattekening.
01.03.2025 - 14:45
![]() Ele napsala:
Ele napsala:
......
14.11.2024 - 16:28
![]() Valana napsala:
Valana napsala:
Is the bikini top suppose to have some type of clasp to hold the back together?
02.08.2024 - 03:48Odpověď DROPS Design :
Dear Valant, no claps but you will work a tie picking up 8 sts in the garter stitch edge at the bottom and work (4 rows garter stitch, 4 rows stocking stitch) until tie measures 40 cm and repeat on the other side. Happy knitting!
02.08.2024 - 08:59
![]() Rose Mason napsala:
Rose Mason napsala:
How do i know what size S, M, L equals?
22.10.2023 - 21:30Odpověď DROPS Design :
Hi Rose, You have the hip measurements for the shorts. As regards the bikini top, the cup sizes are very individual and you might like to check your cup-size against the knitting tension: 21 stitches and 28 rows =10 cm x 10 cm, adjusting with more or fewer stitches and rows if necessary. Hope this helps and happy knitting!
23.10.2023 - 07:27
![]() Sara napsala:
Sara napsala:
Finishing up the shorts, for the rib on the legs, do you advise using a smaller needle as in the waist? The pattern doesn't specify.
11.08.2023 - 13:17Odpověď DROPS Design :
Dear Sarah, use any technique that will allow the edge to stay elastic, see for example this video where we show 3 different techniques to cast off loosely - and in this video we show how to cast off such a rib with an italian cast off. Happy finishing!
11.08.2023 - 15:30
![]() Sara napsala:
Sara napsala:
Working the rib waist on the shorts and 6" seems like too much. Is it meant to fold over? The picture looks like about 2.5"-3" at most. The top fits well!
12.07.2023 - 02:12Odpověď DROPS Design :
Hi Sara, The pattern is for 6" rib waistband but you can of course work the waistband to the height you wish or fold it double. Happy knitting!
12.07.2023 - 07:12
![]() Sara napsala:
Sara napsala:
I had asked a question about the decreases on the top and just found the answer in the instructions! I had missed those previously - now it makes sense!
24.04.2023 - 04:52
![]() Sara napsala:
Sara napsala:
For the bikini top, where are the decreases done? From the picture, it looks like there are decreases on either side of the marker (size large, marker at 25 sts). Or are the 2 sts decreased always after the marker? Is it a k1psso decrease or k2tog decrease?
24.04.2023 - 04:31Odpověď DROPS Design :
Hi Sara, The decreases are 1 stitch on each side of the marker - knit 2 together before the marker and slip 1, knit 1, pass the slipped stitch over after the marker. Happy knitting!
24.04.2023 - 06:43
![]() Elisa Nunne napsala:
Elisa Nunne napsala:
Bonjour, je souhaiterais tricoter ce modèle mais en uni (sans rayures). Pouvez-vous m'aider en me disant combien de pelotes me faudrait il pour une taille S (Top et short) ? Merci !
13.06.2022 - 10:17Odpověď DROPS Design :
Bonjour Mme Nunne, nous ne sommes malheureusement pas en mesure de pouvoir adapter chacun de nos modèles à chaque demande, et comme nous n'avons plus de modèle, nous ne pouvons plus vérifier. Contactez votre magasin, il saura vous aider, même par mail ou téléphone. Merci pour votre compréhension, bon tricot!
13.06.2022 - 11:46
![]() Sham napsala:
Sham napsala:
Hur vet man hur många maskor man ska ha om man har storlek L?
20.02.2022 - 19:02Odpověď DROPS Design :
Hei Sham. Tenker du på bikinitopp eller shorts? Under bikinitopp er det 3 størrelser og L er den du legger opp 92 masker, da kan du ut fra den oppgitt strikkefastheten finne ut av hvor mange cm det blir sånn ca. Strikk gjerne en prøvelapp der du sjekker din egen strikkefasthet. Under shorts er det 6 størrelser og der står det hva som tilsvarer hoftemål i oppskriften. mvh DROPS Design
21.02.2022 - 14:23
|
|
Mermaid Stripes |
|
|
|
|
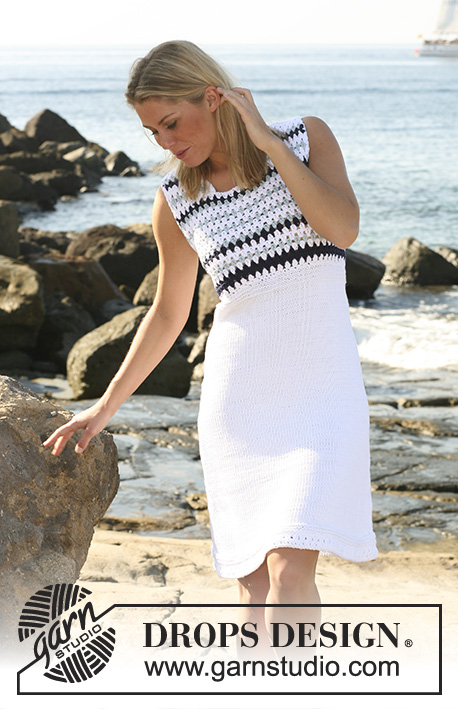
DROPS Pruhované bikiny: podprsenka a kalhotky s nohavičkou z přízí "Muskat" a "Muskat Soft".
DROPS Extra 0-443 |
|
|
VROUBKOVÝ VZOR (v řadách): Pleteme stále hladce, lícové i rubové řady. PRUHY: Pruhy pleteme takto: *4 řady přízí Muskat Soft, 2 řady přízí Muskat*, *-* opakujeme. TIP – Ujímání: Ujímáme vždy z lícové strany. Začínáme 2 oka před značkou: 2 oka spleteme hladce, značka, 1 oko sejmeme hladce, 1 upleteme hladce a sejmuté přes ně přetáhneme. ---------------------------------------------------------------------- PODPRSENKA: Pleteme v řadách. Na jehlice č.4 nahodíme přízí Muskat 76-84-92 ok a upleteme 12 řad vroubkovým vzorem. Nyní budeme plést pouze nad prvními 38-42-46 oky v řadě, zbylá oka odložíme na pomocnou jehlici. Pleteme lícovým žerzejem pruhy – viz výše, jen na obou stranách pleteme 3 krajní oka vroubkovým vzorem. Dbáme na rovnoměrné napětí příze! Upleteme 2 řady, SOUČASNĚ přidáme ve 2. řadě rovnoměrně 42-46-50 ok. Po 21-23-25 okách umístíme značku. Nyní ujímáme 2 oka střídavě v každé 2. a v každé 4. řadě – viz TIP. Ujímáme tak dlouho, až nám v řadě zůstane 6 ok, díl nyní měří asi 20-22-24 cm. Dále pleteme nad zbylými 6 oky (už ne pruhy, pouze bílou přízí Muskat) vázačku, takto: *4 řady vroubkovým vzorem, 4 řady lícovým žerzejem*, *-* opakujeme a ve výši 45 cm (nebo potřebné délce vázačky) oka uzavřeme. Odložená oka z pomocné jehlice vrátíme zpět na jehlice a stejným způsobem upleteme druhý košíček. Na boku spodní části podprsenky nabereme bílou přízí Muskat z vroubkových ok 8 ok a pleteme nad nimi vázačku (přes hrudník), takto: *4 řady vroubkovým vzorem, 4 řady lícovým žerzejem*, *-* opakujeme a ve výši 40 cm oka uzavřeme. Na protější straně podprsenky upleteme stejným způsobem druhou vázačku. ---------------------------------------------------------------------- ŽEBROVÝ VZOR 2/2: Sřídavě pleteme 2 oka hladce, 2 obrace. PRUHY: *2 kruhové řady přízí Muskat, 4 kruhové řady přízí Muskat Soft*, *-* opakujeme. Pozn.: Kruhová řada začíná uprostřed zadního dílu, barvy tedy měníme zde (při změnách barev přízi neodstřihujeme). ---------------------------------------------------------------------- KALHOTKY S NOHAVIČKOU: Pleteme v kruhových řadách od pasu dolů. Na kruhovou jehlici č.3,5 nahodíme přízí Muskat 140-156-168-184-196-212 ok a označíme si začátek kruhové řady. Druhou značku umístíme po 70-78-84-92-98-106 okách. Pleteme žebrovým vzorem 2/2 (viz výše). Ve výši 15 cm práci převedeme na kruhovou jehlici č.4 a dále pleteme lícovým žerzejem pruhy – viz výše. SOUČASNĚ ujmeme na obou stranách značky uprostřed zadního dílu (= začátek kruhové řady) v první kruhové řadě 0-1-0-1-0-1 oko = 140-154-168-182-196-210 ok. Dbáme na rovnoměrné napětí příze! Nyní přidáváme na obou stranách obou značek 1 oko – vždy po 2,5-2,5-2,5-2,5-3-3 cm, celkem 8x = 172-186-200-214-228-242 ok. Ve výši 33-34-35-36-37-38 cm uzavřeme prvních 6-6-7-7-8-8 ok v kruhové řadě, následujících 75-81-87-93-99-105 ok odložíme na pomocnou jehlici (= nohavička), dalších 11-12-13-14-15-16 ok necháme na jehlici (= klín), následujících 75-81-87-93-99-105 ok odložíme na pomocnou jehlici (= nohavička) a posledních 5-6-6-7-7-8 ok uzavřeme. Nyní pleteme na oky klínu 9-10-11-12-13-14 cm lícovým žerzejem, pak oka uzavřeme a klín přišijeme k 11-12-13-14-15-16 uzavřeným okům ve středu zadního dílu. NOHAVIČKA: Odložených 75-81-87-93-99-105 ok z jedné pomocné jehlice přesuneme na krátkou kruhovou jehlici (40 cm) č.4 a podél jedné strany klínu nabereme 17-19-21-23-25-27 ok = 92-100-108-116-124-132 ok. Pleteme nad všemi těmito oky lícovým žerzejem pruhy. Když nohavička měří 4-4-5-5-6-6 cm, upleteme 2 cm výšky žebrovým vzorem 2/2 – viz výše. Pak oka dle vzoru uzavřeme a upleteme stejným způsobem druhou nohavičku. |
|
Dokončili jste tento model?Pak označte své fotky tagem #dropspattern nebo je pošlete do galerie #dropsfan. Potřebujete s tímto návodem poradit?Otevřete-li si návod na stránce garnstudio.com, najdete tam 21 výukových video-ukázek, Komentáře/Dotazy a další užitečné informace. © 1982-2025 DROPS Design A/S. Vyhrazujeme si veškerá práva. Tento dokument, včetně všech jeho dílčích částí, podléhá autorským právům. Podrobnější komentář k možnostem užití našich návodů najdete dole pod každým návodem na našich stránkách. |


V oblasti pletené a háčkované módy působí DROPS Design více než 40 let. Díky tomu vám můžeme nabídnout jednu z nejrozsáhlejších kolekcí modelů s bezplatnými návody dostupnými na internetu - navíc v 17 jazycích. K dnešnímu dni máme na 314 katalogů a 11822 návodů celkem - z nich je už 7048 dostupných v [češtině].
Přidejte komentář k návodu DROPS Extra 0-443
Rádi bychom věděli, co si o tomto modelu myslíte!
Pokud se chcete na něco zeptat, dbejte prosím na to, abyste ve formuláři níže vybrali správnou kategorii - díky tomu se dříve dozvíte, co potřebujete vědět. Povinná pole jsou označena *.