
Popular categories
Looking for a yarn?


|
|||||||||||||||||||||||||||||||
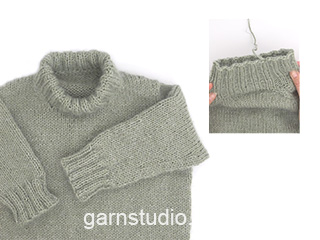
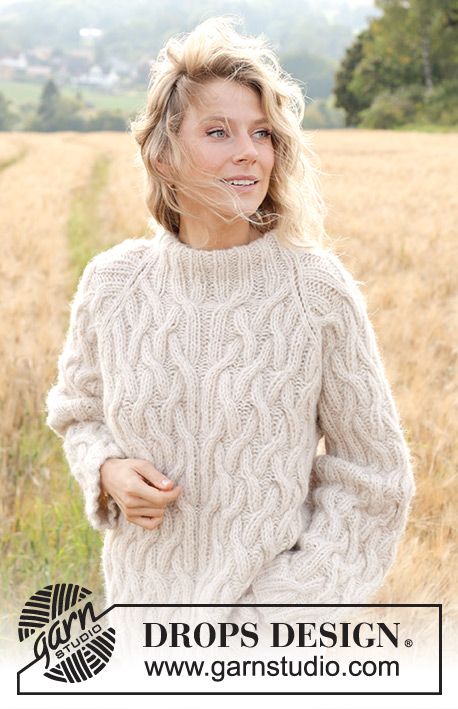
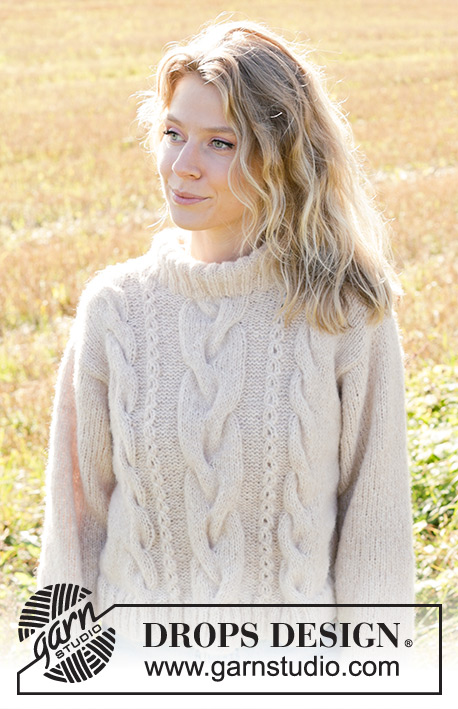
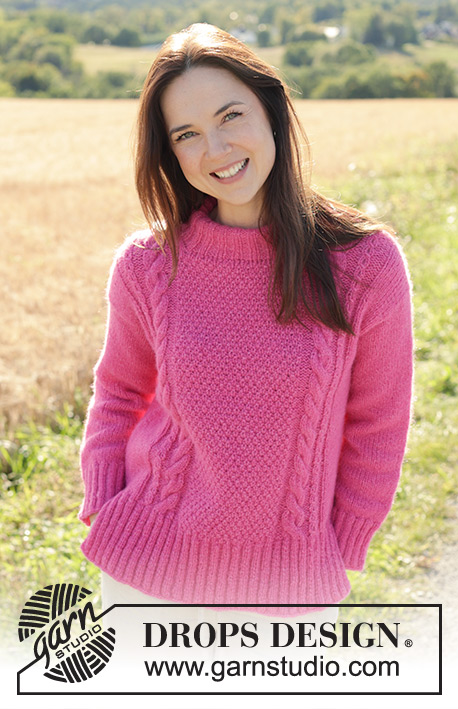
Berry Me Sweater |
|||||||||||||||||||||||||||||||
 |
 |
||||||||||||||||||||||||||||||
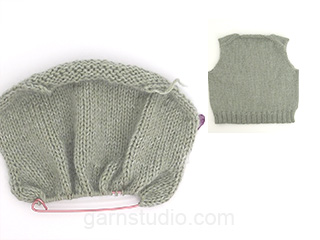
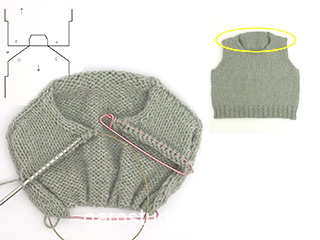
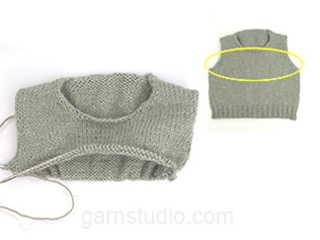
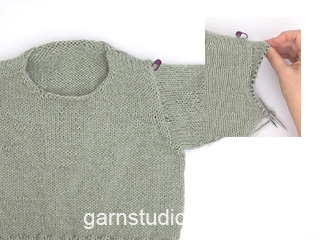
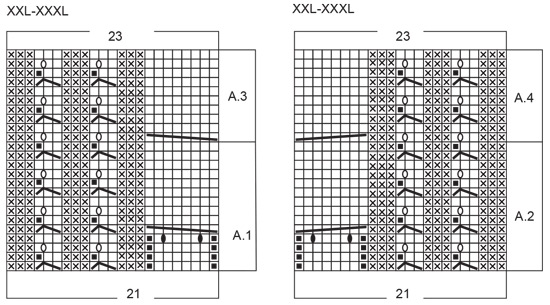
Knitted sweater in DROPS Air or DROPS Paris. Piece is knitted top down with European shoulder / diagonal shoulder, vents in the sides. Size: S - XXXL
DROPS 250-33 |
|||||||||||||||||||||||||||||||
|
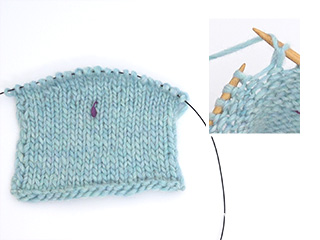
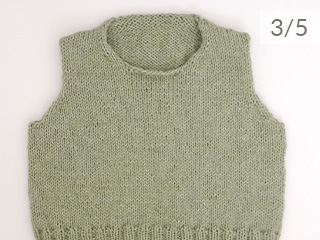
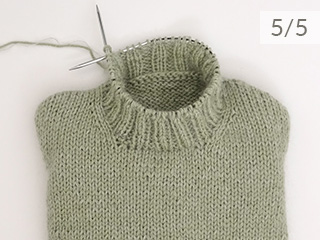
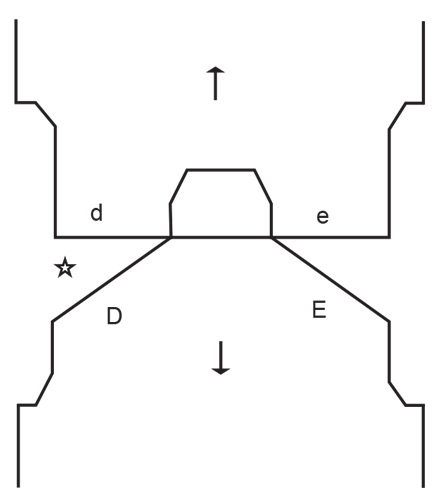
---------------------------------------------------------- EXPLANATION FOR THE PATTERN: ---------------------------------------------------------- GARTER STITCH (back and forth): Knit all rows. 1 ridge vertically = knit 2 rows. INCREASE TIP-1 (from right side): Increase 1 stitch towards the left: Use left needle to pick up yarn between 2 stitches from row below, pick up yarn from the front and knit stitch in back loop of stitch. Increase 1 stitch towards the right: Use left needle to pick up yarn between 2 stitches from row below, pick up yarn from the back and knit stitch in front loop of stitch. INCREASE TIP-2 (from wrong side): Increase 1 stitch towards the left: Use left needle to pick up yarn between 2 stitches from row below, pick up yarn from the back and purl stitch in front loop of stitch. Increase 1 stitch towards the right: Use left needle to pick up yarn between 2 stitches from row below, pick up yarn from the front and purl stitch in back loop of stitch. INCREASE TIP-3 (from right side): Increase purl towards the left: Use left needle to pick up yarn between 2 stitches from row below, pick up yarn from the front and purl stitch in back loop of stitch. Increase purl towards the right: Use left needle to pick up yarn between 2 stitches from row below, pick up yarn from the back and purl stitch in front loop of stitch. DECREASE TIP (applies to mid under sleeves): Decrease 1 stitch on each side of marker thread as follows: Work until 3 stitches remain before marker thread, knit 2 together, knit 2 (marker thread is between these 2 stitches), slip 1 stitch knitwise, knit 1, pass slipped stitch over stitch worked. PATTERN: See diagrams A.1 to A.5. Diagrams show all rows in pattern seen from the right side. Choose diagram for your size in A.1/A.3 and A.2/A.4 ---------------------------------------------------------- START THE PIECE HERE: ---------------------------------------------------------- SWEATER - SHORT OVERVIEW OF THE PIECE: In this pattern long and short needles have been used - begin with fitting length and switch as needed. Work piece back and forth on needle. Begin by casting on stitches in the back of neck. Then work back piece downwards while at the same time increasing in each side of piece until number of stitches for shoulder width is reached. Back piece has a slight diagonal shoulder. Then work down to armholes. Now put back piece a side and work the front piece. Front piece is first worked in 2 parts. Begin by picking up stitches along one shoulder, work pattern while increasing towards the neck. Repeat on the other shoulder. Put right and left front piece together when increases for neck are done. Then work front piece down to armholes. Now slip front piece and back piece on to same circular needle and work body downwards in the round on circular needle before dividing the piece again for vents. Pick up stitches for sleeves around the armholes. First work back and forth with short rows to form a sleeve cap. Then work sleeves downwards in the round on needle. Finish by picking up stitches around the neck and work a neck edge. Fold the neck edge double against the wrong side and fasten. Work front piece in pattern, work back piece in stockinette stitch. BACK PIECE: Cast on 31-31-33-35-37-37 stitches on circular needle size 4.5 MM = US 7 with DROPS Air or DROPS Paris. Purl 1 row from wrong side. Read INCREASE TIP-1 and work next row from right side as follows: Knit 3, increase towards the left, knit until 3 stitches remain, increase towards the right, knit 3. Read INCREASE TIP-2 and work next row from wrong side as follows: Purl 3, increase towards the left, purl until 3 stitches remain, increase towards the right, purl 3. Continue like this and increase the same way from both right side and wrong side 24-28-28-32-34-38 times in total. After last increase there are 79-87-89-99-105-113 stitches on needle. Insert 1 marker in the side. Now measure piece from here! Work in stockinette stitch back and forth until piece measures 10-10-11-12-11-12 cm = 4"-4"-4⅜"-4¾"-4⅜"-4¾", measured along the edge of armhole. Work next row as follows from right side: Knit 3, increase towards the left, work until 3 stitches remain, increase towards the right, knit 3 – remember INCREASE TIP-1. Increase like this on every row from right side 3-3-4-4-5-5 times in total = 85-93-97-107-115-123 stitches. Work until piece measures 13-13-14-15-15-16 cm = 5⅛"-5⅛"-5½"-6"-6"-6¼", measured from marker along armhole. Cut the yarn, slip stitches on a thread or stitch holder, and work front piece as explained below. FRONT PIECE: Begin with left shoulder (when garment is worn). Pick up 24-28-28-32-34-38 stitches inside outermost stitch along left shoulder on back piece (i.e. pick up 1 stitch in every row from edge at the top of back piece, see D on chart). All length measurements on front piece are done from here. Purl 1 row from wrong side, then work as follows - from right side: 3 stitches in stockinette stitch, A.1, stockinette stitch over the last 6-10-10-14-10-14 stitches. When A.1 has been worked 1 time vertically, continue with A.3 over stitches in A.1 (increase 2 stitches in A.1 before first cable) = 26-30-30-34-36-40 stitches. When piece measures 9 cm = 3½", increase stitches towards the neck as explained below. Work next row as follows from right side: Knit 3, increase 1 purl towards the left, work pattern as before over the remaining stitches - read INCREASE TIP-3. Increase like this on every row from right side 3 times in total – purl the increased stitches from the right side = 29-33-33-37-39-43 stitches. Work 1 row with pattern from wrong side, cut the yarn and put piece aside. Then work right shoulder as explained below. Pick up 24-28-28-32-34-38 stitches inside outermost stitch along right shoulder on back piece (i.e. pick up 1 stitch in every row from edge at the top of back piece, see E on chart). All length measurements on front piece are done from here. Purl 1 row from wrong side, then work as follows - from right side: Knit 6-10-10-14-10-14, A.2, knit 3. When A.2 has been worked 1 time vertically, continue with A.4 over stitches in A.2 (increase 2 stitches in A.2 before first cable) = 26-30-30-34-36-40 stitches. When piece measures 9 cm = 3½", increase stitches towards the neck as explained below. Work next row as follows from right side: work pattern as before until 3 stitches remain, increase 1 purl towards the right, knit 3 - remember INCREASE TIP-3. Increase like this on every row from right side 3 times in total – purl the increased stitches from the right side = 29-33-33-37-39-43 stitches. After last increase work 1 row from wrong side. NOTE! Make sure to work the same number of rows on right and left shoulder! Work next row as follows from right side: Work pattern as before over the 29-33-33-37-39-43 stitches from right front piece, cast on 25-25-27-29-31-31 stitches for neck at the end of this row, then work pattern as before over the 29-33-33-37-39-43 stitches from left front piece = 83-91-93-103-109-117 stitches (there are 4 stitches more on front piece than on back piece due to cables). Work next row as follows from wrong side: Purl 6-10-10-14-10-14, A.3, knit 3, purl 31-31-33-35-37-37, knit 3, A.4, purl 6-10-10-14-10-14. Work next row as follows from right side: Knit 6-10-10-14-10-14, A.4, purl 3, A.5 over the next 31-31-33-35-37-37 stitches, purl 3, A.3, knit 6-10-10-14-10-14. Continue this pattern back and forth until piece measures 22-24-25-26-27-28 cm = 8¾"-9½"-9¾"-10¼"-10⅝"-11". Work next row as follows from right side: Knit 3, increase towards the left, work until 3 stitches remain, increase towards the right, knit 3 – remember INCREASE TIP-1 Increase like this on every row from right side 3-3-4-4-5-5 times in total = 89-97-101-111-119-127 stitches. Continue until piece measures 25-27-28-29-31-32 cm = 9¾"-10⅝"-11"-11⅜"-12¼"-12½". Now put front piece and back piece together for body as explained below. BODY: Work pattern as before over the 89-97-101-111-119-123 stitches on needle, cast on 6-6-8-8-10-12 new stitches at the end of this row (in the side), work stockinette stitch over the 85-93-97-107-115-127 stitches from back piece, cast on 6-6-8-8-10-12 new stitches at the end of row = 186-202-214-234-254-274 stitches. Insert 1 marker thread in each side on body, in the middle of the 10-10-12-16-18-20 stitches under each sleeve. Move marker threads upwards when working. Use the marker threads when dividing piece for vents in each side. Continue in stockinette stitch until piece measures 44-46-48-50-52-54 cm = 17¼"-18"-19"-19¾"-20½"-21¼", measured from the top point on shoulder on front piece. Now divide front piece and back piece to make vents in the sides. Slip the 91-99-105-115-125-135 stitches from back piece on a thread or needle and work only over stitches on front piece. FRONT PIECE: = 95-103-109-119-129-139 stitches. Knit 1 row from right side while increasing 39-43-45-51-53-59 stitches evenly = 134-146-154-170-182-198 stitches. Switch to circular needle size 3.5 MM = US 4. Work next row as follows - from wrong side: Work 2 stitches in GARTER STITCH – read explanation above, * purl 2, knit 2 *, work from *-* and finish with purl 2 and 2 stitches in garter stitch. Continue rib like this for 12 cm = 4¾". Bind off. Sweater measures 56-58-60-62-64-66 cm = 22"-22¾"-23⅝"-24⅜"-25¼"-26" in total, measured at the top of shoulder on front piece. BACK PIECE: = 91-99-105-115-125-135 stitches. Knit 1 row from right side while increasing 43-47-49-55-57-63 evenly = 134-146-154-170-182-198 stitches. Switch to circular needle size 3.5 MM = US 4. Work the same way as on front piece. SLEEVES: Place piece flat and insert 1 marker at the top of armhole (NOTE! It is not where stitches were picked up for front piece but approx. 6-8 cm = 2⅜"-3⅛" down on front piece = mid on top of shoulder). Use circular needle size 4.5 MM = US 7, begin in the middle of the new stitches cast on under sleeve, and pick up 74-78-86-88-92-98 stitches along armhole - adjust to pick up same number of stitches on each side of marker along armhole. Now work stockinette stitch back and forth with short rows over sleeve cap, this is done to get a better shape on sleeve. Begin mid under sleeve. 1st row (right side): work 9-10-10-11-11-12 stitches past marker, turn 2nd row (wrong side): work 9-10-10-11-11-12 stitches past marker, turn. 3rd row (right side): 4-4-4-4-4-3 stitches past where the previous turn was, turn 4th row (wrong side): work 4-4-4-4-4-3 stitches past where the previous turn was, turn Repeat 3rd and 4th row until 29-30-34-35-39-36 stitches have been worked past marker mid on top of sleeve (6-6-7-7-8-9 turns have been done in each side). Work from right side until beginning of round (mid under sleeve). Insert 1 marker thread here, this is used when decreasing stitches under sleeve. Move marker thread upwards when working. Continue working in the round in stockinette stitch. When sleeve measures 7-7-8-8-9-10 cm = 2¾"-2¾"-3⅛"-3⅛"-3½"-4" from where stitches were picked up (all length measurements are done mid on top of sleeve), decrease 2 stitches mid under sleeve - read DECREASE TIP. Decrease every other round 3-3-4-4-5-6 times, then decrease every 3-2½-2½-2-2-1½ cm = 1⅛"-1"-1"-¾"-¾"-½" 10-11-13-13-13-14 times, a total of 13-14-17-17-18-20 times = 48-50-52-54-56-58 stitches. Continue to work until sleeve measures 44-43-44-42-41-40 cm = 17¼"-17"-17¼"-16½"-16⅛"-15¾". 8 cm = 3⅛" remain until finished measurements. Try the sweater and work to desired length before rib. Knit 1 round while increasing 12-10-12-10-12-10 stitches evenly = 60-60-64-64-68-68 stitches. Switch to double pointed needles size 3.5 MM = US 4. Work rib (knit 2/purl 2) for 8 cm = 3⅛". Bind off. Sleeve measures approx. 52-51-52-50-49-48 cm = 20½"-20"-20½"-19¾"-19¼"-19". NECK EDGE: Begin at one shoulder line and pick up from right side inside 1 edge stitch approx. 100 to 112 stitches on a circular needle size 3.5 MM = US 4. Number of stitches must be divisible by 4. Work rib (knit 2/purl 2) in the round for 10 cm = 4". Bind off. Fold rib at the top of neck down on inside of garment. Fasten rib to get a double neck edge. To avoid a tight neck edge that sticks out it is important to keep the seam elastic. |
|||||||||||||||||||||||||||||||
Diagram explanations |
|||||||||||||||||||||||||||||||
|
|||||||||||||||||||||||||||||||

|
|||||||||||||||||||||||||||||||
|
|||||||||||||||||||||||||||||||
|
|||||||||||||||||||||||||||||||

|
|||||||||||||||||||||||||||||||
|
Have you made this or any other of our designs? Tag your pictures in social media with #dropsdesign so we can see them! Do you need help with this pattern?You'll find tutorial videos, a Comments/Questions area and more by visiting the pattern on garnstudio.com. © 1982-2024 DROPS Design A/S. We reserve all rights. This document, including all its sub-sections, has copyrights. Read more about what you can do with our patterns at the bottom of each pattern on our site. |
|||||||||||||||||||||||||||||||


With over 40 years in knitting and crochet design, DROPS Design offers one of the most extensive collections of free patterns on the internet - translated to 17 languages. As of today we count 304 catalogs and 11422 patterns - 11417 of which are translated into English (US/in).
We work hard to bring you the best knitting and crochet have to offer, inspiration and advice as well as great quality yarns at incredible prices! Would you like to use our patterns for other than personal use? You can read what you are allowed to do in the Copyright text at the bottom of all our patterns. Happy crafting!
Comments / Questions (15)
Ce magnifique modèle m'a séduit mais j'avais peur de me lancer mais grâce à vos explications et vidéos cela devient additif. Bon tricot à tous/toutes.
15.04.2024 - 23:36Pour la "petite tresse" du motif (sur 3 mailles) il est indiqué : Glisser 1 maille et tricoter 2 mailles endroit, passer la maille glisser par dessus les mailles tricotée. Il nous reste .... 1 seule maille.. Deux rangs après on fait 1 (seule)jetée Du coups on "diminue" 1 maille tout les 4 rangs ??? J'ai du défaire et je passe la maille glissée sur une seule maille tricotée (et non sur les 2 mailles comme indiqué).
15.04.2024 - 19:39DROPS Design answered:
Bonjour Mme Vradis-Willa, pour cette petite torsade, on ne diminue qu'une seule maille: on glisse 1 maille comme pour la tricoter à l'endroit, on tricote les 2 mailles suivantes à l'endroit (mais pas ensemble), puis on passe la maille glissée par-dessus les 2 mailles tricotées = il reste 2 mailles, au rang suivant sur l'endroit, on fait 1 jeté = on a de nouveau 3 mailles. Bon tricot!
16.04.2024 - 13:28C'est taille S que je tricotte. Je constate une erreur quand je fais le motif A1 suivi du A3. Je ne peux pas répéter le A3 tel qu'illustré.cIl y a une erreur que je vois clairement là où il y a les trois mailles qui forment un genre de petite entorse. Je sais qu'on augmente 2 mailles avant la 1ère entorse, ici la question, comment faire alors.
15.04.2024 - 08:10DROPS Design answered:
Bonjour Mme Mawazini, A.1 en taille S se tricote donc sur 15 mailles augmentées à 17 avant la torsade; vous répétez les 4 rangs des petites torsades comme avant (en cas de doute, reprenez ces petites torsades au 1er rang de A.1), et répétez les grandes torsades de A.3 tous les 10 rangs (9 rangs entre chaque torsade). Bon tricot!
15.04.2024 - 08:29C'est taille S que je tricotte. Je constate une erreur quand je fais le motif A1 suivi du A3. Je ne peux pas répéter le A3 tel qu'illustré.cIl y a une erreur que je vois clairement là où il y a les trois mailles qui forment un genre de petite entorse.
15.04.2024 - 08:07Bonjour, pour l'épaule gauche, on fait d'abord le motif A1 sur 24 m, puis A3 sur 26 m (2 mailles ont été augmentée avant la 1ère torsade) par la suite on continue avec A3 sur les 10 rangs suivant. Sauf que, je vois qu'il y a une erreur, et la petite torsade sur 3 mailles ne fonctionne plus, comme s'il y un rang de plus. Pouvez-vous m'expliquer comment faire.
13.04.2024 - 23:48DROPS Design answered:
Bonjour Mme Mawazini, quelle taille tricotez-vous? Car dans les diagrammes XXL et XXXL, A.1 se commence sur 21 mailles, on augmente 2 mailles avant la 1è!re torsade pour tricoter A.3 sur 23 mailles au total. Lorsque vous répétez A.3 en hauteur, répétez les torsades comme avant pour avoir les bons croisements quand il faut, même s'ils ne sont plus faits aux mêmes rangs qu'avant. Bon tricot!
15.04.2024 - 07:43Bonjour, pour l'épaule gauche, on fait d'abord le motif A1 sur 24 m, puis A3 sur 26 m (2 mailles ont été augmentée avant la 1ère torsade) par la suite on continue avec A3 sur les 10 rangs suivant. Sauf que, je vois qu'il y a une erreur, et la petite torsade sur 3 mailles ne fonctionne plus, comme s'il y un rang de plus. Pouvez-vous m'expliquer comment faire.
13.04.2024 - 23:46DROPS Design answered:
Bonjour Mme Magdimansour, A.1 se tricote sur 21 mailles dans les tailles XXL et XXXL, et on augmente 2 mailles au 4ème rang pour avoir 23 mailles. Lorsque vous répétez A.3 par la suite, répétez le bon nombre de rangs pour la grande torsade mais continuez les petites torsades comme avant, autrement dit, il est possible qu'elles ne se fassent pas aux mêmes rangs qu'avant, mais il faut bien conserver le rythme des petites torsades comme avant. Bon tricot!
15.04.2024 - 07:41Hallo Ich möchte gerne den Pulli stricken aber ein anderes Garn nutzen. Nun bekomme ich beim Umrechnen allerdings sehr verschiedene Ergebnisse raus, je nachdem ob ich mich nach DropsAir oder DropsParis richte. An welchem Garn sollte ich mich eher orientieren?
30.03.2024 - 12:16DROPS Design answered:
Liebe Miri, benutzen Sie die kleinere Angabe/Lauflänge für Ihre Größe - je nach Lauflänge wird die Garnmenge in gram verschieden sein. Viel Spaß beim stricken!
02.04.2024 - 14:25How do I download free patterns
22.03.2024 - 17:34DROPS Design answered:
Dear Ariene, right above the line that says "Pattern Instructions" there is a line where you can select the language, and in there is a printer icon. Click on that and that gives you the PDF pattern. Happy Knitting!
23.03.2024 - 22:52Buongiorno vorrei fare un maglione della taglia 58/60 mi fate vedere alcuni modelli con spiegazioni semplici? grazie
29.02.2024 - 15:35DROPS Design answered:
Buongiorno Mariolina, può trovare le misure dei nostri modelli per le diverse taglia in fondo ad ogni pagina del modello: le confronti con un modello in suo possesso e può trovare la taglia corretta. Buon lavoro!
02.03.2024 - 11:35Guten Tag, wo finde ich den V-Ausschnitt bei dem Modell?
17.02.2024 - 14:12DROPS Design answered:
Liebe Katja, danke für den Hinweis, es sieht so aus, daß die Beschreibung geändert sollte, da hier es kein V-Ausschnitt ist. Viel Spaß beim stricken!
19.02.2024 - 08:59