DROPS Alpaca
DROPS Alpaca
100% Alpaca
from 4.85 $ /50g
DROPS Kid-Silk
DROPS Kid-Silk
75% Mohair, 25% Silk
from 6.75 $ /25g
Get the yarn to make this pattern from 51.25$.

The yarn cost is calculated from the pattern’s smallest size and the yarn’s cheapest product type. Looking for an even better price? You might find it on the DROPS Deals!

DROPS SS24

Whisper of Spring

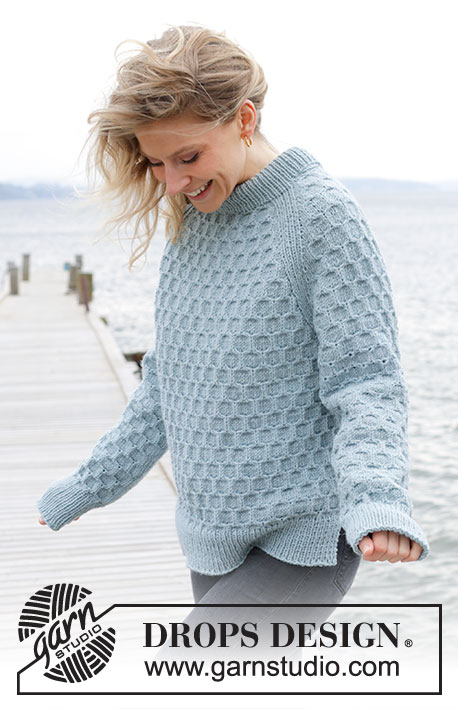
Knitted sweater in DROPS Alpaca and DROPS Kid-Silk. The piece is worked top down with European/diagonal shoulders, cables and split in sides. Sizes S - XXXL.

DROPS 243-6
DROPS Design: Pattern z-991
Yarn group A + A or C
-------------------------------------------------------

SIZES:
S - M - L - XL - XXL – XXXL

Finished measurements:
Chest measurements: 102-108-116-128-138-150 cm = 40"-42½"-45¾"-50⅜"-54¼"-59"
Full length: 56-58-60-62-64-66 cm = 22"-22¾"-23⅝"-24⅜"-25¼"-26"
All measurements in charts are in cm.

YARN:
DROPS ALPACA from Garnstudio (belongs to yarn group A)
250-300-300-350-350-400 g color 9030, pistachio ice cream
And use:
DROPS KID-SILK fra Garnstudio (belongs to yarn group A)
100-125-125-125-150-175 g color 47, pistachio ice cream

NEEDLES:
DROPS CIRCULAR NEEDLE SIZE 5 MM = US 8: Length 40 cm = 16" and 80 cm = 32".
DROPS CIRCULAR NEEDLE SIZE 3.5 MM = US 4: Length 40 cm = 16" and 80 cm = 32".
DROPS DOUBLE POINTED NEEDLES SIZE 5 MM = US 8.
DROPS DOUBLE POINTED NEEDLES SIZE 3.5 MM = US 4.
DROPS CABLE NEEDLE.
The technique MAGIC LOOP can be used – you then only need 80 cm = 32" circular needle in each size.

KNITTING GAUGE:
17 stitches in width and 22 rows in height with stockinette stitch and 1 strand of each quality = 10 x 10 cm = 4" x 4".
NOTE: Needle size is only a guide. If you get too many stitches on 10 cm = 4", change to a larger needle size. If you get too few stitches on 10 cm = 4", change to a smaller needle size.

-------------------------------------------------------

Alternative Yarn – See how to change yarns here
Yarn Groups A to F – Use the same pattern and change the yarn here
Yarn usage using an alternative yarn – Use our yarn converter here

-------------------------------------------------------

DROPS Alpaca
DROPS Alpaca
100% Alpaca
from 4.85 $ /50g
DROPS Kid-Silk
DROPS Kid-Silk
75% Mohair, 25% Silk
from 6.75 $ /25g
Get the yarn to make this pattern from 51.25$.

The yarn cost is calculated from the pattern’s smallest size and the yarn’s cheapest product type. Looking for an even better price? You might find it on the DROPS Deals!

Pattern instructions

NOTE: This pattern is written in American English. All measurements in charts are in cm. For conversion from inches to cm - click here. There are different terms for crocheting in American and British English. If this pattern includes crochet, click for "crochet terms" here. For this pattern in British English, please click here.
-------------------------------------------------------

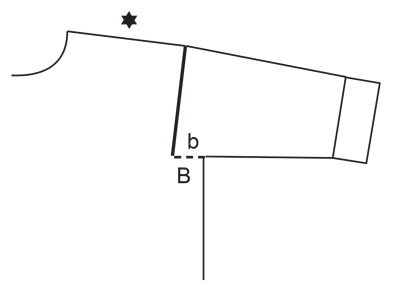
EXPLANATIONS FOR THE PATTERN:
-------------------------------------------------------

GARTER STITCH (worked back and forth):
Knit all rows.
1 ridge = knit 2 rows.

INCREASE TIP FROM RIGHT SIDE:
Increase to left AFTER A.1 / 3 stitches:
Use left needle to pick up thread between 2 stitches from row below, pick up thread from front and knit stitch in back loop.
Increase to right BEFORE A.2 / 3 stitches:
Use left needle to pick up thread between 2 stitches from row below, pick up thread from behind and knit stitch in front loop.

INCREASE TIP FROM WRONG SIDE:
Increase to left AFTER A.2:
Use left needle to pick up thread between 2 stitches from row below, pick up thread from behind and purl stitch in front loop.
Increase to right BEFORE A.1:
Use left needle to pick up thread between 2 stitches from row below, pick up thread from front and purl stitch in back loop.

DECREASE TIP (for sleeves):
Decrease 1 stitch on each side of the marker-thread as follows: Work until there are 3 stitches left before the marker-thread, knit 2 together, knit 2 (marker-thread sits between these 2 stitches), slip 1 stitch knit-wise, knit 1 and pass the slipped stitch over the knitted stitch.

-------------------------------------------------------

START THE PIECE HERE:

-------------------------------------------------------

SWEATER – SHORT OVERVIEW OF THE PIECE:
The top of the back piece is worked back and forth on circular needle until the armholes are finished. Stitches are knitted up along each shoulder for the front piece. Then increased for the neck. Then the front piece is worked back and forth on circular needle until the armholes are finished. The pieces are joined and the body worked in the round. Stitches are knitted up around the armholes and the sleeves worked first back and forth for the sleeve cap, then in the round with short circular needle/double pointed needles. The neck is worked to finish.

BACK PIECE:
Cast on 34-34-38-40-42-44 stitches with circular needle size 5 MM = US 8 and 1 strand DROPS Alpaca and 1 strand DROPS Kid-Silk (2 strands).
Purl 1 row from the wrong side. Now work as follows from the right side: Work A.1, 12-12-16-18-20-22 stitches in stockinette stitch, A.2.
AT THE SAME TIME on the first row increase AFTER A.1 at the beginning of the row and BEFORE A.2 at the end of the row – read INCREASE TIP FROM RIGHT SIDE.
On the next row (wrong side) increase after A.2 and before A.1 – read INCREASE TIP FROM WRONG SIDE.
Continue increasing from both the right and wrong side a total of 26-28-28-30-32-36 times = 86-90-94-100-106-116 stitches. Continue the pattern for 6 rows, without increasing. Insert a marker in each side; the piece is now measured from here! REMEMBER THE KNITTING GAUGE!
Continue the pattern until the piece measures 14-15-16-17-17-18 cm = 5½"-6"-6¼"-6¾"-6¾"-7" from the marker and down the armholes. Cut the strand. Place the stitches on a stitch holder.

FRONT PIECE:
Start on the left shoulder (when the garment is worn).
Knit up 26-28-28-30-32-36 stitches inside 1 stitch along the left shoulder on the back piece; start by the neck and knit up stitches as far as the marker in the side of the back piece. Work stockinette stitch back and forth for 4 cm = 1½". Increase for the neck at the beginning of each row from the right side, after 3 stitches - remember INCREASE TIP FROM RIGHT SIDE. Increase 1 stitch 4 times = 30-32-32-34-36-40 stitches. Purl 1 row from the wrong side. Cut the strand. Place the stitches on a stitch holder and work the right front shoulder as follows.

Knit up 26-28-28-30-32-36 stitches inside 1 stitch along the right shoulder on the back piece. Start by the marker and knit up stitches as far as the neck. Work stockinette stitch back and forth for 4 cm = 1½". Increase for the neck at the end of each row from the right side, before 3 stitches - remember INCREASE TIP FROM RIGHT SIDE. Increase 1 stitch 4 times = 30-32-32-34-36-40 stitches. Purl back from the wrong side.
Work the next row as follows from the right side: Work the 30-32-32-34-36-40 stitches from the right shoulder, cast on 22-22-26-28-30-32 stitches for the neck and work the 30-32-32-34-36-40 stitches from the left front shoulder = 82-86-90-96-102-112 stitches. NOTE! There are 4 more stitches on the back piece than on the front piece because the cables tighten the piece slightly.
Work stockinette stitch back and forth until the piece measures 24-25-26-27-29-30 cm = 9½"-9¾"-10¼"-10⅝"-11⅜"-11¾" down the armhole.
Now join the front and back pieces for the body.


BODY:
Work the 82-86-90-96-102-112 stitches from the front piece, cast on 4-6-8-12-16-16 stitches (= side), work stockinette stitch with A.1/A.2 over the 86-90-94-100-106-116 stitches from the back piece, cast on 4-6-8-12-16-16 stitches = 176-188-200-220-240-260 stitches.
Work stockinette stitch, A.1 and A.2 in the round until the piece measures 46-48-50-52-54-46 cm = 18"-19"-19¾"-20½"-21¼"-18", from the top of the shoulder on the front piece. Now divide for the split in each side. Work the 86-92-98-108-118-128 stitches from the front piece and place them on a stitch holder and work the back piece.

BACK PIECE:
= 90-96-102-112-122-132 stitches. Change to circular needle size 3.5 MM = US 4. Knit 1 row from the right side and increase 34-34-38-44-46-48 stitches evenly spaced between the outermost 13-14-15-17-19-19 stitches on each side = 124-130-140-156-168-180 stitches. Work as follows from the wrong side: A.3 (see diagram for your size and start on 2nd row in diagram), * purl 2, knit 2 *, work from *-* until there are 15-16-17-19-21-21 stitches left, purl 2 and A.4 (see diagram for your size, and start on 2nd row in diagram). Work this rib for 10 cm = 4". Bind off. The sweater measures approx. 56-58-60-62-64-66 cm = 22"-22¾"-23⅝"-24⅜"-25¼"-26" from the top of the shoulder.

FRONT PIECE:
= 86-92-98-108-118-128 stitches. Knit 1 row from the right side and increase 36-38-40-46-48-50 stitches evenly spaced = 122-130-138-154-166-178 stitches. Work the next row from the wrong side as follows: 2 edge stitches in GARTER STITCH – read description above, * purl 2, knit 2 *, work from *-* until there are 4 stitches left, purl 2 and 2 edge stitches in garter stitch. Work this rib for 10 cm = 4". Bind off. The sweater measures approx. 56-58-60-62-64-66 cm = 22"-22¾"-23⅝"-24⅜"-25¼"-26" from the top of the shoulder.

LEFT SLEEVE:
Using circular needle size 5 MM = US 8 and 1 strand DROPS Alpaca and 1 strand DROPS Kid-Silk, knit up from the right side 37-39-41-43-46-48 stitches from the bottom of the armhole and up the front piece to the shoulder, then 27-29-31-31-32-34 stitches from the shoulder down the back piece = 64-68-72-74-78-82 stitches.
Insert a marker in the middle of the row – the sleeve is measured from this marker.
Work stockinette stitch back and forth for 1-2-2-4-5-5 cm = ⅜"-¾"-¾"-1½"-2"-2".
Now join the sleeve on short circular needle/double pointed needles size 5 MM = US 8 and work in the round. Insert 1 marker-thread at the beginning of the round (mid-under sleeve). Allow it to follow your work onwards.
Start at the marker-thread and continue with stockinette stitch. When the sleeve measures 4-4-4-5-6-6 cm = 1½"-1½"-1½"-2"-2⅜"-2⅜" from the marker, decrease 2 stitches mid-under the sleeve – read DECREASE TIP. Decrease like this every 6-4-3-3-2½-2 cm = 2⅜"-1½"-1⅛"-1⅛"-1"-¾" a total of 6-8-9-9-10-11 times = 52-52-54-56-58-60 stitches. Continue working until the sleeve measures 38-38-38-37-36-34 cm = 15"-15"-15"-14½"-14¼"-13⅜". There is 10 cm = 4" left; try the sweater on and work to desired length before the rib. Knit 1 round and increase 16-16-18-16-18-20 stitches evenly spaced = 68-68-72-72-76-80 stitches. Change to double pointed needles size 3.5 MM = US 4. Work rib (knit 2, purl 2) for 10 cm = 4". Bind off. The sleeve measures approx. 48-48-48-47-46-44 cm = 19"-19"-19"-18½"-18"-17¼" from the marker.

RIGHT SLEEVE:
Knit up and work in the same way as the left sleeve but, when knitting up stitches, knit up 27-29-31-31-32-34 stitches from the bottom of the armhole and up the back piece and 37-39-41-43-46-48 stitches from the shoulder and down the front piece. Sew the bottom of the armholes – see sketch.

NECK:
Start on one shoulder and knit up from the right side (inside 1 stitch) 88 to 120 stitches with short circular needle size 3.5 MM = US 4 and 1 strand of each quality. Stitch number must be divisible by 4. Work rib in the round (knit 2, purl 2) for 10 cm = 4". Bind off.
Fold the neck double to the inside and fasten with a stitch in each side.

Diagram

All measurements in charts are in cm.

symbols = Bottom of armholes is sewn: b to B
symbols = stitches on front left shoulder (d) are knitted up along the back left shoulder (D), stitches on front right shoulder (e), are knitted up along the back right shoulder (E)
symbols = knit from right side, purl from wrong side
symbols = purl from right side, knit from wrong side
symbols = place 3 stitches on cable needle in front of piece, knit 3, knit 3 from cable needle
symbols = place 3 stitches on cable needle in behind the piece, knit 3, knit 3 from cable needle
diagram
diagram
diagram
diagram
diagram

Each of our patterns has specific tutorial videos to help you.

Do you have a question? See a list of frequently asked questions (FAQ)

Knitting tension is what determines the final measurements of your work, and is usually measured per 10 x 10 cm. It is provided like so: number of stitches in width x number of rows in height - eg: 19 stitches x 26 rows = 10 x 10 cm.

The knitting tension is very individual; some people knit/crochet loosely while others work tightly. You adjust the knitting tension with the needle size, which is why the suggested needle size only serve as a guide! You need to adjust this (up or down) to ensure that YOUR knitting tension matches the knitting tension provided in the pattern. If you work with a different knitting tension than provided you will have a different yarn consumption, and your work will have different measurements than what the pattern suggests.

The knitting tension also determines which yarns can replace each other. As long as you achieve the same knitting tension you can replace one yarn with another.

See DROPS lesson: How to measure your tension/gauge

See DROPS video: How to make a gauge tension swatch

The required amount of yarn is provided in grams, eg: 450 g. To calculate how many balls you’ll need you first need to know how many grams are in 1 ball (25g, 50g or 100g). This information is available if you click on the individual yarn quality on our pages. Divide the amount required with the amount of each ball. For example, if each ball is 50g (the most common amount), the calculation will be as follows: 450 / 50 = 9 balls.

The important thing when changing from one yarn to another is that the knitting/crochet tension remains the same. This is so that the measurements of the finished piece will be the same as on the sketch provided. It is easier to achieve the same knitting tension using yarns from the same yarn group. It is also possible to work with multiple strands of a thinner yarn to achieve the knitting tension of a thicker one. Please try our yarn converter. We recommend you to always work a test swatch.

Please NOTE: when changing yarn the garment might have a different look and feel to the garment in the photo, due to individual properties and qualities of each yarn.

See DROPS lesson: Can I use a different yarn than the one mentioned in the pattern?

All our yarns are categorised into yarn groups (from A to F) according to thickness and knitting tension – group A contains the thinnest yarns and group F the thickest. This makes it easier for you to find alternative yarns to our patterns, should you wish to switch yarn. All yarns within the same group have a similar knitting tension and can easily replace each other. However, different yarn qualities have different structures and properties which will give the finished work a unique look and feel.

Click here for an overview of the yarns in each yarn group

At the top of all our patterns you’ll find a link to our yarn converter, which is a helpful tool should you wish to use a different yarn than suggested. By filling in the yarn quality you wish to replace, the amount (in your size) and number of strands, the converter will present good alternative yarns with the same knitting tension. Additionally it will tell you how much you’ll require in the new qualities and whether you’ll need to work with multiple strands. Most skeins are 50g (some are 25g or 100g).

If the pattern is worked with multiple colours, every colour will have to be converted separately. Similarly, if the pattern is worked with several strands of different yarns (for example 1 strand Alpaca and 1 strand Kid-Silk) you will have to find alternatives for each, individually.

Click here to see our yarn converter

Since different yarns have different qualities and textures we have chosen to keep the original yarn in our patterns. However, you can easily find options among our available qualities by using our yarn converter, or simply pick a yarn from the same yarn group.

It is possible that some retailers still have discontinued yarns in stock, or that someone has a few skeins at home that they would like to find patterns for.

The yarn converter will provide both alternative yarn as well as required amount in the new quality.

If you think it's hard to decide what size to make, it can be a good idea to measure a garment you own already and like the size of. Then you can pick the size by comparing those measures with the ones available in the pattern's size chart.

You'll find the size chart at the bottom of the pattern.

See DROPS lesson: How to read size chart

The needle size provided in the pattern serves only as a guide, the important thing is to follow the knitting tension. And since knitting tension is very individual, you will have to adjust the needle size to ensure that YOUR tension is the same as in the pattern – maybe you’ll have to adjust 1, or even 2 needle sizes, up or down to achieve the correct tension. For this, we recommend that you work test swatches.

Should you work with a different knitting tension than the one provided, the measurements of the finished garment might deviate from the measurement sketch.

See DROPS lesson: How to measure your tension/gauge

See DROPS video: How to make a gauge tension swatch

Working a garment top-down provides more flexibility and room for personal adjustment. For example it is easier to try the garment on while working, as well as making adjustments to length of yoke and shoulder caps.

The instructions are carefully explaining every step, in the correct order. Diagrams are adjusted to the knitting direction and are worked as usual.

The diagram depicts all rows/rounds, and every stitch seen from the right side. It is read from bottom to top, from right to left. 1 square = 1 stitch.

When working back and forth, every other row is worked from the right side and every other row is worked from the wrong side. When working from the wrong side, the diagram will have to be worked reversed: from left to right, knit stitches are purled, purl stitches are knit etc.

When working in the round every round is worked from the right side and the diagram are worked from right to left on all rounds.

See DROPS lesson: How to read knitting diagrams

The diagram depicts all rows/rounds, and every stitch seen from the right side. It is worked from bottom to top, from right to left.

When working back and forth every other row is worked from the right side: from right to left and every other row is worked from the wrong side: from left to right.

When working in the round, every row in the diagram are worked from the right side, from right to left.

When working a circular diagram you start in the middle and work your way outwards, counter clockwise, row by row.

The rows usually start with a given number of chain stitches (equivalent to the height of the following stitch), this will either be depicted in the diagram or explained in the pattern.

See DROPS lesson: How to read crochet diagrams

Instructions for working several diagrams after each other on the same row/round, will often be written like so: “work A.1, A.2, A.3 a total of 0-0-2-3-4 times". This means you work A.1 once, then A.2 is worked once, and A.3 is repeated (in width) the number of times provided for your size – in this case like so: S = 0 times, M = 0 times, L=2 times, XL= 3 times and XXL = 4 times.

The diagrams are worked as usual: begin with the first row in A.1, then work the first row in A.2 etc.

See DROPS lesson: How to read knitting diagrams

See DROPS lesson: How to read crochet diagrams

The total width of the garment (from wrist-to-wrist) will be larger in the larger sizes, despite the actual sleeves being shorter. The larger sizes have longer sleeve caps and wider shoulders, so there will be a good fit in all sizes.

The measurement sketch/schematic drawing provides information regarding the full length of the garment. If it’s a jumper or a jacket the length is measured from the highest point on the shoulder (usually closest to the neckline), and straight down to the bottom of the garment. It is NOT measured from the tip of shoulder. Similarly, the length of yoke is measured from the highest point on the shoulder and down to where yoke is split into body and sleeves.

See DROPS lesson: How to read a schematic drawing

Diagrams are often repeated on the round or in height. 1 repeat is the diagram the way it appears in the pattern. If it says to work 5 repeats of A.1 in the round, then you work A.1 a total of 5 times after/next to each other in the round. If it says to work 2 repeats of A.1 vertically/in height you work the entire diagram once, then begin again at the start and work the entire diagram one more time.

Chain stitches are slightly narrower than other stitches and to avoid working the cast-on edge too tight, we simply chain more stitches to begin with. The stitch count will be adjusted on the following row to fit the pattern and measurement sketch.

The rib edge is more elastic and will contract slightly compared to, for example, stocking stitch. By increasing before the rib edge, you avoid a visible difference in width between the rib edge and the rest of the body.

It’s very easy to cast off too tightly, and by making yarn overs while casting off (and simultaneously casting these off) you avoid a too tight cast off edge.

See DROPS video: How to bind off with yarn overs (yo)

To achieve an even increase (or decrease) you can increase on, for example: every 3rd and 4th row alternately, like so: work 2 rows and increase on the 3rd row, work 3 rows and increase on the 4th. Repeat this until the increase is complete.

See DROPS lesson: Increase or decrease 1 st on every 3rd and 4th row alternately

Should you prefer to work in the round instead of back and forth, you may of course adjust the pattern. You’ll need to add steeks mid-front (usually 5 stitches), and follow the instructions. When you would normally turn and work from the wrong side, simply work across the steek and continue in the round. At the end you’ll cut the piece open, pick up stitches to work bands, and cover the cut edges.

See DROPS video: How to knit steeks and cut open

Should you prefer to work back and forth instead of in the round, you may of course adjust the pattern so you work the pieces separately and then assemble them at the end. Divide the stitches for the body in 2, add 1 edge stitch in each side (for sewing) and work the front and back pieces separately.

See DROPS lesson: Can I adapt a pattern for circular needles into straight needles?

Pattern repeats can vary slightly in the different sizes, in order to get the correct proportions. If you’re not working the exact same size as the garment in the photo, yours might deviate slightly. This has been carefully developed and adjusted so that the complete impression of the garment is the same in all sizes.

Make sure to follow instructions and diagrams for your size!

If you have found a pattern you like which is available in women’s size it’s not very difficult to convert it to men’s size. The biggest difference will be the length of sleeves and body. Start working on the women size that you think would fit across the chest. The additional length will be worked right before you cast off for the armhole/sleeve cap. If the pattern is worked top-down you can add the length right after the armhole or before the first decrease on sleeve.

Regarding additional yarn amount, this will depend on how much length you add, but it is better with a skein too many than too few.

All yarns will have excess fibres (from production) that might come off as lint or shedding. Brushed yarns (ie hairier yarns) have more of these loose, excess fibres, causing more shedding.

Shedding also depends on what is worn under or over the garment, and whether this pulls at the yarn fibres. It’s therefore not possible to guarantee that there will be no shedding

Below are some tips on how to get the best result when working with hairier yarns:

1. When the garment is finished (before you wash it) shake it vigorously so the looser hairs come off. NOTE: do NOT use a lint roller, brush or any method that pulls at the yarn.

2. Place the garment in a plastic bag and put it in your freezer - the temperature will cause the fibres to become less attached to each other, and excess fibres will come off easier.

3. Leave in the freezer for a few hours before taking it out and shaking it again.

4. Wash the garment according to the instructions on the yarn label.

Pilling is a natural process that happens to even the most exclusive of fibers. It's a natural sign of wear and tear that is hard to avoid, and that is most visible in high friction areas of your garment like a sweater's arms and cuffs.

You can make your garment look as new by removing the pilling, using a fabric comb or a pill/lint remover.

Still can't find the answer you need? Then scroll down and leave your question so one of our experts can try to help you. This will be done normally within 5 to 10 working days.
In the meantime, you can read the questions and answers that others have left to this pattern or join the DROPS Workshop on Facebook to get help from fellow knitters/crocheters!

You might also like...

Post a comment to pattern DROPS 243-6

We would love to hear what you have to say about this pattern!

If you want to leave a question, please make sure you select the correct category in the form below, to speed up the answering process. Required fields are marked *.

Comments / Questions (22)

country flag Valerie O'Donovan wrote:

Hi there, I'm trying to figure out how to knit back and forth on circular needles when I pick up the stitches on the sleeve? It seems impossible as it's just too tight. I must be missing something here,. Can you help please? Many thanks, Val

05.02.2024 - 22:01

DROPS Design answered:

See previous answer below, tell us if it was clear for you.

06.02.2024 - 08:44

country flag Valerie O'Donovan wrote:

Hi there, I need to ask about picking up stitches for the sleeves in this pattern on circular needles size 5mm and then knit stocking stitch back and forth for 2cms? I just can't figure out how to do that. It's so tight, I can't go back and forth.. I can just about knit in the round using the magic loop method. Is it really necessary to go back and forth? Can I just knit in the round? I'd appreciate any help you csn give. Thanks, Val

05.02.2024 - 21:58

DROPS Design answered:

Dear Mrs O'Donovan, in this pattern you pick up the stitches just along the armhole, not in the new stitches cast on when joining front and back piece together and work back and forth for 2 cm before joining in the round. These 2 cm will be then sewn to the stitches cast on mid under sleeve. Happy knitting!

06.02.2024 - 08:43

country flag Evelyn Messing wrote:

Nach den 6 Reihen müssen Markierer gesetzt werden. Aber wohin. Direkt nach und vor A1 und A2. .

24.12.2023 - 11:27

DROPS Design answered:

Liebe Frau Messin, diese Markierer sollen beidseitig eingesetzt werden, dh in die 1. und in die letzte Masche, von hier wird dann die Arbeit für die Armausschnitt gemessen. Viel Spaß beim stricken!

02.01.2024 - 08:14

country flag Luisa wrote:

Buongiorno sto realizzando.il modello.nella taglia xl sul dietro dipo gli aumenti .il segnapunti.lo devo.mettrre prima o dopo i 6 ferri.senza aumenti ? Io l ho.messo dopo ma quando raccolgo le 30 .maglie per i davanti non raggoungo il segnapunti .

18.11.2023 - 10:41

DROPS Design answered:

Buonasera Luisa, il segnapunti va dopo i 6 ferri. Buon lavoro!

19.11.2023 - 19:10

country flag Barbara wrote:

Rückenteil in Größe M 28 Reihen gestrickt, 90 Maschen auf der Nadel, + 6 Reihen gestrickt = 34 Reihen, Markierer angebracht. Für das Vorderteil soll man nun vom Nacken bis zum Markierer 28 Maschen auffassen, aber 34 sind es! Muß ich Maschen auslassen oder sitzt der Markierer falsch? Vielen Dank

12.11.2023 - 09:23

DROPS Design answered:

Liebe Barbara, Markierer sitzt richtig, über diese 34 Reihen wird man nur 28 Maschen regelmäßig verteilt auffassen. Viel Spaß beim stricken!

13.11.2023 - 08:02

country flag Meike wrote:

Sorry.. oder von rechts nach links*

03.11.2023 - 06:47

DROPS Design answered:

Nur die Hinreihen werden rechts nach links gelesen. Viel Spaß beim stricken!

03.11.2023 - 06:53

country flag Meike wrote:

Muss ich die 1. Zeile von A3 und A4 von links nach rechts oder von links nach rechts lesen?

03.11.2023 - 06:46

DROPS Design answered:

Liebe Meike, die Rückreihen werden links nach rechts gelesen. Viel Spaß beim stricken!

03.11.2023 - 06:53

country flag Rendy wrote:

Hallo, ich bin am Rückenteil und soll 34 Maschen gleichmässig verteilt zunehmen und dies zwischen den 13 Maschen am Anfang und Ende der Reihe. Das ergeben 24 Maschen...werden die restlichen 10 Maschen in der Mitte verteilt zugenommen, oder wie verstehe ich das? mfG Rendy

24.10.2023 - 10:42

DROPS Design answered:

Liebe Rendy, in S haben Sie 90 Maschen und die Zunahmen stricken Sie zwischen den 13 beidseitigen Maschen, dh: 13 M rechts stricken, 64 M rechts stricken und gleichzeitig 34 M zunehmen, 13 M rechts stricken. Viel Spaß beim stricken!

24.10.2023 - 17:02

country flag Rendy wrote:

Hallo, ist es richtig, dass am Ende der Beschreibung von "Vorderteil", die Länge der Arbeit 24cm betragen soll, gemessen außen am Armausschnitt, obschon der Armausschnitt bei S nur 19 cm beträgt? Es sind jetzt schon 2 Fehler in der Anleitung gewesen und ich mußte alles aufziehen... Danke für Kontrolle/ Bestätigung.... LG

18.10.2023 - 23:25

DROPS Design answered:

Liebe Rendy, Armausschnitt ist beim europäischen Schulter so richtig, bei S ist es 14 cm lang beim Rückenteil und 24 cm beim Vorderteil, so haben Sie 19 cm Armausschnitt (14+24)/2. Schauen Sie mal die Videos über die europäische Schulter unten, nach der Anleitung und die Diagramme. Viel Spaß beim stricken!

19.10.2023 - 08:16

country flag Meike wrote:

Anja hat mit ihrem Kommentar vom 11.9. recht, es muss in jeder Reihe jeweils 1 Masche nach A1 und vor A2 zugenommen werden und nicht wie in dem Zunahmetipp in Hin-,und Rückreihen beschrieben 3 Maschen!

09.10.2023 - 11:19

DROPS Design answered:

Liebe Meike, die 3 Maschen beziehen sich nicht auf die zugenommenen Maschen, sondern darauf, dass am Vorderteil nach bzw. vor 3 Maschen zugenommen wird. A.1 und A.2 gelten ja nur für das Rückenteil. Der Zunahmetipp wurde nun aber etwas umformuliert, sodass er nun hoffentlich eindeutiger ist. Gutes Gelingen!

10.10.2023 - 20:45