
Popular categories
Looking for a yarn?


Comments / Questions (26)
![]() Courtney wrote:
Courtney wrote:
I am very confused on the increase on the front right. When I increase very other row and every 4th row I get 53 st instead of 51. I don’t think I understand how to increase properly.
05.06.2025 - 03:48DROPS Design answered:
Hi Courtney, You first increase every 2nd row both for the armhole and the neckline (1 stitch x 13 0 26 increases and 39 stitches on the needle). Then you continue increasing like this for the neckline 8 times, at the same time as increasing for the armhole every 4th row 4 times (12 more increased stitches). This gives you a total of 51 stitches. Hope this helps. Regards Drops Team.
05.06.2025 - 06:44
![]() Joanna wrote:
Joanna wrote:
Lewy przód: "Następnie dodawać jeszcze 8 razy jak wcześniej co 2 rzędy na dekolt V, ale dodawać jeszcze 4 razy co 4 rzędy na podkrój rękawa..." Prawy przód: "Dodawać oczka na dekolt V jeszcze 8 razy co 2 rzędy jak wcześniej, ale dodawać oczka na podkrój rękawa jeszcze 4 razy co 4 rzędy....". Oba opisy pokazują dokładnie to samo :)
18.03.2025 - 20:40DROPS Design answered:
Witaj Joanno, chwilę wcześniej znajdziesz różnicę: lewy przód: "dodawać w sumie 7-9-10-11-13 razy co 2 rzędy ZA 5-5-5-6-6 pierwszymi oczkami (NA DEKOLT V) i PRZED 5-5-5-6-6 ostatnimi oczkami (NA PODKRÓJ RĘKAWA)." A prawy przód: "dodawać w sumie 7-9-10-11-13 razy co 2 rzędy ZA 5-5-5-6-6 pierwszymi oczkami (NA PODKRÓJ RĘKAWA) i przed 5-5-5-6-6 ostatnimi oczkami (NA DEKOLT V)". Pozdrawiamy!
19.03.2025 - 12:36
![]() Joanna wrote:
Joanna wrote:
Dziękuję za odpowiedź jednakże opis robótki sugeruje inaczej. Proszę sprawdzić. Pozdrawiam serdecznie
18.03.2025 - 08:48DROPS Design answered:
Witaj ponowie Joasiu, czytam i nie widzę:) Możesz mi wskazać, w którym miejscu we wzorze widzisz problem? W ten sposób będzie łatwiej poprawić ewentualną nieścisłość. Pozdrawiamy!
18.03.2025 - 09:38
![]() Joanna wrote:
Joanna wrote:
Witam Jaka jest różnica między lewym a prawym przodem? Z opisu wygląda na to że obie części są identyczne?
17.03.2025 - 19:45DROPS Design answered:
Witaj Joanno, różnica jest taka, że na prawym przodzie dodajesz oczka na podkrój rękawa i dekolt po przeciwnych stronach w stosunku do lewego przodu (jak w lustrzanym odbiciu). Pozdrawiamy!
18.03.2025 - 08:16
![]() Nina wrote:
Nina wrote:
Onko mittataulukkoa jotta voisi ottaa mitat mikä koko olisi itselle sopiva?
05.09.2024 - 19:20DROPS Design answered:
Mitat löytyvät ohjeen tekstin alapuolella olevasta mittapiirroksesta.
06.09.2024 - 13:22
![]() Patrycja wrote:
Patrycja wrote:
Dodatkowo, mam zakończyć robótkę z 268 oczkami. Jeśli teraz mam ich 180, to robiąc 3-krotne dodawanie oczek-3 będę ich mieć już 204, czyli powinnam dodać 64 oczka korzystając z dodawania oczek-2. Mam ich zrobić 16 razy, po 4 oczka na 8 markerów - już mi wychodzi ich aż 512, a nie 64! Jak to powinno działać>
29.06.2024 - 00:41DROPS Design answered:
Witaj ponownie, dodajesz na bokach 16 razy 4 oczka (2 w miejscu każdego markera) = 64 dodane o. Dodatkowo dodajesz 3 razy 8 oczek (1 w miejscu każdego markera na przodzie i tyle) = 24 dodane o. I łącznie mamy: 180+64+24=268 oczek. Pozdrawiamy!
01.07.2024 - 08:35
![]() Patrycja wrote:
Patrycja wrote:
Dzień dobry, Nie rozumiem za bardzo dodawania oczek-2. Jestem na etapie 16cm robótki, powinnam je teraz zacząć dodawać. Ale w opisie jest napisane, żeby zrobić "narzut, 2 oczka dżersejem, 4 oczka francuskim, 2 dżersejem, narzut, zostają dodane 4 oczka". Z tego opisu wynika, że zostają dodane 2 oczka.
29.06.2024 - 00:40DROPS Design answered:
Witaj Patrycjo, zostaną dodane 2 oczka na jednym z boków. To samo powtarzasz na drugim boku i łącznie będą 4 dodane oczka w okrążeniu. Te markery na bokach niech będą w innym kolorze niż 8 pozostałych (4 na przodzie i 4 na tyle). Pozdrawiamy!
01.07.2024 - 08:30
![]() Roxane wrote:
Roxane wrote:
Quelle est l'aisance positive recommandée ? Quelle est celle de la photo ? Merci
12.06.2024 - 02:59DROPS Design answered:
Bonjour, trouvez votre taille en mesurant un vêtement similaire que vous avez et dont vous aimez la forme, comparez ces mesures à celles du schéma pour trouver la taille adéquate (et l'aisance que vous souhaitez). Retrouvez plus d'infos ici. Bon tricot!
12.06.2024 - 08:30
![]() Anna wrote:
Anna wrote:
Dzień dobry Mam na imię Ania i prowadzę konto na YouTube. Mam już fajne grono fanów. Bardzo ważną misją dla mnie jest aby nauczyć osoby początkujące czytać wzory i wykonywać piękne dzianiny. Chciałabym wykonać tutorial krok po kroku na sukienkę DROPS 240-12 DROPS design: model vs-100. Nadmienię jeszcze, że osobiście jestem fanką włóczek drops i bardzo je polecam. Czy mogę otrzymać zgodę na wykonanie tego filmu? Będę wdzięczna za odpowiedź:) Anna
03.06.2024 - 08:35DROPS Design answered:
Witaj Aniu, będzie nam bardzo miło. Prosimy tylko o zaznaczenie, że video jest na podstawie wzoru DROPS/ nr 240-12 . Pozdrawiamy!
03.06.2024 - 20:03
![]() Laura wrote:
Laura wrote:
How many balls of yarn will i need for the size M
22.05.2024 - 08:03DROPS Design answered:
Dear Laura, you will always find the amount of yarn required for each size under the header, at the top of the page, this means you need here in size M: 500 g DROPS Belle/50 g a ball = 10 balls. Happy knitting!
22.05.2024 - 11:07
|
|
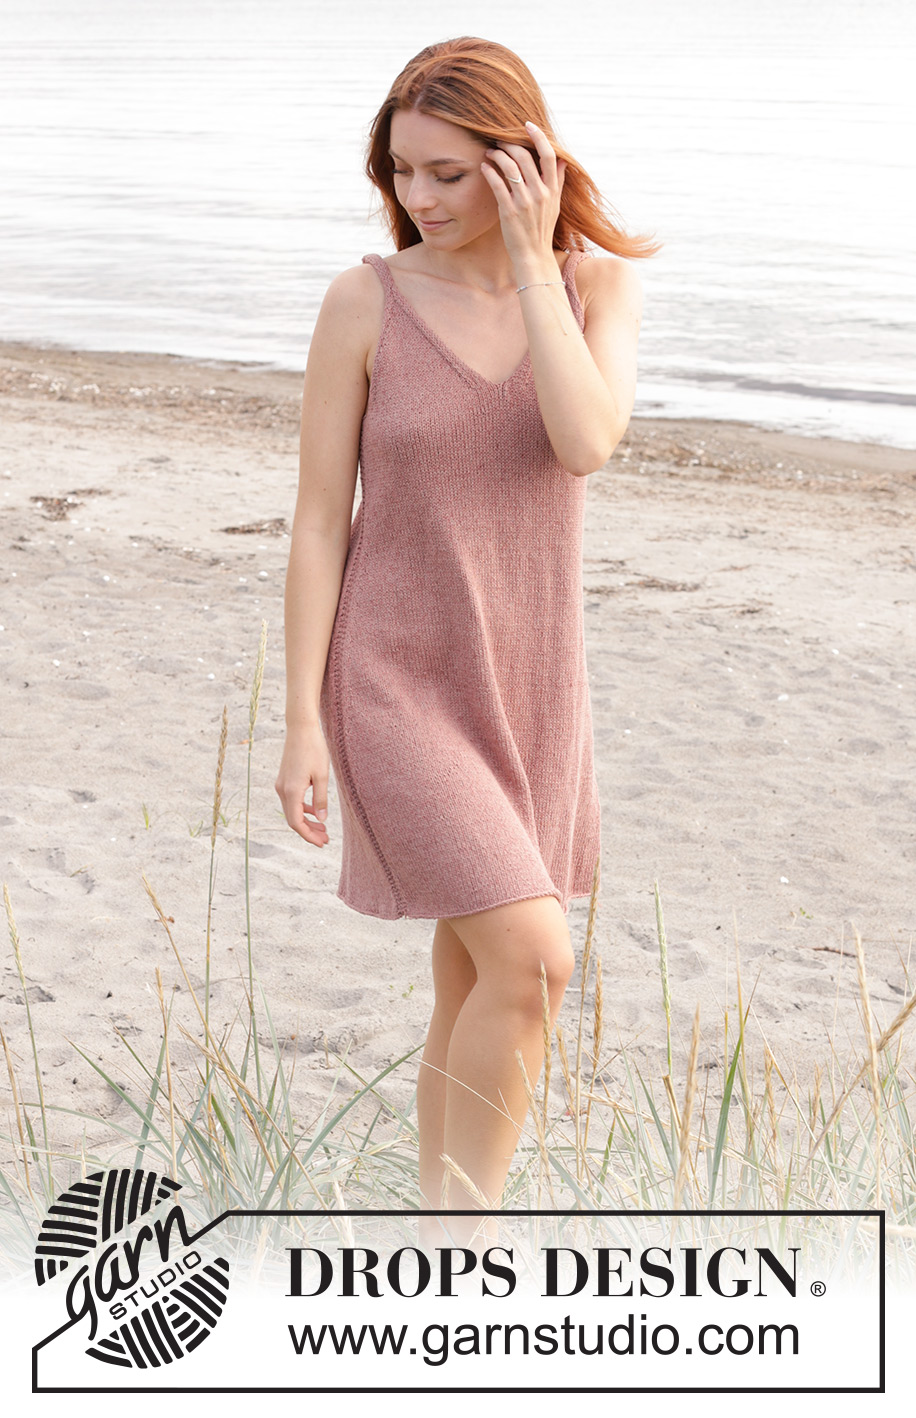
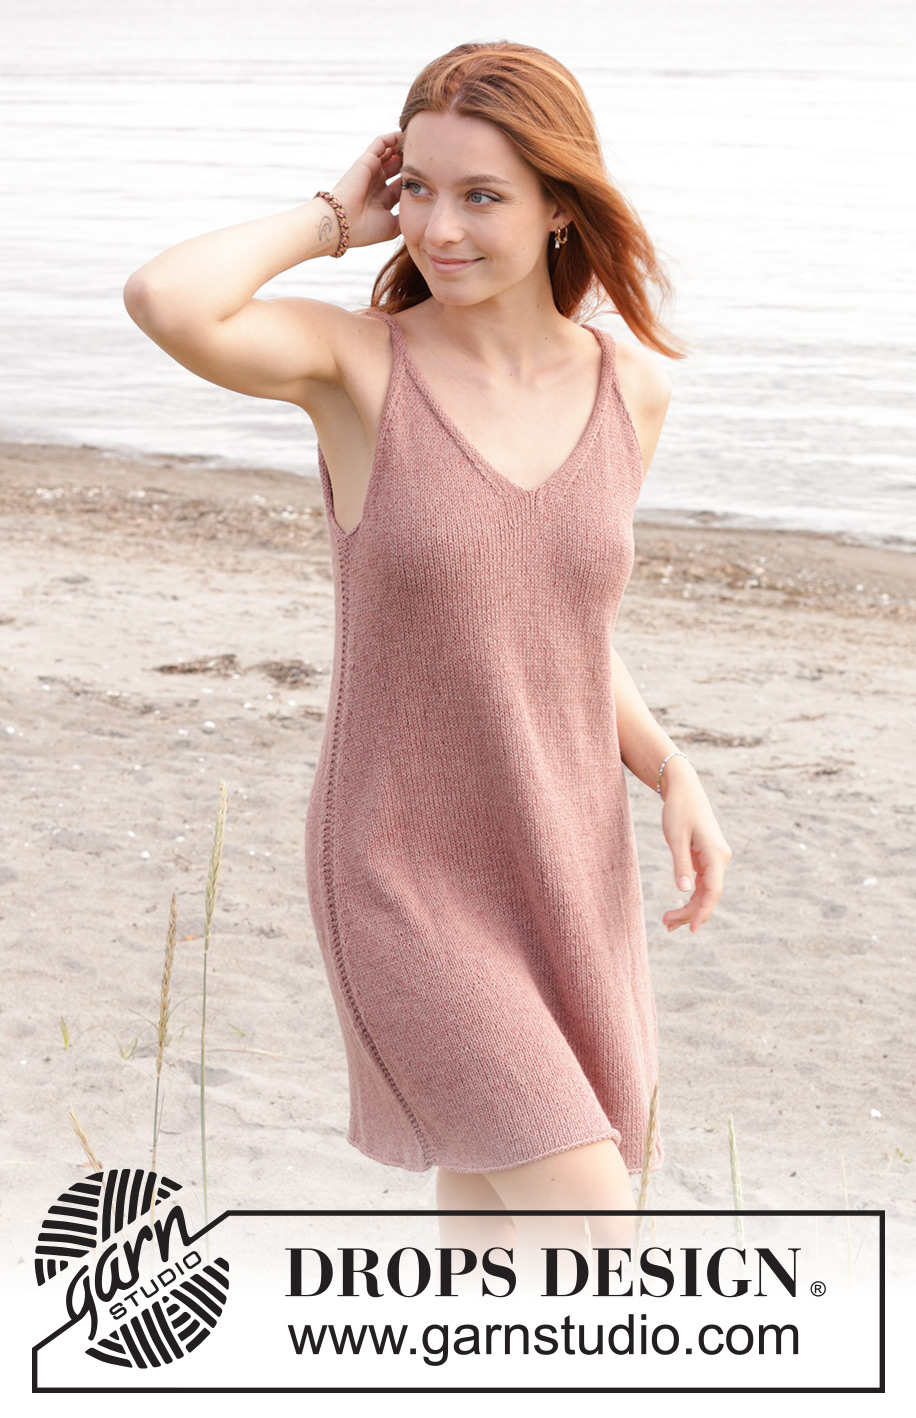
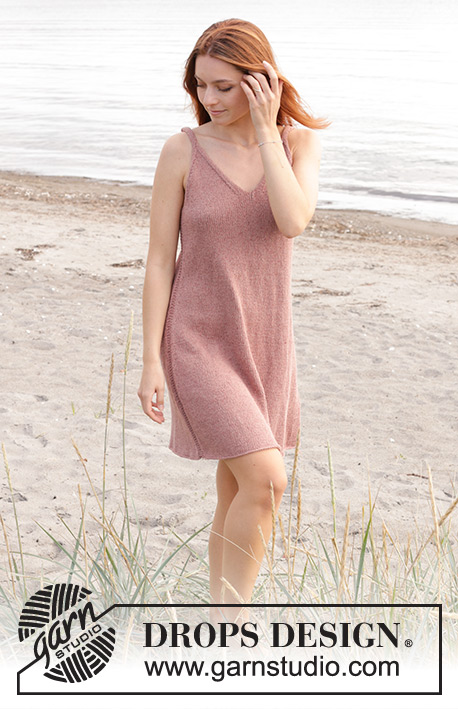
Rose Whisper#rosewhisperdress |
|
 |
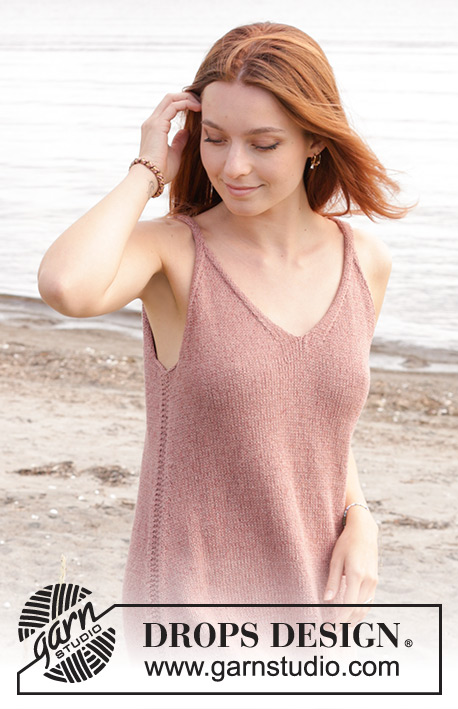 |
Knitted dress in DROPS Belle. Piece is knitted top down in stocking stitch with V-neck and straps. Size XS – XXL.
DROPS 240-12 |
|
|
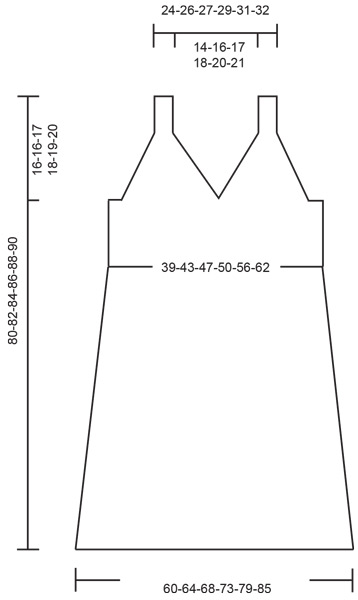
---------------------------------------------------------- EXPLANATION FOR THE PATTERN: ---------------------------------------------------------- GARTER STITCH (worked in the round): 1 ridge vertically = 2 rounds, i.e. knit 1 round and purl 1 round. INCREASE TIP-1: All increases are done from the right side. Knit 5-5-5-6-6-6, make 1 yarn over, knit until 5-5-5-6-6-6 stitches remain, make 1 yarn over and knit 5-5-5-6-6-6 stitches. From wrong side work the yarn overs as follows: Purl until first yarn over, slip yarn over and put it back on needle the opposite way and purl yarn over in back loop, purl until next yarn over, purl yarn over in back loop and purl the rest of row. INCREASE TIP-2: Increase in each side as follows: Work until 4 stitches remain before marker thread, make 1 yarn over, work 2 stitches in stocking stitch, 4 stitches in garter stitch (marker thread is in the middle of these stitches), 2 stitches in stocking stitch, make 1 yarn over. 4 stitches have been increased on round, on next round knit yarn over twisted to avoid holes. INCREASE TIP-3: Increase by making 1 yarn over at every marker thread, on next round knit yarn over twisted to avoid holes. ---------------------------------------------------------- START THE PIECE HERE: ---------------------------------------------------------- DRESS - SHORT OVERVIEW OF THE PIECE: First work front and back piece back and forth, top down in parts, then slip piece together and work in the round down the body and skirt. FRONT PIECE: Front piece consists of 2 parts, when both parts are done, work them together into one front piece. LEFT FRONT PIECE: Cast on 10-10-10-12-12-12 stitches on circular needle size 4 mm with DROPS Belle. Work back and forth in stocking stitch until piece measures 5-3-3½-4-3-4 cm and next row is from right side. Work 5-5-5-6-6-6 stitches in stocking stitch, make 1 yarn over, work 5-5-5-6-6-6 stitches in stocking stitch. Purl 1 row from wrong side but purl the yarn overs twisted to avoid holes = 11-11-11-13-13-13 stitches. Continue in stocking stitch AT THE SAME TIME increase for V-neck and armhole – read INCREASE TIP-1, and work in the different sizes as follows: SIZE XS - S - M - L - XL: Work in stocking stitch and increase from right side as follows: Increase every other row after the first 5-5-5-6-6 stitches (for V-neck) and before the last 5-5-5-6-6 stitches (for armhole) 7-9-10-11-13 times in total. Now change the increase. Increase for V-neck is done every other row as before 8 more times, but now only increase every 4th row for armhole until 4 more increases have been done. It has been increased a total of 11-13-14-15-17 times for armhole and 15-17-18-19-21 times for V-neck. There are 37-41-43-47-51 stitches on needle and piece measures approx. 16-16-17-18-19 cm from cast-on edge. Finish with 1 row from wrong side. Cut the yarn and slip stitches on a thread. SIZE XXL: Work in stocking stitch and increase from right side as follows: Increase every other row after the first 5-5-5-6-6 stitches (for V-neck) and before the last 5-5-5-6-6 stitches (for armhole) 22 times in total. There are 57 stitches on needle and piece measures approx. 20 cm from cast-on edge. Finish with 1 row from wrong side. Cut the yarn and slip stitches on a thread. RIGHT FRONT PIECE: Cast on the same number of stitches, and work the same way as left front piece until there are 11-11-11-13-13-13 stitches on needle Continue in stocking stitch AT THE SAME TIME increase for V-neck and armhole - read INCREASE TIP-1 and work as follows in the different sizes: SIZE XS - S - M - L - XL: Work in stocking stitch and increase from right side as follows: Increase every other row after the first 5-5-5-6-6 stitches (for armhole) and before the last 5-5-5-6-6 stitches (for V-neck) 7-9-10-11-13 times in total. REMEMBER THE KNITTING TENSION! Now change the increase. Increase for V-neck is done every other row as before 8 more times, but now only increase every 4th row for armhole until 4 more increases have been done. It has been increased a total of 11-13-14-15-17 times for armhole and 15-17-18-19-21 times for V-neck. There are 37-41-43-47-51 stitches on needle and piece measures approx. 16-16-17-18-19 cm from cast-on edge. Finish with 1 row from wrong side. Cut the yarn and slip stitches on a thread. SIZE XXL: Work in stocking stitch and increase from right side as follows: Increase every other row after the first 5-5-5-6-6 stitches (for armhole) and before the last 5-5-5-6-6 stitches (for V-neck) 22 times in total. REMEMBER THE KNITTING TENSION! There are 57 stitches on needle and piece measures approx. 20 cm from cast-on edge. Finish with 1 row from wrong side. Cut the yarn and slip stitches on a thread. BACK PIECE: Work right back piece as left front piece, cut the yarn and put the stitches on a thread. Work left back piece as right front piece, cut the yarn and put the stitches on a thread. KNIT FRONT PIECE AND BACK PIECES TOGETHER: Now slip the 4 parts together on the same needle. Work stitches from right front piece, work stitches from left front piece, cast on 8-8-12-12-16-16 new stitches on needle (the side), work stitches from left back piece, work stitches from right back piece, cast on 8-8-12-12-16-16 new stitches on needle (the side). There are 164-180-196-212-236-260 stitches on needle. Front piece and back piece are now worked together. Work body in the round, and measure the piece from here. BODY: Insert a marker thread in the middle of the 8-8-12-12-16-16 new stitches that were cast on in each side. Now work in the round as follows: Work in stocking stitch until 2 stitches remain before first marker thread, work 4 stitches in GARTER STITCH – read above (marker thread is in the middle of these 4 stitches), work in stocking stitch until 2 stitches remain before marker thread in the other side, work 4 stitches in garter stitch (marker thread is in the middle of these 4 stitches) and work in stocking stitch the rest of round. AT THE SAME TIME insert 8 new marker threads in piece without working, count from one marker thread in the side as follows: * Count 17-18-20-21-23-26 stitches, insert a marker thread before next stitch, count 16-18-19-21-24-26 stitches, insert a marker thread before next stitch, count 16-18-20-22-24-26 stitches, insert a marker thread before next stitch, count 16-18-19-21-24-26 stitches and insert a marker thread before next stitch, count 17-18-20-21-23-26 stitches until marker in the side *. Count from *-* the same way from the other marker thread, 4 marker threads have been inserted on the front of dress and 4 marker threads on the back of dress. Move the marker threads when working, use these marker threads for increase later. READ ALL OF THE FOLLOWING SECTION BEFORE CONTINUING! Continue in stocking stitch and 4 stitches in garter stitch in each side. When piece measures 15-16-17-18-19-20 cm, increase at marker threads in each side - read INCREASE TIP-2. Repeat increase every 2½-2½-2½-3-3-3 cm 16-16-16-18-18-18 times in total. AT THE SAME TIME when piece measures 19-21-22-23-24-25 cm increase 1 stitch before each of the 8 marker threads on the front and back of dress - read INCREASE TIP-3. Increase at these marker threads every 12 cm 3 times in total (alternate increase before and after these marker threads). When all increases are done there are 252-268-284-308-332-356 stitches on needle. Work until piece measures 64-66-67-68-69-70 cm from where front piece and back piece were put together. Cast off by knitting. Dress measures 80-82-84-86-88-90 cm from shoulder and down. ASSEMBLY: Sew straps together on each shoulder - sew in outer loops of edge stitches to avoid a chunky seam. |
|
|
|
Have you finished this pattern?Tag your pictures with #dropspattern #rosewhisperdress or submit them to the #dropsfan gallery. Do you need help with this pattern?You'll find 19 tutorial videos, a Comments/Questions area and more by visiting the pattern on garnstudio.com. © 1982-2025 DROPS Design A/S. We reserve all rights. This document, including all its sub-sections, has copyrights. Read more about what you can do with our patterns at the bottom of each pattern on our site. |
|


With over 40 years in knitting and crochet design, DROPS Design offers one of the most extensive collections of free patterns on the internet - translated to 17 languages. As of today we count 314 catalogues and 11822 patterns translated into English (UK/cm).
We work hard to bring you the best knitting and crochet have to offer, inspiration and advice as well as great quality yarns at incredible prices! Would you like to use our patterns for other than personal use? You can read what you are allowed to do in the Copyright text at the bottom of all our patterns. Happy crafting!
Post a comment to pattern DROPS 240-12
We would love to hear what you have to say about this pattern!
If you want to leave a question, please make sure you select the correct category in the form below, to speed up the answering process. Required fields are marked *.