DROPS Safran
DROPS Safran
100% Cotton
from 2.05 $ /50g
Get the yarn to make this pattern from 6.15$.

The yarn cost is calculated from the pattern’s smallest size and the yarn’s cheapest product type. Looking for an even better price? You might find it on the DROPS Deals!

DROPS SS24

Spring Peak

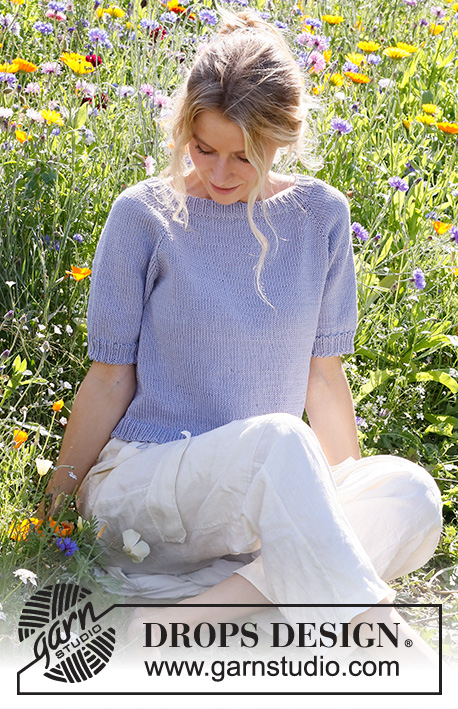
Knitted top top/singlet in DROPS Safran. Piece is knitted top down with lace pattern and vents in the sides. Size: S - XXXL

DROPS 230-54
DROPS design: Pattern e-327
Yarn group A
----------------------------------------------------------

SIZE:
S - M - L - XL - XXL – XXXL

Finished measurements:
Chest measurements: 84-92-100-110-122-134 cm = 33"-36¼"-39⅜"-43⅜"-48"-52¾"
Full length: 44-46-48-50-52-54 cm = 17¼"-18"-19"-19¾"-20½"-21¼"
All measurements in charts are in cm.

MATERIALS:
DROPS SAFRAN from Garnstudio (belongs to yarn group A)
150-200-200-200-250-250 g color 70, sweet orchid

NEEDLES:
DROPS SINGLE POINTED NEEDLES SIZE 3 MM = US 2.5
DROPS CIRCULAR NEEDLE SIZE 2.5 MM = US 1.5: Length: 80 cm = 32"

KNITTING GAUGE:
24 stitches in width and 32 rows vertically in stockinette stitch = 10 x 10 cm = 4" x 4".
NOTE! Remember that needle size is only a suggestion. If you have too many stitches on 10 cm = 4" switch to larger needles. If you have too few stitches on 10 cm = 4" switch to smaller needles.

-------------------------------------------------------

Alternative Yarn – See how to change yarns here
Yarn Groups A to F – Use the same pattern and change the yarn here
Yarn usage using an alternative yarn – Use our yarn converter here

-------------------------------------------------------

DROPS Safran
DROPS Safran
100% Cotton
from 2.05 $ /50g
Get the yarn to make this pattern from 6.15$.

The yarn cost is calculated from the pattern’s smallest size and the yarn’s cheapest product type. Looking for an even better price? You might find it on the DROPS Deals!

Pattern instructions

NOTE: This pattern is written in American English. All measurements in charts are in cm. For conversion from inches to cm - click here. There are different terms for crocheting in American and British English. If this pattern includes crochet, click for "crochet terms" here. For this pattern in British English, please click here.
----------------------------------------------------------

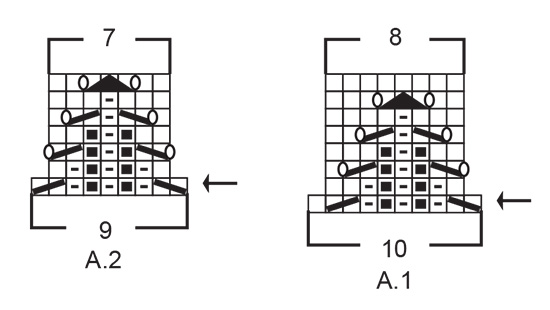
EXPLANATION FOR THE PATTERN:

----------------------------------------------------------

GARTER STITCH (back and forth):
Knit all rows.
1 ridge vertically = knit 2 rows.

PATTERN:
See diagrams A.1 and A.2. Diagrams show all rows in pattern seen from the right side.

INCREASE TIP (applies to armholes):
Increase 1 stitch by making 1 yarn over inside the outermost 7-7-9-9-11-11 stitches in each side. On next row work yarn over twisted to avoid holes Then work the new stitches in stockinette stitch.

DECREASE TIP (applies to sides on front and back piece):
All decreases are done from the right side!
DECREASE AT BEGINNING OF ROW AS FOLLOWS:
Work 1 stitch in garter stitch, 2 stitches in stockinette stitch, slip 1 stitch knitwise, knit 1, pass slipped stitch over stitch worked
DECREASE AT END OF ROW AS FOLLOWS:
Work until 5 stitches remain, knit 2 together, 2 stitches in stockinette stitch, and 1 stitch in garter stitch.

----------------------------------------------------------

START THE PIECE HERE:

----------------------------------------------------------

TOP - SHORT OVERVIEW OF THE PIECE:
Work front and back piece back and forth separately and work top down. Sew piece together on the shoulders and in the sides.

FRONT PIECE:
Begin with left shoulder at the front (when garment is worn).

LEFT SHOULDER:
Cast on 19-19-21-21-23-23 stitches on circular needle size 3 MM = US 2.5 with DROPS Safran. Purl 1 row from wrong side.
Then work a rib as follows:
ROW 1 (= right side): 1 stitch in GARTER STITCH - read explanation above - * knit 1 twisted, purl 1 *, work from *-* until 2 stitches remain on needle, knit 1 twisted and 1 stitch in garter stitch.
ROW 2 (= wrong side): 1 stitch in garter stitch, * purl 1 twisted, knit 1 *, repeat from *-* until 2 stitches remain, purl 1 twisted and 1 stitch in garter stitch.
Repeat 1st and 2nd row until piece measures 8-8-8-9-9-9 cm = 3⅛"-3⅛"-3⅛"-3½"-3½"-3½" – finish after a row from wrong side, do not turn piece, but cast on 65 new stitches at the ned of row for neck. Put piece aside and work the right shoulder.

RIGHT SHOULDER:
Cast on 19-19-21-21-23-23 stitches on circular needle size 3 MM = US 2.5 with DROPS Safran. Purl 1 row from wrong side. Then work rib the same way as on left shoulder until piece measures 8-8-8-9-9-9 cm = 3⅛"-3⅛"-3⅛"-3½"-3½"-3½" – finish after a row from wrong side.

OVERVIEW OF NEXT SECTION:
Now put parts together and work pattern as explained below - in addition increase for armholes in each side. Read section PATTERN and ARMHOLES before continuing!

PATTERN:
Work from right side as before over the first 18-18-20-20-22-22 stitches on right shoulder, purl next stitch, continue rib over the 65 stitches cast on for neck, purl first stitch on left shoulder, and work the last 18-18-20-20-22-22 stitches on left shoulder in rib as before = 103-103-107-107-111-111 stitches.
Work rib like this over all stitches with 1 stitch in garter stitch in each side until piece measures 13-13-14-14-15-15 cm = 5⅛"-5⅛"-5½"-5½"-6"-6" from cast-on edge on shoulder straps.
Work next row as follows from right side: 1 stitch in garter stitch, work rib as before over the next 6-6-8-8-10-10 stitches, work A.1 8 times in total, A.2, rib as before over the next 6-6-8-8-10-10 stitches, and 1 stitch in garter stitch.
Continue this pattern back and forth like this. When A.1 and A.2 have been worked vertically, work in stockinette stitch with 6-6-8-8-10-10 stitches in rib and 1 stitch in garter stitch at the edge in each side. REMEMBER THE KNITTING GAUGE!

ARMHOLE:
AT THE SAME TIME when first row in A.1/A.2 is worked, begin increase for armhole – read INCREASE TIP. Increase 1 stitch in each side on every 4th row 4-2-0-0-0-0 times in total, on every other row 0-7-10-5-6-2 times in total, and then every row 0-0-0-11-13-24 times in total = 93-103-109-121-131-145 stitches.
When a row has been worked after last increase for armhole, cast on 4-4-6-6-8-8 new stitch for armhole at the end of the next 2 rows = 101-111-121-133-147-161 stitches. Piece measures approx. 18-19-20-21-22-23 cm = 7"-7½"-8"-8¼"-8¾"-9" from cast-on edge on shoulder straps. Continue front piece as explained below.

Insert 1 marker on row – now measure piece from this marker.
Work in stockinette stitch with 6-6-8-8-10-10 stitches in rib and 1 stitch in garter stitch at the edge in each side.
When piece measures 2 cm = ¾" from marker, work in stockinette stitch with 1 stitch in garter stitch at the edge in each side.
When piece measures 5 cm = 2" from marker, decrease 1 stitch in each side - read DECREASE TIP. Decrease like this every 5 cm = 2" 4 times in total in each side = 93-103-113-125-139-153 stitches.
When piece measures 20-21-22-23-24-25 cm = 8"-8¼"-8¾"-9"-9½"-9¾" from marker, knit 1 row from right side while increasing 28-30-34-38-42-46 stitches evenly = 121-133-147-163-181-199 stitches. Piece measures now approx. 38-40-42-44-46-48 cm = 15"-15¾"-16½"-17¼"-18"-19" from cast-on edge on shoulder straps.
Switch to circular needle size 2.5 MM = US 1.5.
Then work a rib as follows:
ROW 1 (= wrong side): 1 stitch in garter stitch, * purl 1 twisted, knit 1 *, repeat from *-* until 2 stitches remain, purl 1 twisted and 1 stitch in garter stitch.
ROW 2 (= right side): 1 stitch in garter stitch, * knit 1 twisted, purl 1 *, work from *-* until 2 stitches remain, knit 1 twisted and 1 stitch in garter stitch.
Repeat 1st and 2nd row until rib measures 6 cm = 2⅜". Loosely bind off. Front piece measures approx. 44-46-48-50-52-54 cm = 17¼"-18"-19"-19¾"-20½"-21¼".

BACK PIECE:
Cast on and work as front piece – back and front pieces are exactly the same.

ASSEMBLY:
Sew the shoulder seams. Sew side seams in outer loops of edge stitch - begin seam at armholes and stop when 6 cm = 2⅜" remain at the bottom in each side (vent).

Diagram

All measurements in charts are in cm.

symbols = knit from the right side, purl from the wrong side
symbols = purl from the right side, knit from the wrong side
symbols = knit twisted from right side, purl twisted from wrong side
symbols = between 2 stitches make 1 yarn over
symbols = knit 2 together
symbols = slip 1 stitch knitwise, knit 1, pass slipped stitch over stitch worked
symbols = slip 1 stitch knitwise, knit 2 stitches together, pass slipped stitch over stitches worked together
symbols = on this row begin increase for armholes
diagram
diagram

Each of our patterns has specific tutorial videos to help you.

Do you have a question? See a list of frequently asked questions (FAQ)

Knitting tension is what determines the final measurements of your work, and is usually measured per 10 x 10 cm. It is provided like so: number of stitches in width x number of rows in height - eg: 19 stitches x 26 rows = 10 x 10 cm.

The knitting tension is very individual; some people knit/crochet loosely while others work tightly. You adjust the knitting tension with the needle size, which is why the suggested needle size only serve as a guide! You need to adjust this (up or down) to ensure that YOUR knitting tension matches the knitting tension provided in the pattern. If you work with a different knitting tension than provided you will have a different yarn consumption, and your work will have different measurements than what the pattern suggests.

The knitting tension also determines which yarns can replace each other. As long as you achieve the same knitting tension you can replace one yarn with another.

See DROPS lesson: How to measure your tension/gauge

See DROPS video: How to make a gauge tension swatch

The required amount of yarn is provided in grams, eg: 450 g. To calculate how many balls you’ll need you first need to know how many grams are in 1 ball (25g, 50g or 100g). This information is available if you click on the individual yarn quality on our pages. Divide the amount required with the amount of each ball. For example, if each ball is 50g (the most common amount), the calculation will be as follows: 450 / 50 = 9 balls.

The important thing when changing from one yarn to another is that the knitting/crochet tension remains the same. This is so that the measurements of the finished piece will be the same as on the sketch provided. It is easier to achieve the same knitting tension using yarns from the same yarn group. It is also possible to work with multiple strands of a thinner yarn to achieve the knitting tension of a thicker one. Please try our yarn converter. We recommend you to always work a test swatch.

Please NOTE: when changing yarn the garment might have a different look and feel to the garment in the photo, due to individual properties and qualities of each yarn.

See DROPS lesson: Can I use a different yarn than the one mentioned in the pattern?

All our yarns are categorised into yarn groups (from A to F) according to thickness and knitting tension – group A contains the thinnest yarns and group F the thickest. This makes it easier for you to find alternative yarns to our patterns, should you wish to switch yarn. All yarns within the same group have a similar knitting tension and can easily replace each other. However, different yarn qualities have different structures and properties which will give the finished work a unique look and feel.

Click here for an overview of the yarns in each yarn group

At the top of all our patterns you’ll find a link to our yarn converter, which is a helpful tool should you wish to use a different yarn than suggested. By filling in the yarn quality you wish to replace, the amount (in your size) and number of strands, the converter will present good alternative yarns with the same knitting tension. Additionally it will tell you how much you’ll require in the new qualities and whether you’ll need to work with multiple strands. Most skeins are 50g (some are 25g or 100g).

If the pattern is worked with multiple colours, every colour will have to be converted separately. Similarly, if the pattern is worked with several strands of different yarns (for example 1 strand Alpaca and 1 strand Kid-Silk) you will have to find alternatives for each, individually.

Click here to see our yarn converter

Since different yarns have different qualities and textures we have chosen to keep the original yarn in our patterns. However, you can easily find options among our available qualities by using our yarn converter, or simply pick a yarn from the same yarn group.

It is possible that some retailers still have discontinued yarns in stock, or that someone has a few skeins at home that they would like to find patterns for.

The yarn converter will provide both alternative yarn as well as required amount in the new quality.

If you think it's hard to decide what size to make, it can be a good idea to measure a garment you own already and like the size of. Then you can pick the size by comparing those measures with the ones available in the pattern's size chart.

You'll find the size chart at the bottom of the pattern.

See DROPS lesson: How to read size chart

The needle size provided in the pattern serves only as a guide, the important thing is to follow the knitting tension. And since knitting tension is very individual, you will have to adjust the needle size to ensure that YOUR tension is the same as in the pattern – maybe you’ll have to adjust 1, or even 2 needle sizes, up or down to achieve the correct tension. For this, we recommend that you work test swatches.

Should you work with a different knitting tension than the one provided, the measurements of the finished garment might deviate from the measurement sketch.

See DROPS lesson: How to measure your tension/gauge

See DROPS video: How to make a gauge tension swatch

Working a garment top-down provides more flexibility and room for personal adjustment. For example it is easier to try the garment on while working, as well as making adjustments to length of yoke and shoulder caps.

The instructions are carefully explaining every step, in the correct order. Diagrams are adjusted to the knitting direction and are worked as usual.

The diagram depicts all rows/rounds, and every stitch seen from the right side. It is read from bottom to top, from right to left. 1 square = 1 stitch.

When working back and forth, every other row is worked from the right side and every other row is worked from the wrong side. When working from the wrong side, the diagram will have to be worked reversed: from left to right, knit stitches are purled, purl stitches are knit etc.

When working in the round every round is worked from the right side and the diagram are worked from right to left on all rounds.

See DROPS lesson: How to read knitting diagrams

The diagram depicts all rows/rounds, and every stitch seen from the right side. It is worked from bottom to top, from right to left.

When working back and forth every other row is worked from the right side: from right to left and every other row is worked from the wrong side: from left to right.

When working in the round, every row in the diagram are worked from the right side, from right to left.

When working a circular diagram you start in the middle and work your way outwards, counter clockwise, row by row.

The rows usually start with a given number of chain stitches (equivalent to the height of the following stitch), this will either be depicted in the diagram or explained in the pattern.

See DROPS lesson: How to read crochet diagrams

Instructions for working several diagrams after each other on the same row/round, will often be written like so: “work A.1, A.2, A.3 a total of 0-0-2-3-4 times". This means you work A.1 once, then A.2 is worked once, and A.3 is repeated (in width) the number of times provided for your size – in this case like so: S = 0 times, M = 0 times, L=2 times, XL= 3 times and XXL = 4 times.

The diagrams are worked as usual: begin with the first row in A.1, then work the first row in A.2 etc.

See DROPS lesson: How to read knitting diagrams

See DROPS lesson: How to read crochet diagrams

The total width of the garment (from wrist-to-wrist) will be larger in the larger sizes, despite the actual sleeves being shorter. The larger sizes have longer sleeve caps and wider shoulders, so there will be a good fit in all sizes.

The measurement sketch/schematic drawing provides information regarding the full length of the garment. If it’s a jumper or a jacket the length is measured from the highest point on the shoulder (usually closest to the neckline), and straight down to the bottom of the garment. It is NOT measured from the tip of shoulder. Similarly, the length of yoke is measured from the highest point on the shoulder and down to where yoke is split into body and sleeves.

See DROPS lesson: How to read a schematic drawing

Diagrams are often repeated on the round or in height. 1 repeat is the diagram the way it appears in the pattern. If it says to work 5 repeats of A.1 in the round, then you work A.1 a total of 5 times after/next to each other in the round. If it says to work 2 repeats of A.1 vertically/in height you work the entire diagram once, then begin again at the start and work the entire diagram one more time.

Chain stitches are slightly narrower than other stitches and to avoid working the cast-on edge too tight, we simply chain more stitches to begin with. The stitch count will be adjusted on the following row to fit the pattern and measurement sketch.

The rib edge is more elastic and will contract slightly compared to, for example, stocking stitch. By increasing before the rib edge, you avoid a visible difference in width between the rib edge and the rest of the body.

It’s very easy to cast off too tightly, and by making yarn overs while casting off (and simultaneously casting these off) you avoid a too tight cast off edge.

See DROPS video: How to bind off with yarn overs (yo)

To achieve an even increase (or decrease) you can increase on, for example: every 3rd and 4th row alternately, like so: work 2 rows and increase on the 3rd row, work 3 rows and increase on the 4th. Repeat this until the increase is complete.

See DROPS lesson: Increase or decrease 1 st on every 3rd and 4th row alternately

Should you prefer to work in the round instead of back and forth, you may of course adjust the pattern. You’ll need to add steeks mid-front (usually 5 stitches), and follow the instructions. When you would normally turn and work from the wrong side, simply work across the steek and continue in the round. At the end you’ll cut the piece open, pick up stitches to work bands, and cover the cut edges.

See DROPS video: How to knit steeks and cut open

Should you prefer to work back and forth instead of in the round, you may of course adjust the pattern so you work the pieces separately and then assemble them at the end. Divide the stitches for the body in 2, add 1 edge stitch in each side (for sewing) and work the front and back pieces separately.

See DROPS lesson: Can I adapt a pattern for circular needles into straight needles?

Pattern repeats can vary slightly in the different sizes, in order to get the correct proportions. If you’re not working the exact same size as the garment in the photo, yours might deviate slightly. This has been carefully developed and adjusted so that the complete impression of the garment is the same in all sizes.

Make sure to follow instructions and diagrams for your size!

If you have found a pattern you like which is available in women’s size it’s not very difficult to convert it to men’s size. The biggest difference will be the length of sleeves and body. Start working on the women size that you think would fit across the chest. The additional length will be worked right before you cast off for the armhole/sleeve cap. If the pattern is worked top-down you can add the length right after the armhole or before the first decrease on sleeve.

Regarding additional yarn amount, this will depend on how much length you add, but it is better with a skein too many than too few.

All yarns will have excess fibres (from production) that might come off as lint or shedding. Brushed yarns (ie hairier yarns) have more of these loose, excess fibres, causing more shedding.

Shedding also depends on what is worn under or over the garment, and whether this pulls at the yarn fibres. It’s therefore not possible to guarantee that there will be no shedding

Below are some tips on how to get the best result when working with hairier yarns:

1. When the garment is finished (before you wash it) shake it vigorously so the looser hairs come off. NOTE: do NOT use a lint roller, brush or any method that pulls at the yarn.

2. Place the garment in a plastic bag and put it in your freezer - the temperature will cause the fibres to become less attached to each other, and excess fibres will come off easier.

3. Leave in the freezer for a few hours before taking it out and shaking it again.

4. Wash the garment according to the instructions on the yarn label.

Pilling is a natural process that happens to even the most exclusive of fibers. It's a natural sign of wear and tear that is hard to avoid, and that is most visible in high friction areas of your garment like a sweater's arms and cuffs.

You can make your garment look as new by removing the pilling, using a fabric comb or a pill/lint remover.

Still can't find the answer you need? Then scroll down and leave your question so one of our experts can try to help you. This will be done normally within 5 to 10 working days.
In the meantime, you can read the questions and answers that others have left to this pattern or join the DROPS Workshop on Facebook to get help from fellow knitters/crocheters!

You might also like...

Spring Peak

knittingeon, Spain

Spring Peak

Ana, Spain

Post a comment to pattern DROPS 230-54

We would love to hear what you have to say about this pattern!

If you want to leave a question, please make sure you select the correct category in the form below, to speed up the answering process. Required fields are marked *.

Comments / Questions (20)

country flag Ania wrote:

Witam, dziękuje za odp. Widzę, że schemat A2 się różni od A1( nie ma on 8-ego rzędu). Przerobiłam 7 rzędów schematu A1 i A2 i nie wiem co dalej. Dodałam dotychczas łącznie 8ocz. ( w co drugim rzędzie po oczku z każdej strony robótki) Gdzie dodać pozostałe 12 ocz? Czy przerabiać 8 rząd schematu A1 z pustymi kratkami? a co wtedy ze schematem A2? Po przerobieniu 1 rzędu od ostatnich dod. ocz. na podkroje, nabrać na podkroje 6 oczek na końcu 2 kolejnych rz.

09.01.2023 - 19:33

DROPS Design answered:

Witaj Aniu, 1) w schemacie A.2 brakuje ostatniego rzędu. Jest taki sam jak w schemacie A.1. 2) Po przerobieniu 1 rzędu od ostatnich dodanych oczek na podkroje rękawów, nabrać na podkroje rękawów 6 oczek na końcu 2 kolejnych rzędów. Pozdrawiamy!

10.01.2023 - 08:33

country flag Ania wrote:

Witam, Czy może Pani rozpisać dokładnie jak dodawać oczka dla rozm. L ? 10 razy co 2 rzędy? dodaje 10 ocz. co drugi rząd przez całą wysokość schematu A1 czyli 80 ocz. razem? I tylko po bokach robótki? bo w schemacie A1 i A2 już są widzę zaznaczone narzuty jakieś. 2 dni staram się to rozgryźć. .. PS. Mogłoby być dodatkowe zdjęcie jak ten top wygląda właśnie z boku na modelce. To by znacznie ułatwiło pracę.pozdr.

05.01.2023 - 12:49

DROPS Design answered:

Witaj Aniu, na podkroje rękawów dodajesz 1 oczko z każdej strony, w rozmiarze L 10 razy co 2 rzędy (patrz DODAWANIE OCZEK (podkroje rękawów)). Czyli w co drugim rzędzie dodajesz tylko 2 oczka. W sumie na podkroje rękawów dodasz 20 oczek. Podsumowując: 107 oczek jest przed rozpoczęciem schematów A.1 i A.2. Po ich przerobieniu zostanie 89 oczek (w 1-szym rzędzie każdego schematu A.1 i A.2 są zamknięte 2 oczka >18 zamkniętych oczek). Po dodaniu 20 oczek na podkroje rękawów mamy 89+20=109 oczek. W razie potrzeby pisz. Zapytam czy mamy ujęcie z boku sweterka. Pozdrawiamy!

06.01.2023 - 18:06

country flag Ania wrote:

Dzień dobry, nie rozumiem ile i kiedy mam dodawać oczka na podkroje rękawów. Dodawać 1 oczko z każdej strony w sumie 4-2-0-0-0-0 razy co 4 rzędy, 0-7-10-5-6-2 razy co 2 rzędy i 0-0-0-11-13-24 razy w każdym rzędzie = 93-103-109-121-131-145 oczek. Czemu to jest 3 razy rozpisane i są zera? z góry dzięki za odp., pozdrawiam

03.01.2023 - 18:18

DROPS Design answered:

Witaj Aniu, wybierasz jedną cyfrę z ciągu cyfr w zależności od przerabianego rozmiaru. Np. jeśli przerabiasz rozmiar S (najmniejszy) to wybierasz zawsze 1-szą cyfrę. Tzn. w rozmiarze S dodajesz tylko 1 oczko z każdej strony 4 razy co 4 rzędy (jak widzisz 0 to nie ma wogóle dodawania oczek). Jak dodawać oczka patrz DODAWANIE OCZEK (podkroje rękawów) na górze we wzorze. Pozdrawiamy!

04.01.2023 - 09:15

country flag Katk Elshout wrote:

Ik begin met de meerderingen voor de armsgaten en start met A2 voor maat L 8 keer en A1. Ik heb 107 steken en na 10 keer 2 steken te hebben gemeerderd moet ik 109 steken hebben. Maar 107 st en 10 keer 2 steken gemeerderd komt uit op 127 steken. Wat doe ik niet goed?

01.12.2022 - 20:37

country flag Luize Avrigeanu wrote:

Hello, have a question for this pattern - especially how A1 and A2 are used? first it is said work A1 8 times and no reference when A2 is worked... thank you

24.08.2022 - 17:14

DROPS Design answered:

Dear Mrs Avrigeanu, you will repeat A.1 in width and finish the row with A.2, ie work as follows: 1 edge stitch in garter stitch, work the next 6 - 10 sts (see size) as before, repeat A.1 a total of 8 times in width, work A.2, work the next 6 - 10 sts (see size) as before, 1 edge stitch in garter stitch. From WS work 1 edge st, the next 6-10 sts as before, A.2 (reading from left towards the right), repeat A.1 and finish row with 6-10 sts as before and 1 edge stitch. Happy knitting!

25.08.2022 - 09:11

country flag Anja wrote:

Hallo, wird die Zunahmemasche für die Armausschnitte in den Rückreihen rechts verschränkt oder links verschränkt gestrickt? Und wie werden die zugenommenen Maschen dann weiter gestrickt? Danke schon einmal für die Hilfe!

15.08.2022 - 20:07

DROPS Design answered:

Liebe Anja, die Zunahmen für die Armausschnitte werden links verschränkt (= Rückreihe) und glatt rechts gestrickt, siehe ZUNAHMETIPP (gilt für die Armausschnitte): unter HINWEISE ZUR ANLEITUNG:. Viel Spaß beim stricken!

16.08.2022 - 08:29

country flag Luize wrote:

Hello, I have a question: I have been taught when knitting that the firs stitch is never worked (knitted) at the beginning of the row, I have seen in all your tutorials and patterns that is always worked… would you please enlighten me? Thank you

12.08.2022 - 04:49

DROPS Design answered:

Dear Luize, there are different way to work the edge stitches, in this pattern it has been chosen to work the edge stitches in garter stitch (= knit them on every row both from the right side and the wrong side). Happy knitting!

12.08.2022 - 09:53

country flag Tineke wrote:

Is er soms een fout in het aantal meerderingen voor het armschat.

23.07.2022 - 09:50

country flag Susan wrote:

Is the yarn machine washable?

31.05.2022 - 14:41

DROPS Design answered:

Dear Susan, yes, Safran is machine washable on a gentle cycle (40ºC). You can check all of Safran's details at the following link: https://www.garnstudio.com/yarn.php?show=drops-safran&cid=19 Happy knitting!

31.05.2022 - 16:45

country flag TURPIN wrote:

Lavender

14.01.2022 - 16:21