Angelina by DROPS Design

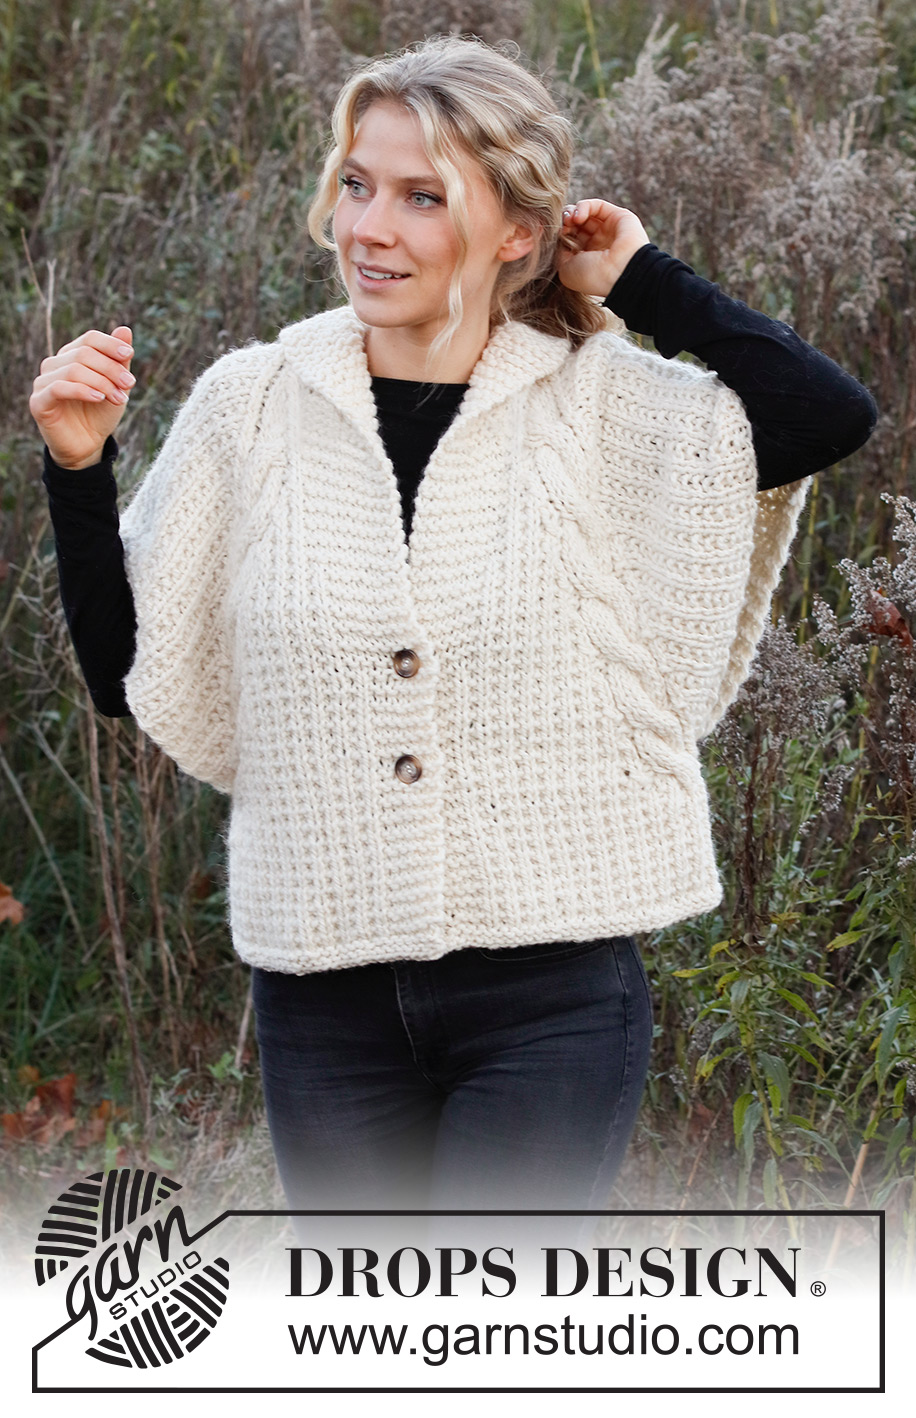
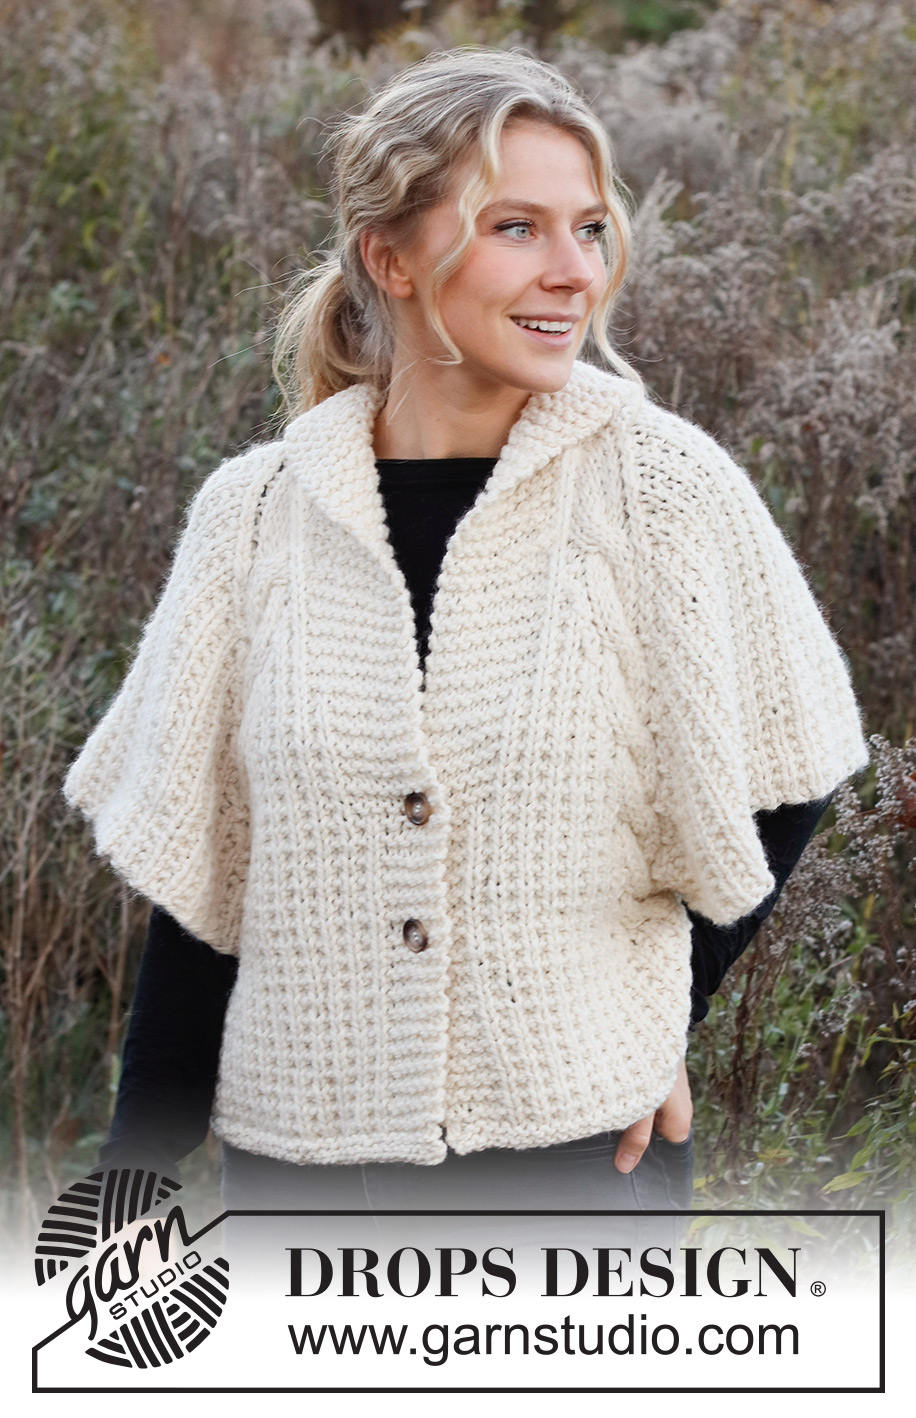
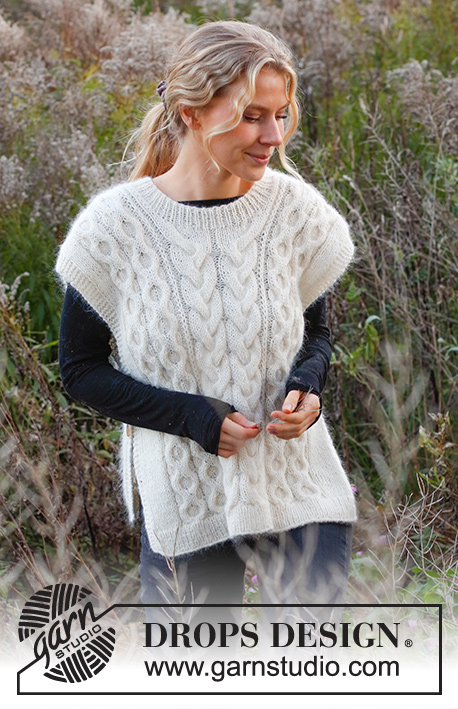
Raglánový propínací svetr s copánky a se strukturovaným vzorem pletený z příze DROPS Andes. Velikost XS - XXL.

DROPS 226-32
DROPS Design: model č. an-067
Skupina přízí E nebo C + C
-------------------------------------------------------

VELIKOSTI:
XS - S - M - L - XL - XXL

MATERIÁL:
DROPS ANDES firmy Garnstudio (spadá do skupiny přízí E)
600-700-700-800-900-1000 g barva č. 0100, smetanová

DROPS knoflíky, Marble # 630: 2 ks pro všechny velikosti.

JEHLICE:
DROPS KRUHOVÁ JEHLICE č.9: délka 80 cm pro strukturovaný vzor.
DROPS KRUHOVÁ JEHLICE č.8: délka 80 cm pro vroubkový vzor.
DROPS POMOCNÁ JEHLICE copánková – na křížení copánků.

ZKUŠEBNÍ VZOREK:
10 ok na šířku a 14 řad na výšku strukturovaným vzorem (A.1) = 10 x 10 cm.
POZNÁMKA: Uvedená síla jehlic je pouze orientační. Máte-li ve svém zkušebním vzorku více ok na 10 cm, použijte jehlice silnější. Pokud máte naopak méně ok na 10 cm, použijte jehlice slabší.

-------------------------------------------------------

Zkušební vzorek – Podívejte se, jak ho měřit a proč
Náhradní příze – Podívejte se, jak změnit přízi
Skupina přízí A až F – Neměňte návod, změňte přízi
Spotřeba příze při použití náhradní příze – Využijte náš převodník

-------------------------------------------------------


65% vlna, 35% alpaka
od 100.00 Kč /100g
DROPS Andes uni colour DROPS Andes uni colour 100.00 Kč /100g
Příze a Jehlice
Objednat
DROPS Andes mix DROPS Andes mix 107.00 Kč /100g
Příze a Jehlice
Objednat
needles Jehlice a háčky
Přízi na tento model můžete mít už za 1200Kč. Více zde.

Návod

-------------------------------------------------------

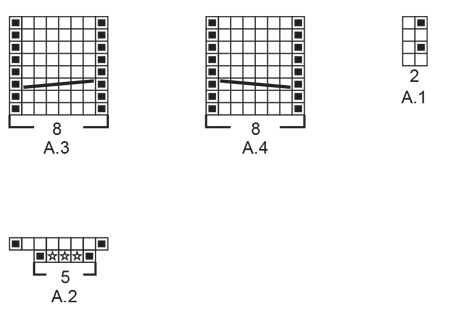
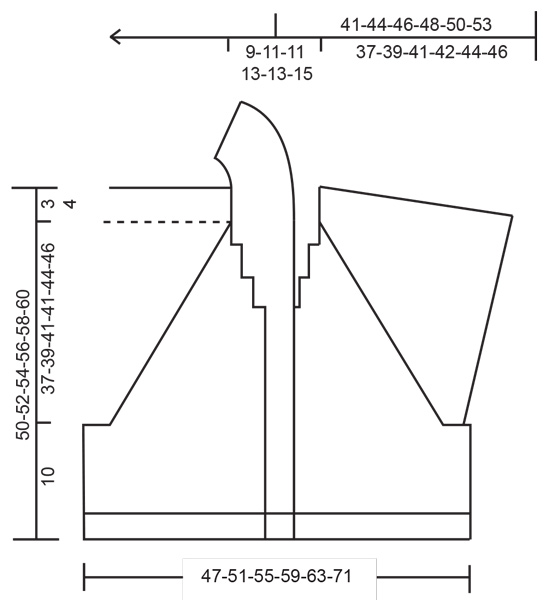
VYSVĚTLIVKY K NÁVODU:

-------------------------------------------------------

VROUBKOVÝ VZOR:
Pleteme stále hladce, lícové i rubové řady.
1 vroubek = 2 řady hladce.

VZOR:
Viz schémata A.1 až A.4.
Zobrazeny jsou všechny řady vzoru nahlížené z lícové strany.

TIP UJÍMÁNÍ:
Abychom vypočítali, v jakých rozestupech máme ujímat, vydělíme celkový počet ok, v kterých máme ujímat (např. 49 ok) počtem ok, která potřebujeme ujmout (např. 21) = 2,3.
V tomto případě tedy spleteme hladce střídavě zhruba každé 1. a 2. oko a každé 2. a 3. oko.

RAGLÁNOVÉ ZKOSENÍ:
Pro raglánové zkosení ujímáme oka pouze na lícové straně.

UJÍMÁNÍ PŘED VZOREM A.3/A.4:
Pleteme až po poslední 2 oka před vzorem A.3/A.4, spleteme 2 oka hladce.
UJÍMÁNÍ ZA VZOREM A.3/A.4:
1 oko sejmeme hladce, 1x hladce upleteme, sejmuté oko přes upletené přetáhneme.


KNOFLÍKOVÉ DÍRKY:
Knoflíkové dírky vyplétáme v léze pravého předního dílu.
1 knoflíková dírka = spleteme 3. a 4. oko od kraje hladce a pak 1x nahodíme. V následující (rubové) řadě pleteme nahození hladce – vznikne dírka.

-------------------------------------------------------

PRÁCE ZAČÍNÁ ZDE:

-------------------------------------------------------

SVETR – JAK BUDEME POSTUPOVAT:
Trup pleteme v řadách na kruhové jehlici, zdola nahoru až k průramkům. Pak nahodíme oka pro rukávy a pokračujeme kruhovou jehlicí v řadách a současně budeme ujímat oka pro raglán. Nakonec upleteme límec, který potom přišijeme.


TRUP:
Na kruhovou jehlici č. 8 nahodíme přízí DROPS Andes 105-113-121-129-137-153 ok (včetně 6 ok légy na každé straně) a upleteme 1 vroubek (= 2 řady hladce) – viz popis výše.
Převedeme práci na kruhovou jehlici č. 9 a pleteme lícovou řadou takto:
6 ok légy vroubkovým vzorem, vzor A.1 až po posledních 7 ok, upleteme první oko vzoru A.1 (vzor je souměrný) a končíme 6 ok légy vroubkovým vzorem.
Do 30.-32.-34.-36.-38.-42. oka z každé strany vložíme značku = boky.
Mezi označenými oky zadního dílu máme 45-49-53-57-61-69 ok, tato označená oka pleteme na lícové straně hladce, na rubu obrace.
Značky později využijeme, snímáme je proto vždy do aktuálně pletené kruhové řady.
Ve výši 10 cm nahodíme oka pro rukávy podle popisu níže; do ukončení práce zbývá asi 40-42-44-46-48-50 cm, v případě potřeby pleteme do požadované výšky.
Pokračujeme lícovou řadou takto: 6 ok légy vroubkovým vzorem, vzor A.1 následujících 18-20-22-24-26-30 ok (= pravý přední díl),
vzor A.2 dalších 5 ok, uzavřeme označené oko, nahodíme 57-59-63-65-69-71 nových ok (= rukáv),
vzor A.2 dalších 5 ok, vzor A.1 následujících 35-39-43-47-51-59 ok (= zadní díl), vzor A.2 dalších 5 ok, uzavřeme označené oko,
nahodíme 57-59-63-65-69-71 nových ok (= rukáv), vzor A.2 dalších 5 ok,
vzor A.1 následujících 18-20-22-24-26-30 ok (= levý přední díl) a 6 ok légy vroubkovým vzorem = 229-241-257-269-285-305 ok.
Upleteme rubovou řadu.

Nyní začneme ujímat oka pro RAGLÁN A SOUČASNĚ vyplétáme copánky, knoflíkové dírky a přidáváme oka légy.

NEŽ BUDETE POKRAČOVAT, PŘEČTĚTE SI PROTO POZORNĚ CELÝ NÁSLEDUJÍCÍ POPIS!

VZOR:
V další lícové řadě v každém přechodu mezi předním/zadním dílem a rukávy začneme plést copánky. Na svetr se teď díváme jako by byl oblečený - pleteme takto:
Mezi pravým předním dílem a pravým rukávem + mezi zadním dílem a levým rukávem: pleteme vzor A.3 nad vzorem A.2.
Mezi levým rukávem a levým předním dílem + mezi pravým rukávem a zadním dílem: pleteme vzor A.4 nad vzorem A.2
Vzory A.3 a A.4 opakujeme na výšku.

RAGLÁN:
SOUČASNĚ ve stejné řadě na lícové straně, v níž začínáme plést vzory A.3 a A.4, ujímáme oka pro raglán - na předním/zadním dílu a na rukávech postupujeme rozdílně - viz popis níže.

ZADNÍ DÍL:
Ujímáme oka každou 4. řadu (každou 2. řadu na lícové straně) celkem 13-12-12-10-10-7x a potom každou 2. řadu (každá řada na lícové straně) celkem 1-4-6-10-12-19x.

PŘEDNÍ DÍL:
Ujímáme oka každou 4. řadu celkem 12-12-12-10-10-7x a potom každou 2. řadu, celkem 0-2-4-8-10-17x (tj. 2x méně než na zadním dílu).

RUKÁVY:
Ujímáme oka každou 2. řadu celkem 26-27-29-29-31-32x.

KNOFLÍKOVÉ DÍRKY:
Ve výši 15 cm a 25 cm vypleteme v léze pravého předního dílu knoflíkové dírky – viz popis výše.

LÉGA/LÍMEC:
Ve výši 25 cm upleteme na každé straně légy o 2 oka více (místo původních 6 ok légy pleteme nyní 8 ok légy vroubkovým vzorem).
Toto přidávání opakujeme každých 8-8-9-9-10-10 cm výšky, celkem 3x = 12 ok légy vroubkovým vzorem na každé straně.
Těchto 12 ok nyní tvoří límec.

VÝSTŘIH:
Po dokončení ujímání ok pro raglán máme na jehlici 73-73-73-77-77-77 ok.
Další lícovou řadu pleteme takto: upleteme 12 ok vroubkovým vzorem jako dosud, upleteme hladce následujících 49-49-49-53-53-53 ok a současně v těchto okách rovnoměrně ujmeme 21-17-17-13-13-9 ok – viz TIP UJÍMÁNÍ, upleteme 12 ok vroubkovým vzorem jako dosud.
Otočíme práci, upleteme 12 ok vroubkovým vzorem a odložíme je na pomocnou jehlici (= límec), uzavřeme následujících 28-32-32-40-40-44 ok (= průkrčník) a nakonec upleteme 12 ok vroubkovým vzorem jako dosud.
Dále pleteme límec podle popisu níže.

PRAVÝ LÍMEC:
Převedeme pleteninu na kruhovou jehlici č.8. Nyní pleteme takto:
* nad všemi 12 oky upleteme v řadách 2 vroubky (= tj. 4 řady vroubkovým vzorem), nad prvními 8 oky na předním okraji upleteme v řadách 1 vroubek (= 2 řady vroubkovým vzorem) *, opakujeme mezi *-* až do výše límce asi 9-10-10-12-12-14 cm (měřeno podél vnitřní, kratší strany).
Límec by měl být po našití na výstřih mírně napnutý. V další lícové řadě zbylá oka hladce uzavřeme.

LEVÝ LÍMEC:
Odložených 12 ok z pomocné jehlice vrátíme na kruhovou jehlici č.8 a upleteme 1 lícovou řadu.
Nyní pleteme takto: * nad všemi 12 oky upleteme v řadách 2 vroubky (= tj. 4 řady vroubkovým vzorem), nad prvními 8 oky na předním okraji upleteme v řadách 1 vroubek (= 2 řady vroubkovým vzorem) *, opakujeme mezi *-* až do výše límce asi 9-10-10-12-12-14 cm - upravíme podle pravého límce. Upleteme ještě jednu rubovou řadu a oka v další lícové řadě uzavřeme.

DOKONČENÍ:
Límec na zátylku sešijeme, dbáme na to, aby byl šev plochý a po přeložení límce směřoval dovnitř. Pak jej vsadíme do průkrčníku.
Na levou légu přišijeme knoflíky.

Schéma

symbols = líc hladce, rub obrace
symbols = líc obrace, rub hladce
symbols = rozpleteme hladce 1 oko na 2, tj. nejdříve upleteme oko hladce za přední smyčku a pak ještě jednou za zadní smyčku (přidáno 1 oko)
symbols = odložíme 3 oka na pomocnou jehlici PŘED práci, 3 oka hladce, 3 oka z pom.jehlice hladce
symbols = odložíme 3 oka na pomocnou jehlici ZA práci, 3 oka hladce, 3 oka z pom.jehlice hladce
diagram
diagram

Potřebujete poradit s tímto návodem?

Děkujeme, že jste si vybrali návod DROPS Design. Zakládáme si na tom, že dáváme k dispozici návody ověřené a snadno srozumitelné. Všechny návody jsou přeložené z norského originálu a tak si můžete kdykoli srovnat rozměry a počty s původním návodem (DROPS 226-32) .

Máte s návodem potíže? Níže najdete seznam odkazů, které vám pomohou dokončit vaše dílo co nejdříve - nebo se třeba přiučit něco nového.

signature-image signature

Máte s návodem potíže? Níže najdete seznam odkazů, které vám pomohou dokončit vaše dílo co nejdříve - nebo se třeba přiučit něco nového.

Každý náš návod je doprovázen speciálními video-ukázkami, které vás navedou.

Máme takopodrobné rozpisy různých technik a postupů krok za krokem - najdete je zde.

1) Why is the knitting/crochet tension so important?

Knitting tension is what determines the final measurements of your work, and is usually measured per 10 x 10 cm. It is provided like so: number of stitches in width x number of rows in height - eg: 19 stitches x 26 rows = 10 x 10 cm.

The knitting tension is very individual; some people knit/crochet loosely while others work tightly. You adjust the knitting tension with the needle size, which is why the suggested needle size only serve as a guide! You need to adjust this (up or down) to ensure that YOUR knitting tension matches the knitting tension provided in the pattern. If you work with a different knitting tension than provided you will have a different yarn consumption, and your work will have different measurements than what the pattern suggests.

The knitting tension also determines which yarns can replace each other. As long as you achieve the same knitting tension you can replace one yarn with another.

See DROPS lesson: How to measure your tension/gauge

See DROPS video: How to make a gauge tension swatch

nahoru

2) What are the yarn groups?

All our yarns are categorised into yarn groups (from A to F) according to thickness and knitting tension – group A contains the thinnest yarns and group F the thickest. This makes it easier for you to find alternative yarns to our patterns, should you wish to switch yarn. All yarns within the same group have a similar knitting tension and can easily replace each other. However, different yarn qualities have different structures and properties which will give the finished work a unique look and feel.

Click here for an overview of the yarns in each yarn group

nahoru

3) Can I use a different yarn than what the pattern suggests?

The important thing when changing from one yarn to another is that the knitting/crochet tension remains the same. This is so that the measurements of the finished piece will be the same as on the sketch provided. It is easier to achieve the same knitting tension using yarns from the same yarn group. It is also possible to work with multiple strands of a thinner yarn to achieve the knitting tension of a thicker one. Please try our yarn converter. We recommend you to always work a test swatch.

Please NOTE: when changing yarn the garment might have a different look and feel to the garment in the photo, due to individual properties and qualities of each yarn.

See DROPS lesson: Can I use a different yarn than the one mentioned in the pattern?

nahoru

4) How do I use the yarn converter?

At the top of all our patterns you’ll find a link to our yarn converter, which is a helpful tool should you wish to use a different yarn than suggested. By filling in the yarn quality you wish to replace, the amount (in your size) and number of strands, the converter will present good alternative yarns with the same knitting tension. Additionally it will tell you how much you’ll require in the new qualities and whether you’ll need to work with multiple strands. Most skeins are 50g (some are 25g or 100g).

If the pattern is worked with multiple colours, every colour will have to be converted separately. Similarly, if the pattern is worked with several strands of different yarns (for example 1 strand Alpaca and 1 strand Kid-Silk) you will have to find alternatives for each, individually.

Click here to see our yarn converter

nahoru

5) Why do I get the wrong knitting tension with the suggested needle size?

The needle size provided in the pattern serves only as a guide, the important thing is to follow the knitting tension. And since knitting tension is very individual, you will have to adjust the needle size to ensure that YOUR tension is the same as in the pattern – maybe you’ll have to adjust 1, or even 2 needle sizes, up or down to achieve the correct tension. For this, we recommend that you work test swatches.

Should you work with a different knitting tension than the one provided, the measurements of the finished garment might deviate from the measurement sketch.

See DROPS lesson: How to measure your tension/gauge

See DROPS video: How to make a gauge tension swatch

nahoru

6) Why is the pattern worked top-down?

Working a garment top-down provides more flexibility and room for personal adjustment. For example it is easier to try the garment on while working, as well as making adjustments to length of yoke and shoulder caps.

The instructions are carefully explaining every step, in the correct order. Diagrams are adjusted to the knitting direction and are worked as usual.

nahoru

7) Why are the sleeves shorter in larger sizes?

The total width of the garment (from wrist-to-wrist) will be larger in the larger sizes, despite the actual sleeves being shorter. The larger sizes have longer sleeve caps and wider shoulders, so there will be a good fit in all sizes.

nahoru

8) What is a repeat?

Diagrams are often repeated on the round or in height. 1 repeat is the diagram the way it appears in the pattern. If it says to work 5 repeats of A.1 in the round, then you work A.1 a total of 5 times after/next to each other in the round. If it says to work 2 repeats of A.1 vertically/in height you work the entire diagram once, then begin again at the start and work the entire diagram one more time.

nahoru

9) How do I work according to a knitting diagram?

The diagram depicts all rows/rounds, and every stitch seen from the right side. It is read from bottom to top, from right to left. 1 square = 1 stitch.

When working back and forth, every other row is worked from the right side and every other row is worked from the wrong side. When working from the wrong side, the diagram will have to be worked reversed: from left to right, knit stitches are purled, purl stitches are knit etc.

When working in the round every round is worked from the right side and the diagram are worked from right to left on all rounds.

See DROPS lesson: How to read knitting diagrams

nahoru

10) How do I work according to a crochet diagram?

The diagram depicts all rows/rounds, and every stitch seen from the right side. It is worked from bottom to top, from right to left.

When working back and forth every other row is worked from the right side: from right to left and every other row is worked from the wrong side: from left to right.

When working in the round, every row in the diagram are worked from the right side, from right to left.

When working a circular diagram you start in the middle and work your way outwards, counter clockwise, row by row.

The rows usually start with a given number of chain stitches (equivalent to the height of the following stitch), this will either be depicted in the diagram or explained in the pattern.

See DROPS lesson: How to read crochet diagrams

nahoru

11) How do I work several diagrams simultaneously on the same row/round?

Instructions for working several diagrams after each other on the same row/round, will often be written like so: “work A.1, A.2, A.3 a total of 0-0-2-3-4 times". This means you work A.1 once, then A.2 is worked once, and A.3 is repeated (in width) the number of times provided for your size – in this case like so: S = 0 times, M = 0 times, L=2 times, XL= 3 times and XXL = 4 times.

The diagrams are worked as usual: begin with the first row in A.1, then work the first row in A.2 etc.

See DROPS lesson: How to read knitting diagrams

See DROPS lesson: How to read crochet diagrams

nahoru

12) Why does the piece start with more chain stitches than it’s worked with?

Chain stitches are slightly narrower than other stitches and to avoid working the cast-on edge too tight, we simply chain more stitches to begin with. The stitch count will be adjusted on the following row to fit the pattern and measurement sketch.

nahoru

13) Why increase before the rib edge when the piece is worked top-down?

The rib edge is more elastic and will contract slightly compared to, for example, stocking stitch. By increasing before the rib edge, you avoid a visible difference in width between the rib edge and the rest of the body.

nahoru

14) Why increase in the cast-off edge?

It’s very easy to cast off too tightly, and by making yarn overs while casting off (and simultaneously casting these off) you avoid a too tight cast off edge.

See DROPS video: How to bind off with yarn overs (yo)

nahoru

15) How do I increase/decrease on every 3rd and 4th row/round alternately?

To achieve an even increase (or decrease) you can increase on, for example: every 3rd and 4th row alternately, like so: work 2 rows and increase on the 3rd row, work 3 rows and increase on the 4th. Repeat this until the increase is complete.

See DROPS lesson: Increase or decrease 1 st on every 3rd and 4th row alternately

nahoru

16) Why is the pattern slightly different than what I see in the photo?

Pattern repeats can vary slightly in the different sizes, in order to get the correct proportions. If you’re not working the exact same size as the garment in the photo, yours might deviate slightly. This has been carefully developed and adjusted so that the complete impression of the garment is the same in all sizes.

Make sure to follow instructions and diagrams for your size!

nahoru

17) How can I work a jacket in the round instead of back and forth?

Should you prefer to work in the round instead of back and forth, you may of course adjust the pattern. You’ll need to add steeks mid-front (usually 5 stitches), and follow the instructions. When you would normally turn and work from the wrong side, simply work across the steek and continue in the round. At the end you’ll cut the piece open, pick up stitches to work bands, and cover the cut edges.

See DROPS video: How to knit steeks and cut open

nahoru

18) Can I work a jumper back and forth instead of in the round?

Should you prefer to work back and forth instead of in the round, you may of course adjust the pattern so you work the pieces separately and then assemble them at the end. Divide the stitches for the body in 2, add 1 edge stitch in each side (for sewing) and work the front and back pieces separately.

See DROPS lesson: Can I adapt a pattern for circular needles into straight needles?

nahoru

19) Why do you show discontinued yarns in the patterns?

Since different yarns have different qualities and textures we have chosen to keep the original yarn in our patterns. However, you can easily find options among our available qualities by using our yarn converter, or simply pick a yarn from the same yarn group.

It is possible that some retailers still have discontinued yarns in stock, or that someone has a few skeins at home that they would like to find patterns for.

The yarn converter will provide both alternative yarn as well as required amount in the new quality.

nahoru

20) How do I make a women’s size garment into a men’s size one?

If you have found a pattern you like which is available in women’s size it’s not very difficult to convert it to men’s size. The biggest difference will be the length of sleeves and body. Start working on the women size that you think would fit across the chest. The additional length will be worked right before you cast off for the armhole/sleeve cap. If the pattern is worked top-down you can add the length right after the armhole or before the first decrease on sleeve.

Regarding additional yarn amount, this will depend on how much length you add, but it is better with a skein too many than too few.

nahoru

21) How do I prevent a hairy garment from shedding?

All yarns will have excess fibres (from production) that might come off as lint or shedding. Brushed yarns (ie hairier yarns) have more of these loose, excess fibres, causing more shedding.

Shedding also depends on what is worn under or over the garment, and whether this pulls at the yarn fibres. It’s therefore not possible to guarantee that there will be no shedding

Below are some tips on how to get the best result when working with hairier yarns:

1. When the garment is finished (before you wash it) shake it vigorously so the looser hairs come off. NOTE: do NOT use a lint roller, brush or any method that pulls at the yarn.

2. Place the garment in a plastic bag and put it in your freezer - the temperature will cause the fibres to become less attached to each other, and excess fibres will come off easier.

3. Leave in the freezer for a few hours before taking it out and shaking it again.

4. Wash the garment according to the instructions on the yarn label.

nahoru

22) Where on the garment is the length measured?

The measurement sketch/schematic drawing provides information regarding the full length of the garment. If it’s a jumper or a jacket the length is measured from the highest point on the shoulder closest to the neckline, and straight down to the bottom of the garment. It is NOT measured from the tip of shoulder. Similarly, the length of yoke is measured from the highest point on the shoulder and down to where yoke is split into body and sleeves.

On a jacket measures are never taken along bands, unless specifically stated. Always measure inside band stitches when measuring the length.

See DROPS lesson: How to read a schematic drawing

nahoru

23) How do I know how many balls of yarn I need?

The required amount of yarn is provided in grams, eg: 450 g. To calculate how many balls you’ll need you first need to know how many grams are in 1 ball (25g, 50g or 100g). This information is available if you click on the individual yarn quality on our pages. Divide the amount required with the amount of each ball. For example, if each ball is 50g (the most common amount), the calculation will be as follows: 450 / 50 = 9 balls.

nahoru

Pořídili jste si přízi DROPS na tento model? Pak máte taky právo žádat po svém prodejci, u něhož jste nakoupili, pomoc a rady. Seznam DROPS obchodů najdete tady!
Pořád se nemůžete dobrat odpovědi, kterou hledáte? Pak posuňte stránku dolů a napište nám svůj dotaz, naši specialisté se vám pokusí poradit. Obvykle to zvládneme během 5 až 10 pracovních dnů.. Mezitím si můžete pročíst otázky a odpovědi, které k tomuto modelu položili ostatní, nebo navštívit skupinu DROPS Workshop na Facebooku, kde vám může poradit některá spřízněná duše!

Komentáře / Otázky (7)

country flag Carine wrote:

Bonjour, je souhaite tricoter ce modèle en taille S. 1 - Je voudrais utiliser Drops Sky en double, ainsi que Kid Silk. Est-ce bien compatible ainsi ? 2 - J'ai 7 pelotes de Drops Sky en coloris 13 - Bleu jeans clair - Si je prends 3 pelotes de Kid Silk, est-ce suffisant ? La couleur de Kid Silk à retenir est-elle plutôt la "Bleu jeans clair" (n° 08) ou la "Bleu clair" (n° 07) ? Merci beaucoup.

30.12.2022 - 19:24

DROPS Design answered:

Bonjour Carine, 2 fils du groupe B (Sky) = 1 fil du groupe D, si vous ajoutez 1 fil du groupe A (Kid-Silk), vous devrez d'abord vérifier votre échantillon pour être certaine que la tension est juste et que la texture vous convient bien - retrouvez plus d'infos sur les alternatives ici - votre magasin saura vous aider dans vos calculs et vous conseiller les couleurs idéales, même par mail ou téléphone. Bon tricot!

02.01.2023 - 13:38

country flag Ouahida Lacheb wrote:

Salut la partie (rabattre la maille avec le marqueure te le montage des maille manche ) ?????

08.10.2022 - 14:05

DROPS Design answered:

Bonjour Mme Lacheb, pour ce modèle, on ne tricote pas les manches séparément avant de les reprendre pour l'empiècement (comme ici, sur un même tour vous allez rabattre 1 maille pour l'emmanchure que vous allez remplacer par les mailles de la manche (montez ainsi 57 à 61 m entre le devant et le dos puis entre le dos et le 2ème devant); Bon tricot!

10.10.2022 - 08:42

country flag Sara wrote:

Hi! How many stitches are decreased for each raglan section? Is it one for the front sections each time and two for the sleeves and back? Thank you!

01.08.2022 - 23:19

DROPS Design answered:

Hi Sara, You decrease for raglan both before and after each A.3/A.4 in each transition between the body and the sleeves. 8 stitches decreased on each decrease round, 1 on each front piece, 2 on each sleeve and 2 on the back piece. Happy knitting!

02.08.2022 - 06:51

country flag Jeanne wrote:

Bonjour, Pour les diminutions du raglan d'une taille L: -Dos : 10fs ts les 4rgs et 10fs ts les 2rgs = 2côtés*20=40dim. -Devants : 10fs ts les 4rgs et 8fs ts les 2rgs = 2*18=36dim. (pas 2fs mois que le dos) -Manches : 29fs*4= 116dim. Total : 40+36+116=192dim. J'avais 269m (taille L) +12 pour le col -192dim.= 89m (pas 77!) Où est ce que je me trompe ? Merci de m'aider

10.06.2022 - 12:54

DROPS Design answered:

Bonjour Jeanne, vous avez bien 269 mailles mais vous n'ajoutez pas les 12 mailles de col, vous devez avoir 269 m - 40 m (dos) - 2x18 m (devants) - 2 x 58 m (manches ) = 77 mailles. Les "augmentations" sous "BORDURE DES DEVANTS/COL:" ne sont pas des augmentations à proprement parler: vous intégrez 3 fois 6 mailles du point fantaisie A.1 des devants à la bordure des devants., ainsi vous avez autant de mailles pour les devants, mais moins en point fantaisie et plus au point mousse. Bon tricot!

10.06.2022 - 17:35

country flag Fiammetti Gianna wrote:

Bonjour , je ne comprend pas à quel moment dans les mailles de la manche je dois faire la diminution (fois 26 touts les 2 rangs, par manche). tenant compte du pont fantaisie et des diminutions raglan je n'arrive pas à comprendre. Je vous remercie de m'expliquer . Cordialement.

18.04.2022 - 19:08

DROPS Design answered:

Bonjour Mme Fiammetti, vous diminuez pour le raglan des manches, du dos et des devants avant/après les torsades A.3/A.4: tricotez jusqu'à ce qu'il reste 2 mailles avant la torsade, diminuez 1 maille, tricotez la torsade, diminuez 1 m - cf RAGLAN au début des explications, et répétez à chaque torsade: diminuez 1 maille avant la torsade et/ou 1 maille après la torsade; le point fantaisie des manches et du dos/devants va être "mangé" par les diminutions. Tricotez les mailles restantes en point fantaisie comme avant. Bon tricot!

19.04.2022 - 11:42

country flag Sylvie wrote:

Bonjour. Êtes vous sûr qu'il faut monter au départ 121 m pour la taille M ? Quand je fais mon rang où il faut monter les mailles pour les manches il me manque des m. Par contre avec 123 m ça tombe juste. Merci de bien vouloir m'aider.

17.02.2022 - 12:22

DROPS Design answered:

Bonjour Sylvie, il faut bien 121 mailles en M: vous avez: 6 m de bordure devant, 22 M de A.1, 5 m de A.2; 1 m avec le marqueur qui doit être rabattue; 5 m de A.5 + 43 m de A.1 + 5 m de A.5, 1 m avec le marqueur qui doit être rabattue, 5 m de A.2, 22 m de A.1, 6 m de bordure devant (sans les manches) soit: 6+22+5+1+5+43+5+1+5+22+6=121 mailles + 3 m augmentées dans chaque A.2 (= 12) - les 2 m avec 1 marqueur + 2 x 63 mailles pour les manches = 257 mailles. Bon tricot!

17.02.2022 - 13:34

country flag Kristina wrote:

Hvordan ser den ud på rykken .?

26.11.2021 - 19:34

DROPS Design answered:

Hej Kristina, bortset fra knapkanten foran så ser ryggen ud som forstykket med samme strukturmønster som foran :)

29.11.2021 - 14:32

Přidejte komentář k návodu DROPS 226-32

Rádi bychom věděli, co si o tomto modelu myslíte!

Pokud se chcete na něco zeptat, dbejte prosím na to, abyste ve formuláři níže vybrali správnou kategorii - díky tomu se dříve dozvíte, co potřebujete vědět. Povinná pole jsou označena *.