


Komentáře / Otázky (12)
![]() Butti napsala:
Butti napsala:
Vorrei eseguire questo maglione in misura M con i filati Big merino e Brushed alpaca silk. Quanti gomitoli devo comprare per ogni filato? Grazie Giovanna
26.01.2025 - 19:58Odpověď DROPS Design :
Buonasera Butti, per un'assistenza così personalizzata può rivolgersi al suo rivenditore DROPS di fiducia. Buon lavoro!
29.01.2025 - 23:05
![]() Sil napsala:
Sil napsala:
Ik heb maat xl aangehouden met breien .Hals 58st. Meerderen 6 st =64st. Dan voor de raglan 18 x elke tweede naald meerderen. (8steken). Het totaal aantal steken moet zijn 212. Maar ik heb er 208. (58st van boord, 6st gemeerderd na de boord.=64. Dan 18x8 =144 van de raglan. Samen 208 st. Maar bij jullie staat 212 steken.???? Graag een reactie.😏
02.10.2023 - 13:12
![]() Barbara napsala:
Barbara napsala:
Hallo, ich möchte diesen tollen pulli mit air (meine lieblingswolle) für meine tochter stricken. gibt es eine berechnung für xs? resp. 80 cm brust umfang. herzlichen dank für eure hilfe. barbara zu
22.08.2021 - 17:25Odpověď DROPS Design :
Liebe Barbara, leider können wir jeder Anleitung nach jedem individuellen Frage anpassen und einzelne Modelle auf individuellen Wunsch hin umrechnen. Wenn sie Hilfe damit brauchen, wenden Sie sich bitte an Ihrem DROPS Laden, dort hilft man Ihnen gerne weiter. Danke im voraus für Ihr Verständnis. Viel Spaß beim stricken!
23.08.2021 - 07:35
![]() Patrizia napsala:
Patrizia napsala:
Buona sera Dove posso trovare un video che mi aiuta a capire come confezionare il collo, cioè come cucirlo a metà ? Grazie Patrizia
15.04.2021 - 21:46Odpověď DROPS Design :
Buongiorno Patrizia, deve semplicemente risvoltare il collo a metà verso l'interno e cucirlo in modo che risulti doppio. Buon lavoro!
17.04.2021 - 11:44
![]() Nathalie napsala:
Nathalie napsala:
Vous proposez des modèles qui se tricotent de haut en bas, à tricoter en rond, avez vous pensé aux femmes qui ne peuvent pas tricoter ainsi ? pourquoi ne pas proposer les modèles des deux manières différentes ? Je me retrouve exclue comme d'aitres centaines de femmes je pense... merci de penser à nous !
06.04.2021 - 16:25Odpověď DROPS Design :
Bonjour Nathalie, nous adaptons notre offre à la demande croissante de ce type de modèles, toutefois, dans un souci de permettre à chacune de trouver son bonheur, nous avons aussi de nombreux modèles gratuits tricotés de bas en haut. Et si vous voulez tenter l'expérience, suivez notre leçon et vidéo montrant comment tricoter un pull de haut en bas - vous les retrouverez listés ci-dessus. Bon tricot!
07.04.2021 - 07:55
![]() SYLVIE napsala:
SYLVIE napsala:
Bonjour, Ne peut-on pas utiliser des anneaux marqueurs plutôt que de placer des fils ? Merci ! (Merci aussi pour ce modèle que je vais sûrement réaliser)
15.03.2021 - 13:00Odpověď DROPS Design :
Bonjour Sylvie, vous pouvez tout à fait utiliser des marqueurs à la place des fils marqueurs, ce qui compte est que vous ayez un moyen de bien délimiter les zones indiquées. Bon tricot!
15.03.2021 - 13:12
![]() Aneta napsala:
Aneta napsala:
Ile motkow włoczki Drips Wish należy użyć do wykonania sweterka rozmiar M? Bardzo dziękuję za odpowiedź 🙂 Aneta
06.03.2021 - 23:59Odpověď DROPS Design :
Witaj Aneto, odpowiedź jest w 'materiałach': dla rozmiaru M potrzebować będziesz 500 g DROPS Wish (10 motków). Miłej pracy i powodzenia!
08.03.2021 - 13:45
![]() Maria napsala:
Maria napsala:
El alto del cuello mide 11 cm y doblado queda reducido a la mitad. Cuál es la medida de la circunferencia del cuello? No entiendo el diagrama. Mi tensión es diferente y no sé cuántos puntos poner. Me podrían orientar? Muchas gracias!
16.02.2021 - 14:41Odpověď DROPS Design :
Hola Maria, teje el resorte según el patrón para tu talla y todo debería estar bien. Yo siempre hago eso. Lo que importa es la tensión del punto jersey. La tensión del tejido se ajusta según el tamaño de la aguja, es por eso que el tamaño de la aguja sugerido es únicamente orientativo! Necesitas ajustar esto para asegurar que TU tensión del tejido coincida con la tensión del tejido indicada en el patrón. Buena suerte :)
19.02.2021 - 10:34
![]() María napsala:
María napsala:
¿Cuál la tensión del punto resorte tejido con aguja de 7 mm?
12.02.2021 - 23:43Odpověď DROPS Design :
Hola Maria, no es importante, porque este punto se estira. Happy knitting!
16.02.2021 - 11:10
![]() Ria napsala:
Ria napsala:
Hallo Ik wil graag deze trui breien. Maat xl. Ik kan helaas niet vinden hoeveel bollen wol ik moet gebruiken. Hoor. Graag even jullie reactie. Graag via onderstaand mailadres reageren. Met een vriendelijke groet Ria Schuurman
06.02.2021 - 15:27Odpověď DROPS Design :
Dag Ria,
Bovenaan bij de materialenlijst staat per maat aangegeven hoeveel gram je nodig hebt. (Het eerste getal is voor maat S, het tweede getal voor maat M, enzovoort). 1 bol Wish weegt 50 gram, dus als er bijvoorbeeld 400 gram staat heb je 8 bollen nodig.
11.02.2021 - 13:30
|
|
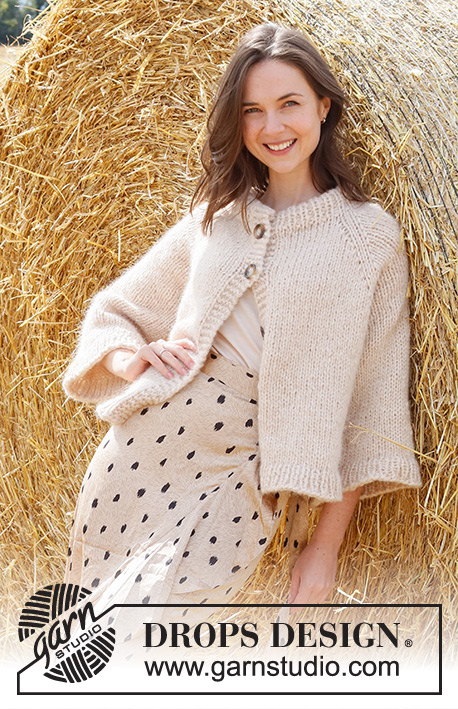
Joy of the Harvest#joyoftheharvestsweater |
|
 |
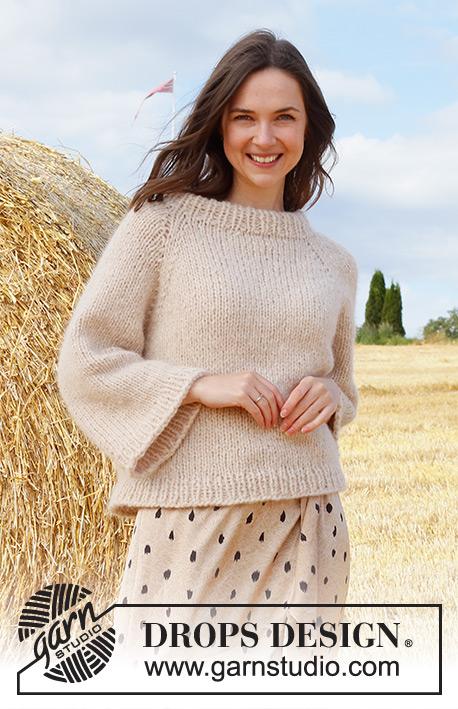 |
Raglánový pulovr s širokými ¾ rukávy pletený shora dolů z dvojité příze DROPS Air nebo jednoduché příze Wish. Velikost S - XXXL.
DROPS 223-10 |
|
|
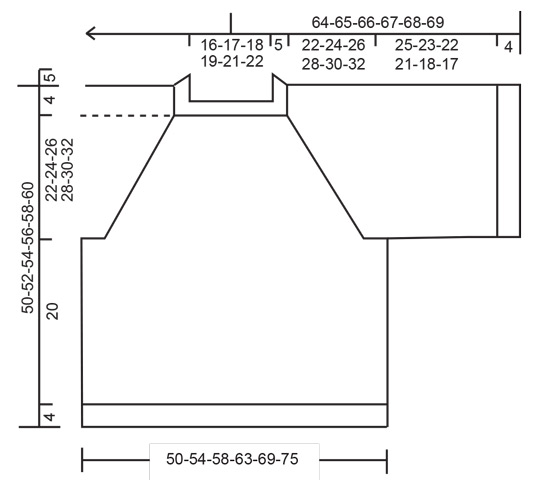
------------------------------------------------------- VYSVĚTLIVKY: ------------------------------------------------------- TIP - PŘIDÁVÁNÍ: Abychom vypočítali, v jakých rozestupech máme přidávat, vydělíme celkový počet ok na jehlici (tj. 52 ok) počtem ok, která potřebujeme přidat (např. 4), takže 52 : 4 = 13. V tomto případě tedy 1x nahodíme za každým 13. okem. V následující kruhové řadě pleteme nahození za zadní nit, aby se v pletenině netvořily dírky. RAGLÁNOVÉ ZKOSENÍ: Pro vytvarování raglánového zkosení přidáváme na obou stranách všech 4 značek (tj. ve všech místech, kde se stýkají rukávy s trupem), takto – začínáme 1 oko před značkou: 1x nahodíme, 2 oka upleteme hladce (značka leží mezi nimi), 1x nahodíme (= přidali jsme 2 oka). V následující kruhové řadě pleteme nahození za zadní nit, aby se v pletenině netvořily dírky. Nová oka pak pleteme lícovým žerzejem. Celkem takto přidáme 8 ok v jedné kruhové řadě. TIP - UZAVÍRÁNÍ: Abychom neměli uzavřený okraj moc stažený, můžeme na uzavírání ok použít silnější jehlice nebo za každým zhruba 6. okem 1x nahodíme – nahození hned uzavřeme jako běžné oko. ------------------------------------------------------- POPIS PRÁCE: ------------------------------------------------------- PULOVR – JAK BUDEME POSTUPOVAT: Lem průkrčníku a sedlo pleteme v kruhových řadách na kruhové jehlici, shora dolů od středu zadní strany. Od sedla pak oddělíme rukávy a trup dokončíme v kruhových řadách. Rukávy potom dopleteme také v kruhových řadách, na krátké kruhové jehlici. LEM PRŮKRČNÍKU: Na krátkou kruhovou jehlici č.7 nahodíme 2 vlákny příze Air (= dvojitou přízí) nebo jedním vláknem příze Wish 52-54-56-58-64-66 ok a upleteme 1 kruhovou řadu hladce. Pak pleteme v kruhových řadách pružný lem 1/1 (= střídáme 1 oko hladce, 1 obrace). Ve výši 11 cm pleteme 1 kruhovou řadu hladce a SOUČASNĚ přidáme rovnoměrně 4-6-6-6-6-8 ok – viz TIP – PŘIDÁVÁNÍ = 56-60-62-64-70-74 ok. Upleteme 1 kruhovou řadu hladce (nahození pleteme hladce za zadní nit). Pak převedeme pleteninu na kruhovou jehlici č.8. Označíme si začátek kruhové řady (= střed zadního průkrčníku) – SEDLO MĚŘÍME OD TOHOTO MÍSTA! SEDLO: Do pleteniny vložíme 4 značky (oka teď nepleteme, jen rozmístíme značky) v těchto rozestupech: 1. značku vložíme za prvních 9-10-11-11-13-14 ok (= mezi zadní díl a pravý rukáv), 2. značku umístíme za následujících 9 ok (= mezi pravý rukáv a přední díl), 3. značku vložíme za dalších 19-21-22-23-26-28 ok (= mezi přední díl a levý rukávy) a 4. značku dáme za následujících 9 ok (= mezi levý rukáv a zadní díl). Za touto poslední značkou zbývá v kruhové řadě 10-11-11-12-13-14 ok zadního dílu. Pleteme v kruhových řadách lícovým žerzejem; SOUČASNĚ začneme v 1. kruhové řadě přidávat pro RAGLÁNOVÉ ZKOSENÍ – viz výše. Toto přidávání opakujeme v každé 2. kruhové řadě, celkem 14-15-17-18-20-22x, pak přidáme ještě 1x na předním a zadním dílu (= v této kruhové řadě přidáme jen 4 oka) = 172-184-202-212-234-254 ok. Pokračujeme až do výše 22-24-26-28-30-32 cm od značky na průkrčníku. V následující kruhové řadě rozdělíme pleteninu na rukávy a trup, takto: upleteme prvních 24-26-29-30-34-37 ok (= ½ zadního dílu), následujících 37-39-43-45-49-53 ok odložíme na pomocnou jehlici (= rukáv), nahodíme 6-6-6-8-8-8 nových ok (= podpaží), upleteme 49-53-58-61-68-74 ok (= přední díl), dalších 37-39-43-45-49-53 ok odložíme na pomocnou jehlici (= rukáv), nahodíme 6-6-6-8-8-8 nových ok (= podpaží) a upleteme posledních 25-27-29-31-34-37 ok (= ½ zadního dílu). Trup a rukávy dopleteme odděleně. NYNÍ MĚŘÍME DÍL OD TOHOTO MÍSTA. TRUP: = 110-118-128-138-152-164 ok. Pleteme v kruhových řadách lícovým žerzejem. Ve výši 20 cm od podpaží (platí pro všechny velikosti) pleteme 1 kruhovou řadu hladce a SOUČASNĚ přidáme rovnoměrně 16-18-20-20-22-24 ok = 126-136-148-158-174-188 ok. Pleteninu převedeme na kruhovou jehlici č.7 a pleteme lem pružným vzorem 1/1 (= střídáme 1 oko hladce, 1 obrace). Když je lem vysoký 4 cm, všechna oka dle vzoru volně uzavřeme – viz TIP – UZAVÍRÁNÍ! Pulovr měří asi 50-52-54-56-58-60 cm (od ramene). RUKÁV: Odložených 37-39-43-45-49-53 ok jednoho rukávu vrátíme z pomocné jehlice zpět na krátkou kruhovou jehlici č.8 a navíc k nim nabereme po 1 oku z každého z 6-6-6-8-8-8 nových ok v podpaží = 43-45-49-53-57-61 ok. Pleteme v kruhových řadách lícovým žerzejem. Ve výši 25-23-22-21-18-17 cm od podpaží pleteme 1 kruhovou řadu hladce a SOUČASNĚ přidáme rovnoměrně 7-7-7-7-9-9 ok = 50-52-56-60-66-70 ok. Pleteninu převedeme na krátkou kruhovou jehlici č.7 a pleteme lem pružným vzorem 1/1 (= střídáme 1 oko hladce, 1 obrace). Když je lem vysoký 4 cm, všechna oka dle vzoru volně uzavřeme – viz TIP – UZAVÍRÁNÍ. Rukáv měří asi 29-27-26-25-22-21 cm (od podpaží). Stejným způsobem upleteme i druhý rukáv. DOKONČENÍ: Lem průkrčníku přeložíme napolovic, zahneme do rubu a přišijeme. Dbáme na to, aby byl šev volný – měkký a pružný, jinak se bude lem kroutit a ohýbat na lícovou stranu. |
|
|
|
Dokončili jste tento model?Pak označte své fotky tagem #dropspattern #joyoftheharvestsweater nebo je pošlete do galerie #dropsfan. Potřebujete s tímto návodem poradit?Otevřete-li si návod na stránce garnstudio.com, najdete tam 22 výukových video-ukázek, Komentáře/Dotazy a další užitečné informace. © 1982-2025 DROPS Design A/S. Vyhrazujeme si veškerá práva. Tento dokument, včetně všech jeho dílčích částí, podléhá autorským právům. Podrobnější komentář k možnostem užití našich návodů najdete dole pod každým návodem na našich stránkách. |
|


V oblasti pletené a háčkované módy působí DROPS Design více než 40 let. Díky tomu vám můžeme nabídnout jednu z nejrozsáhlejších kolekcí modelů s bezplatnými návody dostupnými na internetu - navíc v 17 jazycích. K dnešnímu dni máme na 314 katalogů a 11822 návodů celkem - z nich je už 7048 dostupných v [češtině].
Přidejte komentář k návodu DROPS 223-10
Rádi bychom věděli, co si o tomto modelu myslíte!
Pokud se chcete na něco zeptat, dbejte prosím na to, abyste ve formuláři níže vybrali správnou kategorii - díky tomu se dříve dozvíte, co potřebujete vědět. Povinná pole jsou označena *.