DROPS Air
DROPS Air
65% Alpaca, 28% Polyamide, 7% Wool
from 6.45 $ /50g
Get the yarn to make this pattern from 51.60$.

The yarn cost is calculated from the pattern’s smallest size and the yarn’s cheapest product type. Looking for an even better price? You might find it on the DROPS Deals!

DROPS SS24

Joy of the Harvest

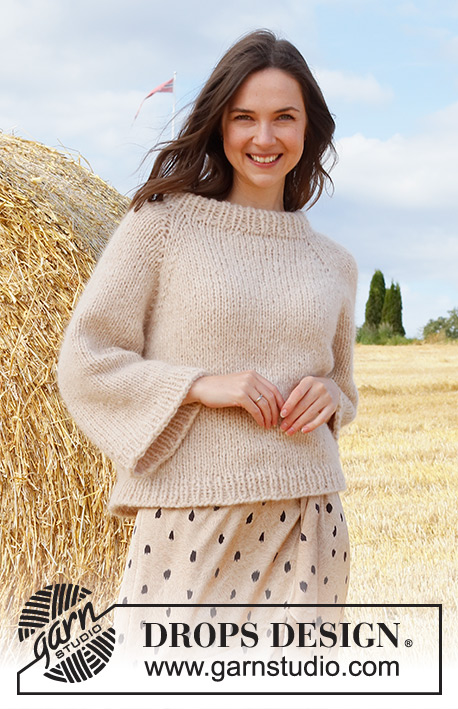
Knitted sweater in 2 strands DROPS Air or 1 strand Wish. The piece is worked top down with raglan, double neck and wide, ¾-length sleeves. Sizes S - XXXL.

DROPS 223-10
DROPS Design: Pattern no ai-317
Yarn group C + C or E
-------------------------------------------------------

SIZES:
S - M - L - XL - XXL – XXXL

Finished measurements:
Chest measurements: 100-108-116-126-138-150 cm = 39⅜"-42½"-45¾"-49½"-54¼"-59"
Full length: 50-52-54-56-58-60 cm = 19¾"-20½"-21¼"-22"-22¾"-23⅝"
All measurements in charts are in cm.

MATERIALS:
DROPS AIR from Garnstudio (belongs to yarn group C)
400-450-450-500-550-600 g color 02, wheat
Or use:
DROPS Wish from Garnstudio (belongs to yarn group E)
450-500-550-600-650-700 g color 04, wheat

KNITTING GAUGE:
11 stitches in width and 15 rows in height with stockinette stitch and 2 strands Air or 1 strand Wish = 10 x 10 cm = 4" x 4".

NEEDLES:
DROPS CIRCULAR NEEDLE SIZE 8 MM = US 11: Length 40 cm = 16" and 80 cm = 32" for stockinette stitch.
DROPS CIRCULAR NEEDLE SIZE 7 MM = US 10.75: Length 40 cm = 16" and 80 cm = 32" for rib.
Needle size is only a guide. If you get too many stitches on 10 cm = 4", change to a larger needle size. If you get too few stitches on 10 cm = 4", change to a smaller needle size.

-------------------------------------------------------

Alternative Yarn – See how to change yarns here
Yarn Groups A to F – Use the same pattern and change the yarn here
Yarn usage using an alternative yarn – Use our yarn converter here

-------------------------------------------------------

DROPS Air
DROPS Air
65% Alpaca, 28% Polyamide, 7% Wool
from 6.45 $ /50g
Get the yarn to make this pattern from 51.60$.

The yarn cost is calculated from the pattern’s smallest size and the yarn’s cheapest product type. Looking for an even better price? You might find it on the DROPS Deals!

Pattern instructions

NOTE: This pattern is written in American English. All measurements in charts are in cm. For conversion from inches to cm - click here. There are different terms for crocheting in American and British English. If this pattern includes crochet, click for "crochet terms" here. For this pattern in British English, please click here.
-------------------------------------------------------

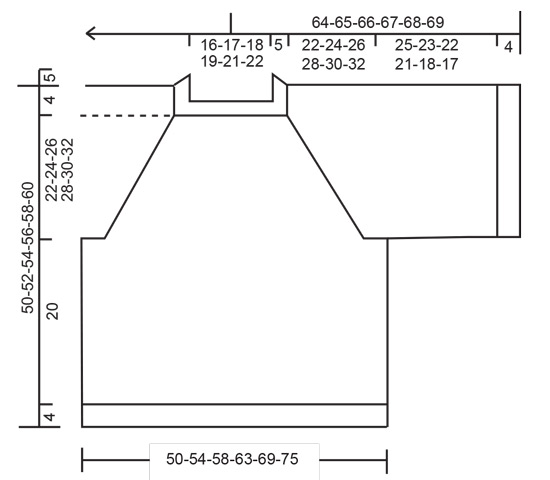
EXPLANATIONS FOR THE PATTERN:

-------------------------------------------------------

INCREASE TIP (evenly spaced):
To work out how to increase evenly, count the total number of stitches on the needle (e.g. 52 stitches) and divide by the number of increases to be made (e.g. 4) = 13.
In this example, increase by making 1 yarn over after each 13th stitch. On the next round work the yarn overs twisted to avoid holes.

RAGLAN:
Increase to raglan on each side of all marker threads in the transitions between body and sleeves as follows: Work until there is 1 stitch left before the marker thread, 1 yarn over, knit 2 (marker thread sits between these 2 stitches), 1 yarn over (= 2 stitches increased). On the next round knit the yarn overs twisted to avoid holes. Then work the new stitches in stockinette stitch. A total of 8 stitches are increased on the round.

BINDING-OFF TIP:
To avoid the bind-off edge being tight you can bind off with a larger size needle. If the edge is still tight, make 1 yarn over after approx. each 6th stitch at the same time as binding off; the yarn overs are bind off as normal stitches.

-------------------------------------------------------

START THE PIECE HERE:

-------------------------------------------------------

SWEATER – SHORT OVERVIEW OF THE PIECE:
The neck and yoke are worked in the round with circular needle, top down from mid back. The yoke is divided for body and sleeves and the body continued in the round with circular needle. The sleeves are worked in the round with short circular needle, top down.

NECK:
Cast on 52-54-56-58-64-66 stitches with short circular needle size 7 MM = US 10.75 and 2 strands Air or 1 strand Wish. Knit 1 round. Then work rib (knit 1, purl 1) in the round for 11 cm = 4⅜". Knit 1 round where you increase 4-6-6-6-6-8 stitches evenly spaced – read INCREASE TIP = 56-60-62-64-70-74 stitches. Knit 1 round (yarn overs are knitted twisted).
Change to circular needle size 8 MM = US 11. Insert 1 marker at the beginning of the round (= mid-back), the yoke is measured from this marker!

YOKE:
Now insert 4 marker threads in the piece as follows: Skip the first 9-10-11-11-13-14 stitches, insert a marker thread here (= in the transition between the back piece and right sleeve), skip the next 9 stitches, insert a marker thread here (= in the transition between the right sleeve and front piece), skip the next 19-21-22-23-26-28 stitches, insert a marker thread here (= in the transition between the front piece and left sleeve), skip the next 9 stitches, insert a marker thread here (= in the transition between the left sleeve and back piece). There are 10-11-11-12-13-14 stitches left on the round after the last marker thread.
Work stockinette stitch in the round. On the first round start to increase to RAGLAN – read description above. Increase like this every 2nd round 14-15-17-18-20-22 times, then increase 1 more time on the front and back pieces (= 4 stitches increased on the round) = 172-184-202-212-234-254 stitches. Continue working until the piece measures 22-24-26-28-30-32 cm = 8¾"-9½"-10¼"-11"-11¾"-12½" from the marker below the neck.
Now divide the piece for body and sleeves on the next round as follows:
Work the first 24-26-29-30-34-37 stitches (= ½ back piece), place the next 37-39-43-45-49-53 stitches on a thread for the sleeve, cast on 6-6-6-8-8-8 stitches (= in side under sleeve), work the next 49-53-58-61-68-74 stitches (= front piece), place the next 37-39-43-45-49-53 stitches on a thread for the sleeve, cast on 6-6-6-8-8-8 stitches (= in side under sleeve), work the last 25-27-29-31-34-37 stitches (= ½ back piece).
Body and sleeves are finished separately. THE PIECE IS NOW MEASURED FROM HERE.

BODY:
= 110-118-128-138-152-164 stitches. Work stockinette stitch in the round. When the piece measures 20 cm = 8" from the division in all sizes, knit 1 round where you increase 16-18-20-20-22-24 stitches evenly spaced = 126-136-148-158-174-188 stitches.
Change to circular needle size 7 MM = US 10.75. Work rib (knit 1, purl 1) for 4 cm = 1½". Bind off with knit over knit and purl over purl – read BINDING-OFF TIP! The sweater measures approx. 50-52-54-56-58-60 cm = 19¾"-20½"-21¼"-22"-22¾"-23⅝" from the shoulder down.

SLEEVES:
Place the 37-39-43-45-49-53 stitches from the thread on the one side of the piece on short circular needle size 8 MM = US 11 and knit up 1 stitch in each of the 6-6-6-8-8-8 stitches cast on under the sleeve = 43-45-49-53-57-61 stitches.
Work stockinette stitch in the round. When the sleeve measures 25-23-22-21-18-17 cm = 9¾"-9"-8¾"-8¼"-7"-6¾" from the division (shorter measurements in larger sizes due to wider neck and longer yoke), knit 1 round where you increase 7-7-7-7-9-9 stitches evenly spaced = 50-52-56-60-66-70 stitches. Change to short circular needle size 7 MM = US 10.75 and work rib (knit 1, purl 1) for 4 cm = 1½". Bind off with knit over knit and purl over purl – remember BINDING-OFF TIP. The sleeve measures approx. 29-27-26-25-22-21 cm = 11⅜"-10⅝"-10¼"-9¾"-8¾"-8¼" from the division. Work the other sleeve in the same way.

ASSEMBLY:
Fold the neck double to the inside and sew down. To avoid the neck being tight og rolling outwards, it is important that the seam is elastic.

Diagram

All measurements in charts are in cm.

diagram measurements
Do you have a question? See a list of frequently asked questions (FAQ)

Knitting tension is what determines the final measurements of your work, and is usually measured per 10 x 10 cm. It is provided like so: number of stitches in width x number of rows in height - eg: 19 stitches x 26 rows = 10 x 10 cm.

The knitting tension is very individual; some people knit/crochet loosely while others work tightly. You adjust the knitting tension with the needle size, which is why the suggested needle size only serve as a guide! You need to adjust this (up or down) to ensure that YOUR knitting tension matches the knitting tension provided in the pattern. If you work with a different knitting tension than provided you will have a different yarn consumption, and your work will have different measurements than what the pattern suggests.

The knitting tension also determines which yarns can replace each other. As long as you achieve the same knitting tension you can replace one yarn with another.

See DROPS lesson: How to measure your tension/gauge

See DROPS video: How to make a gauge tension swatch

The required amount of yarn is provided in grams, eg: 450 g. To calculate how many balls you’ll need you first need to know how many grams are in 1 ball (25g, 50g or 100g). This information is available if you click on the individual yarn quality on our pages. Divide the amount required with the amount of each ball. For example, if each ball is 50g (the most common amount), the calculation will be as follows: 450 / 50 = 9 balls.

The important thing when changing from one yarn to another is that the knitting/crochet tension remains the same. This is so that the measurements of the finished piece will be the same as on the sketch provided. It is easier to achieve the same knitting tension using yarns from the same yarn group. It is also possible to work with multiple strands of a thinner yarn to achieve the knitting tension of a thicker one. Please try our yarn converter. We recommend you to always work a test swatch.

Please NOTE: when changing yarn the garment might have a different look and feel to the garment in the photo, due to individual properties and qualities of each yarn.

See DROPS lesson: Can I use a different yarn than the one mentioned in the pattern?

All our yarns are categorised into yarn groups (from A to F) according to thickness and knitting tension – group A contains the thinnest yarns and group F the thickest. This makes it easier for you to find alternative yarns to our patterns, should you wish to switch yarn. All yarns within the same group have a similar knitting tension and can easily replace each other. However, different yarn qualities have different structures and properties which will give the finished work a unique look and feel.

Click here for an overview of the yarns in each yarn group

At the top of all our patterns you’ll find a link to our yarn converter, which is a helpful tool should you wish to use a different yarn than suggested. By filling in the yarn quality you wish to replace, the amount (in your size) and number of strands, the converter will present good alternative yarns with the same knitting tension. Additionally it will tell you how much you’ll require in the new qualities and whether you’ll need to work with multiple strands. Most skeins are 50g (some are 25g or 100g).

If the pattern is worked with multiple colours, every colour will have to be converted separately. Similarly, if the pattern is worked with several strands of different yarns (for example 1 strand Alpaca and 1 strand Kid-Silk) you will have to find alternatives for each, individually.

Click here to see our yarn converter

Since different yarns have different qualities and textures we have chosen to keep the original yarn in our patterns. However, you can easily find options among our available qualities by using our yarn converter, or simply pick a yarn from the same yarn group.

It is possible that some retailers still have discontinued yarns in stock, or that someone has a few skeins at home that they would like to find patterns for.

The yarn converter will provide both alternative yarn as well as required amount in the new quality.

If you think it's hard to decide what size to make, it can be a good idea to measure a garment you own already and like the size of. Then you can pick the size by comparing those measures with the ones available in the pattern's size chart.

You'll find the size chart at the bottom of the pattern.

See DROPS lesson: How to read size chart

The needle size provided in the pattern serves only as a guide, the important thing is to follow the knitting tension. And since knitting tension is very individual, you will have to adjust the needle size to ensure that YOUR tension is the same as in the pattern – maybe you’ll have to adjust 1, or even 2 needle sizes, up or down to achieve the correct tension. For this, we recommend that you work test swatches.

Should you work with a different knitting tension than the one provided, the measurements of the finished garment might deviate from the measurement sketch.

See DROPS lesson: How to measure your tension/gauge

See DROPS video: How to make a gauge tension swatch

Working a garment top-down provides more flexibility and room for personal adjustment. For example it is easier to try the garment on while working, as well as making adjustments to length of yoke and shoulder caps.

The instructions are carefully explaining every step, in the correct order. Diagrams are adjusted to the knitting direction and are worked as usual.

The diagram depicts all rows/rounds, and every stitch seen from the right side. It is read from bottom to top, from right to left. 1 square = 1 stitch.

When working back and forth, every other row is worked from the right side and every other row is worked from the wrong side. When working from the wrong side, the diagram will have to be worked reversed: from left to right, knit stitches are purled, purl stitches are knit etc.

When working in the round every round is worked from the right side and the diagram are worked from right to left on all rounds.

See DROPS lesson: How to read knitting diagrams

The diagram depicts all rows/rounds, and every stitch seen from the right side. It is worked from bottom to top, from right to left.

When working back and forth every other row is worked from the right side: from right to left and every other row is worked from the wrong side: from left to right.

When working in the round, every row in the diagram are worked from the right side, from right to left.

When working a circular diagram you start in the middle and work your way outwards, counter clockwise, row by row.

The rows usually start with a given number of chain stitches (equivalent to the height of the following stitch), this will either be depicted in the diagram or explained in the pattern.

See DROPS lesson: How to read crochet diagrams

Instructions for working several diagrams after each other on the same row/round, will often be written like so: “work A.1, A.2, A.3 a total of 0-0-2-3-4 times". This means you work A.1 once, then A.2 is worked once, and A.3 is repeated (in width) the number of times provided for your size – in this case like so: S = 0 times, M = 0 times, L=2 times, XL= 3 times and XXL = 4 times.

The diagrams are worked as usual: begin with the first row in A.1, then work the first row in A.2 etc.

See DROPS lesson: How to read knitting diagrams

See DROPS lesson: How to read crochet diagrams

The total width of the garment (from wrist-to-wrist) will be larger in the larger sizes, despite the actual sleeves being shorter. The larger sizes have longer sleeve caps and wider shoulders, so there will be a good fit in all sizes.

The measurement sketch/schematic drawing provides information regarding the full length of the garment. If it’s a jumper or a jacket the length is measured from the highest point on the shoulder (usually closest to the neckline), and straight down to the bottom of the garment. It is NOT measured from the tip of shoulder. Similarly, the length of yoke is measured from the highest point on the shoulder and down to where yoke is split into body and sleeves.

See DROPS lesson: How to read a schematic drawing

Diagrams are often repeated on the round or in height. 1 repeat is the diagram the way it appears in the pattern. If it says to work 5 repeats of A.1 in the round, then you work A.1 a total of 5 times after/next to each other in the round. If it says to work 2 repeats of A.1 vertically/in height you work the entire diagram once, then begin again at the start and work the entire diagram one more time.

Chain stitches are slightly narrower than other stitches and to avoid working the cast-on edge too tight, we simply chain more stitches to begin with. The stitch count will be adjusted on the following row to fit the pattern and measurement sketch.

The rib edge is more elastic and will contract slightly compared to, for example, stocking stitch. By increasing before the rib edge, you avoid a visible difference in width between the rib edge and the rest of the body.

It’s very easy to cast off too tightly, and by making yarn overs while casting off (and simultaneously casting these off) you avoid a too tight cast off edge.

See DROPS video: How to bind off with yarn overs (yo)

To achieve an even increase (or decrease) you can increase on, for example: every 3rd and 4th row alternately, like so: work 2 rows and increase on the 3rd row, work 3 rows and increase on the 4th. Repeat this until the increase is complete.

See DROPS lesson: Increase or decrease 1 st on every 3rd and 4th row alternately

Should you prefer to work in the round instead of back and forth, you may of course adjust the pattern. You’ll need to add steeks mid-front (usually 5 stitches), and follow the instructions. When you would normally turn and work from the wrong side, simply work across the steek and continue in the round. At the end you’ll cut the piece open, pick up stitches to work bands, and cover the cut edges.

See DROPS video: How to knit steeks and cut open

Should you prefer to work back and forth instead of in the round, you may of course adjust the pattern so you work the pieces separately and then assemble them at the end. Divide the stitches for the body in 2, add 1 edge stitch in each side (for sewing) and work the front and back pieces separately.

See DROPS lesson: Can I adapt a pattern for circular needles into straight needles?

Pattern repeats can vary slightly in the different sizes, in order to get the correct proportions. If you’re not working the exact same size as the garment in the photo, yours might deviate slightly. This has been carefully developed and adjusted so that the complete impression of the garment is the same in all sizes.

Make sure to follow instructions and diagrams for your size!

If you have found a pattern you like which is available in women’s size it’s not very difficult to convert it to men’s size. The biggest difference will be the length of sleeves and body. Start working on the women size that you think would fit across the chest. The additional length will be worked right before you cast off for the armhole/sleeve cap. If the pattern is worked top-down you can add the length right after the armhole or before the first decrease on sleeve.

Regarding additional yarn amount, this will depend on how much length you add, but it is better with a skein too many than too few.

All yarns will have excess fibres (from production) that might come off as lint or shedding. Brushed yarns (ie hairier yarns) have more of these loose, excess fibres, causing more shedding.

Shedding also depends on what is worn under or over the garment, and whether this pulls at the yarn fibres. It’s therefore not possible to guarantee that there will be no shedding

Below are some tips on how to get the best result when working with hairier yarns:

1. When the garment is finished (before you wash it) shake it vigorously so the looser hairs come off. NOTE: do NOT use a lint roller, brush or any method that pulls at the yarn.

2. Place the garment in a plastic bag and put it in your freezer - the temperature will cause the fibres to become less attached to each other, and excess fibres will come off easier.

3. Leave in the freezer for a few hours before taking it out and shaking it again.

4. Wash the garment according to the instructions on the yarn label.

Pilling is a natural process that happens to even the most exclusive of fibers. It's a natural sign of wear and tear that is hard to avoid, and that is most visible in high friction areas of your garment like a sweater's arms and cuffs.

You can make your garment look as new by removing the pilling, using a fabric comb or a pill/lint remover.

Still can't find the answer you need? Then scroll down and leave your question so one of our experts can try to help you. This will be done normally within 5 to 10 working days.
In the meantime, you can read the questions and answers that others have left to this pattern or join the DROPS Workshop on Facebook to get help from fellow knitters/crocheters!

You might also like...

Joy of the Harvest

Kerstin Buttkus, Germany

Joy of the Harvest

Ingrid, Belgium

Post a comment to pattern DROPS 223-10

We would love to hear what you have to say about this pattern!

If you want to leave a question, please make sure you select the correct category in the form below, to speed up the answering process. Required fields are marked *.

Comments / Questions (11)

country flag Sil wrote:

Ik heb maat xl aangehouden met breien .Hals 58st. Meerderen 6 st =64st. Dan voor de raglan 18 x elke tweede naald meerderen. (8steken). Het totaal aantal steken moet zijn 212. Maar ik heb er 208. (58st van boord, 6st gemeerderd na de boord.=64. Dan 18x8 =144 van de raglan. Samen 208 st. Maar bij jullie staat 212 steken.???? Graag een reactie.😏

02.10.2023 - 13:12

country flag Barbara wrote:

Hallo, ich möchte diesen tollen pulli mit air (meine lieblingswolle) für meine tochter stricken. gibt es eine berechnung für xs? resp. 80 cm brust umfang. herzlichen dank für eure hilfe. barbara zu

22.08.2021 - 17:25

DROPS Design answered:

Liebe Barbara, leider können wir jeder Anleitung nach jedem individuellen Frage anpassen und einzelne Modelle auf individuellen Wunsch hin umrechnen. Wenn sie Hilfe damit brauchen, wenden Sie sich bitte an Ihrem DROPS Laden, dort hilft man Ihnen gerne weiter. Danke im voraus für Ihr Verständnis. Viel Spaß beim stricken!

23.08.2021 - 07:35

country flag Patrizia wrote:

Buona sera Dove posso trovare un video che mi aiuta a capire come confezionare il collo, cioè come cucirlo a metà ? Grazie Patrizia

15.04.2021 - 21:46

DROPS Design answered:

Buongiorno Patrizia, deve semplicemente risvoltare il collo a metà verso l'interno e cucirlo in modo che risulti doppio. Buon lavoro!

17.04.2021 - 11:44

country flag Nathalie wrote:

Vous proposez des modèles qui se tricotent de haut en bas, à tricoter en rond, avez vous pensé aux femmes qui ne peuvent pas tricoter ainsi ? pourquoi ne pas proposer les modèles des deux manières différentes ? Je me retrouve exclue comme d'aitres centaines de femmes je pense... merci de penser à nous !

06.04.2021 - 16:25

DROPS Design answered:

Bonjour Nathalie, nous adaptons notre offre à la demande croissante de ce type de modèles, toutefois, dans un souci de permettre à chacune de trouver son bonheur, nous avons aussi de nombreux modèles gratuits tricotés de bas en haut. Et si vous voulez tenter l'expérience, suivez notre leçon et vidéo montrant comment tricoter un pull de haut en bas - vous les retrouverez listés ci-dessus. Bon tricot!

07.04.2021 - 07:55

country flag SYLVIE wrote:

Bonjour, Ne peut-on pas utiliser des anneaux marqueurs plutôt que de placer des fils ? Merci ! (Merci aussi pour ce modèle que je vais sûrement réaliser)

15.03.2021 - 13:00

DROPS Design answered:

Bonjour Sylvie, vous pouvez tout à fait utiliser des marqueurs à la place des fils marqueurs, ce qui compte est que vous ayez un moyen de bien délimiter les zones indiquées. Bon tricot!

15.03.2021 - 13:12

country flag Aneta wrote:

Ile motkow włoczki Drips Wish należy użyć do wykonania sweterka rozmiar M? Bardzo dziękuję za odpowiedź 🙂 Aneta

06.03.2021 - 23:59

DROPS Design answered:

Witaj Aneto, odpowiedź jest w 'materiałach': dla rozmiaru M potrzebować będziesz 500 g DROPS Wish (10 motków). Miłej pracy i powodzenia!

08.03.2021 - 13:45

country flag Maria wrote:

El alto del cuello mide 11 cm y doblado queda reducido a la mitad. Cuál es la medida de la circunferencia del cuello? No entiendo el diagrama. Mi tensión es diferente y no sé cuántos puntos poner. Me podrían orientar? Muchas gracias!

16.02.2021 - 14:41

DROPS Design answered:

Hola Maria, teje el resorte según el patrón para tu talla y todo debería estar bien. Yo siempre hago eso. Lo que importa es la tensión del punto jersey. La tensión del tejido se ajusta según el tamaño de la aguja, es por eso que el tamaño de la aguja sugerido es únicamente orientativo! Necesitas ajustar esto para asegurar que TU tensión del tejido coincida con la tensión del tejido indicada en el patrón. Buena suerte :)

19.02.2021 - 10:34

country flag María wrote:

¿Cuál la tensión del punto resorte tejido con aguja de 7 mm?

12.02.2021 - 23:43

DROPS Design answered:

Hola Maria, no es importante, porque este punto se estira. Happy knitting!

16.02.2021 - 11:10

country flag Ria wrote:

Hallo Ik wil graag deze trui breien. Maat xl. Ik kan helaas niet vinden hoeveel bollen wol ik moet gebruiken. Hoor. Graag even jullie reactie. Graag via onderstaand mailadres reageren. Met een vriendelijke groet Ria Schuurman

06.02.2021 - 15:27

DROPS Design answered:

Dag Ria,

Bovenaan bij de materialenlijst staat per maat aangegeven hoeveel gram je nodig hebt. (Het eerste getal is voor maat S, het tweede getal voor maat M, enzovoort). 1 bol Wish weegt 50 gram, dus als er bijvoorbeeld 400 gram staat heb je 8 bollen nodig.

11.02.2021 - 13:30

country flag Merete Bjørn wrote:

Classic fashionista

10.01.2021 - 22:14