
Beliebte Kategorien
Suchen Sie nach einem Garn?


Kommentare / Fragen (28)
![]() Georgia hat geschrieben:
Georgia hat geschrieben:
Coming back to this pattern now which is very difficult. The pattern does not tell you what needles to change to when reducing/shaping. I have discovered there are several different ways but none of them are outlined here on this website.
07.10.2022 - 17:01DROPS Design hat geantwortet:
Dear Georgia, we only change to double-pointed needles when it's too difficult to work the stitches in a circular needle because you have too few stitches in the needle. From them, you can continue with the double pointed needles up till the end. So it may depend on each person; you can directly change to double-pointed needles as soon as you start decreasing/ shaping for the top of the hat. Happy knitting!
09.10.2022 - 19:18
![]() Georgia hat geschrieben:
Georgia hat geschrieben:
Should the 'knit 2 together' and decrease knit be also 'twist knit'? What about the slip knitting h when decreasing? Dies it mean normal knitting or trust knit? Whi h would actually be purlwise .
03.05.2022 - 08:18DROPS Design hat geantwortet:
Dear Georgia, you can replace the K2 tog with slip 1 twisted, slip 1 twisted and K2 together, and the slip 1 as if to K., K1, psso, with slip 1 twisted, knit 1 and psso; Happy knitting!
03.05.2022 - 10:30
![]() Georgia hat geschrieben:
Georgia hat geschrieben:
Turning the work: when watching the suggested videos for this, the second video gies the best finish HOWEVER, because the video is using knit only it is important to make sure that your working yarn is in the right place. I have worked out that you need to follow the video instruction making sure that where the yarn is you need to do the opposite so that the yarn is in the right position (at the back) for when you have turned and are ready to do the first stitch will be a knit.
12.04.2022 - 12:30
![]() Georgia hat geschrieben:
Georgia hat geschrieben:
Another question: how do you 'turn the work'? I have watched the videos but both methods don't explain how to turn when doing ribbing.
11.04.2022 - 20:23DROPS Design hat geantwortet:
Dear Georgia, when you fold the lower part of the hat, the wrong side will be facing outwards. So, to be sure that the rib looks the same both in the upper part on the right side and the lower part on the wrong side, you turn, so that you work on the wrong side and then knit where you would purl and purl where you would knit. Then, if you fold the lower part of the hat, the rib should look opposite to what you have worked and the same as in the upper part of the hat. Happy knitting!
11.04.2022 - 22:56
![]() Georgia hat geschrieben:
Georgia hat geschrieben:
Hello, I am a beginner and don't understand what this means: A.1 (= 26 stitches) over all stitches (= 5 times in width). When A.1 has been worked 1 time in height there are 10 stitches left.
08.04.2022 - 21:42DROPS Design hat geantwortet:
Dear Georgia, you repeat A.1 (which consists of 26 stitches) in the round. So, to work it until the end of the round, you need to repeat it 5 times (work round 1 of A.1 once, then start again the round 1 of A.1 the 2nd time...). A.1 includes decreases. In the last round of A.1, you only work 2 stitches in each repeat (so, if you had 5 repeats, you will have 10 stitches left in total). Since you are working the last round of A.1, that's what's called working A.1 1 time in height (you have worked all of the rounds of A.1). Happy knitting!
09.04.2022 - 18:44
![]() Andreas hat geschrieben:
Andreas hat geschrieben:
Jag förstår inte hur jag ska vända arbetet?! När jag stickar baklänges blir det ett hål när jag kommer tillbaka till markören. Säg att jag stickar rät/ avig när jag vänder arbetet, kommer första maskan jag ska sticka i vara avig?
29.01.2022 - 11:14
![]() Laila hat geschrieben:
Laila hat geschrieben:
Etter å ha strikket oppbrettskanten, skal en ikke strikke videre med rett/vrang, og ikke vridd rett/vrang?
28.12.2021 - 08:34DROPS Design hat geantwortet:
Hei Laila. Når oppbrettskanten er ferdig, vendes luen slik at luen strikkes rundt i motsatt retning av brettekanten. Og det skal strikkes videre med vrangbord (= 1 vridd rett / 1 vrang). mvh DROPS Design
04.01.2022 - 13:55
![]() Ulrike K hat geschrieben:
Ulrike K hat geschrieben:
Die Mütze ist zur Lieblingsmütze des Vaters geworden, der täglich Mütze trägt. Grund dafür ist sicher das Garn, es ist so leicht und hält so schön warm. Da werde ich bald noch eine stricken. Vielen Dank für die Anleitung.
28.12.2021 - 07:26
![]() Claude hat geschrieben:
Claude hat geschrieben:
Bonjour, que voulez vous dire par :Continuer maintenant le bonnet en tournant l'ouvrage sur l'endroit et tricoter en rond, dans le sens opposé, en côtes. Pourriez vous intégrer un tutoriel pour que l’on puisse visualiser
03.09.2021 - 23:15DROPS Design hat geantwortet:
Bonjour Claude, la partie que vous avez tricoté au début doit se retrouver maintenant sur l'envers et vous continuez à tricoter sur l'endroit (qui était l'envers auparavant) pour que l'endroit du revers soit à l'endroit quand on le retourne (mais il sera sur l'envers jusqu'à la fin du bonnet). En espérant que ces explications complémentaires puissent vous aider; votre demande a été transmise à notre équipe; Bon tricot!
06.09.2021 - 07:17
![]() Alva hat geschrieben:
Alva hat geschrieben:
Hej! Läses A1 diagrammet från höger till vänster eller tvärtom?
28.05.2021 - 10:36DROPS Design hat geantwortet:
Hej Alva, Ja du starter i nederste højre hjørne og strikker hver maske ifølge diagrammet, så starter du forfra igen omgangen rundt :)
28.05.2021 - 13:37
|
||||||||||||||||
Care for Nature#carefornaturehat |
||||||||||||||||
 |
 |
|||||||||||||||
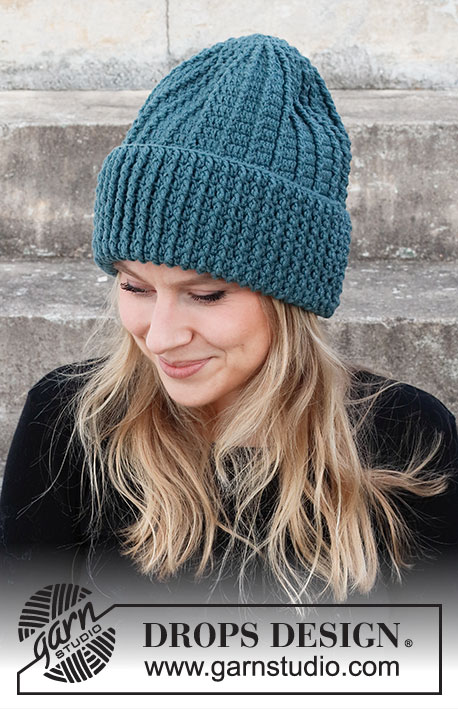
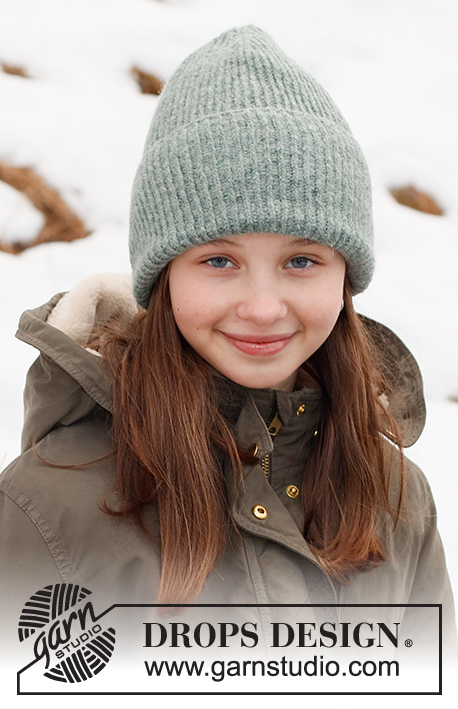
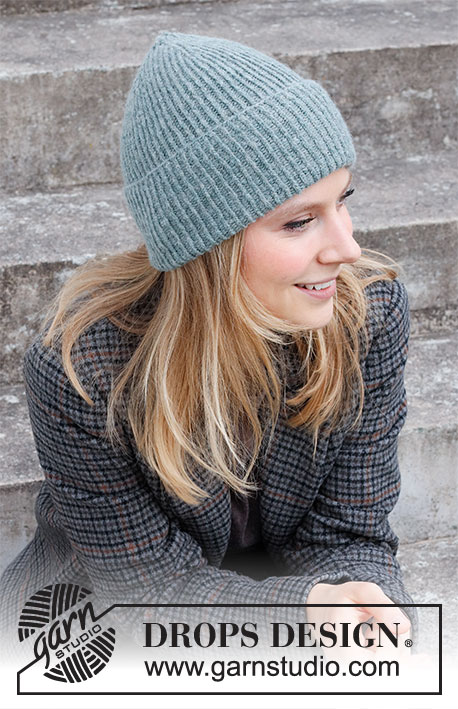
Gestrickte Mütze / Hipstermütze mit Rippenmuster in DROPS Sky. Einheitsgröße.
DROPS 214-33 |
||||||||||||||||
|
------------------------------------------------------- HINWEISE ZUR ANLEITUNG: ------------------------------------------------------- MUSTER: Siehe Diagramm A.1. ------------------------------------------------------- DIE ARBEIT BEGINNT HIER: ------------------------------------------------------- MÜTZE - KURZBESCHREIBUNG DER ARBEIT: Die Arbeit wird in Runden auf der Rundnadel gestrickt, von unten nach oben. Zuerst wird der Mützenaufschlag von der Rückseite gestrickt, d.h. nach dem Aufschlag wird die Arbeit gewendet und der Rest der Mütze wird von der Vorderseite gestrickt. Im Laufe der Abnahmen zum Nadelspiel wechseln. MÜTZE: Zuerst den Aufschlag der Mütze wie folgt von der Rückseite stricken: 130 Maschen auf Rundnadel Nr. 3 mit Sky anschlagen und 1 Runde rechts stricken. Dann 12 cm im Rippenmuster stricken (= 1 Masche rechts verschränkt / 1 Masche links). Wenn der Aufschlag später nach oben umgeschlagen wird, zeigen die rechts verschränkten Maschen nach außen und liegen nicht innen. Nun die Arbeit wenden und von der Vorderseite weiterstricken, d.h. es wird in Runden in die entgegengesetzte Richtung weitergestrickt. Im Rippenmuster weiterstricken (= 1 Masche rechts verschränkt / 1 Masche links). MASCHENPROBE BEACHTEN! Bei einer Gesamtlänge von 27 cm (einschließlich ca. 12 cm Bruchkante, es fehlen nun noch ca. 8 cm) A.1 (= 26 Maschen) über alle Maschen stricken (= 5 x in der Breite, d.h. weiter rechts verschränkte Maschen rechts verschränkt und linke Maschen links stricken). Wenn A.1 1 x in der Höhe gestrickt wurde, sind 10 Maschen übrig. Den Faden abschneiden, durch die restlichen Maschen fädeln, zusammenziehen und gut vernähen. Die Mütze hat eine Höhe von ca. 35 cm ab dem Anschlagrand. Die untersten 12 cm nach oben umschlagen. |
||||||||||||||||
Erklärungen zum Diagramm |
||||||||||||||||
|
||||||||||||||||
 |
||||||||||||||||
Haben Sie diese Anleitung nachgearbeitet?Dann taggen Sie Ihre Fotos mit #dropspattern #carefornaturehat oder schicken Sie sie an die #dropsfan Galerie Brauchen Sie Hilfe bei dieser Anleitung?Sie finden 13 Videotutorials, einen Kommentar/Fragen-Bereich und vieles mehr, wenn sie die Anleitung bei garnstudio.com aufrufen. © 1982-2026 DROPS Design A/S. Wir besitzen alle Rechte. Dieses Dokument, einschließlich aller Untersektionen, hat Urheberrechte. Mehr dazu, was Sie mit unseren Anleitungen machen können, finden Sie ganz unten auf der Seite zu jeder Anleitung. |
||||||||||||||||


Mit über 40 Jahren Tätigkeit im Entwerfen von Strick- und Häkelmustern bietet Ihnen DROPS Design eine der umfangreichsten Sammlungen von kostenlosen Anleitungen im Internet - in 17 Sprachen übersetzt. Zum jetzigen Zeitpunkt haben wir insgesamt 324 Handarbeitshefte und 12239 Anleitungen auf Deutsch. 12151
Unser Ziel ist es, Ihnen die besten Angebote zum Stricken und Häkeln, Inspirationen und Ratschläge sowie qualitativ hochstehende Garne zu unglaublichen Preisen zu bieten! Möchten Sie unsere Anleitungen nicht nur für den persönlichen Gebrauch nutzen? Unsere Copyright Bedingungen finden Sie bei allen unseren Anleitungen ganz unten auf der jeweiligen Seite. Viel Spaß beim Handarbeiten!
Kommentieren Sie die Anleitung DROPS 214-33
Wir würden gerne Ihre Meinung zu diesem Modell erfahren!
Wenn Sie eine Frage stellen möchten, prüfen Sie bitte, dass Sie die richtige Kategorie im unten stehenden Formular gewählt haben - so bekommen Sie schneller eine Antwort. Die obligatorischen Felder sind mit einem * gekennzeichnet.