
Beliebte Kategorien
Suchen Sie nach einem Garn?


Kommentare / Fragen (11)
![]() Claudine hat geschrieben:
Claudine hat geschrieben:
I have issues with the top right & left front with extra stitches and cannot do the assembly correctly. Reading the comments below I agree the increases should be decreases. I am about to frog both tops of the front pieces.
03.01.2025 - 18:32DROPS Design hat geantwortet:
Dear Claudine, the pattern is correct; these increases are only for the neck which is raised kind of like a lapel, as seen in the picture. If you have a different thread or gauge than that of the pattern the resulting effect may be too loose and it will fall instead of staying straight. Happy knitting!
05.01.2025 - 19:33
![]() DROPS Design hat geschrieben:
DROPS Design hat geschrieben:
Molly, your are right that the shawl collar piece that goes around the neck will have a height measure of approx 5 inch. This drapes up along your neck, and you fold the upper edge only. Depending on which yarn you are using the collar might drape differently. In SilkeTweed which is very drapey and crisp this works beautifully. SilkeTweed used in this design holds it's shape and doesn't "fall" down.
17.04.2009 - 18:10
![]() Molly hat geschrieben:
Molly hat geschrieben:
Correction to my last comment: The gauge for this project is more like 6 sts per inch (which is what I'm getting) so that 32-34 stitch collar is over 5 inches in width (height).
17.04.2009 - 08:31
![]() Molly hat geschrieben:
Molly hat geschrieben:
If 9 stitches is 1 inch in Silke-Tweed (and that is what I'm getting) then the collar, which is 33 stitches, is over 3.5 inches before the 2 thread part. This does seem quite tall-- does it scrunch up behind under the more rigid 2 thread detail? Is it possible there is a detail picture of the back of the collar? Or perhaps a clearer close-up of the collar on the existing picture? I've done the front right panel and, other than my back collar questions, it looks like the picture.
17.04.2009 - 05:56
![]() DROPS Design hat geschrieben:
DROPS Design hat geschrieben:
The inc for collar is also made at the center front edge. Pattern is edited.
14.04.2009 - 19:27
![]() Molly hat geschrieben:
Molly hat geschrieben:
Could you clarify this: "At the same time when the piece measures 32-33-34 cm [12-5/8" - 13" - 13-3/8"] inc 1 st at the center front 8-9-10 times every 7-6-6 rows = 60-61-63 sts." Elsewhere in the pattern it says specifically "center front edge" yet the instruction above says only "center front." Does that mean the increases should no longer be on the edge? That I should put them in the middle, like a bust dart?
14.04.2009 - 18:05
![]() Karen hat geschrieben:
Karen hat geschrieben:
We did post a reply on the 11 November 2006, please check further down this page. As we said in our reply, 66-11 is a 5-year-old pattern and no errors have been found to date. Also we have double checked the translation and this follows the original pattern. It may be that the photo doesn't reflect the true shape/design of the cardigan, and if you want a different look, your suggestions seem a good idea. Again if the instructions
05.01.2007 - 10:16
![]() MKelly hat geschrieben:
MKelly hat geschrieben:
Hi this is the 2nd time that I've written to you regarding 66-11 but noone has emailed me back and I don't see any corrections posted. I have knit this pattern and found numerous errors in it. A novice knitter or even an intermediate knitter would not be able to maneuver this pattern. The front has errors where it says" When piece measures 13" inc.1 st. at the center front 9 times. This should be a decrease not an increas as by the time you get to the collar you have a big lapel shape. It needs to be consistently decreasing at the front to give the v shaping needed. Not increasing and getting larger. The way the collar is described makes absolutely no sense whatso ever if the instructions for the front are not changed. It only will work if the front decreases to end with only the 28 st at the shoulder. As well knitting 2.75 " for the collar is too long and will not stand up as shown in the picture on the website. 35 stitches is not enough for the collar either. I used 95 sts.on a smaller (2.25) needle and double yarn and it then had the length and weith needed to stand up. I also made it 1.5 " instead of 2.75.There is no shaping included in this pattern to allow for the gradual sloping from the front edge to the stand up collar so that it is incorporated smoothly. The sleeves work fine until the underarm decrease of 3 st. either side of marker, but then it says to just knit back and forthe which is not adequate instruction because it doesn't say for how long. also it moves directly to the cap shaping and if I had not knit before I would end up with a 6" arm opening when a 9" arm opening to fit the body is needed. I ended up at the underarm decrease shaping it myself aas for the arm shaping on the body and then added 6 extra rows and then the cap shaping then it worked out a novice would be unable to figure all this out. In the end this is going to be fine but it is a painful pattern and I think there needs to be corrections made.
30.12.2006 - 19:54
![]() karen hat geschrieben:
karen hat geschrieben:
Hi Ya Ya, The Scandinavian version of this pattern is 5 years old and no errors have been found or noted to date. I've checked the translation against the original pattern and Frederikka's translation is word perfect and the instructions in full accordance with the original pattern. The jacket is meant to have a collar/lapel. You increase 9 sts for the collar which in Silketweed amounts to just over 1 inch (the width of the collar on front pieces) and continue over 33 sts for the collar to be sewn tog at the back. Silketweed is a rather rugged quality and the collar will "stand" rather than fall when you have completed the edge in 2 threads and folded it double. I hope this helps. If you don't get the desired look by following the pattern, your alternative sounds a good idea. Kind regards Karen
19.11.2006 - 23:34
![]() Ya Ya hat geschrieben:
Ya Ya hat geschrieben:
I am writing regarding pattern 66-11 the wrap around cardigan in Silke Tweed. There is an error in the pattern for the left and right fronts. Where the pattern reads,"At the same time when the piece measures 13 " inc. 1 st. at the centre front 9 times every 6 rows. This adds far too much material which then actually crosses over at the top instead of angling back towards the shoulder as it shows in the picture and the diagram.As well the next section tells us to leave 33 st on the needle for the collar and knit it an additional 2.75 " When the project is knit in this exact fashion it ends up being huge at the front with a lapel effect. I have since ripped it out and am now doing dec. every 6 rows instead of increases and will continue this until I reach 28 st. and will then put the front and back together and do a 3 needle bind off of the 28sts. to form the shoulder instead of casting off and then sewing it together. I then plan to pick up the cast off 28 sts. on the back for the neck and pick up enough stitches to begin making a collar that looks like the picture using short rows to achieve this. Then I will pick up the stitches all the way around the front and knit in reverse stockinette stitch the last 5 rows. If You have already found the errors and have a correction sheet for this would you please send it to me. I would appreciate hearing back from you either way regarding this pattern. Thanks so much have a good day....Ya Ya
17.11.2006 - 05:42
|
|
Kathmandu |
|
|
|
|
DROPS Jacke in „Silke-tweed“
DROPS 66-11 |
|
|
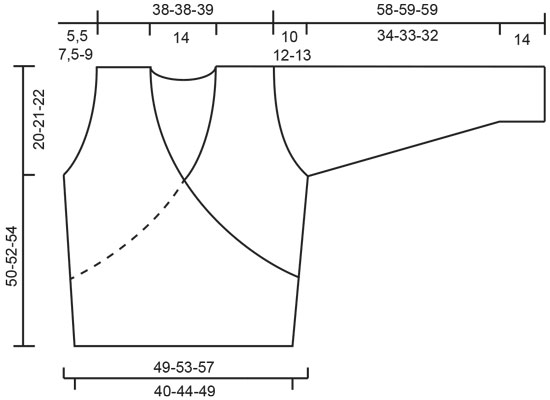
Maschenprobe: Achtung, die Nadelnummer (Ndl) ist nur ein Vorschlag! 23 M. x 30 R. auf Ndl. Nr 3,5 und Glattstr. = 10 x 10 cm Bündchen: * 1 re., 1 li. *. von *-* wiederholen. Muster: Das Muster geht über 6 R. * Mit einem Faden grün auf Ndl. Nr. 2,5 3 R. glatt stricken, zu 3,5 wechseln und mit 1 Faden grün und 1 Faden grassgrün 3 R. glatt stricken (mit der linken Seite nach aussen) *, von *-* wiederholen. Tipp: mit der rechten/linken Seite ist Links und Rechts des Vorderteiles gemeint. Rechtes Vorderteil: Mit grün auf Ndl. Nr. 2,5, 94-104-114 M. (Inkl. 1 Randm. auf beiden Seiten) anschlagen. 7 cm Bündchen stricken – siehe oben – mit 1 M. Krausrippe auf beiden Seiten. Zu Ndl. Nr. 3,5 wechseln und glatt stricken, gleichzeitig, auf der rechten Seite wie folgt aufnehmen: 1 M x 10-10-10 bei jeder 7.-7.-8. R. auf der linken Seite: 1 M. x 2-2-2 bei jeder 7.-7.-8. R. Nach ca. 13,5 cm (es sind nun 98-108-118 M. auf der Nadel) auf der linken Seite, bei jeder 2. R. wie folgt abk. (auf der rechten Seite wie gehabt aufnehmen): 8 M. x 2-2-2, 2 M. x 6-9-12, 1 M. x 11-10-9 und danach bei jeder 4. R.: 1 M. x 2-2-2 = 65-70-75 M. Nach 30-31-32 cm, gegen die Seite bei jeder 2 . R. für das Armloch abk.: 3 M. x 1-2-3, 2 M. x 3-3-4 und 1 M. x 4-6-5. Gleichzeitig nach 32-33-34 cm gegen die Mitte wie folgt aufnehmen: 1 M. x 8-9-10 bei jeder 7.-6.-6. R. = 60-61-63 M.. Nach 50-52-54 cm werden auf der Seite (von der Schulter gegen den Hals) 28-28-29 M. abk. = 32-33-34 M. auf der Nadel. Diese werden, für den Kragen, glatt gestrickt. Wenn der Kragen 7 cm misst wird abgekettet. Linkes Vorderteil: Wie das rechte Vorderteil nur spiegelverkehrt. Rückenteil: Mit grün auf Ndl. Nr, 2,5., 94-104-114 M. (Inkl. 1 Randm. auf beiden Seiten) anschlagen. 7 cm Bündchen, mit 1 M. Krausrippe auf beiden Seiten, stricken. Zu Ndl. Nr. 3,5 wechseln, glatt stricken und gleichzeitig auf beiden Seiten, wie folgt, aufnehmen: 1 M. x 10-10-10 bei jeder 7.-7.-8. R. = 114-124-134 M. Nach 30-31-32 cm, auf beiden Seiten, wie beim Vorderteil, für das Armloch abk. = 88-88-90 M. Nach 49-51-53 cm die mittleren 28-28-28 M. für den Hals abk. Weiter, gegen den Hals 2 M. abk. = 28-28-29 M. per Schuler übrig. Nach 50-52-54 cm abk. Ärmel: Mit grün auf Nadelspiel Nr. 2,5, 58-60-62 M. anschlagen und 2 Krausrippen stricken. Danach mit dem Muster – siehe oben- weiterfahren bis die Arbeit ca. 14-14-14 cm misst. Zu Ndl. Nr. 3,5 wechseln und glatt weiterstricken – gleichzeitig, nach dem Muster, unter dem Arm wie folgt aufnehmen: 2 M. x 13-15-16 Mal. Grösse S: bei jeder 8. R., Grösse M: Abwechslungsweise bei jeder 6. und 7. R., Grösse L: bei jeder 6. R. = 84-90-94 M. Nach 48-47-46 cm, die mittleren 6-6-6 M., unter dem Arm abk. und von jetzt an hin und zurück stricken. Weiter, gegen die Schulter, bei jeder 2. R. wie folgt abk.: 3 M. x 1-1-1, 2 M. x 2-2-2, 1 M. x 7-10-12, 2 M. x 2-2-2 und 3 M. x 2-2-2. Nach ca. 58-59-59 cm abk. Zusammennähen: Die Schulternaht zusammennähen. Auf der rechten Seite mit grün auf Ndl. Nr. 3,5 ca. 140-160 M. aufnehmen (am rechten Vorderteil entlang bis hinten in den Nacken). Zu 1 Faden grün und 1 Faden grassgrün wechseln du 5 R. glatt stricken (mit der linken Seite nach aussen) abk. Auf der linken Seite wiederholen. Das Bord nach innen legen und annähen. Zusammennähen: Die Seitennäht zusammennähen, auf der rechten Seite, gleich über dem Bündchen 4 cm offen lassen (dort wird der Gurt durchgezogen), mit Knopflochstichen rund um das Loch herum nähten. Gurt: Mit grün auf Ndl. Nr. 2,5, beim rechten Vorderteil (nicht im Bündchen) 19 M. aufnehme. Bündchen, mit je einer 1 M. Krausrippe auf beiden Seiten. Gleichzeitig nach 3, 6 und 9 cm, auf beiden Seiten (innerhalb der Randm.) 1 M. abk. = 13 M. Nach ca. 70 cm, re. auf Rechts und li. auf Links abk. Am linken Vorderteil wiederholen. |
|
 |
|
Haben Sie diese Anleitung nachgearbeitet?Dann taggen Sie Ihre Fotos mit #dropspattern oder schicken Sie sie an die #dropsfan Galerie Brauchen Sie Hilfe bei dieser Anleitung?Sie finden 19 Videotutorials, einen Kommentar/Fragen-Bereich und vieles mehr, wenn sie die Anleitung bei garnstudio.com aufrufen. © 1982-2026 DROPS Design A/S. Wir besitzen alle Rechte. Dieses Dokument, einschließlich aller Untersektionen, hat Urheberrechte. Mehr dazu, was Sie mit unseren Anleitungen machen können, finden Sie ganz unten auf der Seite zu jeder Anleitung. |


Mit über 40 Jahren Tätigkeit im Entwerfen von Strick- und Häkelmustern bietet Ihnen DROPS Design eine der umfangreichsten Sammlungen von kostenlosen Anleitungen im Internet - in 17 Sprachen übersetzt. Zum jetzigen Zeitpunkt haben wir insgesamt 324 Handarbeitshefte und 12290 Anleitungen auf Deutsch. 12202
Unser Ziel ist es, Ihnen die besten Angebote zum Stricken und Häkeln, Inspirationen und Ratschläge sowie qualitativ hochstehende Garne zu unglaublichen Preisen zu bieten! Möchten Sie unsere Anleitungen nicht nur für den persönlichen Gebrauch nutzen? Unsere Copyright Bedingungen finden Sie bei allen unseren Anleitungen ganz unten auf der jeweiligen Seite. Viel Spaß beim Handarbeiten!
Kommentieren Sie die Anleitung DROPS 66-11
Wir würden gerne Ihre Meinung zu diesem Modell erfahren!
Wenn Sie eine Frage stellen möchten, prüfen Sie bitte, dass Sie die richtige Kategorie im unten stehenden Formular gewählt haben - so bekommen Sie schneller eine Antwort. Die obligatorischen Felder sind mit einem * gekennzeichnet.